Aperture choice: My favorite photos and why I chose the f-stop I did

Seven years ago, when I first began my journey into photography, my husband gifted me with the cheap but fantastic Canon 50mm f/1.8 lens.

It rocked my world! I loved it.

I opened up that aperture wide and was suddenly able to capture those beautiful compressed backgrounds and bokeh I’d been craving. It was exciting!

But as I studied more about the exposure triangle – how the variables of aperture, shutter speed, and ISO associate to determine the exposure of a photograph – I realized that I wasn’t using my lens to its entire capacity nor was my photography growing and improving to its full potential.

Wrapping my head around the exposure triangle was tricky for me at first. But with lots of practice, changing my camera settings became second nature. I want to share not only the settings on a few of my photographs, but the brief story behind them and WHY I chose the aperture I did.

Helpful hint: When starting to work with aperture, begin by shooting in aperture priority mode. Set your aperture and keep your eye on the shutter speed. If it’s too fast then bring the ISO down. If the shutter speed is too slow then bring the ISO up.

Example 1: f/2

This is one of my all time personal favorite photographs. I was quickly brushing through my hair after a shower when I spied my naked baby in the mirror playing with the roll of toilet paper – classic babyhood!

I hastily shut off the lights, opened the blinds on a window, and sprinted for my camera halfway across the house. On my way back to the bathroom, I quickly adjusted my camera settings.

I’d shot in that bathroom before and knew it was relatively dark. That morning, there happened to be wildfire smoke covering much of the sun, making the light coming through the window weaker than usual.

My goal was to achieve a shutter speed of 1/250 or more in order to freeze his moving arms and hands. Because of the relative darkness, I raised my ISO to 3200 and set my aperture to f/2 to let in more light. The combination of those two variables made my shutter speed 1/320.

I sat down on the floor and got about four shots in before the baby lost interest and the moment was over. Fortunately, I got this keeper of a photograph!

black and white picture of baby playing with a roll of toilet paper by Jessie Nelson
Canon EOS 6D | 50mm | f/2 | ISO 3200 | 1/320s

Example 2: f/2.5

Who doesn’t love creamy golden backlight?

My go-to aperture setting is usually f/2.2-2.8. For me, it’s the perfect balance between a compressed background and nailing focus on my moving boys because the plane of focus is just a little bit wider than if I shot completely wide open at f/1.4.

On this particular summer evening, I was in the backyard with the baby enjoying the last of the sunshine. He began scooting his way through the grass and that’s when I pulled out my camera.

With an aperture of f/2.5 and an ISO of 400, my shutter speed was very quick at 1/2000. In retrospect, I could have dropped my ISO down a couple clicks to allow for a slower shutter speed. This would allow more time for light to hit the sensor which can add to that dreamy feel in a photograph! But I like how this backlit photo turned out anyhow.

Related: 5 easy backlighting tips
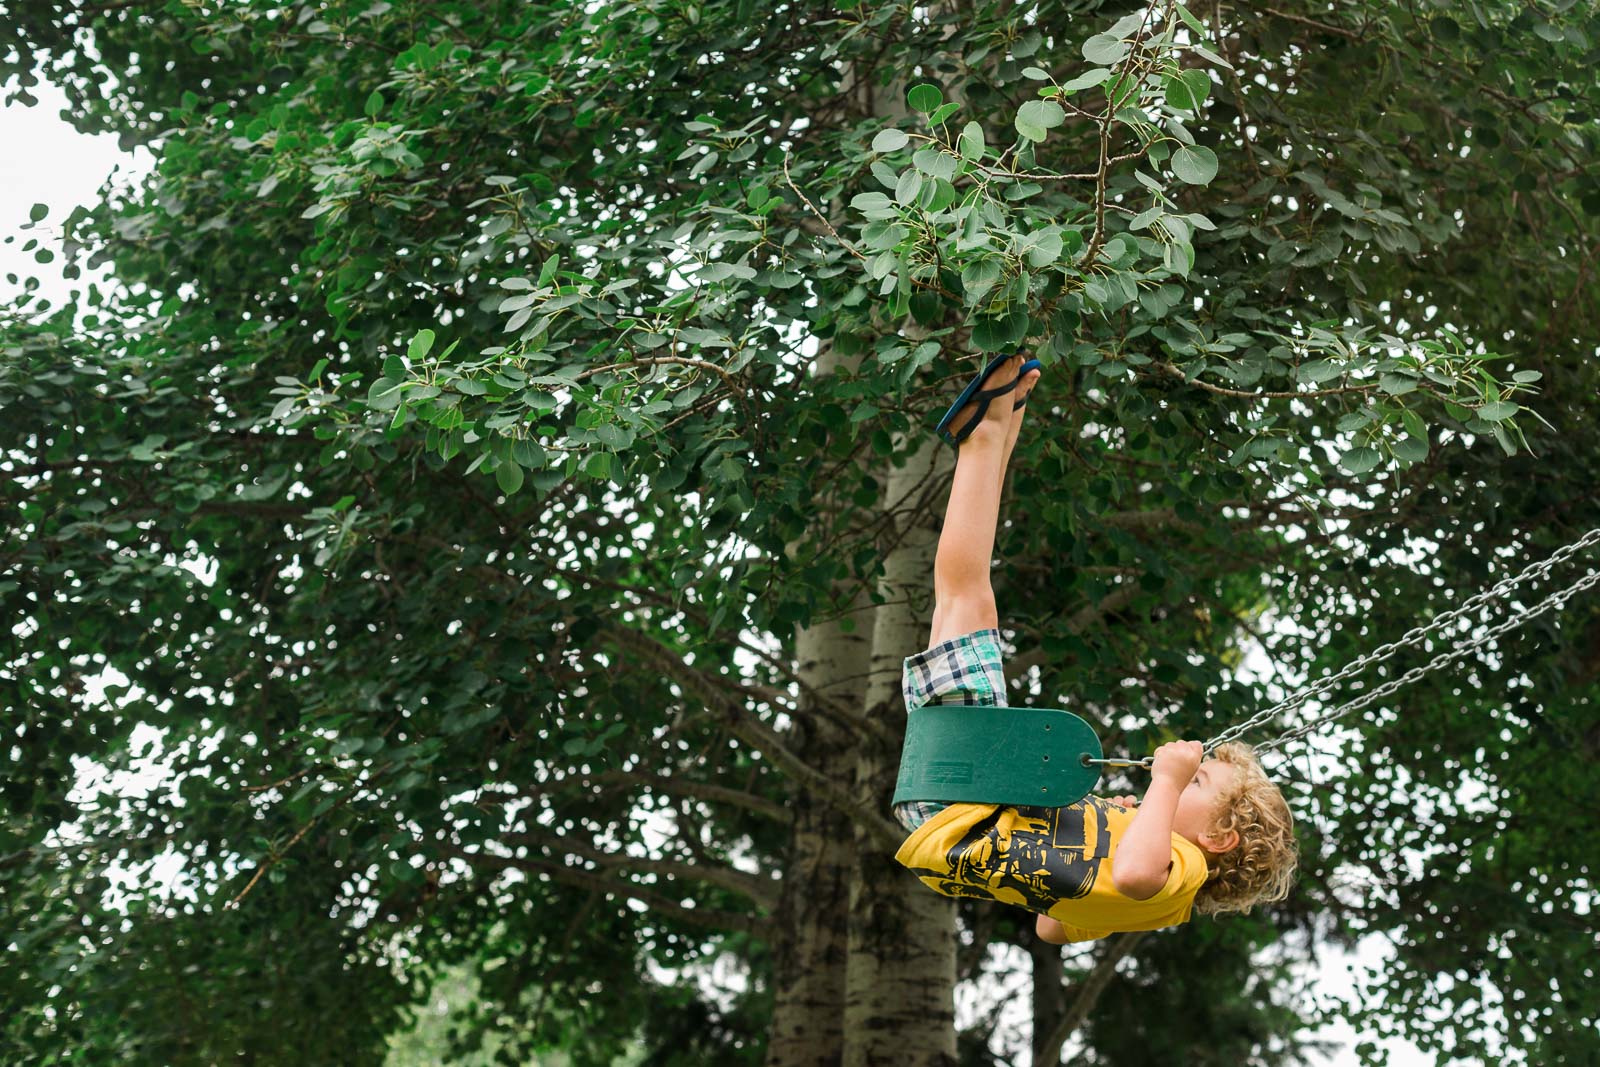
backlit picture of baby boy crawling through the grass by Jessie Nelson
Canon EOS 6D | 50mm | f/2.5 | ISO 400 | 1/2000s

Example 3: f/4

When I’m outside, I like to use a slightly smaller aperture as I’m often trying to shoot multiple people, or in this case, movement.

On this particular afternoon, my five-year-old son was having a blast swinging so high that his toes touched the leaves in the treetops. I wanted to capture that moment. I plopped myself down on the grass, composed my shot, and waited for my son to swing into the frame.

Because he was moving so fast, I focused on the branch that he was consistently hitting. Since it was hard to predict exactly where he’d swing, I knew I needed a bigger plane of focus. Thus, I chose an aperture of f/4.

Because I stopped my aperture down a few clicks, there was suddenly less light entering my camera lens. I checked my shutter speed and noticed that it was slow for an action shot. Therefore, I increased my ISO to 400. That increased my camera’s sensitivity to light and in turn raised my shutter speed to a nice 1/500.

photo of boy swinging into the trees by Jessie Nelson
Canon EOS 6D | 50mm | f/4 | ISO 400 | 1/500s

Example 4: f/8

I took my boys on a nature hike one evening where we were rewarded with a breathtaking view of the Snake River and a distant thunderstorm.

They were content to sit on a rock to look for moose while I stepped back to capture the scene. The background was just as big, if not bigger, a subject than my boys in the foreground.

I knew that If I shot wide open at f/1.4, my background might become a compressed smear of colors. However, I wanted to capture the scene as I saw it so I stopped down my aperture to f/8. The smaller aperture makes my boys sharp but also allows the viewer to see some details in the background, too.

Because my lens opening at f/8 was now much smaller and let in less light than my previous aperture, I had to increase the ISO to 1250 to ensure a nice quick shutter speed of 1/400.

pic of two brothers on a mountain looking at the view by Jessie Nelson
Canon EOS 6D | 50mm | f/8 | ISO 1250 | 1/400s

Example 5: f/13

It’s become an evening ritual at our house this Fall to toss the football around in the backyard. On this particular evening, the sun was setting and that beautiful golden hour light was calling my camera.

I could have shot this backlit scene with a wide aperture, but I wanted to do something different. Instead, I closed my aperture to f/13 in hopes of creating a starburst effect.

Shooting towards a light source with a narrow opening will cause the light to hit the edges of the len’s diaphragm and cause the light to diffract, or make a starburst. My aperture was small and the sun was fading fast so I had to make some adjustments. In order to get a quick shutter speed of 1/800 to freeze the ball, I cranked my ISO to 3200.

Related: How to create starbursts in your photos

photo of dad and boys throwing a football in a field by Jessie Nelson
Canon EOS 6D | 35mm | f/13 | ISO 3200 | 1/800s

Helpful hint: When shooting in backlit situations, you need to overexpose in order to keep your subject from becoming a blackened silhouette. The photo above was overexposed in camera by two full stops!

Join the Clickin Moms photography forum

The post Aperture choice: My favorite photos and why I chose the f-stop I did appeared first on Clickin Moms.


Clickin Moms

Posted in Photograpy How To | Tagged , , , , , | Leave a comment

How to Photograph Sunrises and Sunsets

Landscape with no vibrance or saturation

There are no times of day more famous for photography than “Golden Hour” — sunrise and sunset. Although great light can happen at any time, the edges of the day are perhaps the most consistent sources of inspiration you can find. Still, just because they’re beautiful doesn’t mean they’re easy to photograph. In this article, I’ll cover some suggestions for capturing sunrise and sunset as well as possible, including tips for exposure, creativity, and post-processing.

[Read More…]

Photography Life

Posted in Photograpy How To | Tagged , , | Leave a comment

Turn an adventure with the kids into a photo series

It’s time to pack up the kids and wave goodbye to deadlines.

Go on an adventure that will leave you snap happy and the kids’ imaginations running wild.

By the end of the adventure, you’ll have a one-of-a-kind photo series to share – because we all need more content for Instagram 😉

How do you create an adventurous photo series? It starts with picking an adventure and letting your imagination run wild.

Working as a maternity and newborn photographer in San Francisco, I was ready for a little photography fun that didn’t involved bellies and babies.

When I learned there were hidden fairy houses (yes, fairy houses) throughout the Bay Area I knew it would be the perfect adventure for my son. But more so, I knew it would make the perfect photography adventure for us both.

Plus, by having an adventure on the books, it meant I had activities planned for nearly a week. Gone were the days of trying to figure out what to do with a preschooler.

Here are a few things I learned along the way about how to plan for your adventure and how to get the most out of creating your photos series.

It's time to go on a photo adventure. By the end, you’ll have a one-of-a-kind photo series to share – because we all need more content for Instagram ;)

Research and plan.

Do the footwork ahead of time so you can focus your energy on the adventure itself and not the logistics of it. Admittedly, I spent hours researching the secret fairy houses. Then, I compiled a list of the fairy houses I wanted to find and the approximate locations.

I even found a Facebook group who’s mission was to make, discover and share fairy houses within’ a specific city. I joined the group to learn more.

Lastly, because my son is 3 years old, I enlisted his grandma to come on the adventure with us. First, because I knew it would make my son feel like it was an extra special adventure. Second, because I knew we’d be walking on the street and I wanted to ensure he was safe while I was setting up the shot.

It's time to go on a photo adventure. By the end, you’ll have a one-of-a-kind photo series to share – because we all need more content for Instagram ;)

It's time to go on a photo adventure. By the end, you’ll have a one-of-a-kind photo series to share – because we all need more content for Instagram ;)

Dress for the adventure.

Take your photo series to the next level by choosing clothing that coordinates with the adventure. Just as you would for a family photography session, this is no different. It gives the photos cohesion and brings the story to life.

You can go all out in costume attire or choose simple clothing that will look good at the scene. For example, after we found our first fairy house on a nature walk in San Francisco, I wished I had dressed my son for the part. However, by the last fairy hunt outing I was prepared and picked out an outfit that fit his needs and that of the adventure.

It's time to go on a photo adventure. By the end, you’ll have a one-of-a-kind photo series to share – because we all need more content for Instagram ;)

Buy props.

Ransack your local dollar or thrift store to find props that elevate the adventure fun. It will get the kids excited while making for a fun addition to have in the photos.

During our fairy house hunts I learned that fairies love receiving “pearls” (rocks, glass beads or marbles). I immediately dashed to the dollar store to stock up on pearls for my son to leave at each fairy house he found. While we were raiding the store for fairy gifts, we found a butterfly catcher – another great prop for photos.

All these props got him extra excited for the adventure and gave him an activity during the fairy hunt. In turn, having these small props made the photo series a little more whimsical.

Save

It's time to go on a photo adventure. By the end, you’ll have a one-of-a-kind photo series to share – because we all need more content for Instagram ;)

It's time to go on a photo adventure. By the end, you’ll have a one-of-a-kind photo series to share – because we all need more content for Instagram ;)

Capture a variety of angles to tell the story.

Think about your shot list ahead of time and write it down. Taking a variety of angles will give you options when you cull your images to put together a photo series.

You might opt for all detail shots, all wide angle shots or perhaps more photos that tell a story and show a little of both. But by having options it’ll save you from re-shooting.

It's time to go on a photo adventure. By the end, you’ll have a one-of-a-kind photo series to share – because we all need more content for Instagram ;)

It's time to go on a photo adventure. By the end, you’ll have a one-of-a-kind photo series to share – because we all need more content for Instagram ;)

Keep it fun.

The point of the adventure is that everyone is having fun. If you show up to the location and the lighting is horrible, there’s a ton of people or it’s not as awesome as you expected then just roll with it.

On our last day of fairy hunting, we spent the entire morning walking around an island in the Bay Area looking for small fairy doors. The lighting was full sun, it was humid and hot and the locations weren’t making my heart flutter.

But you know what, after we got home and I culled the images, those were the photos that turned out to be my favorite.

It's time to go on a photo adventure. By the end, you’ll have a one-of-a-kind photo series to share – because we all need more content for Instagram ;)

What now?

Now that you’ve gone on your adventure(s) and you have a set of photos that fit into a series, what do you do? Here’s a few fun ideas.

  • Print the photos and display in your child’s bedroom or playroom. You can switch out the photos every time you go on a new adventure. It’s a great way for your child to remember the fun they had and keep the whimsy of the adventure percolating in their imaginations.
  • Post to Instagram and Facebook (duh).
  • Reach out to a local publication that covers ‘what-to-do’ in your area and pitch your adventure. You’ll have to write the content but you’ll already have a beautiful set of images to go with it.
  • If you feel your photo series is tipping towards fine art, have a gallery show and invite everyone you know.
  • Get creative and write a fictional story inspired by your adventure and make a book for your child. You can easily do this using Blurb, Mpix and Artifact Uprising.

Are you inspired to take the kids on an adventure and create a photo series? Let me know what your first adventure photo series will be of in the comments below!

Join the Clickin Moms photography forum

Save

Save

The post Turn an adventure with the kids into a photo series appeared first on Clickin Moms.


Clickin Moms

Posted in Photograpy How To | Tagged , , , , , | Leave a comment

Recommended Nikon D850 Settings

Nikon D850

The Nikon D850 is perhaps one of the most advanced DSLRs made by Nikon to date. As a result, it comes with a lot of controls and menu settings that might be confusing for many photographers out there. In this article, I will provide information on what settings I personally use and shortly explain what some of the camera buttons and controls do. Please do keep in mind that while these work for me, it does not mean that everyone else should be shooting with exactly the same settings. The below information is provided as a guide for those who struggle with the camera and just want to get started with an understanding of the camera and its many features.

[Read More…]

Photography Life

Posted in Photograpy How To | Tagged , , , | Leave a comment

36 pictures that realistically show what real life looks like

Are you looking for a photography challenge?

Maybe you love taking photos or maybe you just need some motivation to start taking pictures again (or maybe you simply love contests that promise the chance at a prize!)

Well, we’ve got you covered! (More on that below!)

Every month on the Clickin Moms photography forum, we select a new theme and ask our members to interpret it in their images in any way they wish. Last month, the theme was ‘Real Life’.

Our members wow’ed us with a beautiful collection of pictures that gave us a glimpse inside their lives and showed up what childhood looks like to them.

We have selected some of our favorites for you to enjoy here, and we want to congratulate Marissa for winning a live Breakout Session seat from Click Photo School with her image!

Sharrisa Marie

Would you like the opportunity to be featured in next month’s photo share here on the Clickin Moms Blog and be entered to win a Live Seat to any Click Photo School Breakout Session? (Told you we’d share more details here on how to do that!) This month, we’re looking for your best ‘Fall Vibes’ photos which you can submit here.

Not a member of the Clickin Moms forum? We’d LOVE to have you join us! You can do that right now! (Questions? Please feel free to post those below!)

Join the Clickin Moms photography forum

The post 36 pictures that realistically show what real life looks like appeared first on Clickin Moms.


Clickin Moms

Posted in Photograpy How To | Tagged , , , , , , | Leave a comment