Christmas City Gothenburg

2

I know I’ve sent you postcards from this city before but I thought I would use this post as an excuse to wish everyone some seasonal cheer from a city that loves Christmas. I already live in the greatest city in the greatest country in the history of the world and like a swallow to Capistrano it’s where I always return. But an invitation from a beautiful woman is always hard to resist and a short hop over the North Sea later I was in Gothenburg.

[Read More…]

Photography Life

Posted in Photograpy How To | Tagged , , | Leave a comment

ETTR: Everything you need to know about Exposing To The Right

Let me introduce you to ETTR!

Sounds super exciting, right?!

I promise you’re going to love what I have to say because your final polished up images will just be BETTER! Yippee!

All right, let’s dive into the topic of ETTR.

So what exactly is ETTR?

  1. The in camera light meter
  2. Setting exposure manually
  3. Reading a histogram

However, in case you are unfamiliar with these topics I’ll take you through a brief explanation of their functionality when it comes to ETTR.

The in camera light meter:

Once you turn your camera on you have a choice. That choice is to allow your camera to read the light within a scene for you on an Auto or Semi-Auto setting or you can manually read the light within a scene through the light meter in your camera.

ETTR stands for “Expose To The Right”. In order to understand and use ETTR there is the assumption that you have some comfort level with...
Example of an in camera light meter.

Reading a light meter sounds trickier than it actually is.

Light is most accurately read for ETTR when your camera is set to spot metering mode. I always choose to spot meter.

A light meter can be read by placing the active focal point (Nikon) or center focal point (Canon) over highlights, midtones and shadows within a scene. I encourage you to play around with reading your light meter. You can do this by turning your camera on and ensuring your camera is in spot metering and manual mode.

Move your camera around a room and observe the light meter. You should see your light meter move towards the underexposed side when the light reading focal point is placed over a shadow and then move towards the overexposed side when the light reading focal point is placed over a highlight.

So why is it important for you to read light within a scene? Well, because reading the light will help you make good exposure triangle choices when you make the decision to ETTR.

Related: Metering modes explained and how to know which one to use

Setting exposure manually:

In order to ETTR you will want to dial in exposure settings that facilitate good exposure.

Now good exposure can mean many different things. However, when one chooses to ETTR, good exposure means pushing your exposure as far to the right side of a histogram as possible without losing any details within the important highlights of an image.

When setting your exposure, use the light meter to read the light within a scene. Typically, I expose for skin when I am capturing a human subject.

When I want to ETTR, I place my light reading focal point over a bright highlight on the skin and adjust my exposure triangle settings in a way that allows for my light meter to read at about +1 for skin. By doing this I’ve overexposed the brightest highlights of my subject’s skin according to my light meter by about 1 stop. Typically, this results in good ETTR exposure.

Reading a histogram:

Before I go any further I must digress a touch and explain the important role of the histogram in ETTR. A histogram is a graph that distributes information about the light within a scene as captured by a camera.

ETTR stands for “Expose To The Right”. In order to understand and use ETTR there is the assumption that you have some comfort level with...
Shadows within an image live on the left side of the histogram.

ETTR stands for “Expose To The Right”. In order to understand and use ETTR there is the assumption that you have some comfort level with...
Highlights within an image live on the right side of the histogram.

All the pixels within an image are assigned a number.

The deepest and darkest shadows, begin with 0, and live in the left side of the histogram. The brightest highlights end at 255, far right side of the histogram. Pure black with no information is 0. Pure white with no information is 255.

ETTR stands for “Expose To The Right”. In order to understand and use ETTR there is the assumption that you have some comfort level with...

Cameras are limited when it comes to dynamic range. Dynamic range is a camera’s ability to record shadows through highlights in a scene.

When a camera cannot record information within shadows because they are too dark or highlights because they are too bright this results in clipping in the shadows or blowing in the highlights.

Related: How to read a histogram: 7 examples for you!

So what does the histogram have to do with dialing in ETTR exposure settings?

Reviewing an image in preview mode is not effective in determining ETTR exposure. A much more precise way of determining whether or not an image has good ETTR exposure is to review the in camera histograms.

To find my in camera histogram I bring up an image into preview mode and then hit the up or down scroll function to display my histograms. I take a quick glance at my histograms and observe the right/highlight side of the graphs.

Histograms in camera are often broken down into the R,G,B colour channels. Typically, I look to my red channel histogram as many highlights live within the red channel and the red channel is often the first channel to blow out when highlights are too high.

I know that I have good ETTR exposure when my red channel is not climbing the right side of the histogram but is pushed very far to the right side.

ETTR stands for “Expose To The Right”. In order to understand and use ETTR there is the assumption that you have some comfort level with...
Example of a histogram that has good ETTR exposure.

ETTR stands for “Expose To The Right”. In order to understand and use ETTR there is the assumption that you have some comfort level with...
Underexposed image.

ETTR stands for “Expose To The Right”. In order to understand and use ETTR there is the assumption that you have some comfort level with...
Overexposed image.

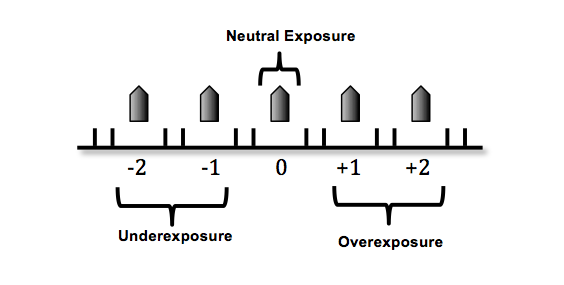
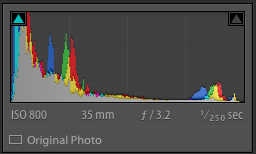
Once I review my histogram, I can go back and adjust my exposure settings accordingly if I need to pull back on my highlights because they are climbing the wall on the right side of the histogram and my image is overexposed and losing detail within important areas or my histogram is pulled back too far from the right side of the wall and not meeting ETTR exposure.

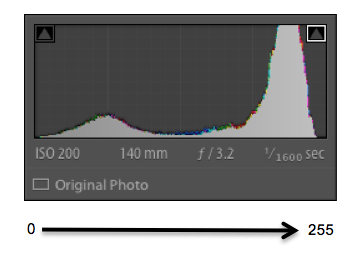
The purpose of ETTR is to use exposure settings that push the highlights as far to the right of a histogram as possible without blowing out important highlights which can be seen when there is climbing on the right side of the histogram wall.

Before we move on with the reasons I ETTR, let’s talk about the importance of the in camera highlight indicator or in camera preview blinkies and the exception to highlight wall climbing in the histogram.

Sometimes upon image review your histogram will climb the right side of the wall yet exposure will not be at its best ETTR. This happens in high dynamic range situations, like a strongly backlit subject or when a bright light source like a window is visible in a scene.

Turning on your in camera highlight indicator is useful in such situations. Upon image review, in preview mode, your image will blink in areas that are blown and represented by that climbing on the right side of the histogram. You can decide if the blinking areas, which indicate blowing and loss of detail, are important to retain or not within your image.

In such high dynamic situations I dial in exposure settings until an important area of my image, like skin, starts to blink. I then pull back on my settings a touch to ensure the highlight indicator is not illuminating important areas of my image.

I now confidently know that I have good ETTR exposure I the important areas of my image, even though some areas of my scene, such as the brightest areas, have lost detail.

Sounds like a lot of work? Right? I promise it’s not. After years of experience, it only takes me a matter of seconds to put all of this into practice.

Reasons to ETTR:

But why do I want to go through these steps and push my histogram as far to the right as possible?

Arguably there’s no such thing as correct exposure. Exposure has everything to do with the vision a photographer has for an image.

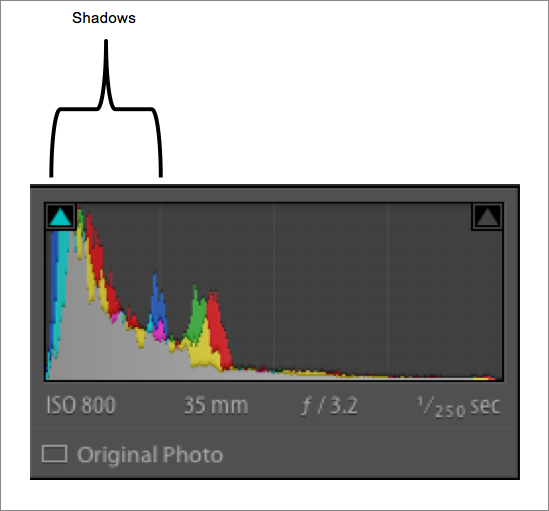
However, if I ETTR what I’ve done is not only preserved as much detail in the highlights as possible but I’ve also shifted the entire histogram to the right. This preserves more detail in my shadows. ETTR increases the likelihood that both highlights and shadows will retain information that I can work with in post processing.

I like detail and I want to be able to retain as much information within my images as I can. Maximizing the overall technical accuracy of my images is my goal and ETTR allows for me to do that.

I don’t want my blacks to become a muddle of darkness. I want detail there. If possible I don’t want my highlights to be blown out and appear white. I want information.

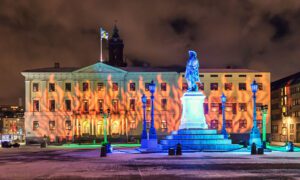
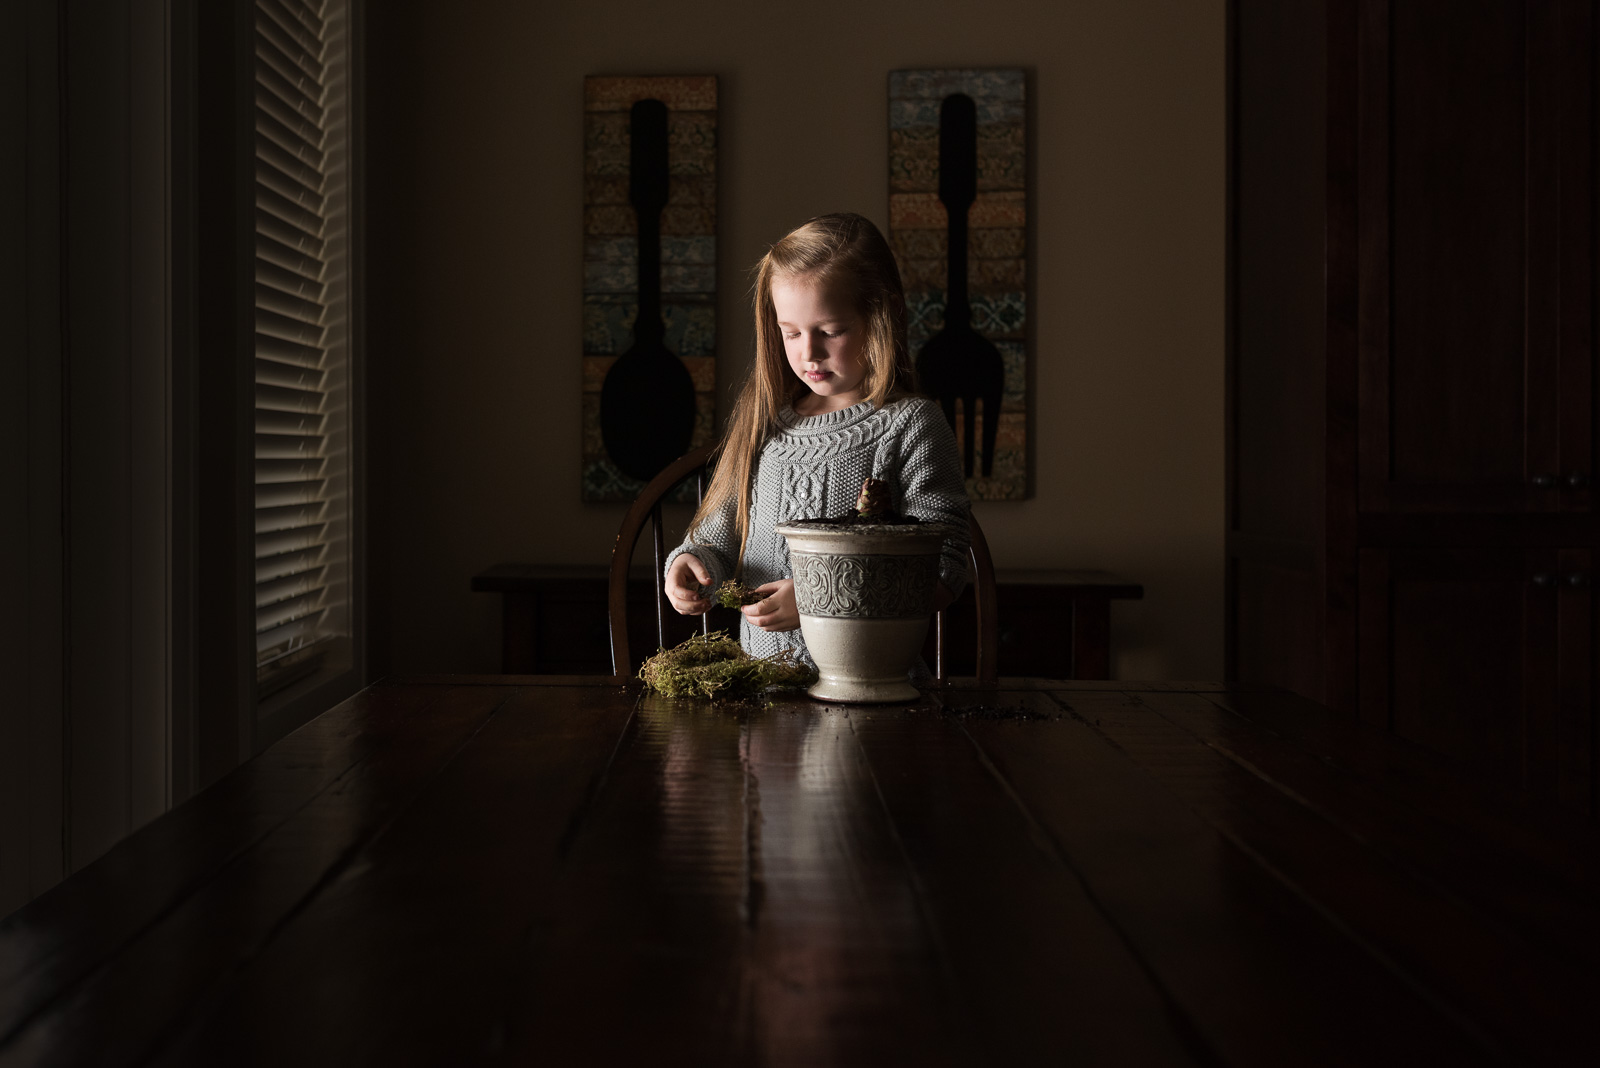
Take this image as an example.

SOOC (straight out of camera) I have dialed in exposure settings in order to push my histogram far to the right side of the graph without blowing out any highlights. Although the SOOC capture does not capture the vision I had in mind for my final edit, what it does do is preserve full dynamic range SOOC.

Had I shot for the mood I wanted I’d have clipped and lost detail in my shadows. The magic of ETTR is that in post processing I can adjust my exposure to meet my vision for the image knowing that I have preserved details in all areas of the image from shadows through highlights.

ETTR stands for “Expose To The Right”. In order to understand and use ETTR there is the assumption that you have some comfort level with...
SOOC image with ETTR.

Observe what happens if I had not used ETTR but instead shot for my final vision for the image. As you can see I have clipped a large number of shadows (blue highlight). There’s no detail in the blue highlights within this image.

ETTR stands for “Expose To The Right”. In order to understand and use ETTR there is the assumption that you have some comfort level with...

This is my final edit with highlights, shadows and mood preserved because I used ETTR.

ETTR stands for “Expose To The Right”. In order to understand and use ETTR there is the assumption that you have some comfort level with...

Additionally, when I ETTR and bring down my exposure in post processing, I preserve the quality of an image as I am not introducing unwanted noise. Underexposing and then increasing exposure in post processing will introduce noise.

ETTR not only increases the potential for detail within your image but also the quality of your images. I like that and for those reasons I take a few moments to ETTR to preserve detail and quality within my images!

Join the Clickin Moms photography forum

The post ETTR: Everything you need to know about Exposing To The Right appeared first on Clickin Moms.


Clickin Moms

Posted in Photograpy How To | Tagged , , , , , , | Leave a comment

Understanding Composition: Beyond the Rule of Thirds

Photo employing simplicity

Composition is critical. If you want to take powerful photos, it’s one of the most important parts of photography. Still, a lot of photographers start out only hearing about the rule of thirds, and they never go more in depth on how to compose better photos. The good news is that you can learn more about composition — and you should. It’s a deep topic, and there’s no way to cover everything in just one article, but I’ll do my best to hit the biggest points here.

[Read More…]

Photography Life

Posted in Photograpy How To | Tagged , , , , | Leave a comment

10 things creative child photographer Jan Tyler loves

We like to shop around here but what we really enjoy doing is sharing our most loved items with our favorite people – YOU!

Today we have Jan Tyler, Click Pro and a wildly creative photographer of her son, joining us to share just a few of her favorite things.

photo of boy walking on the beach by Jan Tyler

1. Water

Living on an island, we are literally surrounded by water. It is such a big part of our lives, and one of my favorite things to shoot.

Even if we were to go to the same beach every day, the dance between the sun and water is truly unique to each new day. I never tire of watching them in action.

pic of boy reading books on the front porch by Jan Tyler

2. Children’s books

There is nothing quite like a good book. I have spent so many nights staying up too late as I read “just one more chapter”.

Now that my son loves reading, we read a lot of the same books. It is so wonderful to be able to talk to him about the books, and to be “in the know”. We have had so many amazing conversations and discussions about book topics and different characters…and, yes, the book is ALWAYS better than the movie!

picture of boy playing in the ocean by Jan Tyler

3. Fun lenses

I love to play and experiment with my photography. It can be so easy to fall in to routines and patterns that I could easily get bored with my work. Playing with creative lenses really allows me to express myself creatively.

My favorite creative lenses are my Lensbaby lenses. I also love to bring my fisheye lens out to see the world from a new perspective.

photo of boy holding a copy of Click Magazine by Jan Tyler

4. Click Magazine

Yes. I love Click. I have been a subscriber since the very first issue and I have saved every single copy. It is one magazine that I refer back to and am constantly inspired by.

Being published in Click was a dream come true for me. Even though I had already received my copy in the mail, my son and I went to our local Barnes and Noble so that we could buy another copy in person. I loved being able to connect with him through this joint project.

pic of boy looking at printed photos by Jan Tyler

5. Printed photos

Nothing compares to holding a stack of images in your hand and being able to look through them. I absolutely love seeing my images in print. I definitely have my fair share of photo books, but a stack of prints is really what makes me happy.

I love that I always have images available to share with others and to use for school projects when they come up at the last minute. From a technical point, printing is also such a great way to check the color on my monitor. My favorite labs to use are Miller’s, Artifact Uprising and Artsy Couture.

photo of boy sitting on the floor by Jan Tyler

6. Textures

Editing is a bit of a passion for me. A perfect day would be to have several hours of uninterrupted time to edit.

One of my favorite editing techniques is to add texture to an image. I love the depth and dimension it adds to an image. I also love how it creates unexpected color and contrast in select parts of an image. Adding textures from Jessica Drossin‘s collection to my work has lifted me out of a creativity rut many times.

photo of essential oils by Jan Tyler

7. Oils

I am obsessed with my doTerra oils. They have changed my life in so many ways. We start our days with calming oils and focus oils. I also have oils in my morning tea. Throughout the day, we use oils for clear breathing, muscle aches, and any cuts and scrapes that may come our way.

picture of kid holding candy canes by Jan Tyler

8. Shadows and directional light

Learning how to control light was such an important part of my photography journey. I realized how much I loved using a window and how much I adored deep shadows and directional light. It is always my go-to when I am looking for a quick shot indoors.

photo of boy playing baseball by Jan Tyler

9. Baseball

The baseball field is definitely my favorite place to spend a spring evening. I love watching the team hang out in the dugout with their water bottles, bubble gum, and sunflower seeds.

I love the dust being kicked up into the lights. I love the air as it is just starting to warm up into summer. I love the action and cheering of the game. I also love that each player has their own position, and it is easy to capture them in play.

family photo on a hill by Jan Tyler

10. The hill behind my house

The wonderful thing about a hill is that you can position yourself to capture both sunrise and sunset, and you have nothing in the background to distract from your subject.

We have a little, tiny hill behind our house. It isn’t much, but if I get down low enough, it makes it look higher than it actually is. We have been able to create so many different looks and scenes on this hill, and it inspires me every time.

SHOP THIS POST:

Join the Clickin Moms photography forum

The post 10 things creative child photographer Jan Tyler loves appeared first on Clickin Moms.


Clickin Moms

Posted in Photograpy How To | Tagged , , , , , | Leave a comment

Where Do You Print Your Photos?

Zabriskie Point Panorama 400 MP

Many of our readers have been asking us to write detailed howto articles on printing, a topic we have certainly neglected over the years. Getting our work seen is very important for us photographers, because that’s why we shoot in the first place. While posting images to Facebook and Instagram is something many of us love doing, images often look completely different in print when compared to how electronic devices display them. And I am not just talking about differences in color reproduction, accuracy and perception (which are obviously important), but about other important factors that influence them such as print brightness, contrast, sharpness, reflection, glare, paper type, print material, size and much more.

[Read More…]

Photography Life

Posted in Photograpy How To | Tagged , | Leave a comment