4 Quick Photoshop fixes for the Lightroom user

I’m a Lightroom girl.

I do 95% of my editing within that program.

Lightroom gives me the full creative power I need to bring my images to life.

However, there are a few situations where Photoshop can deliver a result that is stronger or faster than what I  can do in Lightroom. In these situations, I do my Lightroom work first and then I bring the image over to Photoshop for a quick fix.

Once my Photoshop fix is done, I bring the image back to Lightroom to finalize and export.

Before heading into Photoshop

Before heading into Photoshop to make any of the below edits, I first complete my Lightroom edit. I work my way down the Develop panel making both global and local adjustments, ensuring that I have the color or black and white conversion as I want it.

Once I’m satisfied with the overall edit, I take the image into Photoshop for some final fine-tuning and polish.

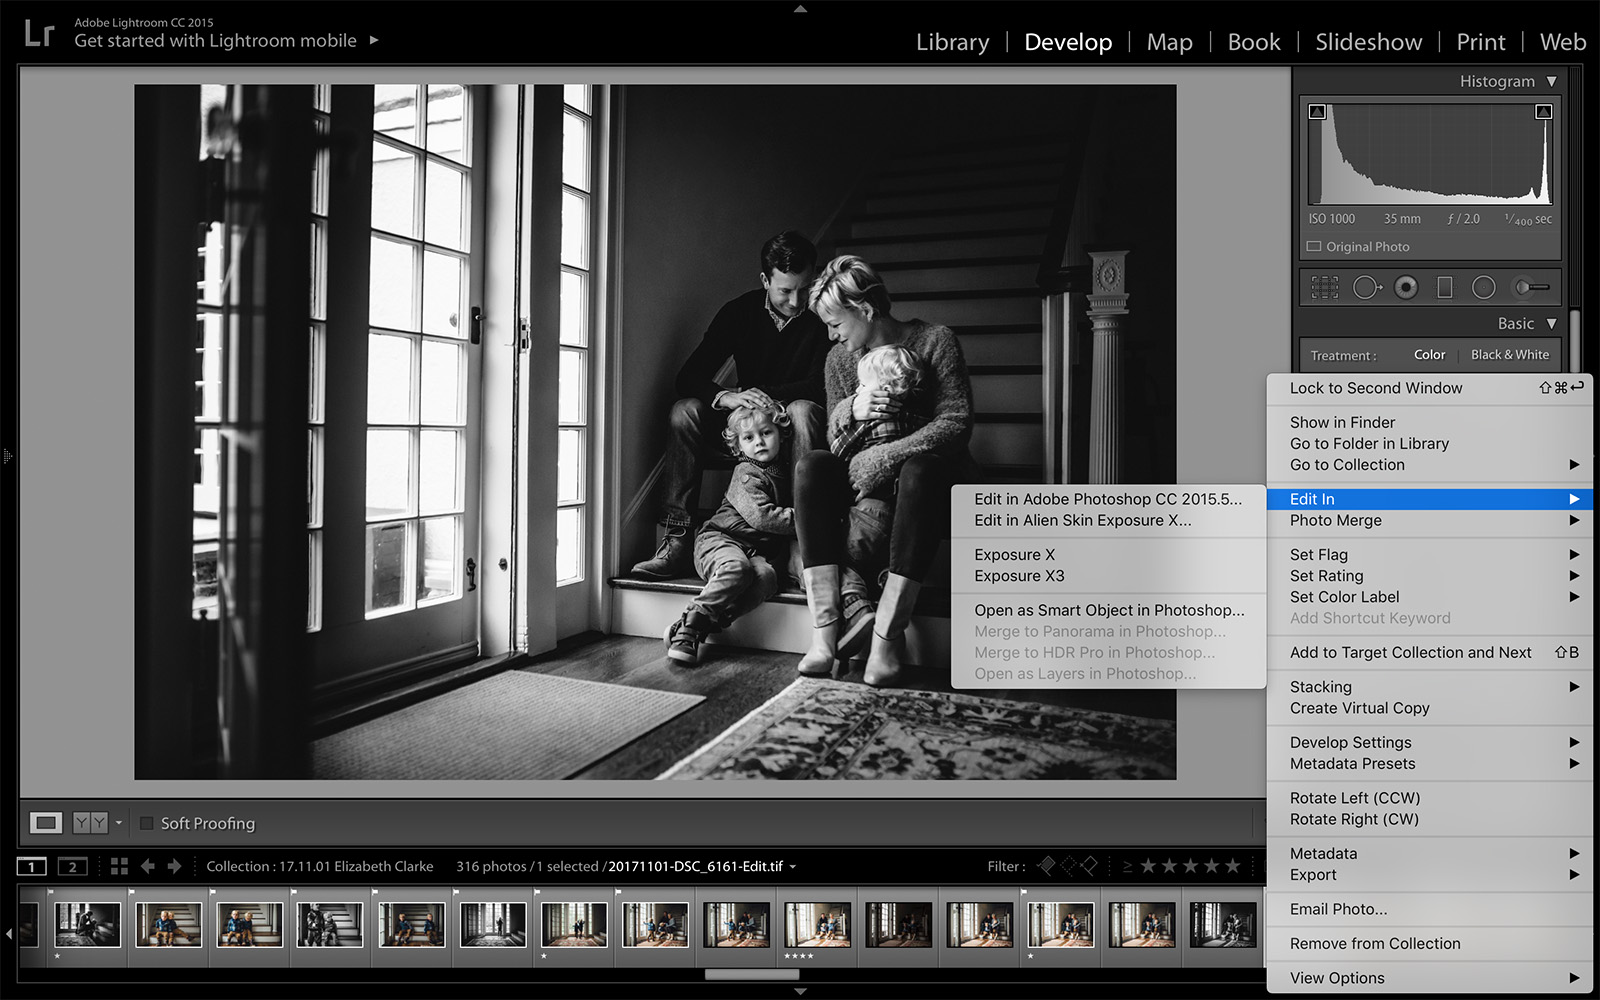
For those of you new to Photoshop, to take an image into Photoshop from Lightroom simply right click on the image thumbnail on the bottom of your screen and click “Edit in Photoshop”.

Once the image opens in Photoshop right click on the initial layer of the image and click “duplicate layer”. This will leave your original image in tact underneath your edits in the event that you want to undo some of your changes.

When you are done making your edits, simply click “save” and it will automatically save the image back down to Lightroom.

I'm a Lightroom girl. However, there are a few situations where Photoshop can deliver a result that is stronger or faster than what I can do in Lightroom.

Photoshop fix #1: Spot removal

While the spot removal tool in Lightroom has improved with each Lightroom update, nothing is quicker and smoother at removing spots than the Spot Healing Brush Tool in Photoshop.

Whether it’s a scratch, a flyaway hair or newborn baby acne, I find the Spot Healing Brush Tool to be quicker and more accurate than the spot removal tool in Lightroom.

After taking the image into Photoshop, click on the Spot Healing Brush tool. You can use the key that looks like this “[“ to make the correction circle smaller, or “]” to make the circle bigger.

You can click on a single spot to erase it, or drag the tool to erase something longer like a scratch on the skin. This brush automatically samples from the area around the imperfection to ensure the correction is a proper color match.

I'm a Lightroom girl. However, there are a few situations where Photoshop can deliver a result that is stronger or faster than what I can do in Lightroom.

After erasing all of the little imperfections, simply click save to bring the image back down to Lightroom.

I'm a Lightroom girl. However, there are a few situations where Photoshop can deliver a result that is stronger or faster than what I can do in Lightroom.

I'm a Lightroom girl. However, there are a few situations where Photoshop can deliver a result that is stronger or faster than what I can do in Lightroom.

Photoshop fix #2: Patch tool for removing unwanted objects

The Patch Tool is great for repairing larger areas or for removing distracting elements within your image that may not correct as well with the Spot Healing Brush.

The Patch Tool is located in the same spot as the Spot Healing Brush tool. Right click on the Spot Healing brush and select the Patch Tool from the menu.

To use this tool begin by drawing a circle around the area you wish to correct. Then drag this area in any direction toward the part of the image you would like to correct with. (Note: Check to see that “Source” is selected in the upper menu bar before dragging the selection).

Photoshop then blends the pixels from the destination area into the original selection, erasing the unwanted object.

I'm a Lightroom girl. However, there are a few situations where Photoshop can deliver a result that is stronger or faster than what I can do in Lightroom.

For example, if you are removing a power outlet from a wall, circle the power outlet and then drag the selection to the blank wall located above the power outlet. The patch tool should automatically replace the power outlet with blank wall.

If the tool did not full erase the object you were trying to remove, circle it again and repeat the process. When you are satisfied with the replacement, hit Cmd + D on mac and Ctrl + D on PC to deselect the area.

I'm a Lightroom girl. However, there are a few situations where Photoshop can deliver a result that is stronger or faster than what I can do in Lightroom.

I'm a Lightroom girl. However, there are a few situations where Photoshop can deliver a result that is stronger or faster than what I can do in Lightroom.

Photoshop fix #3: Eyes that sparkle

There are many ways to enhance the eyes, but I’ll walk you through one method that is relatively quick and straightforward, but yields captivating results.

After taking the image into Photoshop, click on the Magnifying Glass to zoom in on the eyes of the image. Then click on the Magnetic Lasso tool.

This is one of my favorite tools in Photoshop because it makes selecting any part of the image super quick and easy. (Note: If you are only seeing the Lasso tool and not the Magnetic Lasso, right click on the Lasso and a small menu will appear with the Magnetic Lasso option.)

Using the Magnetic Lasso select the area around the eye. To select both eyes at the same time, after completely circling one eye, hold down the Shift key and then circle the other eye.

I'm a Lightroom girl. However, there are a few situations where Photoshop can deliver a result that is stronger or faster than what I can do in Lightroom.

Once both eyes are selected go to Layer -> New Layer Via Copy on the top menu.

Then go to Filter -> Other -> High Pass. The High Pass filter is a sharpening filter that gives very nice results when used carefully and selectively. I usually set the High Pass filter to 10, and then adjust the opacity as necessary in the layer panel if 10 makes the eyes look unnatural.

After clicking on High Pass, the eyes will look foggy, so you will then want to go to the Layer panel, and change your layer blending mode to Soft Light.

I'm a Lightroom girl. However, there are a few situations where Photoshop can deliver a result that is stronger or faster than what I can do in Lightroom.

I'm a Lightroom girl. However, there are a few situations where Photoshop can deliver a result that is stronger or faster than what I can do in Lightroom.

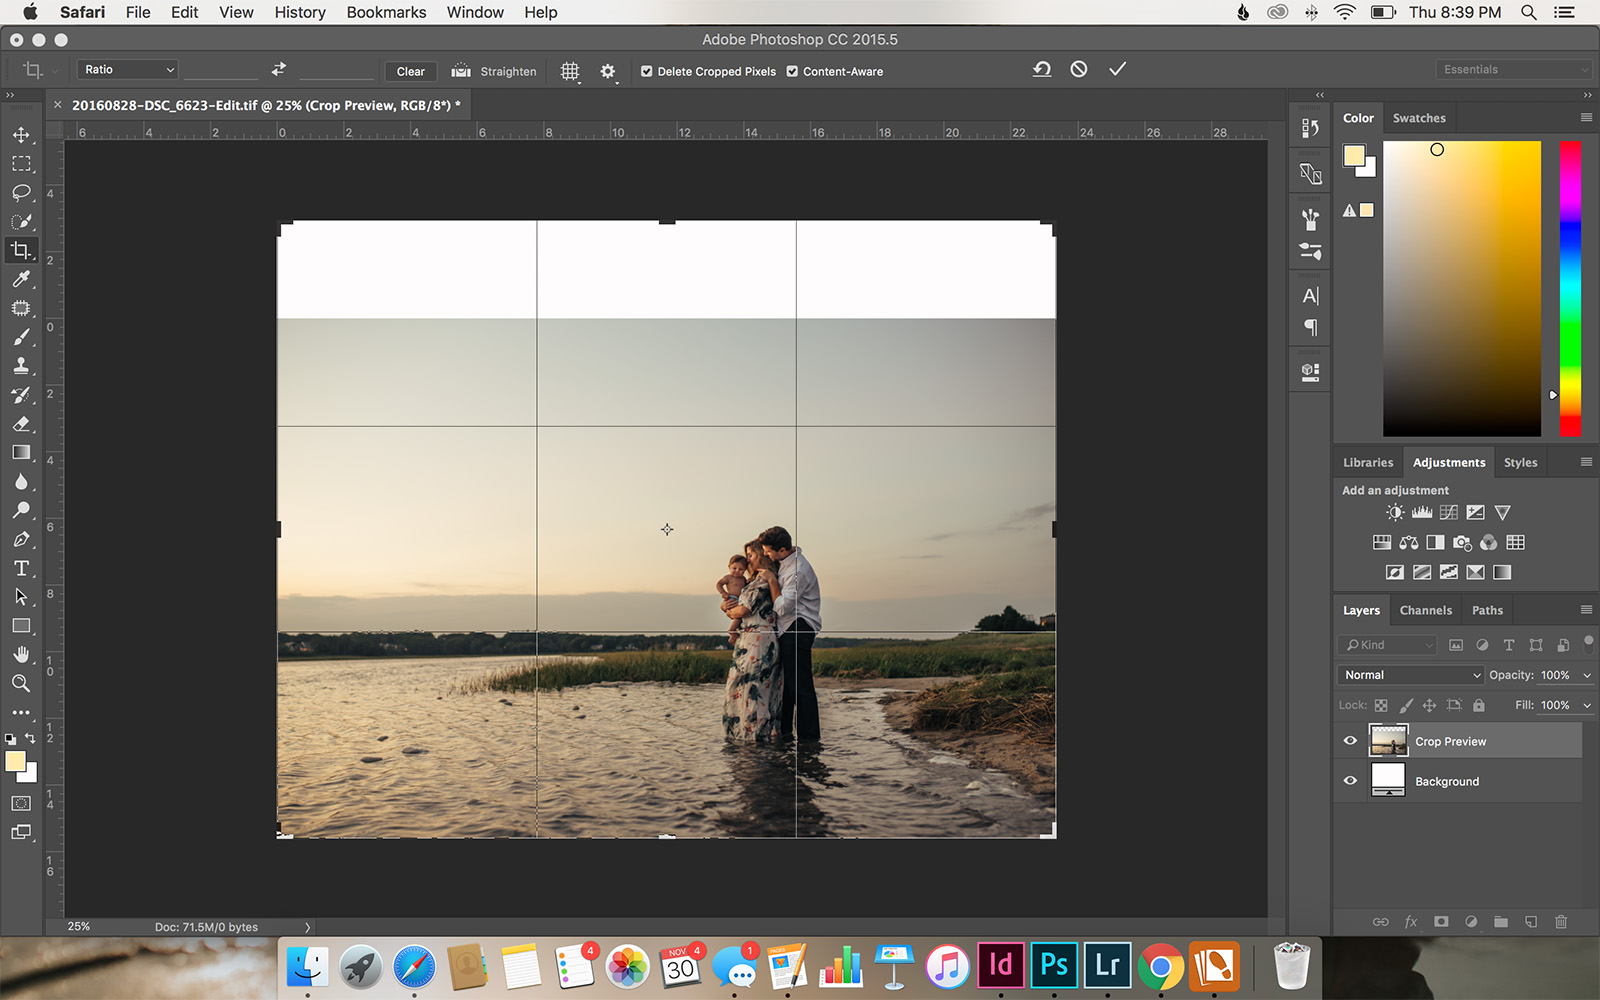
Photoshop fix #4: Content aware fill to extend your background

Sometimes you may find yourself needing just a bit more sky or background than you actually shot. For example, your client may request an image that you captured in a 4×6 ratio as an 8×10, and to print properly at this size without changing the vision you had for the image, you may need to extend your background.

The easiest way to do this in Photoshop is with Contentment Away Fill. After opening the image in Photoshop, click on the Crop tool.

From there, simply drag on the part of the image you would like to extend. If it’s the sky, drag the crop up until you reach the size you need. If you find the whole image is continuing to move at the same scale you started with, click the Clear button on the top menu bar.

On the top menu bar you will also want to make sure Content Aware is checked. Then hit enter and the tool will automatically fill the area in using the information it has gathered from the pixels around it.

I'm a Lightroom girl. However, there are a few situations where Photoshop can deliver a result that is stronger or faster than what I can do in Lightroom.

Please note that this works best when you have a relatively simple background. Even then you may find that you need to clean up the new area a bit more.

To do this, use the Patch Tool we talked about in Fix #3 to select the areas that still need a little smoothing and cleanup.

I'm a Lightroom girl. However, there are a few situations where Photoshop can deliver a result that is stronger or faster than what I can do in Lightroom.

I'm a Lightroom girl. However, there are a few situations where Photoshop can deliver a result that is stronger or faster than what I can do in Lightroom.

Lightroom will always be my go-to editing program, I just love ease at which it gives me complete creative freedom over my editing process.

However, by incorporating a few simple Photoshop tricks into my workflow, I’m able to add an additional layer of polish and creativity, thus allowing me to fully realize my vision for each image.

Join the Clickin Moms photography forum

The post 4 Quick Photoshop fixes for the Lightroom user appeared first on Clickin Moms.


Clickin Moms

Posted in Photograpy How To | Tagged , , , , | Leave a comment

Photographer’s child syndrome: How I avoid it

Need help overcoming the dreaded photographer’s child syndrome?

I have five children ranging in age from 23 down to 7.

I’ve had many failures.

But finally, kind of, (sort of, but maybe not) I’ve figured this thing out at child number five.

1. It needs to be FUN for them.

At first I thought this should go without saying. But then I thought no, it not only needs to be said but it needs to be at the top.

This should be a fun activity for you both. Life is about experiences and you want the experience your children has when you bring out your camera to be a fun one.

Isn’t this is why we photograph? To capture beautiful memories of our children to look back on and reflect.

I’ll tell you, when I look back on pictures that I have, even the not good ones, I smile and my heart warms. My heart is full with both joy of being able to witness the moments again and sorrow that those moments have passed and I will never be able to get them back.

What happens when I look back on photographs when I pushed my children to do something they really didn’t want to do? Or where I know I was trying a new technique or mode? That feeling is of bitter, bitter regret.

You can see in their faces they weren’t enjoying it. I didn’t get what I wanted. I didn’t learn anything from it and I gave them a bad experience in front of the lens. Those moments that I photographed – I don’t treasure them.

If you both aren’t having fun and can’t turn it around, put the camera down and engage them in something fun. These will not be memories that you treasure and it will sour your child from having their pictures taken.

I would also suggest that you don’t ask your child to pose all the time. Posing is hard work and can become tiresome and boring for them, and just not fun.

Need help overcoming photographer’s child syndrome? I have 5 children. I’ve had many failures. But finally, kind of, I've figured it out.

2. It needs to be fun for YOU.

Not only does fun need to be in there at the top, it needs to be in there twice. YOU need to be having fun, too!

Children pick up on our emotions very quickly and if you’re having fun, they will, too. Conversely, if you’re getting frustrated or irritated, they’ll pick up on that, too.

These should be fun memories that you’re creating together. When you look at pictures you’ve created together, you aren’t just remembering how they looked, you’re remembering everything: the moment, how you felt, how they felt.

Let that memory be as good as it can possibly be.

3. It’s not the time to test out manual mode or new methods.

If we refer back to the above tips, this one’s a no brainer.

Unless you have that rare personality that doesn’t get flustered or frustrated when things don’t go according to plan (and if you do have that personality, I want to be your new best friend), don’t go out intending to learn manual mode, or practice manual mode, whilst directing your children to get beautiful portraits. It rarely ends well.

I’m not saying don’t try new things. No one would ever grow if we didn’t.

Try new things but do so without your children in the frame. (If you’re like me you might not want them nearby either. I have the mouth of a sailor and there’s nothing quite like things not going the way I intended to unleash that beast.)

Again, it goes back to number one – it needs to be fun for them. If they see you getting upset and mad at the camera, it will rapidly become very much not fun for them. They’ll begin to associate you holding a camera with an unpleasant experience which isn’t good.

Need help overcoming photographer’s child syndrome? I have 5 children. I’ve had many failures. But finally, kind of, I've figured it out.

Need help overcoming photographer’s child syndrome? I have 5 children. I’ve had many failures. But finally, kind of, I've figured it out.

4. Praise them.

If you’ve just photographed your child, and everything went relatively, accordingly, kind of, close to plan(ish), praise them! They helped you out. Tell them that they helped you and did a wonderful job.

If they’re a little older, and you don’t think that every time you take a picture they will want to see the back of the camera, choose a few pictures from the back and show them. Be specific and point out what they did that you liked and why.

Children thrive on praise, they (generally until you have friends over, are out in public, or are on the phone) want to please you. They’ll likely try to repeat what you’ve pointed out the next time you have your camera in hand.

5. Reward chart.

This one is controversial. Consider this – do you go to work for free? I certainly don’t.

I don’t give a treat each time we go out and photograph but I do have a reward chart. Before we start to check off the boxes, I sit my children down and ask what they would like.

The length of the reward chart (i.e. how many boxes have to be checked off) varies according to the items my children select (they each have one).

My daughter loves dolls. She’s a little older now so I try and find the longest chart available and it takes her a year or so to fill it up. Then, not only do I get her the doll but we go to the store and have lunch there. It turns into a fun day out. I want her to know that she’s appreciated, she’s worked hard, and she’s earned this treat.

My son likes video games and Legos. He doesn’t like having his picture taken so his chart is a little shorter to keep him motivated.

Make sure the chart is handy. When you’ve finished taking your pictures, get the chart, praise them for helping, and check the box. Tell them how many are left and that they’re filling them up fast.

When my children were younger, I had a treasure box with inexpensive items from the dollar section of any store. Hello, Target! Once they fill up a small reward chart they get to choose an item from the box.

Just remember to praise, praise, praise every step of the way during the process! They’re getting the treat because they’ve been helpful and done a wonderful job.

6. Engage them.

My daughter loves animals. She’s the daughter of a veterinarian so I guess that part was written in the stars. So it’s not an uncanny coincidence that she’s frequently photographed with our family pets.

The animals work well to keep her engaged and doing something. The engaged word is key. If your child doesn’t have a favorite pet, maybe it’s an object.

If you’re into more styled portraits than lifestyle, there are so many classic toys that you can purchase that look wonderful when photographed. For a lifestyle approach, have them play with their favorite toys or do a fun activity that they love and that engages them.

Need help overcoming photographer’s child syndrome? I have 5 children. I’ve had many failures. But finally, kind of, I've figured it out.

7. Get help.

Paid or unpaid, an extra pair of hands are wonderful.

I’m so lucky that the preschool my children went to have some amazing teachers, so I hire them to come and help me when I have a particular idea in mind. They’re wonderful with children, my kids love them and they help to keep them engaged and having a good time.

Maybe you have a wonderful spouse who will help, a neighbor or a fun older cousin.

8. Keep it short and sweet.

It’s so easy when we’re caught in the moment to want to push the time past the point our children want to willingly cooperate with us. Knowing a child’s time limit and keeping a shoot short will keep them interested in future pictures.

9. Choose the right lens.

When making a choice as to the lens that you want to use, keep in mind how comfortable your child is away from you. If you have a young child, chances are they aren’t going to want to be far from you.

My favorite lens is the 200mm and the bokeh and compression from it is beautiful. But, it requires putting a substantial amount of distance between you and your child.

If you have a helper or a fun activity that your child is engaged in, that will help immensely. But if you have a child who likes to be in your pocket, a wider lens will cause you less frustration in the long run. Bonus, it’ll save you sucking in air as you run back and forth between your child and the spot you need to be in!

10. When things aren’t going well.

You have your child perfectly styled for what you know will be a wonderful portrait and all of a sudden they don’t want to cooperate. Try a few of the above steps to see if you can salvage it.

Be calm and patient. Tell them what a big help they are, explaining to them they’re doing great with the reward chart.

You need to be ready to make a decision to let this one go if they’re not going to cooperate and you need to be relatively fast in making it. If you drag it out and your child(ren) are miserable, it’ll make it more difficult the next time you pick your camera up.

I have so many missed opportunities but I know if I pushed it I wouldn’t have gotten portraits that I wanted. And I know that when I look back on them and see my child’s face, I would remember sadness and frustration instead of us having a good time.

I’ll end with this simple statement – I photograph to remember. I want to remember my children with all their little moments and quirks. I want to look back and think that I gave them a wonderful, joyous and fun-filled childhood.

Why do you photograph?

Join the Clickin Moms photography forum

The post Photographer’s child syndrome: How I avoid it appeared first on Clickin Moms.


Clickin Moms

Posted in Photograpy How To | Tagged , , , | Leave a comment

PL Landscape Photography Video Course Is Here!

Tetons at night

Our team at Photography Life would like to begin by wishing Happy Holidays to our readers all around the world! Thank you for all your support, and we are excited to say that we have a huge announcement today, which many people have been asking us about for months. With festivities in the air, we are happy to announce that our first “Level 3” video tutorial — the Landscape Photography Course — is now available! If the end of the year is stirring your excitement for photography, we hope this comprehensive guide will be the perfect place to start.

[Read More…]

Photography Life

Posted in Photograpy How To | Tagged , , , , | Leave a comment

Switching From Lightroom to Capture One Pro

C1P - 100 Clarity

It seems only a short while ago when I was undecided on the RAW processing software that would replace Lightroom. I shortlisted several potential alternatives – Capture One Pro, RawTherapee, DxO Optics and Darktable among others – but was able to try out only Capture One Pro properly. A demo version 10 of Capture One gave me 30 days to test it, after which I was able to continue evaluation by signing up for a beta copy of version 11. After using Capture One for several weeks, I made a decision to stick with it despite its hefty price tag. Now seems to be the right time to publish this, with the last standalone version of Lightroom 6.14, having just been released. Needless to say, my attempts at using other software I listed earlier were quite lukewarm. So to the reader who is here expecting a comparison between different alternatives to Lightroom, this post is unfortunately not it. Instead this post documents my migration from Lightroom to Capture One.

[Read More…]

Photography Life

Posted in Photograpy How To | Tagged , , , | Leave a comment

How to Get Precise Exposure for Your Shots

Fig6_RPP_2725_52_10_10_K64

Practically every day, one can see threads on photographic forums where members discuss the various different modes of automatic exposure, trying to find the right one. As a rule, these discussions result in the same question – what compensation to automatic metering ought one set to get consistently good exposure? It turns out that no autoexposure mode universally guarantees good out-of-box results.

[Read More…]

Photography Life

Posted in Photograpy How To | Tagged , , | Leave a comment