A surprising way to get beautiful sunflare in your photos

As we all must do more often than we would like, I was folding laundry the other day and I noticed how cool the texture of the used dryer sheet was.

I have seen amazing images of people shooting through zip-lock bags, metal pipes and even crystal bracelets.

With this in mind, I decided I should try shooting through the dryer sheet.

This particular dryer sheet had been through the dryer twice as I was forgetful and didn’t bother to put a new one in. I pulled it apart a bit so there would be a hole in the middle that I could focus through.

I then attached the dryer sheet to my lens with a thick elastic band being careful to keep the hole in the middle. I used my center focal point when shooting so that I would definitely be able to get focus.

I have seen amazing images of people shooting through zip-lock bags, metal pipes and even crystal bracelets. With this in mind, I decided I should try shooting though the dryer sheet.

I have seen amazing images of people shooting through zip-lock bags, metal pipes and even crystal bracelets. With this in mind, I decided I should try shooting though the dryer sheet.

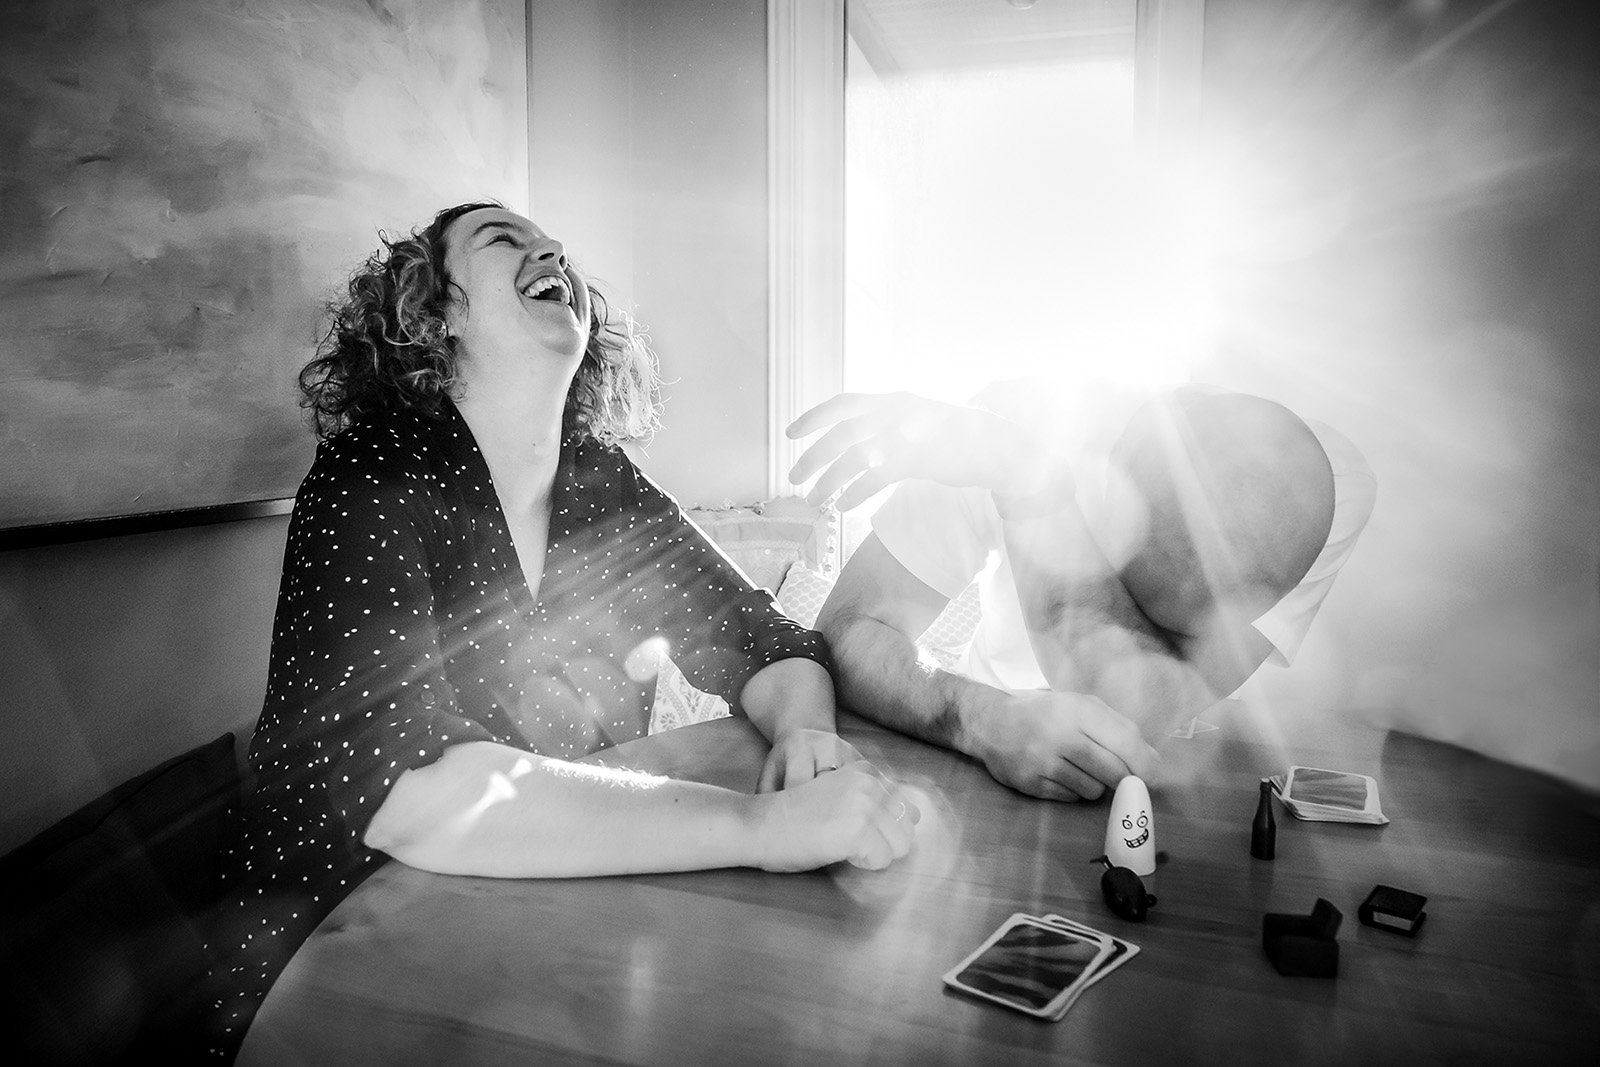
I was expecting the addition of the dryer sheet to add a neat texture to the image but was completely surprised at what it did to the light coming into the camera when I pointed the lens directly at the sun.

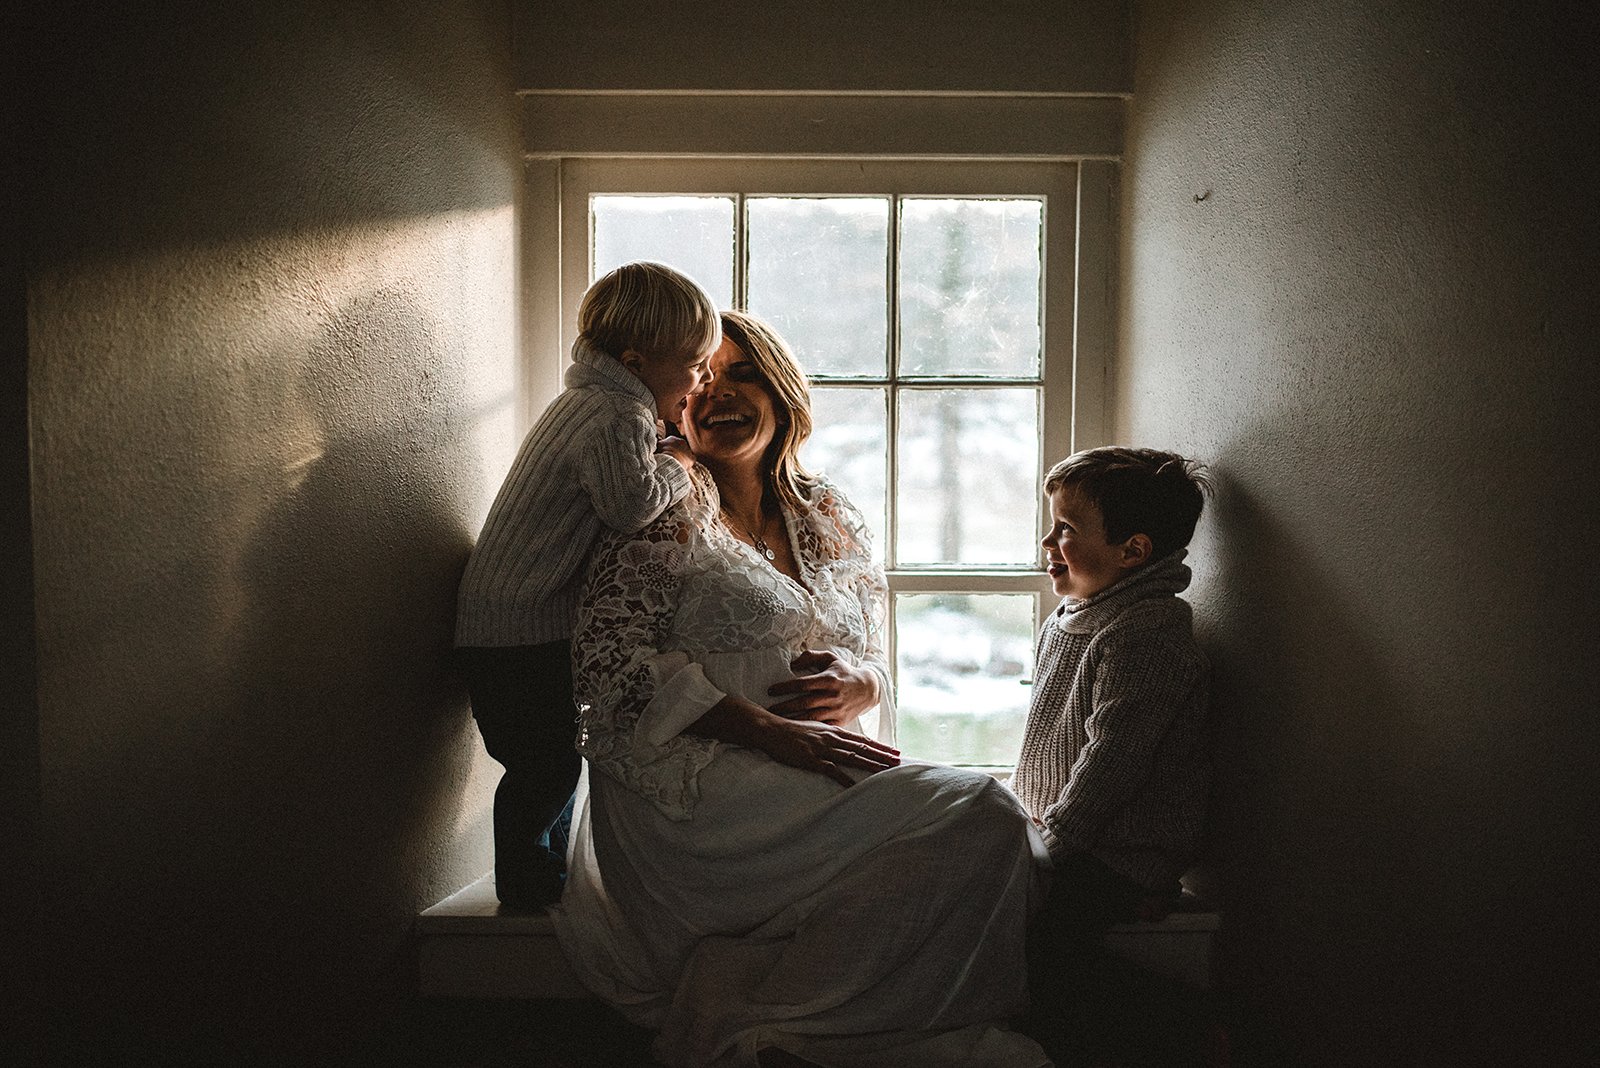
I placed my girls on the chair you can see in the photos below and took pictures of them at sunset. My settings were: ISO 320, f/3.2, 1/250.

Here’s a pullback comparison of the flare I achieved without the dryer sheet and then with.

I have seen amazing images of people shooting through zip-lock bags, metal pipes and even crystal bracelets. With this in mind, I decided I should try shooting though the dryer sheet.
without

I have seen amazing images of people shooting through zip-lock bags, metal pipes and even crystal bracelets. With this in mind, I decided I should try shooting though the dryer sheet.
with

I was amazed at the way the light seemed to spread across the piece of dryer sheet, creating a really neat effect.

I have seen amazing images of people shooting through zip-lock bags, metal pipes and even crystal bracelets. With this in mind, I decided I should try shooting though the dryer sheet.

I was concerned that this may have been a lucky shot so I tried using my dryer sheet flare techniques in some other situations.

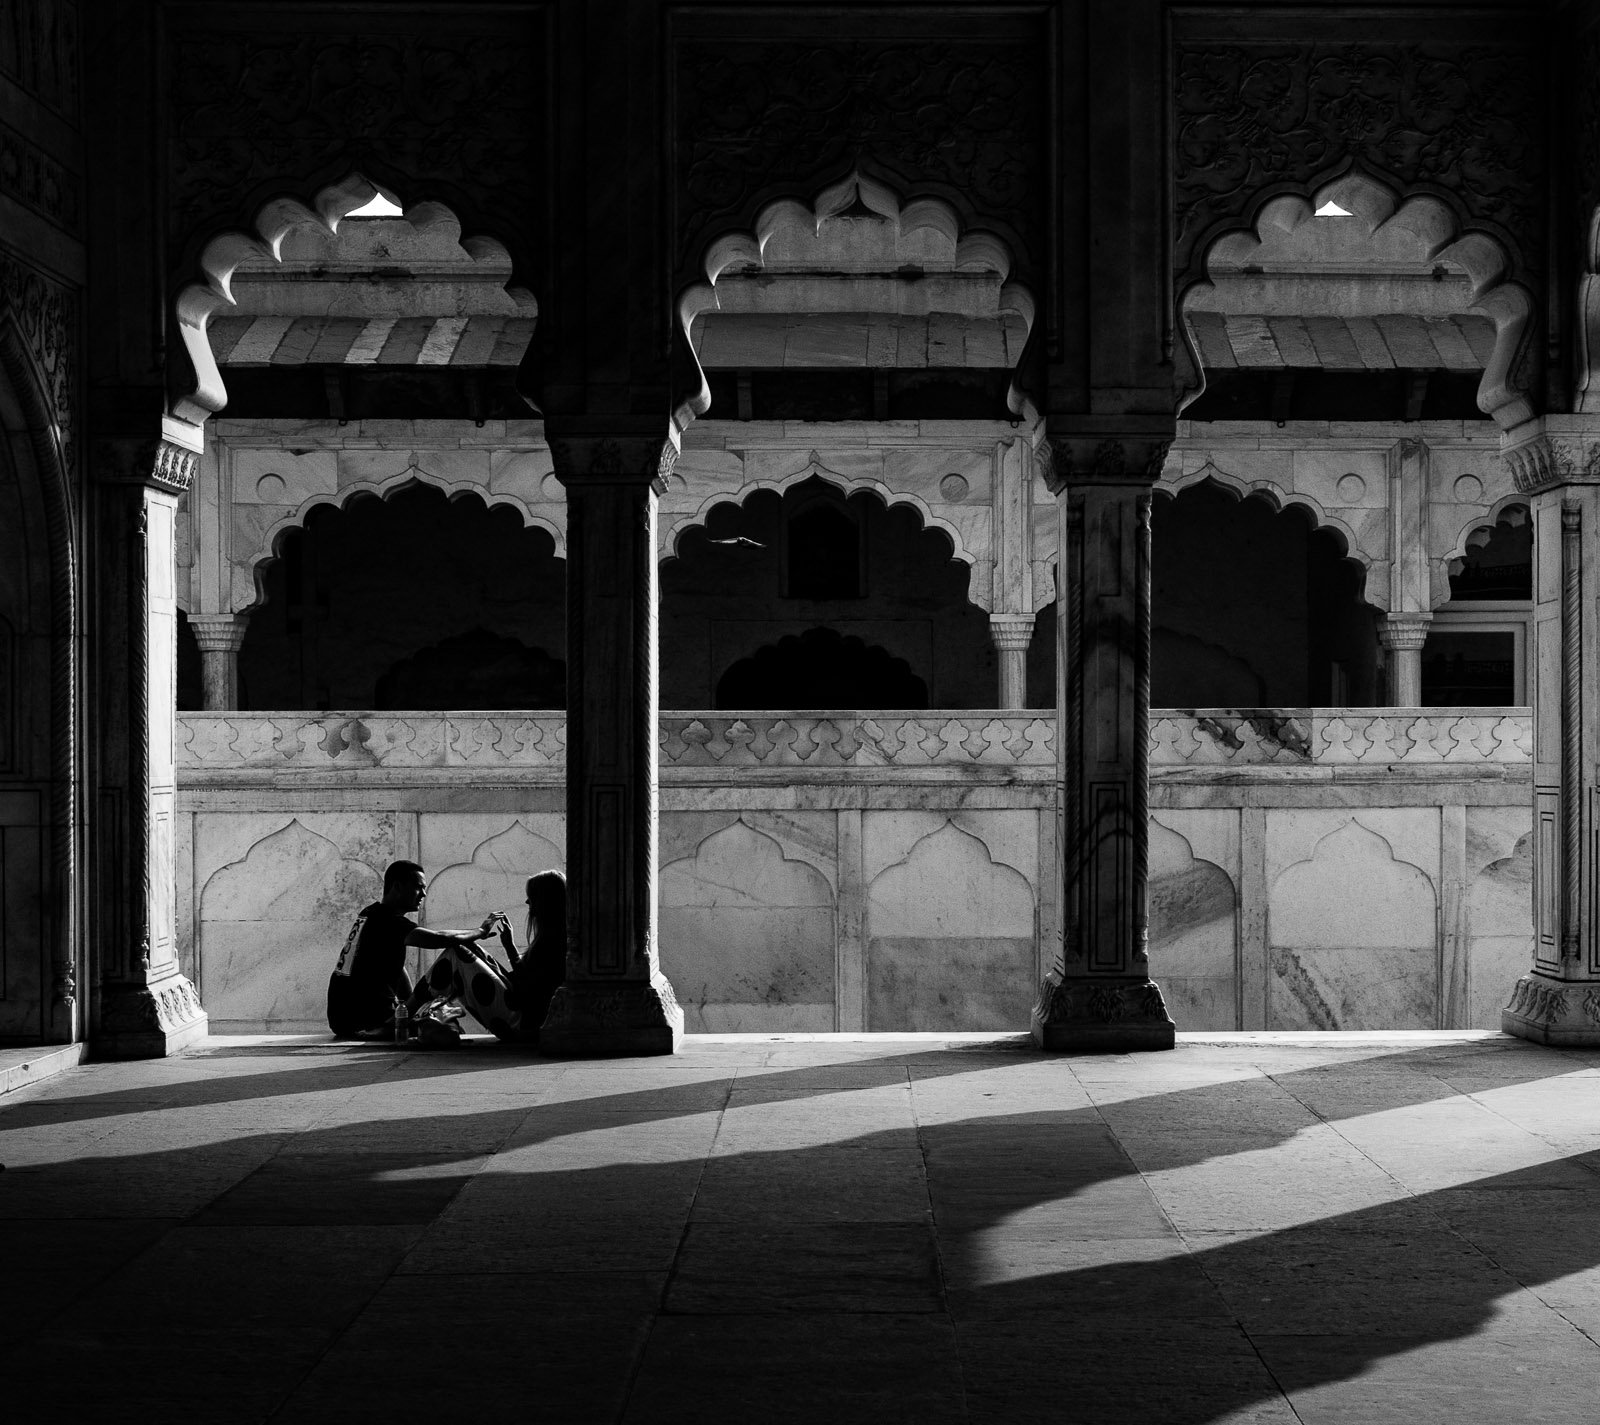
When you use the dryer sheet without the sun directly hitting the lens you get a much more subtle effect. As you can see here, my daughter is blocking the light with her body and the dryer sheet provides a soft, dreamy effect to the image.

I have seen amazing images of people shooting through zip-lock bags, metal pipes and even crystal bracelets. With this in mind, I decided I should try shooting though the dryer sheet.

Happily, I was able to recreate the flare effect on numerous occasions with different pieces of dryer sheet (always used twice because that makes it much easier to pull apart without it tearing).

Keep in mind, there is a bit of luck involved, as you don’t have a lot of control over where the flare ends up. However, this is one of my favorite parts about my dryer sheet experiment as it forced me to let go of control and embrace the surprise!

I have seen amazing images of people shooting through zip-lock bags, metal pipes and even crystal bracelets. With this in mind, I decided I should try shooting though the dryer sheet.

I hope you will give this fun technique a try! It’s a really easy way to add a little creativity to your photography.

Join the Clickin Moms photography forum

The post A surprising way to get beautiful sunflare in your photos appeared first on Clickin Moms blog: Helping you take better pictures one day at a time.


Clickin Moms blog: Helping you take better pictures one day at a time

Posted in Photograpy How To | Tagged , , , | Leave a comment

What does love look like? (40 photos that will make your heart burst)

Are you looking for a photography challenge?

Maybe you love taking photos or maybe you just need some motivation to start taking pictures again (or maybe you simply love contests that promise the chance at a prize!)

Well, we’ve got you covered! (More on that below!)

Every month on the Clickin Moms photography forum, we select a new theme and ask our members to interpret it in their images in any way they wish. Last month, the theme was ‘Love’.

Our members wow’ed us with a beautiful collection of pictures. We have selected some of our favorites for you to enjoy here, and we want to congratulate Jamie Eilts for winning a live Breakout Session seat from Click Photo School with her image!

Stephanie Simon
Stephanie Simon

El Fung
El Fung

Jenn Hicks
Jenn Hicks

Kory D
Kory D

Mar "mar_laza"
Mar "mar_laza"

Lisa Coole
Lisa Coole

Olga Levien
Olga Levien

Jamie Eilts
WINNER! Jamie Eilts

Tanya Jennings
Tanya Jennings

Annick Paradis
Annick Paradis

Priya "priyamluthra"

Alyssa Ahern
Alyssa Ahern

Brittney Smith
Brittney Smith

Mandy Pelton
Mandy Pelton

Jess Buttermore
Jess Buttermore

AnnMarie Denis
AnnMarie Denis

Tasha Ford
Tasha Ford

Tricia Pompilio
Tricia Pompilio

Stacy Stambaugh
Stacy Stambaugh

Laura Ludwig
Laura Ludwig

Katharine Saunders
Katharine Saunders

Jessie Nelson
Jessie Nelson

Jacqueline Anders
Jacqueline Anders

Lisa Tichane
Lisa Tichane

Alicia Kintner
Alicia Kintner

Bonnie Cornelius
Bonnie Cornelius

Kate Gelatt
Kate Gelatt

Becca Lundin
Becca Lundin

Lauren Wright
Lauren Wright

Gisele Queiroz
Gisele Queiroz

Alyssa Knight
Alyssa Knight

Twyla Jones
Twyla Jones

Chanel French
Chanel French

Jenn Bartell
Jenn Bartell

Amber Rae Privizzini

Sharrisa Paranada
Sharrisa Paranada

Kathy Chapman
Kathy Chapman

Ariana Falerni
Ariana Falerni

Beth Cagnoni
Beth Cagnoni

Camille "camcamacho"

Would you like the opportunity to be featured in next month’s photo share here on the Clickin Moms Blog and be entered to win a Live Seat to any Click Photo School Breakout Session? (Told you we’d share more details here on how to do that!) This month, we’re looking for your best XXX.

Not a member of the Clickin Moms forum? We’d LOVE to have you join us! You can do that right now! (Questions? Please feel free to post those below!)

Join the Clickin Moms photography forum

The post What does love look like? (40 photos that will make your heart burst) appeared first on Clickin Moms blog: Helping you take better pictures one day at a time.


Clickin Moms blog: Helping you take better pictures one day at a time

Posted in Photograpy How To | Tagged , , , , , | Leave a comment

10 things fine art photographer Elle Walker loves

We like to shop around here but what we really enjoy doing is sharing our most loved items with our favorite people – YOU!

Today we have Elle Walker, Click Pro and a brilliant fine art photographer, joining us to share just a few of her favorite things.

family photo of Elle Walker by Katie Hillary
Photo by Katie Hillary

1. My family

I know it sounds obvious but family is without a doubt my most favourite thing in the world and I feel blessed every single day that I get to do life with mine by my side.

I married my husband in 2006 and we still live in the same town we both grew up in. We have three gorgeous kiddos and are lucky enough to be surrounded by nieces and nephews as well – plenty of noise and fun!

black and white pic of kid behind a door by Elle Walker

2. Anonymity

There is something so thought provoking about looking at an image that incorporates anonymity and I love using this element within my own work!

Shooting reflections in puddles or from outside windows not only help to present a unique perspective but also allows for the viewer to be left wanting to know more.

strong is the new pretty book

3. Strong Is The New Pretty book

There really is nothing more relaxing than settling down with a good book. What better book than one like Strong Is The New Pretty that combines photography and truly inspiring girls!

My daughter adores this book as much as I do and she’s even been brainstorming quotes and image ideas for us to make her some ‘pages’ of her own!

underwater pic with a go pro hero 5 by Elle Walker

4. GoPro Hero 5

I love this little camera! I’ve only had the GoPro HERO 5 for a short while (we’ve had an older version for a couple of years), but am already taking it everywhere.

Having the LCD screen on the back makes it so much more fun and user friendly for the whole family and being able to shoot underwater in our pool is SO exciting! I love the wide view but having the option to shoot ‘standard’ comes in handy, too.

photo of a horses mane by Elle Walker

5. Horses

Horses have been a part of my life since I was a child, spending most weekends with my sister and Mum competing at various events.

I love that we all still ride and that I get to share that love with my daughter and nieces now, too. They happen to make amazingly gorgeous photography subjects too, which is a big bonus!

Rim Walk at Kings Canyon in the Australian Outback by Elle Walker

6. Exploring the Outback

I adore outback Australia! All of that red dirt and the beautiful, natural landscapes – it really is my happy place!

This image of my husband and kids was taken last year while doing the 6km ‘Rim Walk’ at Kings Canyon. A definite highlight of that trip.

floral photograph by Elle Walker

7. Fresh flowers

I absolutely love having fresh flowers throughout our home and find beauty in their every stage. From single stems to artfully arranged bunches, the colours, textures and scents are so lovely!

They happen to make fairly stunning photographic subjects, too – which is a definite bonus!

pic of child and dog dressed as superheros by Elle Walker

8. Cloudy Skies

I really don’t love a clear blue sky… give me interesting clouds or stormy horizons any day!

Whether I’m shooting landscapes or portraits, or something else all together, I love the added depth and drama an active sky can bring to an image

picture of kids camping by Elle Walker

9. Camping

There are always 1001 things that need doing at home but getting away for a few days or weeks is so good for the soul.

I love watching the kids discover their new ‘backyard’ and having the time to appreciate the simple things, like the number of stars in a big open sky. And who doesn’t love a marshmallow on a stick!

ruins in Australia in black and white by Elle Walker

10. Old buildings

Ever since I was a child I have been fascinated by the beauty of old buildings. I am always drawn in to trying to get a sense of their history and story and spend far too long exploring and admiring.

SHOP THIS POST:

Join the Clickin Moms photography forum

The post 10 things fine art photographer Elle Walker loves appeared first on Clickin Moms blog: Helping you take better pictures one day at a time.


Clickin Moms blog: Helping you take better pictures one day at a time

Posted in Photograpy How To | Tagged , , , , , | Leave a comment

How to easily brighten your backlit subjects in Lightroom

Sometimes it can be hard to brighten your subject in post without leaving that tell-tale halo that looks unnatural and overly edited. I’d like to share a simple way to brighten your subject quickly and precisely in Lightroom (this also works in Adobe Camera Raw).
before

Sometimes it can be hard to brighten your subject in post without leaving that tell-tale halo that looks unnatural and overly edited. I’d like to share a simple way to brighten your subject quickly and precisely in Lightroom (this also works in Adobe Camera Raw).
after

If you’re like me, you love a beautifully backlit photo!

There’s just something about that dreamy, golden hour light that makes a picture sing.

You probably also know that backlit photos can be tricky! You have to slightly underexpose your subject so that you don’t blow out your background.

Sometimes it can be hard to brighten your subject in post without leaving that tell-tale halo that looks unnatural and overly edited. I’d like to share a simple way to brighten your subject quickly and precisely using Lightroom CC Classic’s new color and luminance range masking tool (this also works in Adobe Camera Raw.)

Don’t let that techy sounding name frighten you! The tool is incredibly easy to use and makes editing in Lightroom faster and more precise.

The tool can be found in the Adjustment Brush (keyboard shortcut “K”) which I’ll be showing you below. It can also be found in the Graduated filter, as well as the Radial filter because let’s face it… editing tends to be a bit more complicated than a straight line or a circle.

This tool gives you the precision that you never had in Lightroom. To explain it simply, you can quickly brush on an adjustment (like exposure) and then using the range color selector, tighten up the selection to more accurately choose what you want to adjust. It is actually quite simple. Let me show you…

Here’s my original photo exported straight from RAW. The sun was setting quickly behind the tree line just as we saw this really cool old car sitting in the parking lot as we were wrapping up our senior portrait shoot. You can see the sky is slightly blown out and my subject is quite dark.

Sometimes it can be hard to brighten your subject in post without leaving that tell-tale halo that looks unnatural and overly edited. I’d like to share a simple way to brighten your subject quickly and precisely in Lightroom (this also works in Adobe Camera Raw).

First, I made a few global adjustments. I increased the exposure slightly, decreased the highlights to get rid of the clipping in the sky, and I added a little warmth to the white balance.

It was a good start but it wasn’t enough to get my subject exposed correctly.

Sometimes it can be hard to brighten your subject in post without leaving that tell-tale halo that looks unnatural and overly edited. I’d like to share a simple way to brighten your subject quickly and precisely in Lightroom (this also works in Adobe Camera Raw).

Next, I used my adjustment brush and painted over her face, arms and hair very quickly and not very precisely.

I scrolled to the bottom of the adjustment brush tool to “Range Mask” and chose “color” from the dropdown menu. I clicked on the eye dropper tool which activates the range color selector. Then I just click and drag a small portion of her skin under her chin to tell Lightroom which colors to zero in on.

If you don’t like what it chooses you can click another spot and it will make a different selection. You can see in this case, it very accurately highlights only what I want to brighten up.

Sometimes it can be hard to brighten your subject in post without leaving that tell-tale halo that looks unnatural and overly edited. I’d like to share a simple way to brighten your subject quickly and precisely in Lightroom (this also works in Adobe Camera Raw).

I then make exposure and warmth adjustments to her skin. Because I have only highlighted her skin and hair, it doesn’t add yellow to her teeth, eyes, and shirt. I can go back and do the same thing on her shirt if I want to brighten it up as well.

Additionally, if I wanted to pop the blue of the car without taking away from the overall warmth of the scene I can easily highlight the blue, use the color range mask tool to pinpoint only those colors you wish to enhance and then increase my blue saturation.

It really is as easy as that! You can see below I’ve brightened my backlit subject in just 3 easy steps:

  1. quick global adjustments
  2. painted on exposure and warmth adjustments to her hair and skin
  3. brightened her white top without adding additional yellow.

She’s gone from dull to wow in less than a minute’s time.

Sometimes it can be hard to brighten your subject in post without leaving that tell-tale halo that looks unnatural and overly edited. I’d like to share a simple way to brighten your subject quickly and precisely in Lightroom (this also works in Adobe Camera Raw).
before

Sometimes it can be hard to brighten your subject in post without leaving that tell-tale halo that looks unnatural and overly edited. I’d like to share a simple way to brighten your subject quickly and precisely in Lightroom (this also works in Adobe Camera Raw).
after

If you’d like to see me edit this from start to finish you can watch the video below.

Join the Clickin Moms photography forum

The post How to easily brighten your backlit subjects in Lightroom appeared first on Clickin Moms blog: Helping you take better pictures one day at a time.


Clickin Moms blog: Helping you take better pictures one day at a time

Posted in Photograpy How To | Tagged , , , , | Leave a comment

When, why and how to flip a photo when editing

Over the years, I have discovered the power of flipping images.

So much so that I flip almost all of my images during editing just to investigate the possibilities (although only a rare few stay flipped).

Combined with other editing decisions, flipping can reinforce storytelling. It can help lead the viewer’s eye to important elements in the frame, reinforce or develop themes in an image and create or intensify emotion.

Create a scene that’s more compositionally pleasing

As photographers, we crop and tweak images to be compositionally pleasing. We consider balance and triangles, swirls and curves, lines and dissections to lead the viewer’s eye through the frame.

In some instances, simply flipping an image, or a part of an image, can help compositionally prioritize elements in the photograph to better express the intended story.

I love the energy in this summer image! I want the viewer to get to that joyful expression as quickly as possible. Flipping horizontally creates a more natural leading line from the bottom left corner up the image and into her laughter.

Combined with other editing decisions, flipping can reinforce storytelling. It can help lead the viewer’s eye to important elements in the frame, reinforce or develop themes in an image and create or intensify emotion.
before

Combined with other editing decisions, flipping can reinforce storytelling. It can help lead the viewer’s eye to important elements in the frame, reinforce or develop themes in an image and create or intensify emotion.
after

In this image, I want the viewer to circle from the little girl to the trees and back to her but her eye line leading out of the frame competes with that flow. Flipping just her figure creates a more natural flow through the image.

Combined with other editing decisions, flipping can reinforce storytelling. It can help lead the viewer’s eye to important elements in the frame, reinforce or develop themes in an image and create or intensify emotion.
before

Combined with other editing decisions, flipping can reinforce storytelling. It can help lead the viewer’s eye to important elements in the frame, reinforce or develop themes in an image and create or intensify emotion.
after

Use composition to support the intended story

With a simple image flip, you can rewrite an image’s plot.

Most visual theory implies that our eye enters the frame from the left, so flipping an image can help influence where the eye is drawn. If elements are moving left to right, the momentum is comfortable and easy. If they are moving right to left, there is tension or struggle introduced into the scene.

This can also be implied with the struggle of a vertical climb versus horizontal movement.

My intention with this image is to focus on the sibling relationship. I flipped the image so the viewer enters the frame from the left, where the bridge lines lead to the pair, to big brother holding onto his little sister’s hand, holding her back from the water.

The viewer’s eye circles from the pair to the bridge and back to the pair. In the left image, all of the lines (the bridge, the shore, the direction they are walking) pull the eye out of the frame and towards the water, away from the sibling interaction.

Combined with other editing decisions, flipping can reinforce storytelling. It can help lead the viewer’s eye to important elements in the frame, reinforce or develop themes in an image and create or intensify emotion.
before

Combined with other editing decisions, flipping can reinforce storytelling. It can help lead the viewer’s eye to important elements in the frame, reinforce or develop themes in an image and create or intensify emotion.
after

These webworms were overtaking our neighborhood trees and we were all disgusted by them. One afternoon, I decided to drag out the macro lens and see them in a different light, to try and find the wonder in their form.

The original photograph isolates the worm, but the upward climb creates a struggle that competes with my intended story. Rotating and flipping the image, giving the worm plenty of space to move, creates a more peaceful mood, allowing the viewer to take in the details of the worm without distraction or tension.

Combined with other editing decisions, flipping can reinforce storytelling. It can help lead the viewer’s eye to important elements in the frame, reinforce or develop themes in an image and create or intensify emotion.
before

Combined with other editing decisions, flipping can reinforce storytelling. It can help lead the viewer’s eye to important elements in the frame, reinforce or develop themes in an image and create or intensify emotion.
after

Create a surreal or dreamy scene (flipping the world upside down)

My favorite way to use the flip is to present scenes that aren’t possible in real life. I love to take a scene, turn it sideways or upside down and create a dreamlike or surreal story.

These flips can create an image where the viewer isn’t immediately certain what is happening, keeping them in the frame searching for clues. I tend to push the editing in these images to add to the fantasy of the scene.

In this image, I loved how he looked like a torpedo shooting through the water with the sun at his back. Flipping the image gives the image even more speed and almost makes it look like he’s caught in an ocean wave rather than swimming at the local pool.

Combined with other editing decisions, flipping can reinforce storytelling. It can help lead the viewer’s eye to important elements in the frame, reinforce or develop themes in an image and create or intensify emotion.
before

Combined with other editing decisions, flipping can reinforce storytelling. It can help lead the viewer’s eye to important elements in the frame, reinforce or develop themes in an image and create or intensify emotion.
after

In this image, I originally shot to have their silhouettes and reflections bathed in the golden light, but the composition wasn’t what I had envisioned. I almost threw this image away, but I flipped it and found an entirely new image, one where the viewer is drawn into a dreamy scene of sunny nostalgia.

Combined with other editing decisions, flipping can reinforce storytelling. It can help lead the viewer’s eye to important elements in the frame, reinforce or develop themes in an image and create or intensify emotion.
before

Combined with other editing decisions, flipping can reinforce storytelling. It can help lead the viewer’s eye to important elements in the frame, reinforce or develop themes in an image and create or intensify emotion.
after

Check your edges for distractions

A final and more practical way to use the power of the flip is to check your edges for distractions. It’s like playing a game of Boggle, where you don’t recognize an obvious word until you turn the board a few times.

Seeing a scene from a different angle reveals edge flicker that you don’t realize is there, allowing you to clean up your frame before returning to its original orientation.

In this image, I originally flipped it because I wanted the eye to enter from the left and lead towards her at the door. But flipping the image made me aware of distractions (the broom in the corner and the wall plaque) that weren’t as obvious in the original frame.

Watch out for words in flipped images – I needed to flip “MY PAL” after flipping this image. Even when I have no intention of keeping an image flipped, I use this trick to check for distractions.

Combined with other editing decisions, flipping can reinforce storytelling. It can help lead the viewer’s eye to important elements in the frame, reinforce or develop themes in an image and create or intensify emotion.
before

Combined with other editing decisions, flipping can reinforce storytelling. It can help lead the viewer’s eye to important elements in the frame, reinforce or develop themes in an image and create or intensify emotion.
after

Flip before you click

The most powerful benefit of the flip is considering it while you shoot. I experiment with flipping almost every image I edit, even if I have no intention of keeping it flipped.

Seeing images on a computer screen from a different angle and/or flipping sections of an image helps prepare my eye for future shooting. It’s a training of sorts, a daily practice of seeing how an image would have looked in a different position, bringing awareness to different perspectives while in the moment of clicking the shutter.

Once I see how powerful those changes are on screen, it forces me to move my body and experiment with angles and perspective while my camera is in hand.

Combined with other editing decisions, flipping can reinforce storytelling. It can help lead the viewer’s eye to important elements in the frame, reinforce or develop themes in an image and create or intensify emotion.

I challenge you to do the same as you shoot – consider the power of the flip in an effort to get it right in camera. To shift compositional elements in the frame for balance, think about how you can shift your body left to right or up and down to alter positions of elements in the frame.

If you’re trying to create tension or flow, you can move yourself to the other side of a scene or wait for the action to shift (which often happens with running, swimming or biking).

For surreal or dreamy effects created with vertical flips, you will usually have to do some post processing, but considering the completed frame as you shoot will help you create a more intentional final product.

The post When, why and how to flip a photo when editing appeared first on Clickin Moms blog: Helping you take better pictures one day at a time.


Clickin Moms blog: Helping you take better pictures one day at a time

Posted in Photograpy How To | Tagged , , | Leave a comment