Jennifer Denton Shares Her Experience with NILMDTS

Picture

by Skip Cohen

As September comes to a close, so does Recruitment Month at Now I Lay Me Down To Sleep. That doesn’t mean you can’t get involved at any other time of the year, just that this month’s focus is on helping new photographers become a part of this amazing group of volunteers.

Every NILMDTS photographer I’ve every spoken with has talked about being involved from two different perspectives. First, they all share the story of their first session. They talk about their fear of being able to maintain composure, and be “professional.” Without exception they talk about how they learned they didn’t have to be composed, just supportive of the family’s grief, sadness and pain.

Second, and it never varies, is the way they describe each NILMDTS assignment as being life-changing. There’s a redefined sense of purpose to being a photographic artist. Jennifer Denton in the video above does a terrific job of explaining what NILMDTS means to her and how it’s helped change her perspective on life and her career.

                    “There’s nothing else I’ve ever done that provides me this kind of fulfillment and satisfaction…”

I’ve shared a number of posts over the last few years from NILMDTS photographers. I hope you’ll watch Jennifer’s video, and if you’d like another artist’s perspective check out this post from co-founder, Cheryl Haggard as she talks about capturing love. Just click on the image below to read her story.

Coming up tomorrow, September 28 is a FREE NILMDTS webinar. Here’s your chance to find out more about being a volunteer and being a part of this very special group. Registration for the information webinar is just a click away.


SkipCohenUniversity – SCU Blog

Posted in Photograpy How To | Tagged , , , , | Leave a comment

Dulce Wohner;frances Rainer;karel Williams Canvas Traditional 1 5/8″ Natural Espresso Wood Grain 24×29 Photo On Canvas

Dulce Wohner;frances Rainer;karel Williams Canvas Traditional 1 5/8″ Natural Espresso Wood Grain 24×29 Photo On Canvas


Dulce Wohner;Frances Rainer;Karel Williams” is an art print by Gjon Mili from The Life Picture Collection. Get photo prints of “Dulce Wohner;Frances Rainer;Karel Williams” in a variety of frames, styles, and materials. Photographer Bio Emigrating to the United States from Albania in 1923, Gjon Mili is regarded as the first photographer to use electronic flash and stroboscopic light to create photographs outside of a scientific context. A true pioneer of the artform, Mili’s photographs of dancers, athletes, and pictures or performances have shaped our understanding of how movement too rapid or too complex for the eye to discern is captured in the still image. Mili’s career as a photographer for Life Magazine spanned four decades and saw the publication of thousands of his photographs, taking him around the world; from collaborations with Pablo Picasso, to the incarceration of Adolph Eichmann, to original photos from Broadway plays. The Life Picture Collection From one of the most iconic magazines ever to hit the shelves comes The Life Collection – an archive of some of the most recognizable imagery of the 20th Century. Documenting events in politics, culture, celebrity, the arts and the American experience, these compelling and provocative photographs include the works of some of the greatest photographers capturing some of the greatest moments in history.

Price: $
Sold by Photos.com by Getty Images

Posted in How To Photograph | Tagged , , , , , , , , , , , | Leave a comment

How Was This Picture Made #12: The Answer

Last week, for our How Was This Picture Made? series, I had posted a landscape photograph to share and discuss. Thanks to our PL commentators, Gary Bunton, Brian Webster, and Shane, for their participation and sage commentary on the techniques employed and the overall considerations. Well done!

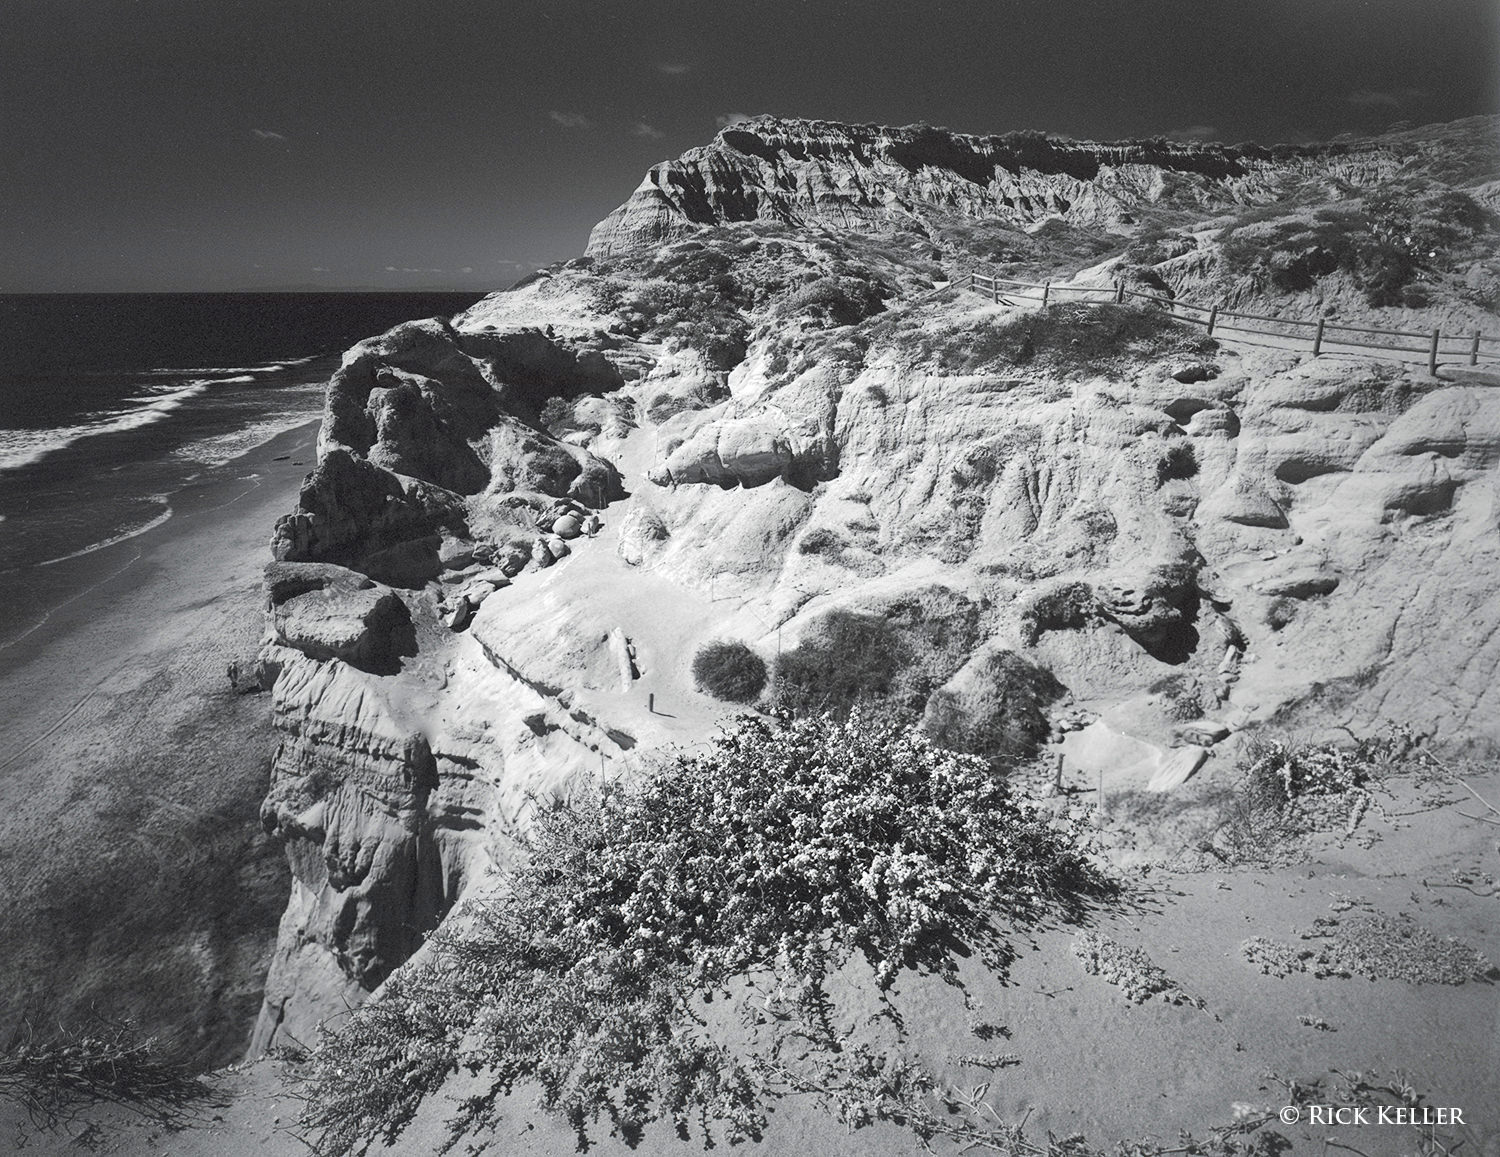
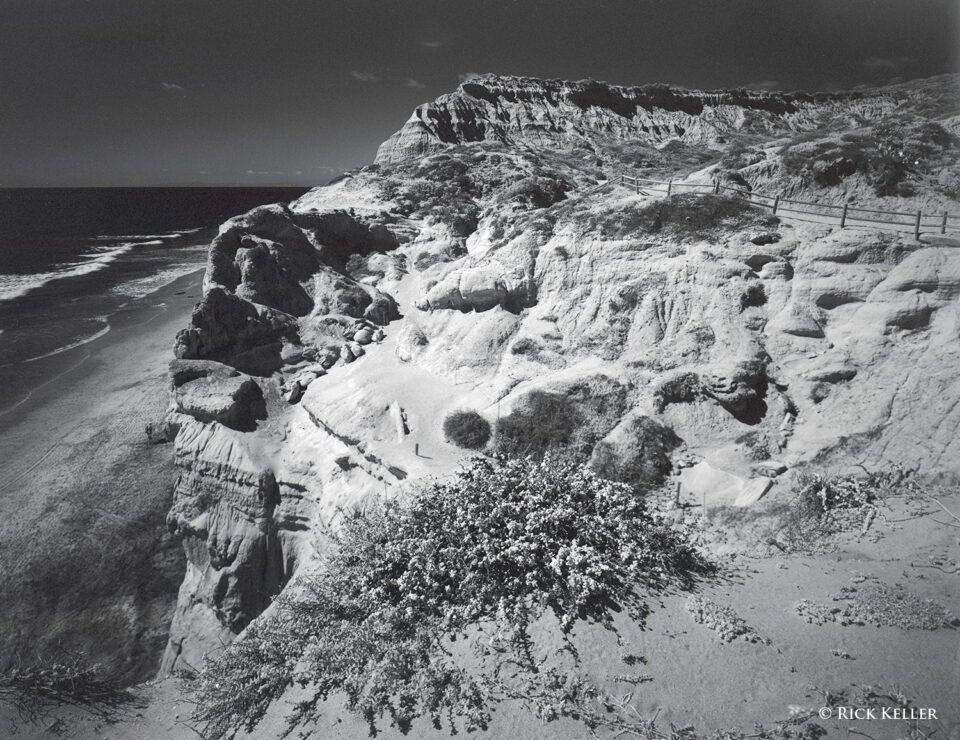
Let’s review the photograph, which I made along one of the many splendid and uplifting hiking trails at Torrey Pines State Natural Reserve in San Diego, CA.

Our PL commentator, Brian Webster, had remarked on the dark appearance of the original image (which was actually “straight out of the camera”). Indeed, I agree that the overall exposure was a tad dark (more on this below), so I decided to make a modest adjustment in Photoshop. The new rendition is shown below.

Torrey Pines

In terms of the visualization process, after having scouted this scene I desired to create a black and white image that captures the scale, textures, and form of this beautiful sandstone bluff. As I had previously discussed in an article on light, shadows, and visualization, in order for the visual artist to impart shape and depth to a landscape and reveal its textures, ideally the photograph should be made when long shadows are being cast by unidirectional light. Further, I desired to create contrast in such a way that the interplay of light and shadows would draw the viewer’s eyes into the scene.

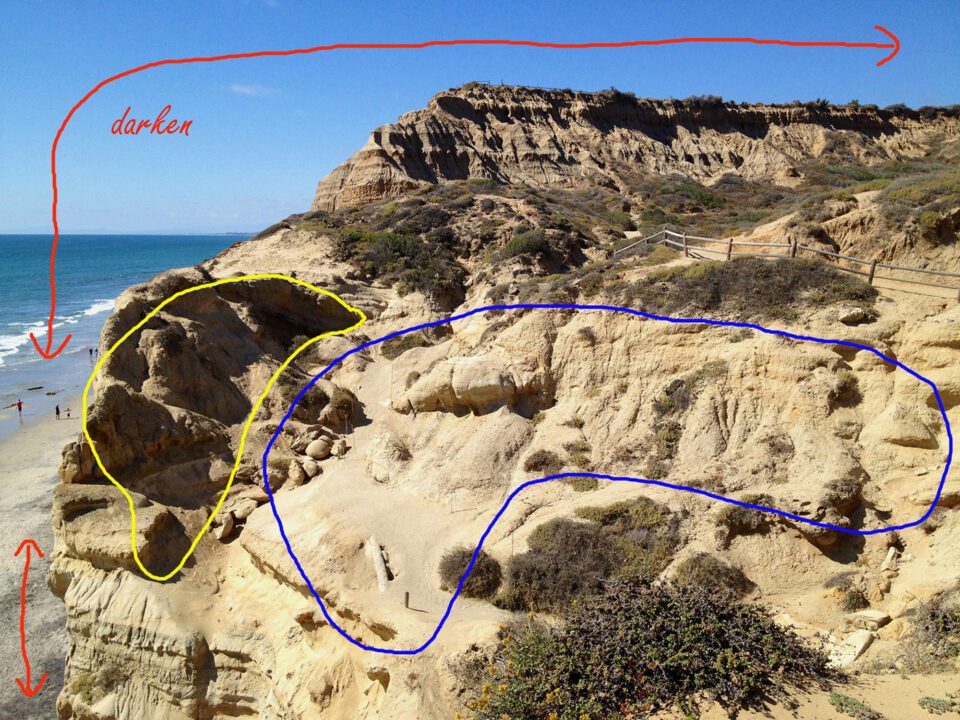
As I studied the subject through my composing card, I realized that the potential to create a high contrast image was enticing. As the iPhone “scout” photo below reveals, I composed the photograph such that there would be a surrounding rim of sky and sea to the left of the bluff.

Scout shot

iPhone 4S

In order to draw the viewer into the scene and keep the viewer fixated in the center of the photograph, I needed to darken the blue sky and sea. With the juxtaposition of the dark values in the sand in the left lower corner with dark values in the sky and sea, I visualized creating a rim of “vignetting” around the high values in the center of the bluff to create contrast and invite the viewer’s mind into this world. The deep shadows (shown within the yellow cartoon) at the front of the bluff juxtaposed with the high values in the center lent themselves well to creating depth and revealing form. Our PL commentator, Gary Bunton, wisely pointed out that the dark values in the sky as well as the deep shadows in the bluff could have been created with the use of a red 25A filter (more on this below).

Based on my previous experience with infrared film in both 35mm and medium formats, an interesting property of sandstone is that it has the potential to appear as “chalk white” when illuminated by infrared light. With this vision in mind, I chose to pursue an infrared rendition. For film I chose Rollei IR 400, which is (sadly) one of the last bastions of infrared film. The previous gold standards, Kodak HIE and Efke, have long been discontinued.

To create an exposure on infrared film, the photographer must employ filtration to block visible and UV light and allow infrared light to pass through the lens. A key technical point is that the spectral sensitivity of the infrared film must be matched with the spectrum of infrared light that is passed through the filter. For Rollei IR, which has a peak sensitivity of 720 nm with extension up to 820 nm, I used the Hoya R72 infrared filter, which blocks visible light up to 720 nm yet allows passage of light above this threshold (i.e., the infrared spectrum). When you examine this filter, it is not completely opaque, as you can still see slightly through it, meaning that this filter allows some contamination from visible red light. This is not that big of a deal for me, as a mix of a high proportion of IR exposure with a small amount of visible red light exposure might impart a unique look to the image, perhaps distinct from a pure IR or a conventional black and white print.

In terms of the quality of light (more on this on an upcoming article), I typically (but not always) choose the unidirectional light of early sunrise or sunset to create long shadows in the landscape. However, for creating an infrared exposure, these times of the day are not ideal since light at these extremes of the day is not as enriched with infrared light compared to the intense and non-unidirectional light from the mid-day sun. So, I made a compromise: a clear blue sky in the late afternoon where there would still be a good amount of incident infrared light along with some degree of unidrectionality, which again is instrumental to creating long shadows to lend form and depth to the landscape and reveal its textures. Our PL commentators, Gary Bunton and Brian Webster, had astutely pointed out that this photo was made in the late afternoon, based on the directionality of the shadows.

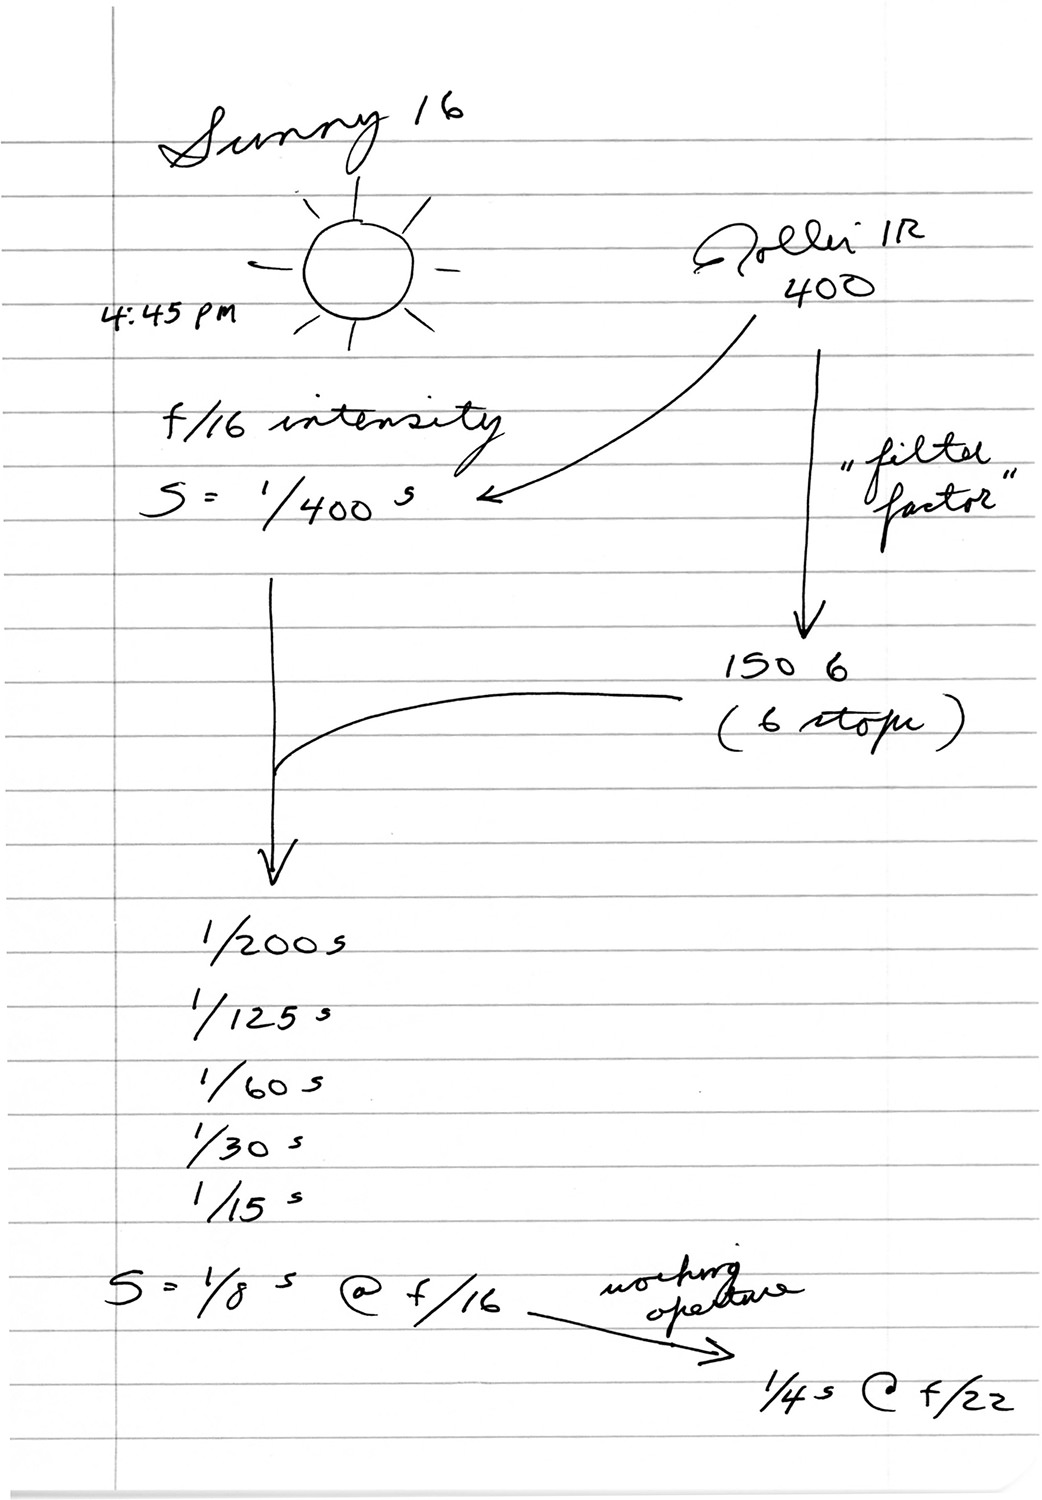
Now, for the trickiest part of the shot: the exposure. Conventional camera light meters and external light meters cannot directly meter infrared light (unless they have been specially modified). In order to obtain a proper exposure on infrared film, the photographer must empirically determine the “working ISO” of the infrared film based on the filter factor of the infrared filter and the prevailing lighting conditions. Rollei IR has a box speed of ISO 400 without the use of an infrared filter. Based on the shared experience of other photographers, the Hoya R72 filter has an estimated filter factor of +5 stops, meaning that the exposure must be increased by five stops (in this case, by prolonging the shutter speed) to obtain a nominal exposure. Many photographers have previously rated the ISO of filtrated Rollei IR 400 to be between ISO 6 to 12. Based on my empiric results with Rollei IR 400 on 120 medium format film where I bracketed exposures between ISO 3 and 25, I previously rated the Hoya R72 filter factor at +6 stops of light and rated the ISO of the film at 6.

Once the filter factor and working ISO have been empirically determined, the next step is to properly adjust the exposure (shutter speed) based on the intensity of the light. This is where the time-honored “Sunny 16 Rule” enters the picture. At the time of day of this particular photo (4:45 pm PST), under clear skies, I would have needed to have used a shutter speed (with the aperture set to f/16) that is equal to the reciprocal of the ISO. For example, under clear skies with bright light (as in this exposure), using a film speed of 100 with the aperture set to f/16, a shutter speed of 1100 second (≈1125  second) should render a proper exposure. Therefore, given the box ISO speed of 400 and my chosen filter factor of +6 stops of light, the requisite shutter speed for this exposure would be knocked down from 1400 second to ⅛ second at an aperture of f/16.

Notes

But wait . . . this presumes that the photographer intends to use f/16 as the taking aperture for the photo. The photographer may in fact choose to set a different aperture depending on his/her wishes for depth of field (DOF) control. For example, if the photographer desires more DOF than that afforded by f/16 in this scenario, then the aperture will need to be stopped down, requiring a reciprocal increased duration of the shutter speed to compensate. Alternatively, if the photographer desires less DOF that than afforded by f/16 in this scenario, then the aperture will need to be opened with an accompanying reciprocal shortening of the shutter speed to compensate.

So, which aperture did I choose? This brings us to an equally critical stage of the shot: setting up the camera and lens.

Our PL commentator, Shane, astutely surmised that I used a view camera for this shot. Indeed, I chose to use a 4×5 view camera in order to obtain uniform and simultaneous focus of the foreground and background. To frame the perspective as visualized through my composing card, I used a wide-angle lens, the Nikkor-SW 75mm f/4.5S, which is a razor sharp and contrasty lens and my “go-to” wide-angle lens in large format. This lens provides an angle of view that is similar to that seen with a 21 mm lens in the 35mm format.

Of the plethora of technical reasons that I enjoy using a view camera for landscapes is that the design of the camera is such that the lens projects an “inverted” image circle onto the focusing screen (the ground glass) in the same way that images are projected through the human lens onto the retina (before the image is “flipped” by the visual center of the brain). In my humble opinion, viewing an inverted image on the ground glass empowers the photographer to focus more astutely on composition, perspective, shape, and structure. Plus, the use of the dark cloth to shade the ground glass from ambient light in effect isolates the photographer from the distractions of his immediate environment so that he/she becomes “intimate” with the subject. It is a great experience!

Although a full discussion is beyond the scope of this article, the key principle in focusing the view camera is based on the time-honored Scheimpflug Principle, which dictates that the photographer adjust the orientation of the camera such that the plane of focus, the lens plane, and the film plane intersect at a well-defined plane, which renders the foreground and background in complete focus (even before the lens aperture is manually stopped down). The type of camera movements (tilts and swings of the front and rear standards) that are required to arrive at the Scheimpflug “point” vary with the design of the view camera (i.e., base tilts vs axis tilts). The camera that I used here was a Japanese wooden view camera (Ikeda Anba), which is designed to permit tilts of the lens and film planes that pivot at the base of the camera. Other view cameras are constructed such that the lens and film planes must be tilted about a pivot point that is located at the center axis of the front and rear standards. In a nutshell, for view cameras with base tilts, the Scheimpflug plane is best achieved by “tilting (the lens) to the near and focusing on the far”.
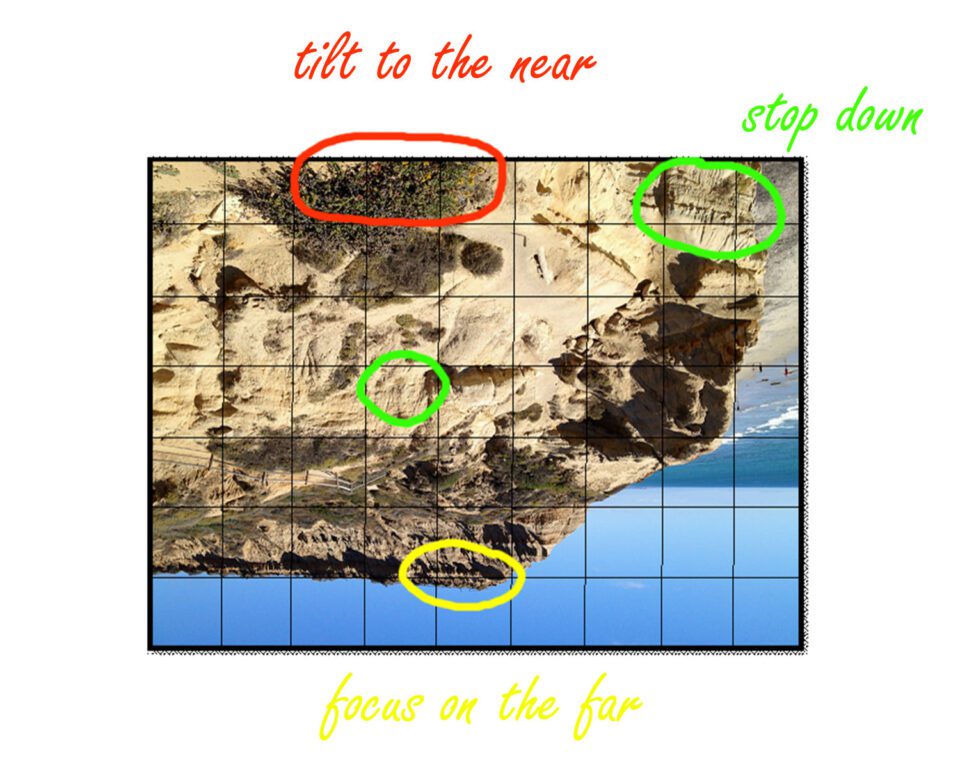
Ground glass

Ground glass

There are many excellent checklists to help learn and master this process, but one of my personal favorites is one devised by Howard Bond that may be viewed here. For this shot, following three successive adjustments of tilting to the near and focusing on the far to render the foreground and background in focus, the next step was to stop the down the lens for DOF control. Although DOF in view camera photography is a tricky and complicated subject, the salient feature is that the laws of optics and the view camera are such that there is a “wedge” of DOF extending from the lens to the far distance. Close to the lens, the DOF is poor, but as the distance from the lens increases, so do the outer limits of the DOF. For this shot, what complicated the DOF is that the immediate foreground was a not a level surface: I had positioned the camera near the ledge of the bluff where the drop-off would place the descending bluff (the “green circle” at the upper right corner of the “ground glass” illustration above) well beyond the near limit of the DOF wedge. Thus, in order to render this portion of the subject in “acceptable sharpness”, the lens aperture must be stopped down appropriately. So, with the competing considerations of DOF and diffraction in mind (fortunately, the latter is not as problematic in large format compared to smaller formats, as large format negatives/slides need not be enlarged as much for a given print size), I chose an aperture of f/22.

Incidentally, one benefit of the mechanical design of large format lenses is that the photographer can manually adjust the lens diaphragm with a continuous and fluid rotation of the aperture lever, which allows the photographer to view instantaneously – in real time – the changes in the DOF on the ground glass; it is almost as if you are viewing a live movie as the diaphragm is being smoothly closed or opened and the scene is slowly coming into sharp focus or out of focus, respectively. This is in stark contrast to the clumsy “clicks” of the aperture ring of manual focus SLR camera lenses, the automated SLR camera lenses where manual diaphragm control has been stripped out, and the fact that DOF can only be “previewed” with a clumsy DOF button in both manual and automated SLRs.

Returning to the shot, with a chosen aperture of f/22, I adjusted the shutter speed from ⅛ second at f/16 to ¼ second to make the exposure. A tripod was mandatory. As you study the final image, the effect of infrared light on lightening some parts of the sandstone is evident and interesting. The rim of dark values in the sky, sea, and the beach is effective in drawing the viewer’s eyes into the center of the image. This darkening effect of the blue hues was made possible by the heavy blockade of blue light from the infrared filter, which is essentially a heavy-duty red filter.

As I had mentioned above, the original, unadjusted image was a tad dark and underexposed for my taste; if I had to retake this photo, I would have added one stop of exposure (total exposure ½ sec). In retrospect, compared to my previous empiric bracketing exposures with Rollei IR film at high noon, I likely overestimated the intensity of the “f/16 light” at 4:45 pm (likely it was closer to f/11 intensity). Further, I probably would have stopped the lens down to f/32 to squeeze out a little more DOF. Alternatively, for future exposures with this film, I just may re-adjust my filter factor rating for the Hoya R72 to +7 stops and the ISO of Rollei IR to ISO 3. Overall, though, I felt this was an interesting (and fun) first test shot on 4×5 infrared film.

Although I did not originally intend to delve in the following discussion, our PL commentator, Gary Bunton, made an interesting comment on the suggested shutter speed for this exposure: “ . . . based on the wave movement in the background, about 125th of a second.” Indeed, the breaking waves in the distance do appear to be in “acceptable” focus, meaning the shutter speed of ¼ second was sufficient to freeze the motion,which may sound counterintuitive to the beginning photographer in that such a slow shutter speed had this end result. How could a “slow” shutter speed of ¼ second have rendered the distant breaking waves/ripples reasonably sharp? Well, I am glad that you asked! The answer is encapsulated by three considerations. First, the speed of the subject across the image plane (the most obvious one). Second is the magnification: the size that the subject that will occupy on the image area. Third, the direction that the subject is moving (toward/away vs side-to-side). Let’s examine the latter two factors in more depth.

Subjects that have a small magnification (i.e., near infinity focus) need a relatively slower shutter speed to freeze motion compared to a larger magnification. Based on the classic thin lens equations for magnification ( M = image distance / subject distance = f / [subject distance – f] ), for a given focal length and for a given image distance (i.e., lens extension), magnification is inversely proportional to the subject distance. Hence, for a distant subject (i.e., the breaking waves that are about 450 yards away moving at about 3 mph on the image plane), the magnification is small, the subject speed across the image plane is small, the focal length is small relative to the size of the format (i.e., wide angle), all of which results in the need for a relatively slower shutter speed to freeze action (¼ to 16 sec). Further, for a given subject distance, the longer the lens, then the greater the magnification that can be achieved. So, if I had used a normal lens for this photograph, I would have needed a faster shutter speed (115 to 120 second) to freeze the distant waves. And if I had used a long lens for this photograph, I would have needed a much faster shutter speed to freeze the distant waves (probably at least 150 second). I would surmise that a very long focal length, say one that affords an angle of view from a 200mm lens in the 35mm format, would require a shutter speed of 1125 second to freeze the motion of the distant waves. Conversely, if I had used the same 75mm wide-angle lens to photograph a breaking wave at a closer distance, say 10 feet, then the situation again changes: the magnification is increased and the speed of the waves across the image plane is faster. Thus, a relatively faster shutter speed would be needed to freeze the motion.

Finally, a subject that is moving across the image plane (as opposed to away or toward the lens) will require a relatively faster shutter speed to freeze motion. I think this factor is relatively intuitive and straightforward in practice.

Special thanks to Northcoast Photographic Services, in Carlsbad, CA, for providing the film development services for this photograph. Great job, Scott! Please, stay tuned for an upcoming article, “The Quality of Light”, where I will examine the physical factors of light that influence the aesthetics and emotion of a photograph.

The post How Was This Picture Made #12: The Answer appeared first on Photography Life.

Photography Life

Posted in Photograpy How To | Tagged , , , | Leave a comment

The Best Place in the World for Amateur Night Sky Photographers

The Atacama Desert on the Chilean high plateau of Altiplano and the Mauna Kea Summit on the Big Island of Hawaii are generally recognized as the two best places for astronomical observations. However, in this article, I argue that the best place for amateur night sky photography is elsewhere. It is in Hawaii too, but on the Island of Maui. It is the extinct Haleakala volcano. Although smaller than the Mauna Kea volcano, Haleakala might actually be better suited for amateur photographers.

Astrophotography_001

Milky Way and the observatories at the summit of Haleakala volcano
NIKON D750 + 20mm f/1.8 @ 20mm, ISO 6400, 15/1, f/2.5

The combination of dark sky (due to the absence of light pollution) and high altitude with little cloud is what makes the Atacama Desert on the Chile-Bolivian border and Mauna Kea Summit so unique. It is therefore no wonder that one finds state-of-the-art technology telescopes in those sites: in Atacama, the ALMA project as the world’s largest system of 66 telescopes was launched in 2013; Mauna Kea Summit is the second largest observatory for optical, infrared and submillimeter astronomy. I have had the great fortune to have visited both these locations (I was not at the ALMA site itself, as it was under construction back in early 2013, but I went to a public observatory nearby). And that is why I dare pronounce this verdict: those sites are great for experts working for those observatories, but not so great for amateur photographers.

Astrophotography_002

Panorama of Mauna Kea Summit with observatories
NIKON D750 + 14mm f/2.8 @ 14mm, ISO 100, 8/10, f/4.5

Don’t get me wrong, I am not arguing that the Atacama Desert and Mauna Kea Summit are not unique and beautiful enough. They absolutely are and you should visit them, not only because of the dark sky.

Astrophotography_003

Summit of Mauna Kea with telescopes and the Summit of Mauna Loa on the top left corner
NIKON D7100 + 10-24mm f/3.5-4.5 @ 13mm, ISO 100, 1/100, f/8.0

Astrophotography_004

Altiplano landscape and the Atacama Desert are stunning and a true paradise for landscape photographers
NIKON D7000 + 10-24mm f/3.5-4.5 @ 17mm, ISO 100, 1/500, f/6.3

However, if your interest is primarily astrophotography, you should know that taking those incredible Milky Way shots there is not so easy. Why?

Both the Atacama Desert and Mauna Kea observatories lie well above 4 000 m (12 000 feet). For that reason, you need to acclimatize yourself and even then you might still suffer from altitude sickness. But that is by far not the main hassle. Unfortunately, there are further restrictions. Mauna Kea Summit is open to the public, but only from dawn to dusk, when the telescopes are inactive. Staying overnight is forbidden, unless you have a special permit. I found out that it takes a year or even longer for professional photographers with long records in astrophotography to obtain such a permit.

Astrophotography_005

The summit of Mauna Kea can be reached by a standard car, but due to a gravel-road part it is highly recommended to take off-road car
NIKON D7100 + 70-200mm f/4 @ 130mm, ISO 100, 1/200, f/9.0

Astrophotography_006

Shortly after sunset you must leave the Mauna Kea Summit
NIKON D7100 + 10-24mm f/3.5-4.5 @ 20mm, ISO 100, 1/25, f/4.5

Moreover, tourists need to hire an off-road vehicle, since the upper part of the route is on a steep gravel road (actually, I encountered some normal cars too, although most standard hired cars are not insured for the Mauna Kea Summit trip). Anyway, regardless of the type of your vehicle, shortly after sunset, you are kindly but firmly informed by a ranger to leave the summit.

Astrophotography_007

Nightsky with Milky Way shot near the Onizuka Center observatory. Sometimes, the headlights of passing car can lit the landscape in a very nice way, but most of the times, you can get frustrated by too much light coming out of them
NIKON D750 + 14mm f/2.8 @ 14mm, ISO 4000, 30/1, f/2.8

Astrophotography_008

NIKON D750 + 14mm f/2.8 @ 14mm, ISO 5000, 30/1, f/4.0

Photographing below the summit is possible and definitely worthwhile, but since there is an observatory running star-gazing programs that have become very popular, you will encounter crowds and ceaseless traffic. Car headlights can thwart any of your dark-sky shots at any time. I found this very distracting when shooting below Mauna Kea.

Astrophotography_009

I was unlucky when shooting night sky near San Pedro de Atacama – moon was already in the third phase and there were clouds, which happens allegedly only a few times per year
NIKON D7000 + 11-16mm f/2.8 @ 11mm, ISO 1000, 30/1, f/3.5

Shooting in the Atacama Desert is difficult in other aspects. The Atacama Desert is vast and, unlike at Mauna Kea, there is no problem in finding a dark spot to shoot from without any permit. You might have to travel long distances to find an interesting foreground for a good composition. The vastness also makes it a bit dangerous (especially the high-altitude Atacama Desert near the Argentina-Bolivian border) when far from larger cities – the closest town being San Pedro de Atacama. Many surrounding areas do not have any GSM coverage. Running out of gas or water might be a big problem. Furthermore, for a reason I could not understand, when traveling into and out of the town of San Pedro de Atacama, one has to pass through something like Customs control every single time – which can be a very lengthy and rather unpleasant procedure for those who have not mastered the Spanish language.

That is why I find Haleakala Summit on the Hawaiian Island of Maui to be a much more convenient site for amateur photographers. Here are the exact reasons why:

  • The conditions for great night photos are no less perfect; you still get the great combination of dark sky and high altitude.

    Astrophotography_010

    NIKON D750 + 20mm f/1.8 @ 20mm, ISO 6400, 15/1, f/2.0

  • There is zero light pollution to the east and south, very little pollution to the west and north.
  • Interesting foregrounds are to be found in all directions. There are two parking lots. The lower one is located near the Visitors’ Center, which has a perfect viewpoint to the east over the Haleakala Crater. Here you may take perfect compositions in early March and April. At the very top, there is one more parking lot with another summit building. From here, you can see the observatories to the south. These function primarily during the day, so restrictions here are not so strict and it is possible to get closer to the telescopes and have them in the foreground. They are perfect for compositions from May to September. Moreover, at the parking place, there are many silversword plants that also fit nicely as foreground.
    Astrophotography_011

    NIKON D7100 + 10-24mm f/3.5-4.5 @ 24mm, ISO 100, 1/60, f/9.0

    Astrophotography_012

    NIKON D750 + 14mm f/2.8 @ 14mm, ISO 6400, 30/1, f/2.8

    Astrophotography_013

    NIKON D750 + 14mm f/2.8 @ 14mm, ISO 10000, 30/1, f/2.8

    Astrophotography_014

    NIKON D750 + 20mm f/1.8 @ 20mm, ISO 10000, 25/1, f/3.5

  • Haleakala Summit is easy to access on an asphalt paved road, an off-road vehicle is not needed. There is no problem with the insurance of hired cars, unlike in the case of ascending Mauna Kea.
  • You are 54 km (33.5 miles) away from the sea (and what a beautiful one) and the city of Kahului with all the services, restaurants, shops. There is also a very limited capacity of accommodation in the hotels and motels along the Haleakala road.

    Astrophotography_015

    Magnetic Peak is just next to the very summit of Haleakala where the upper parking place is located
    NIKON D7100 + 16-85mm f/3.5-5.6 @ 16mm, ISO 100, 1/160, f/6.3

  • Even if you get up to 3 055 meters (10 023 feet) above sea level, which is high enough for crisp air, you will most likely not suffer from high-altitude sickness.
  • At night, there are no crowds; I saw some cars with organized groups but they were gone after 11 p.m. There are no rangers, no controls.
  • No special permit to stay overnight is needed; you only have to pay the entrance fee of 15 USD (valid for 3 days) to the Haleakala National Park.
  • It is possible to stay overnight. There are rough and ready conditions in the Visitors’ Center booths at the summit – you need to have your own mattress and a warm sleeping bag. A few miles below the summit, you can sleep in a tent in the Hosmer Grove Campground (no permit needed, on a first-come, first-served basis).
  • If you stay overnight at the summit, you get a very spectacular Haleakala Crater sunrise from the lower Visitors’ Center as a bonus.
    Astrophotography_016

    Sunrise above the Haleakala Crater is spectacular, just do not expect to be alone there, crowds are coming to watch this spectacle
    NIKON D750 + 10-24mm f/3.5-4.5 @ 17mm, ISO 100, 1/50, f/4.5

    Astrophotography_017

    NIKON D750 + 70-200mm f/4 @ 116mm, ISO 100, 1/250, f/4.5

  • Maui offers even more locations for good night photography; theoretically you can shoot the Milky Way both from the seaside and the volcano summit in one night.

    Astrophotography_018

    Milky Way as shot from Olawalu Campground at the south coast of Maui
    NIKON D750 + 14mm f/2.8 @ 14mm, ISO 10000, 30/1, f/2.8

But I should also warn you, even here the conditions may get very rough:

  • It is usually very windy up there; keeping my tripod stable in a gale-force wind was the biggest challenge for me.
  • Needless to say, it gets bitterly cold overnight (freezing temperatures even in summer). Wearing many warm layers of good clothing is crucial.
  • Even if the road is in top quality, it is still a demanding drive – driving the 54-km (33.5-mile) route from Kahului with all the bends takes at least 1.5 hours.
  • The night may not be completely cloudless. The middle layer of clouds is usually below the highest peak, yet there are nights with high clouds (around 10 km / 6 miles), so there is no guarantee of perfect weather (you do not get this at Mauna Kea or the Atacama Desert either).
Astrophotography_019

Self-portrait – I was lucky that a thin layer of clouds was passing over the summit exactly at the right time – otherwise the light from my head torch would not be visible
NIKON D750 + 20mm f/1.8 @ 20mm, ISO 10000, 15/1, f/2.5

Last but not least, let me point out that I do not want to tell you guys that, in order to get great astrophotography images, you have to go to Haleakala Summit.

Astrophotography_020

I took this shot in Ondrejov Observatory barely 20km away from Prague – the darkness of the sky is nowhere to be compared with Hawaii and yet I got a decent image
NIKON D750 + 14mm f/2.8 @ 14mm, ISO 3200, 30/1, f/2.8

I enjoy shooting night images in the Bohemian Paradise in Central Europe, where there is a moderate to high level of light pollution according to this map. The conditions are incomparably worse there, yet I immensely enjoy the process of taking the photos. But if night photography becomes your passion or even obsession (as it is in my case), Haleakala Summit in Maui should be on your bucket list.


This guest post was submitted by Vaclav Bacovsky, a photographer from the Czech Republic (in the very heart of Europe). He loves shooting landscapes, architecture, macro and wildlife (see his 500px page). He blogs at www.krasnesvetlo.cz (in Czech language only though). And his infrared photographs are published on his Instagram account.

The post The Best Place in the World for Amateur Night Sky Photographers appeared first on Photography Life.

Photography Life

Posted in Photograpy How To | Tagged , , , , , | Leave a comment

What is Motivation

Motivation is of particular interest to Educational psychologists because of the crucial role it plays in student learning.  Motivation in education can have several effects on how students learn and their behaviour towards subject matter (Ormrod, 2003).  Motivation has been found to be a pivotal area in treating Autism Spectrum Disorders, as in Pivotal Response Therapy.  Motivation is also an important element in the concept of Andragogy (what motivates the adult learner).  Motivation by threat is a dead-end strategy, and naturally staff are more attracted to the opportunity side of the motivation curve than the threat side.  Motivational strategies need to be applied individually and changed frequently so that they do not become ineffective through over use.

Motivation

According to Geen, motivation refers to the initiation, direction, intensity and persistence of human behaviour.  Some authors distinguish between two forms of intrinsic motivation: one based on enjoyment, the other on obligation.  There is currently no universal theory to explain the origin or elements of intrinsic motivation, and most explanations combine elements of Fritz Heider’s attribution theory, Bandura’s work on self-efficacy and other studies relating to locus of control and goal orientation. 

Note that the idea of reward for achievement is absent from this model of intrinsic motivation, since rewards are an extrinsic factor.  In work environments, money may provide a more powerful extrinsic factor than the intrinsic motivation provided by an enjoyable workplace.  Successful coercion sometimes can take priority over other types of motivation.  The self-control of motivation is increasingly understood as a subset of emotional intelligence; a person may be highly intelligent according to a more conservative definition (as measured by many intelligence tests), yet unmotivated to dedicate this intelligence to certain tasks. 

Abraham Maslow’s hierarchy of human needs theory is the most widely discussed theory of motivation.  Frederick Herzberg’s two-factor theory, aka intrinsic/extrinsic motivation, concludes that certain factors in the workplace result in job satisfaction, but if absent, lead to dissatisfaction.  To understand how to control motivation it is first necessary to understand why many people lack motivation. 

It is usually suggested that it is critical to maintain a list of tasks, with a distinction between those which are completed and those which are not, thereby moving some of the required motivation for their completion from the tasks themselves into a “meta-task”, namely the processing of the tasks in the task list, which can become a routine.  However, the specific kind of motivation that is studied in the specialized setting of education differs qualitatively from the more general forms of motivation studied by psychologists in other fields. 

Because students are not always internally motivated, they sometimes need situated motivation, which is found in environmental conditions that the teacher creates.  There are two kinds of motivation: Intrinsic motivation occurs when people are internally motivated to do something because it either brings them pleasure, they think it is important, or they feel that what they are learning is significant. 

At lower levels of Maslow’s hierarchy of needs, such as Physiological needs, money is a motivator; however it tends to have a motivating effect on staff that lasts only for a short period (in accordance with Herzberg’s two-factor model of motivation).  At higher levels of the hierarchy, praise, respect, recognition, empowerment and a sense of belonging are far more powerful motivators than money, as both Abraham Maslow’s theory of motivation and Douglas McGregor’s Theory X and theory Y (pertaining to the theory of leadership) demonstrate. 

According to the system of scientific management developed by Frederick Winslow Taylor, a worker’s motivation is solely determined by pay, and therefore management need not consider psychological or social aspects of work.  In essence scientific management bases human motivation wholly on extrinsic rewards and discards the idea of intrinsic rewards. 

In contrast, David McClelland believed that workers could not be motivated by the mere need for money– in fact, extrinsic motivation (e.  , money) could extinguish intrinsic motivation such as achievement motivation, though money could be used as an indicator of success for various motives, e.

Motivation is of particular interest to Educational psychologists because of the crucial role it plays in student learning.  Motivation has been found to be a pivotal area in treating Autism Spectrum Disorders, as in Pivotal Response Therapy.  Motivation by threat is a dead-end strategy, and naturally staff is more attracted to the opportunity side of the motivation curve than the threat side.  Motivation is the key to performance improvement. 

Motivation is, in effect, a means to reduce and manipulate this gap.  Motivational strategies need to be applied individually and changed frequently so that they do not become ineffective through over use.  Motivation is a pivotal concept in most theories of learning.  Motivation to achieve is a function of the individual’s desire for success, the expectancy of success, and the incentives provided.  Motivation is divided into two basic types: integrative and instrumental. 

Motivation is an important factor in L2 achievement.  Motivation’s philosophy is based on commitment towards ‘enhancing the quality of life of people with disabilities’ through the provision of appropriate mobility devices (wheelchairs and prosthetic limbs), professional services such as physiotherapy, economic empowerment (via job fairs, vocational training, job placements) and advocating basic human rights.  Motivation depends on many factors with the primary factor being the power of your dreams.

Glen Peebles is the owner of Loxy Gift Shop a website that provides High Quality Gifts and Outstanding Service – find gifts for all occasions such as Christmas, Anniversary, Birthday and more. You can visit his website at: http://www.loxy.org

Posted in What Is Aperture | Tagged | Leave a comment