
Although the Pentax 645Z medium format DSLR has been out for a few years, I only had a chance to try it out earlier this year, during my trip to Death Valley. I have been wanting to try the 645Z for quite some time, since I heard so many good things about it. With medium format digital being traditionally out of reach in terms of cost for most photographers out there, including myself, I did not really have much interest in trying out cameras that are as expensive as some nice cars. However, the Pentax 645D changed the game back in 2010, by being the first sub-$ 10K medium format digital camera at launch.
When Pentax released an updated version of the camera in the form of 645Z, and this time with a CMOS instead of CCD sensor, the company decided to lower the MSRP of the camera even further, down to $ 8,500. To get rid of the existing stock of the 645D models, the company lowered the price of the predecessor all the way down to $ 4K at one point, making medium format digital reach a sub-$ 5K price for the first time in history. Today, the Pentax 645Z can be bought for $ 7K brand new and you can find it for much less if you don’t mind shopping for a used one. Without a doubt, the impact of Pentax medium format cameras has been seriously felt among other medium format camera manufacturers.

PENTAX 645Z + smc PENTAX-FA645 45-85mm F4.5 @ 60mm, ISO 100, 1/1, f/16.0
Since then, we have seen a couple of announcements that target the same niche. Hasselblad has recently introduced its first mirrorless X1D-50c medium format camera, while Fuji also decided to jump all the way up to medium format with its GFX 50S, skipping full-frame cameras altogether. It is great to see more competition in this relatively new market today, but we must not forget that Pentax was the company that pioneered the idea of somewhat affordable medium format cameras in the first place. If it wasn’t for the success of the Pentax 645D and 645Z cameras, it is hard to say if others would have risked to move into the sub-$ 10K medium format arena. Medium format sensors are still quite costly to manufacture compared to full-frame sensors, and it is certainly not easy to sell such cameras to the mass market. If Nikon and Canon sell a fairly small number of top-of-the-line DSLRs like the Nikon D5 and Canon 1D X Mark II when compared to other cheaper DSLRs, the market for medium format users is even more minuscule in comparison.
So why review the Pentax 645Z now? Well, with the excitement of the upcoming Hasselblad X1D-50c and Fuji GFX 50S cameras, it might be interesting for our readers to see what medium format has to offer, especially when compared to full-frame cameras. I have not yet obtained a copy of the two new medium format cameras yet (Fuji’s price isn’t even announced, while the Hasselblad has been delayed till November of 2016), but I have played with the 645Z enough to say a few things about it. Perhaps this review will help our readers in understanding medium format digital a bit better. Considering that the sensor technology between the three cameras is going to be quite a bit similar in terms of things like physical sensor size, aspect ratio and image quality, many topics discussed in this review will apply similarly to all three. Lastly, I already had most of the Pentax 645Z review written a while ago, so I decided to get it completed and published before moving on to reviewing other cameras and lenses.

PENTAX 645Z + smc PENTAX-FA645 45-85mm F4.5 @ 45mm, ISO 100, 1/15, f/11.0
1) Overview and Sensor Size Comparison
The Pentax 645Z was announced more than two years ago, back in April of 2014. As I have already pointed out, it was a big announcement back at the time, since there was no real competitor to the camera at a similar price point. The 645Z reigned supreme since then, making it a popular MF camera among Pentax enthusiasts and professionals. With over 30 different lenses to choose from for the 645 mount (16 of which are current and can be bought new today) and the ability to mount older Pentax 6×7 lenses via adapters (along with other third party options), it has become a pretty solid and mature system overall.
With a 51.4 MP sensor, the Pentax 645Z boasts more resolution than any other full-frame digital camera on the market (the closest in resolution is the Canon 5DS / 5DS R DSLR, with its 50.6 MP sensor). However, as you may already know, resolution plays a small part in the overall image quality of any system – sensor size is a far more important part of the equation. Larger sensors generally have better overall image quality due to better handling of noise, potentially better dynamic range, better colors and with the right set of lenses, can produce beautifully rendered photographs. Sensor size certainly does matter, but the question is, how much of a difference would there be between sensors, and can one actually tell the difference in image quality between different formats? Let’s take a look at the below illustration:
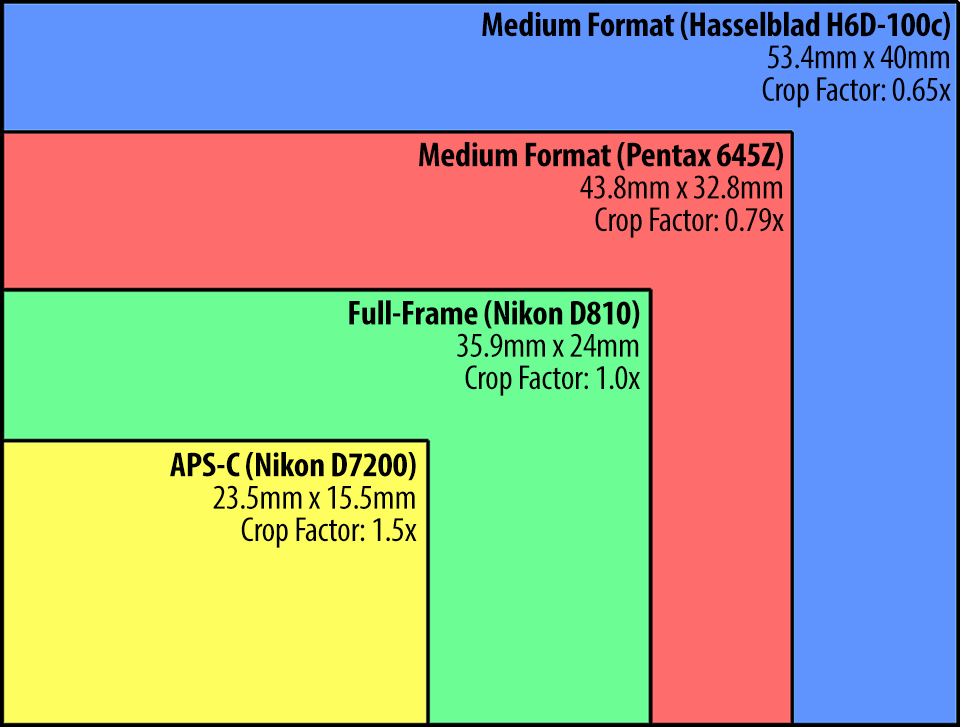
First of all, let’s get one fact straight – unlike “APS-C” and “full-frame”, “medium format” does not strictly define one particular size of sensor. As you can see, the sensor on the Pentax 645Z (as well as on the new Hasselblad X1D-50c and the Fuji GFX 50S), is significantly smaller compared to the medium format sensor found on the Hasselblad H6D-100c. This means that one should understand that moving up to “medium format” can differ quite a bit depending on what size of medium format sensor one chooses. There is a huge cost premium involved when moving up to the largest 53.5mm x 40mm sensors – the Hasselblad H6D-100c retails for $ 33K, far more than what the Pentax 645Z or the newer mirrorless medium format from Hasselblad and Fuji go for.

PENTAX 645Z + smc PENTAX-FA645 45-85mm F4.5 @ 50mm, ISO 400, 1/200, f/8.0
When it comes to overall sensor size, it is also important to point out the physical size difference between the above-mentioned cameras:
- Full-Frame is 236% larger than APS-C and typically 2x-4x more expensive
- Medium Format Small (Pentax 645Z, Hasselblad X1D-50c, Fuji GFX 50S) is 167% larger than full-frame and typically ~3.7x more expensive
- Medium Format Large (Hasselblad H6D-100c) is 149% larger than Medium Format Small and 3.7x more expensive
As you can see, moving up in sensor size costs a huge premium and the larger you go, the less value you get. Considering that one can get a camera with an APS-C sensor for around ~$ 500 nowadays, does it make sense to move up to a Hasselblad H6D-100c that costs $ 33 thousand dollars? Even if the latter has a 586% larger sensor, the cost difference is a whopping 6,600%, which is mind-boggling. For most people, this is simply a huge waste of money. Now considering that the smaller medium format sensor is only 167% larger than full-frame and yet it is 2-3 times more expensive compared to something like the Nikon D810, one wouldn’t get the same dollar per sensor inch value as say when moving from an APS-C to a full-frame camera. Hence, such a move would not make much financial sense for most photographers out there.

PENTAX 645Z + smc PENTAX-FA645 45-85mm F4.5 @ 50mm, ISO 100, 15/1, f/22.0
However, for those who want to have the best image quality and do not mind the much higher price premium, medium format cameras certainly do have an edge over full-frame cameras. For example, if we look at pixel size, the Pentax 645Z at 51.4 MP is roughly at 5.3µ, whereas the Nikon D810 at 36.3 MP is roughly at 4.88µ. Not only does the latter have less resolution, but it also has smaller pixels, which gives a fairly noticeable advantage to the 645Z. The difference is certainly visible in images, as you will see from this review. This obviously comes at a huge expense of added bulk and weight, since the Pentax 645Z is a DSLR, which means that it has a huge mirror in front of the sensor and a fairly large flange distance, both of which translate to bigger camera body and hence a heavier overall setup. That’s what makes the new mirrorless medium format offerings so much more attractive in comparison – they do not have such drastic size and weight differences. Let’s talk about build quality and ergonomics next.
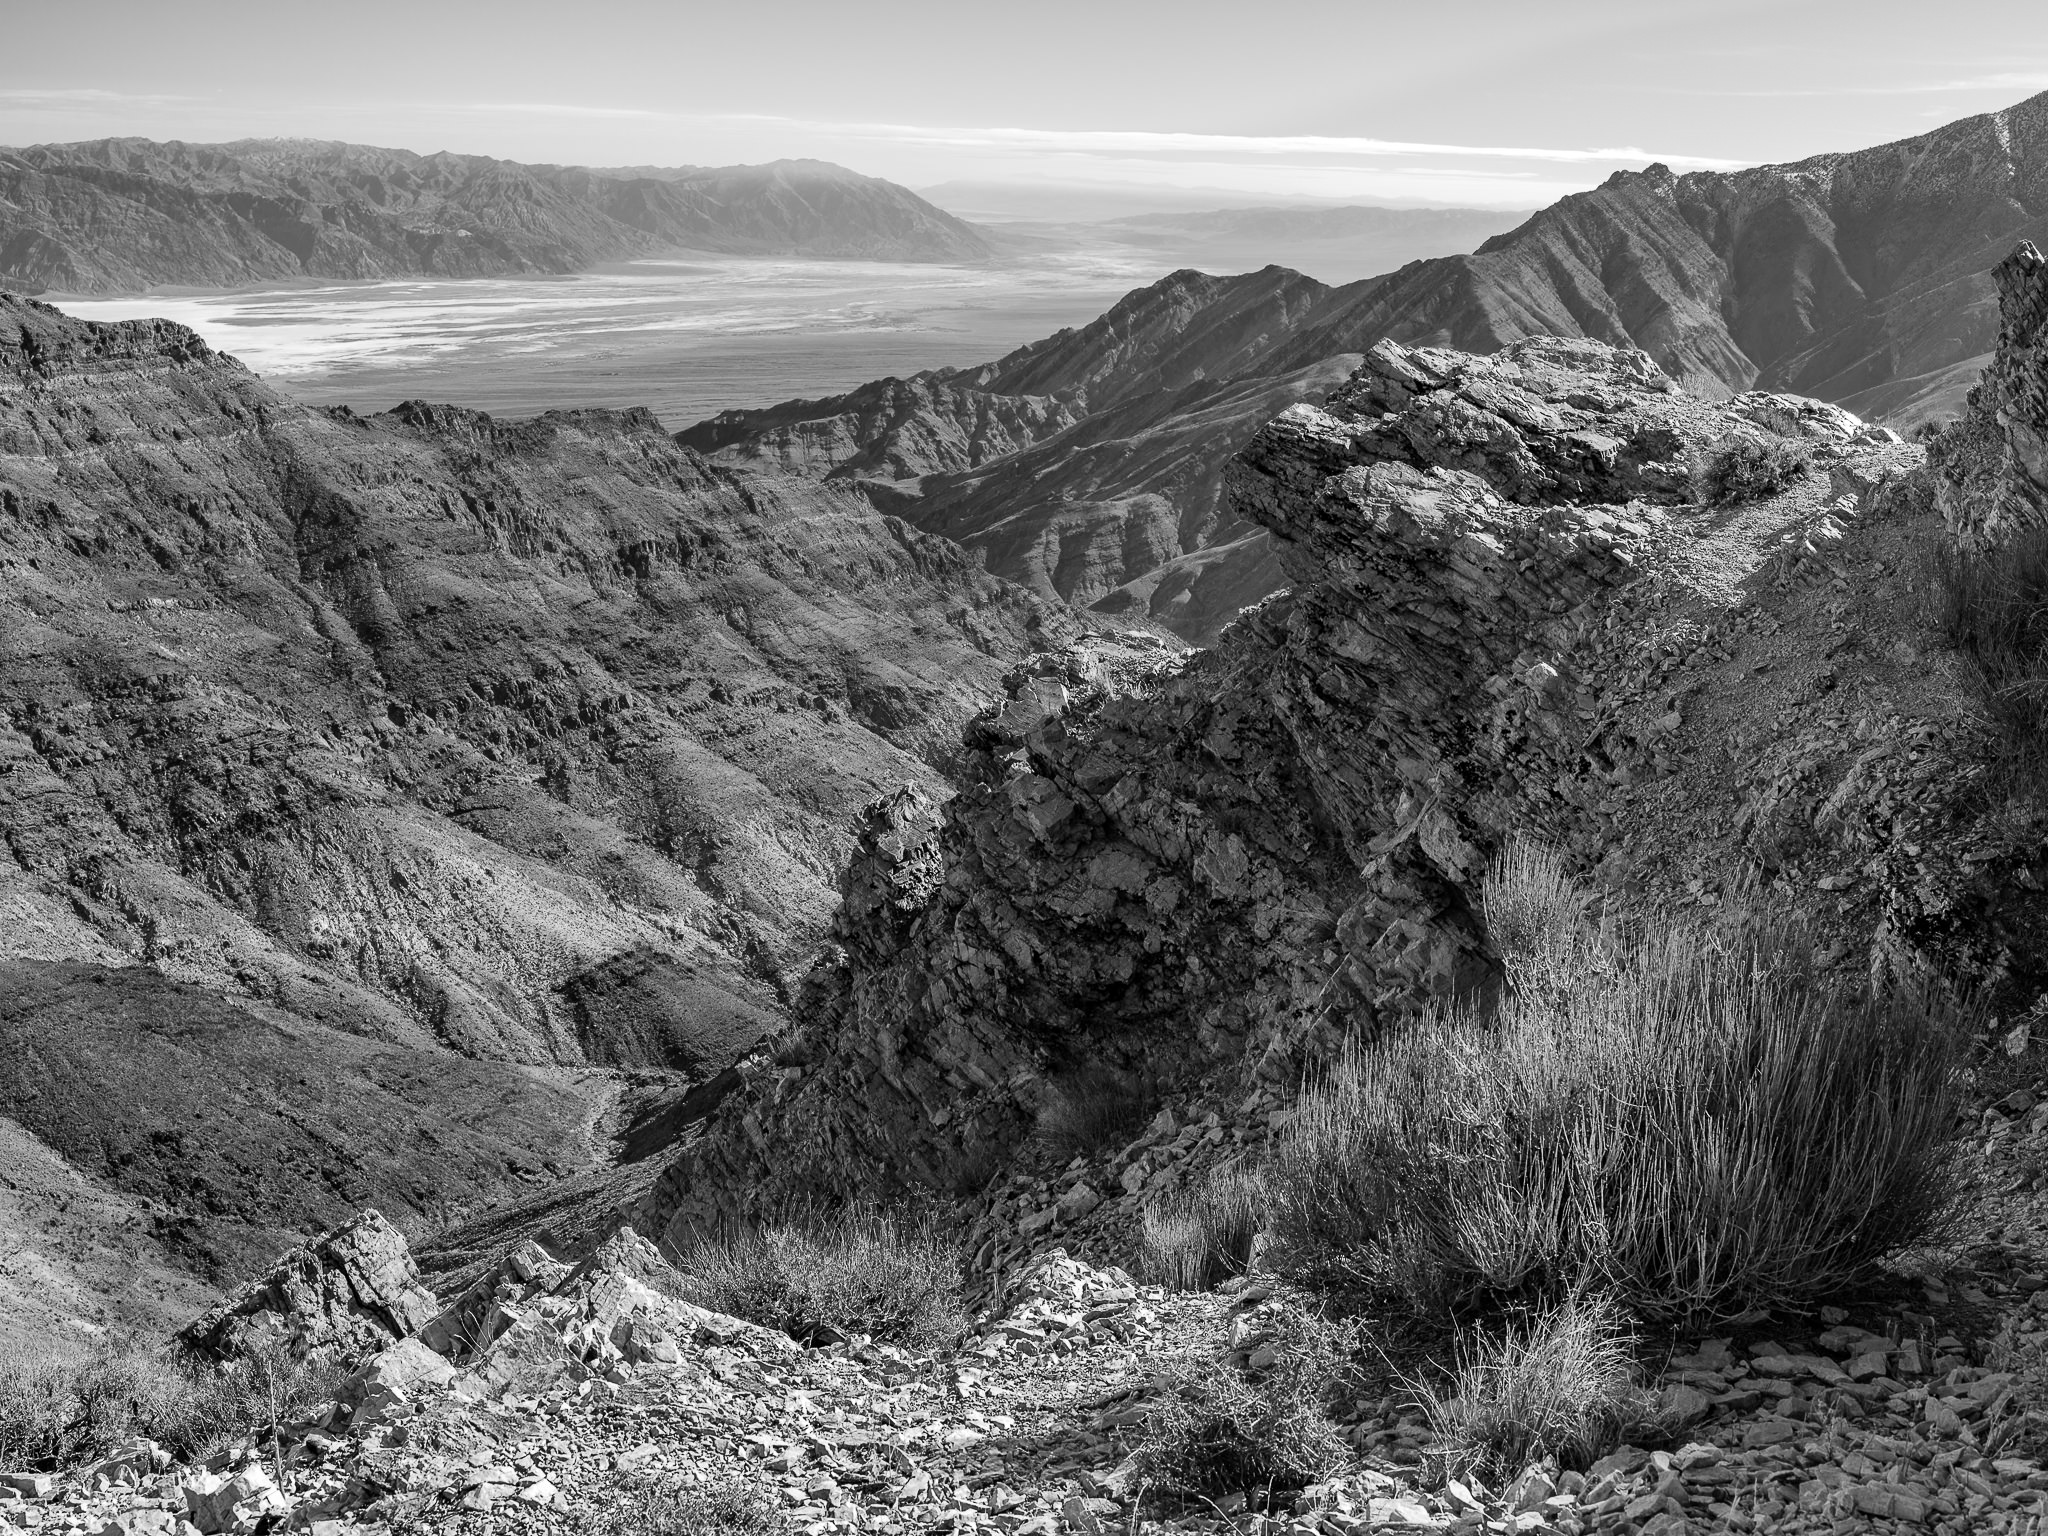
PENTAX 645Z + smc PENTAX-FA645 45-85mm F4.5 @ 60mm, ISO 100, 6/10, f/11.0
2) Pentax 645Z Specifications
Main Features and Specifications:
- Sensor: 51.4 MP, 5.3µ pixel size
- Sensor Size: 43.8 x 32.8mm
- Resolution: 8256 x 6192
- Native ISO Sensitivity: 100-204,800
- Processor: PRIME III
- Metering System: 86,000 pixel RGB metering system
- Weather Sealing/Protection: Yes
- Shutter: Up to 1/4000 and 30 sec exposure
- Storage: 2x SD slots
- Viewfinder Coverage: 98%
- Viewfinder Magnification: 0.62x (55mm f/2.8 at infinity); 0.85x (75mm f/2.8 at infinity)
- Speed: 3 FPS
- Built-in Flash: No
- Autofocus System: SAFOX II TTL phase-matching autofocus with 27 AF points (25 cross type focus points in the center)
- LCD Screen: 3.2″ 1037k-Dot Tiltable TFT Color LCD
- Battery Type: Rechargeable Li-Ion battery D-LI90
- Battery Life: 1230 shots
- USB Standard: 3.0
- Weight: 54.7 oz / 1.55 kg (including battery and memory card)
- Dimensions: 6.1 x 4.6 x 4.8″ / 15.5 x 11.7 x 12.2 cm (excluding protrusions)
- Price: $ 8,499 MSRP ($ 6,996.95 as of 10/01/2016)
A detailed list of camera specifications is available at Ricoh Imaging.

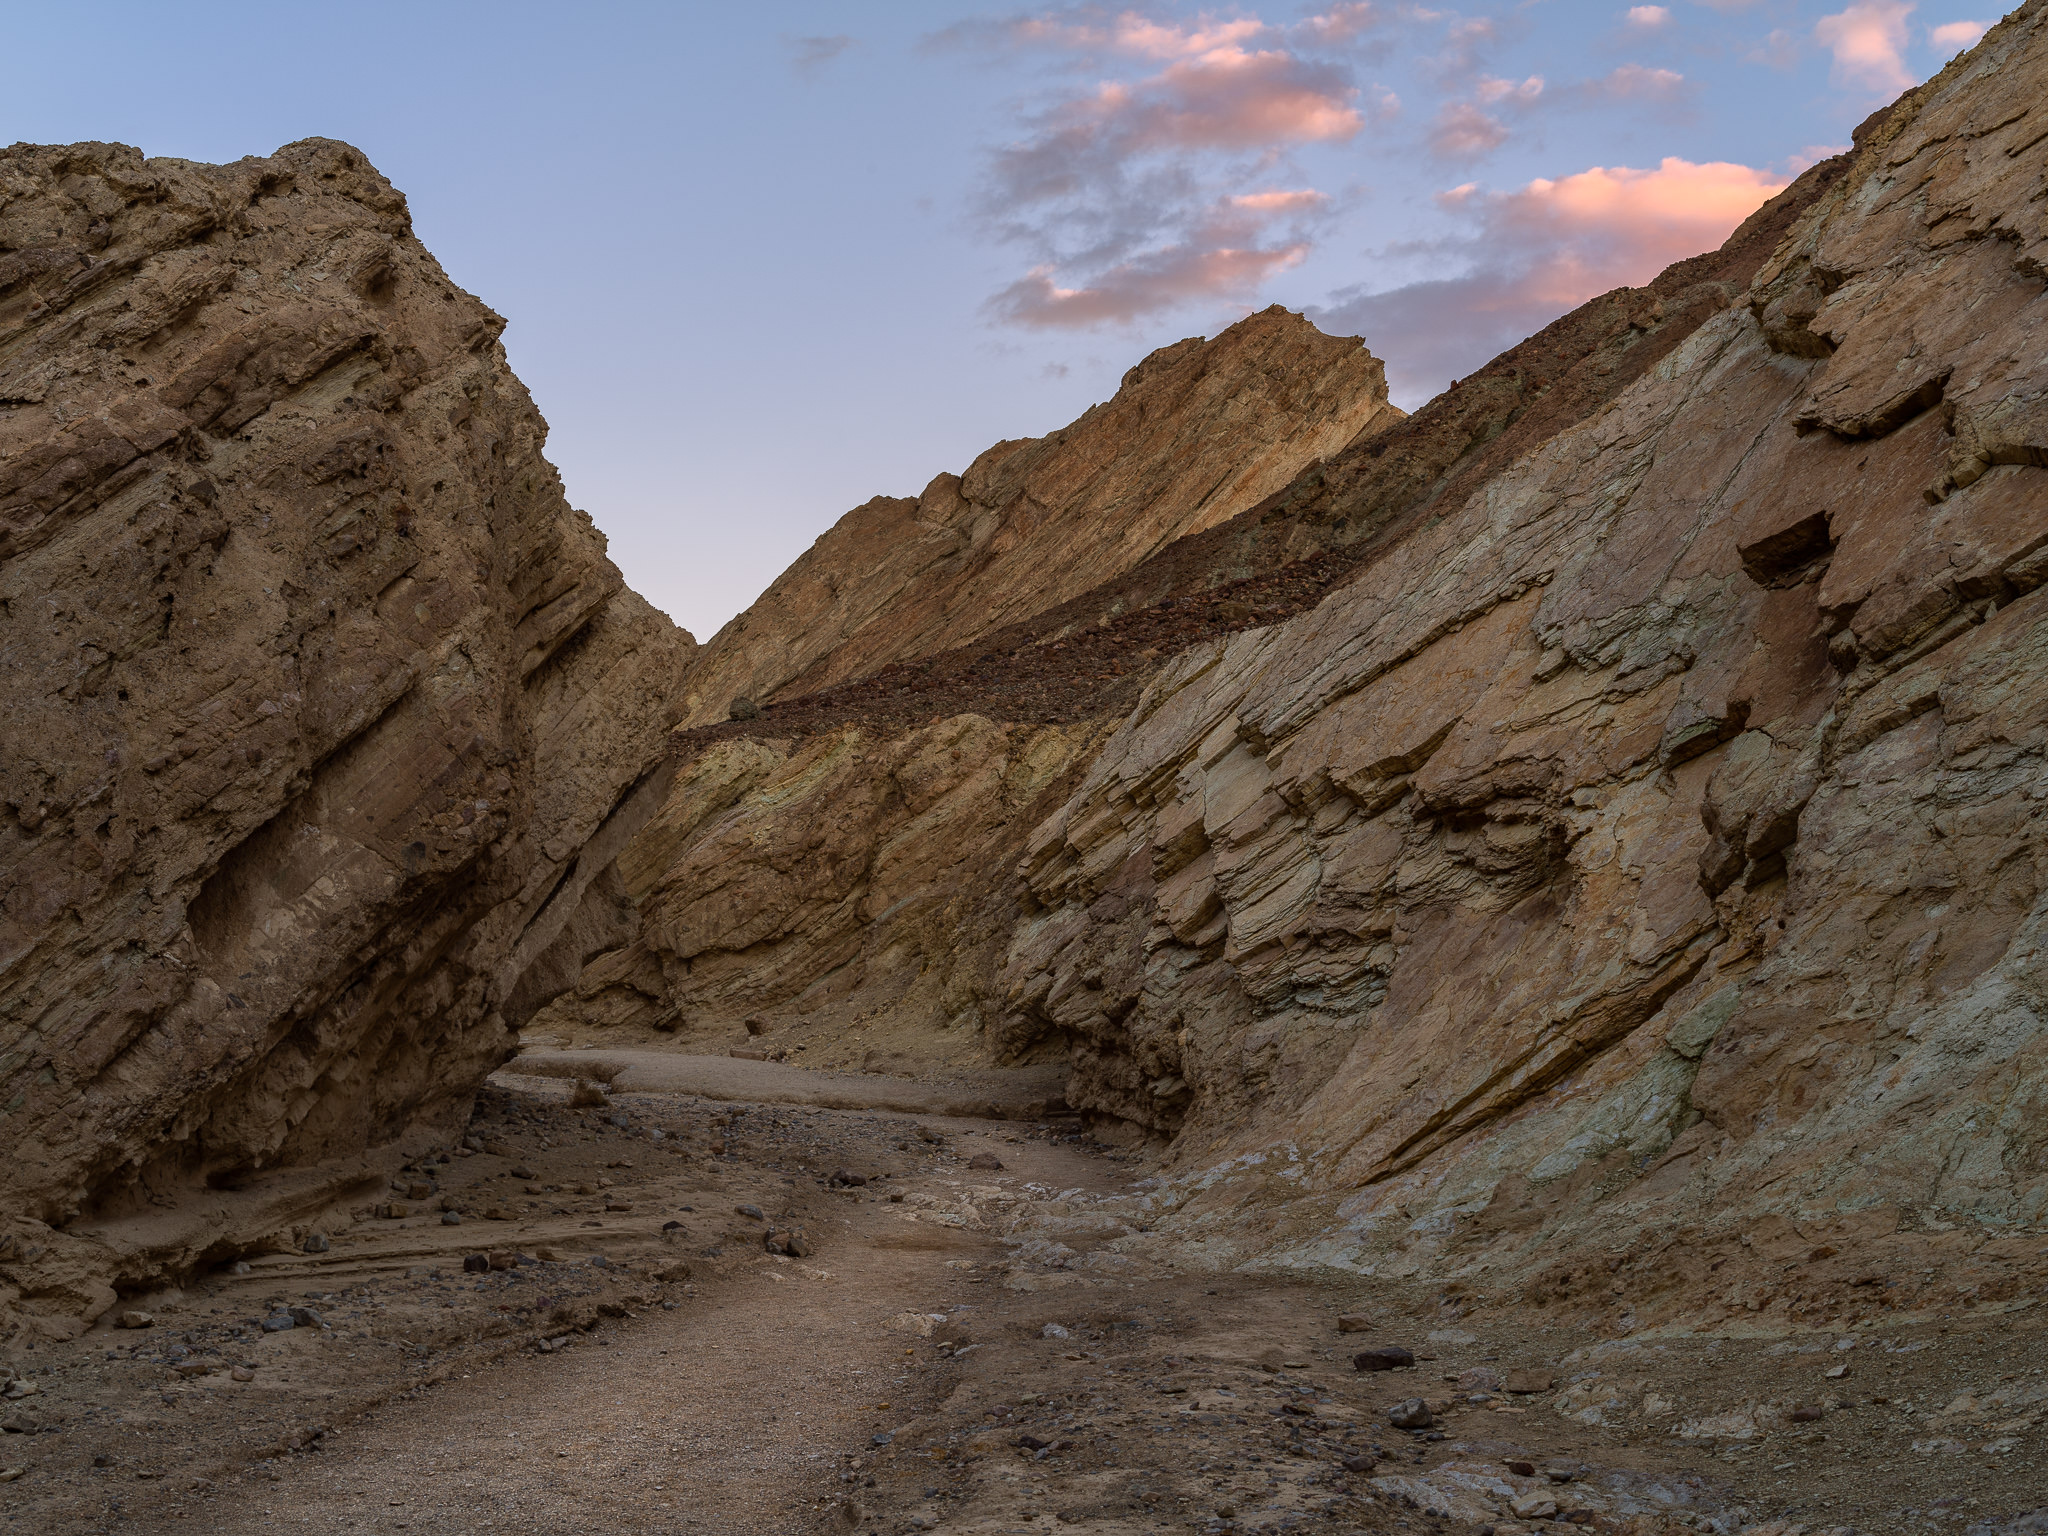
PENTAX 645Z + smc PENTAX-FA645 45-85mm F4.5 @ 45mm, ISO 100, 3/10, f/25.0
3) Build Quality
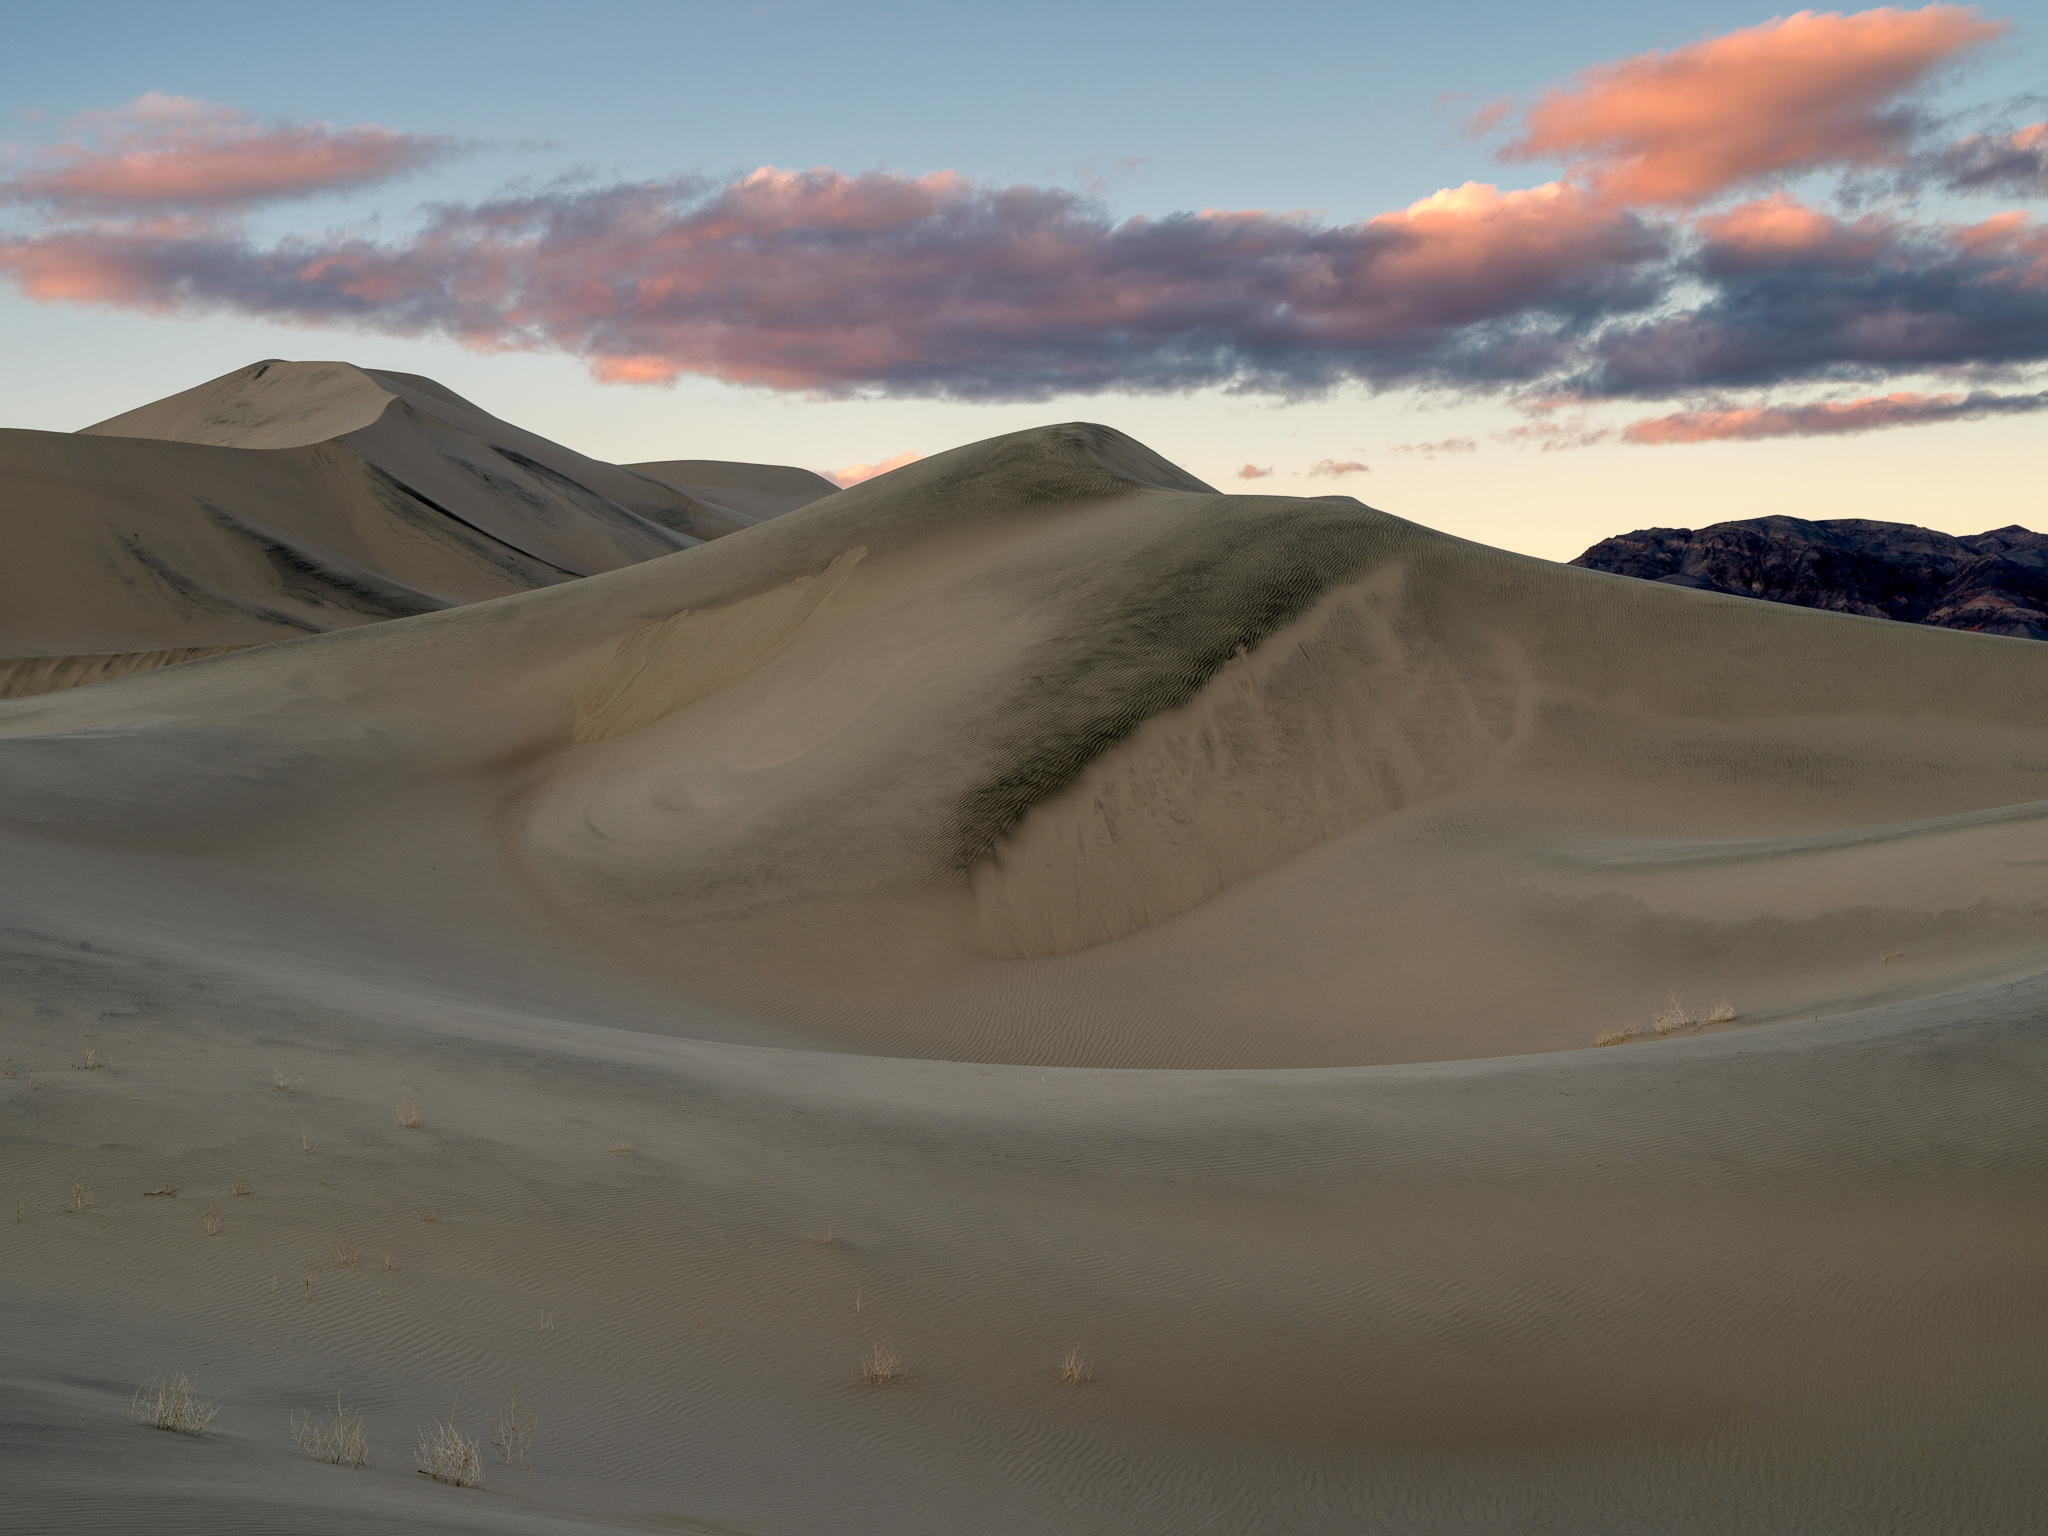
When it comes to build quality, Ricoh usually does not disappoint and the Pentax 645Z is not an exception. In fact, the Pentax 645Z is one of the best built cameras I have held in my hands – it feels very solid and its build quality is indeed superb in every way, starting from each dial all the way to the tilting LCD screen. As some say, the camera is “built like a tank” and I can certainly attest to it – I did manage to drop it on the ground while hiking (the camera took a pretty moderate hit on its side and back). I was very worried about the camera, but once I picked it up, brushed off the dust and inspected it, I only saw a couple of small areas where the paint came off a little, revealing the tough magnesium alloy shell. Aside from that, the camera did not suffer from damage and it continued to perform as if nothing had happened. I took it with me to Death Valley in January, so I put the camera to pretty harsh conditions, shooting in very dusty and sometimes below freezing conditions. With its 76 special weather seals all around the camera, I never saw any dust particles getting into the camera body. The good thing is, I only had one lens to shoot with, since the lenses I wanted were out of stock at the time. But it worked out pretty well, since I ended up not having to change lenses when shooting in Mesquite Sand Dunes, Eureka Dunes and other sandy/dusty areas of the park, known to be pretty harmful to both cameras and lenses (never try to wipe out sand particles from camera LCD or lens front element with microfiber cloth – always brush those off gently first, or you might scratch them). In short, the camera is built so well, that it will last for ages, even under heavy (ab)use!

PENTAX 645Z + smc PENTAX-FA645 45-85mm F4.5 @ 50mm, ISO 800, 1/100, f/8.0
4) Handling
In terms of handling though, this is a very big and heavy beast – much bigger, bulkier and heavier than an average-size DSLR. When shooting with the Pentax 645Z, I had my Nikon D810 with me and I have to say, carrying both in a single camera bag was pretty tough. My favorite Think Tank Airport Commuter (see our detailed review) was able to accommodate both cameras and lenses I had with me, but boy, it was tight and it was not a lightweight setup by any means! The Pentax 645Z pretty much took most of the bag due to its bulk, making it hard to close the bag, so I ended up either taking out the D810 or the 645Z and carrying one of the two in my hands to make it easier.
How big is the difference between the Pentax 645Z and the Nikon D810? Take a look at the below image:

When looking at both from the front, the size differences are pretty negligible – as you can see, the D810 is only slightly shorter in comparison. In fact, the Nikon D810 is actually slightly taller, thanks to its protruded top that hosts the pentaprism and the flash unit. Despite the much bigger throat size, Pentax did a wonderful job with keeping the front of the camera fairly small. However, the differences are much more pronounced once you take a look at the two cameras from the top:

Ouch, that’s a massive difference here – look at how big and bulky the mount area of the Pentax 645Z is. The Nikon D810’s flange distance of 46.50mm is pretty small in comparison – look where the mount starts and compare where it starts on the 645Z (which is right under the Pentax logo, with a flange distance of 70.87mm). Now add the length of a lens, and you will see why the Pentax 645Z gets so large so quickly.

PENTAX 645Z + smc PENTAX-FA645 45-85mm F4.5 @ 75mm, ISO 100, 3/1, f/18.0
4) Weight Concerns
In terms of weight, the Pentax 645Z weighs a whopping 1.5 kg, which is almost twice heavier than the Nikon D810. This might not be a big issue for many, but it is basically a deal breaker for me, since I have carpal-tunnel. Any time I handle something very heavy on my hands for a prolonged period of time, it simply hurts (and sadly, two surgeries in both hands only served as temporary relief for a few years). Doubling the weight of my setup was pretty taxing on my hands, making it difficult to hand-hold the camera. Speaking of hand-holding, while it is certainly doable, I would recommend against it – due to the size and weight of the camera, I found it pretty hard to hand-hold the camera without introducing camera shake. While it worked out fairly well in broad daylight, any time I had to stop down significantly or when the light was less than ideal, my images took the hit. I found out quickly that it was best to get the camera on a sturdy tripod – my Gitzo traveler with its tiny feet and a small RRS BH-25 ballhead wasn’t good enough to handle this camera anymore, so I had to switch to my Gitzo Systematic with the RRS BH-55 ballhead instead. Keep all this in mind when considering the Pentax 645Z – you might need to upgrade your tripod to something more stable if you want to shoot the camera without causing camera shake.

PENTAX 645Z + smc PENTAX-FA645 45-85mm F4.5 @ 65mm, ISO 100, 1/2, f/11.0
When it comes to camera shake, the Pentax 645Z has a dedicated Mirror Up switch on the side of the camera, which works great. However, there is one serious flaw with the 645Z in my opinion – the camera does not have an electronic front curtain! That’s a pretty big omission on behalf of Ricoh. Although the mirror mechanism certainly does add quite a bit of vibration during operation, the shutter can often be a bigger cause of vibrations, particularly at certain shutter speeds. Considering that many landscape photographers would be choosing the Pentax 645Z as a dedicated camera, I believe Ricoh should have added the ability to shoot with electronic front curtain turned on via a firmware update. Considering that it has not been done for two years now, I don’t think it will ever happen, which is sad.

PENTAX 645Z + smc PENTAX-FA645 45-85mm F4.5 @ 55mm, ISO 400, 1/50, f/20.0
5) Ergonomics
Ergonomically, the Pentax 645Z is superb – the grip is not only nicely protruded, but there is an extra dip that goes all the way into the camera body, making it comfortable for people with small or large hands to hold the camera. Although you can use your right hand to hold the camera when walking around, due to the weight and the size of the camera, I would recommend to support it with the left hand as well. I went ahead and initially attached the camera strap, but quickly ended up removing it. First, I did not want to put so much weight on my neck (which started to hurt rather quickly) and second, I did not want the strap to cause extra vibrations when shooting in windy conditions from my tripod.

PENTAX 645Z + smc PENTAX-FA645 45-85mm F4.5 @ 50mm, ISO 100, 2/1, f/11.0
I love the fact that Ricoh added two tripod sockets on the Pentax 645Z. This is a wonderful feature, since you can mount two brackets on the camera separately, instead of dealing with a single plate, or a large L bracket. When switching from landscape to portrait orientation, or vice-versa, all you have to do is dismount and remount the camera using the other plate – no need to try to align with the ballhead dip for vertical compositions.
The buttons on the camera are super intuitive – Ricoh engineers certainly put a lot of thought into that, which is nice. There are only four buttons on the top side of the camera (RAW, Exposure Bracketing, AF area, Lock) and the mirror up switch is on the right side. Both exposure compensation and ISO buttons are where they should be – right below the On/Off switch / Shutter Release button:

The camera PASM dial is on the left of the viewfinder, where we are used to normally seeing it. The dial has U1, U2 and U3 preset modes and it does wonders, just like the preset modes do on cameras like the Nikon D750. You can set up each of the modes specifically for different types of shooting environments and all you do from that point on, is switch to that preset mode and you are good to go. That’s how it should be on every camera! Sadly, Nikon does not understand this and it continues to use its useless memory bank feature on its high-end DSLRs like Nikon D810.
The Hyper Program feature is really neat. This is the first time I see Program Mode to be actually useful. In Program Mode, if you move the front dial, the camera switches to shutter priority mode, whereas moving the rear dial switches to Aperture priority mode. And if one wants to return to Program Mode, the green button on the back of the camera does it.
You will find two extra switches on the top of the camera. One is used to switch from AF-S (single servo) to AF-C (continuous servo) mode, and the other is used to switch from still shooting to video shooting. Although it is nice to have a video recording feature, I personally did not use it at all and I don’t think anyone would buy this camera for its video recording features anyway. Still, perhaps it is better to have it, than not having it at all.
The rear of the Pentax 645Z is also very well thought through. Again, it took me some time to get used to all the buttons, but once I did after a day or two, it was a breeze. Ricoh put all the function buttons to the right of the LCD, as seen below:

Certainly a bit different compared to anything Nikon, but not too bad. After using Nikon DSLRs for so many years, I prefer to have my AF button on the top right side of the camera, so that’s probably the button that I found hardest to get used to (for back-button focusing). Changing focus points was also a bit of a hassle initially, since I did not understand how it worked (you have to press a button below the function / navigation buttons first), but again, it was just a matter of time until it all made sense.

PENTAX 645Z + smc PENTAX-FA645 45-85mm F4.5 @ 50mm, ISO 100, 1/13, f/16.0
In terms of navigation buttons (left, up, right, down), their secondary role is to serve as functions to be able to change shooting mode, white balance, etc. And this is where the Pentax 645Z needs ergonomic improvement. While it might make sense to have a white balance button, why dedicate buttons for such useless features as custom images and flash? Custom images (similar to Picture Controls) are only applicable to JPEG images anyway, whereas flash is not something this camera has in the first place (and by the way, the Pentax 645Z might not be the ideal candidate for flash use, since it is limited to 1/125 flash sync speed, which is a pity). Ricoh should have removed the markings from these buttons and let people configure them to anything they want from the menu instead.
Pressing the record button on the back of the camera immediately flips the mirror up, because it is used for Live View. Live View is absolutely necessary for proper focusing when shooting landscapes, since phase detection rarely can be fully trusted for precise focusing. When switched from shooting mode to movie mode using the top switch, the mirror comes up automatically and the video recording button changes to record video. In playback mode, the same button is used for deleting images. Not super intuitive for a single button to work for video capture, live view and trash, but it works out OK. Overall, it is not a bad ergonomic placement of buttons, although I personally prefer Nikon and Canon DSLR ergonomics instead, since they are much easier to get used to and buttons are not crammed into one area.

PENTAX 645Z + smc PENTAX-FA645 45-85mm F4.5 @ 60mm, ISO 100, 1/1, f/16.0
The Pentax 645Z has a wonderful tilting LCD screen, which is quite shocking, considering that this is a medium format camera. Nikon and Canon refuse to put tilting LCD screens on their high-end DSLRs, making us think that tilting screens are only for lower-end cameras. As a result, some photographers now think that such omission is even preferable, because the screen is not going to break. Well, after using the Pentax 645Z for over a month and using its tilting LCD screen extensively, I have to say that it is all a myth – tilting LCD screens are not prone to breaking more than regular screens are. I own two Nikon D750s and I have been using many other cameras with tilt screens for field work. I am yet to see any of them break! If such a massive camera as the 645Z has a tilting screen, there is no reason why it should be absent from cameras like the Nikon D810 and D5…
6) Menu System
Unlike the awful menu system we see on many modern cameras (Sony, for example), the menu system on the Pentax 645Z is amazing. It is very intuitive and the placement of options makes sense. My only gripe is the use of the right arrow button. I wish Pentax changed it, so that the right arrow does not go into the sub-menu, but rather was used to navigate between the sub-menus. In my opinion, it would have been better if one would have to press the OK button to go into each menu item instead. While it is easy to rotate the rear dial on the back of the camera to navigate between sub-menus, it would have been more intuitive to do it through the left-right navigation buttons.
I love the Pentax 645Z’s ability to playback an image, then rotate the rear dial to get to 100% – it works just like Nikon’s center OK button, which is a very useful and must-have feature on any camera. What’s great, is that you can use the dial in view mode once 100% view is engaged, to move to different zoom levels and the rear buttons serve to navigate through the image.
PENTAX 645Z + smc PENTAX-FA645 45-85mm F4.5 @ 45mm, ISO 400, 1/60, f/11.0
7) Autofocus System
Autofocus is limited to a tiny portion of the frame in phase detection mode, which is kind of a given, considering the size of the sensor relative to the size of the phase detection sensor. However, this makes it limiting when one needs to focus in different areas of the frame. Although the focusing and recomposing technique works really well in most situations, one has to be careful when shooting with wide aperture lenses at maximum aperture and close distances – using a center focus point and recomposing can be problematic due to changes in focus plane, as explained in the article.
When moving focus points, there is a little red dot in the viewfinder that moves around. Triggering focus point change mode is done with a separate button beneath the main function dials, as described above. This allows toggling between making the primary navigation buttons functional and turning them into focus point change buttons. The good thing is, the camera remembers it when you turn the camera on and off, so you only need to switch once.
In terms of focusing speed and accuracy, the Pentax 645Z is fairly average when compared to other DSLRs on the market. It has been out for two years now and perhaps back then it was OK, but when I compare it to cameras like the Nikon D810, it is not as good, particularly in AF accuracy. Phase detection is not particularly reliable and it is a given, but I did not expect live view to be somewhat inaccurate as well. When switching to live view and letting the camera focus, I noticed that the Pentax 645Z would not focus with 100% accuracy using the 45-85mm lens I was utilizing. This was a bit of a surprise for me, because live view is typically very accurate on Nikon and Canon DSLRs. With the 645Z, I would occasionally get poor focus and I would have to switch to manual focusing in order to nail the focus, which was rather disappointing. I don’t know what causes this particular problem, but Pentax should address it as soon as possible – I think that’s pretty unacceptable for such an advanced camera. And sadly, I have seen the same behavior on the Pentax K-1 as well.

PENTAX 645Z + smc PENTAX-FA645 45-85mm F4.5 @ 55mm, ISO 100, 1/30, f/16.0
8) Pentax smc FA 645 45-85mm f/4.5 Lens
When testing the Pentax 645Z, I primarily relied on the Pentax smc FA 645 45-85mm f/4.5, a wonderful 35.5-67mm full-frame equivalent lens. Optically, the lens turned out to be tack sharp, which is exactly what I needed for landscapes. It was sharp at 45mm and it was a bit softer towards 85mm, but once stopped down, the lens was stellar at all focal lengths. However, I do have a gripe – why continue designing lenses with an old push/pull design to switch between AF and MF? I don’t know if there is a technical limitation on why Pentax does it, but I wish there was a simple switch on the side of the lens instead. There were times when I wanted to switch to manual focus while shooting and moving the AF/MF ring would sometimes end up slightly changing my framing, which was a hassle. When the lens is set to autofocus, there is no focus override option either. Other than the above, the lens performed very well and focused pretty fast. The lens is a bit loud when AF is engaged (no silent wave / ultrasonic motor), but it did not bother me much.

PENTAX 645Z + smc PENTAX-FA645 45-85mm F4.5 @ 45mm, ISO 200, 2/1, f/11.0
9) 4:3 Aspect Ratio
Having been shooting with APS-C and full-frame cameras for many years now, I am very used to the 3:2 aspect ratio. The Pentax 645Z, just like the upcoming Fuji and Hasselblad mirrorless medium format cameras, has an aspect ratio of 4:3, which is quite different in comparison. While one can modify aspect ratio in post, I have to say, shooting with a different aspect ratio than you are used to changes the way you frame. Plus, why would you want to lose all that resolution? For me, shooting with a 3:2 aspect ratio yields pleasing, wide images that I am used to seeing, whereas 4:3 looks more squarish in comparison. With our computer monitors being mostly wide nowadays, stretching as wide as 16:9, the 4:3 aspect ratio leaves a lot of gaps on the sides. That is certainly a problem for myself and many others when composing tight – if I have to think about 3:2 or other wider options, I have to compose with that in mind. So make sure you take aspect ratio into account when considering these medium format cameras!
PENTAX 645Z + smc PENTAX-FA645 45-85mm F4.5 @ 70mm, ISO 100, 1/2, f/13.0
10) Panorama Options
What do you do when you have a 51 MP sensor to play with? In my case, I decided to take advantage of the resolution of the sensor in order to make an enormous panorama. While shooting in Death Valley National Park, I photographed one of the most incredible sunrises I have seen, with stunning red and orange clouds, and a beautiful blue sky that reflected everything back on the landscape. The scene was stunning and mesmerizing – something I had never previously witnessed at Zabriskie Point after going there so many times before, all with failed attempts. As the clouds were changing, I switched the Pentax 645Z to vertical orientation and decided to run a two-row panorama. Below is a stitch comprised of 20 images, 10 on each row, along with a magnified crop that shows the amount of detail I was able to capture:
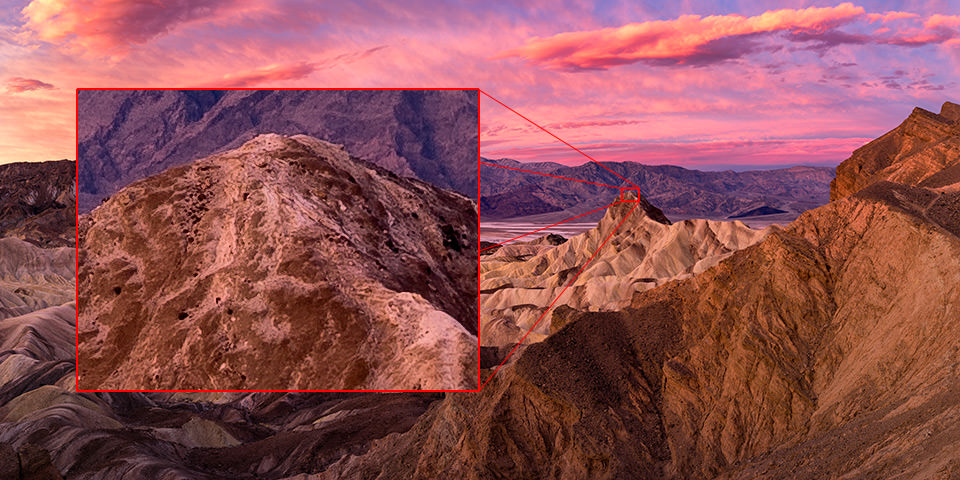
As you can see, the camera was able to capture a very detailed image of the scene and thanks to the camera, I now have a 400 MP image. I have not yet printed this image out, but I am excited to see how this image would look at 300+ dpi on a large print!
11) Summary
As you can see from this review, the Pentax 645Z served me very well during my month-long time with it. The camera truly has amazing image quality, wonderful build quality and ergonomics, excellent weather sealing, long battery life and when coupled with high-quality lenses such as the Pentax 45-85mm f/4.5, it can yield exceptionally detailed images. As a landscape photographer, I have been wondering for quite sometime about what medium format cameras have to offer when compared to full-frame cameras and the Pentax 645Z gave me this opportunity. Without a doubt, it is a very fine camera in many ways and I am sure it would have served my needs well if I were to get one.

PENTAX 645Z + smc PENTAX-FA645 45-85mm F4.5 @ 45mm, ISO 100, 5/1, f/22.0
However, the camera is not without its faults. Aside from some minor ergonomic nuisances (for a Nikon shooter), lack of electronic front curtain mode, rather limiting 1/125 flash sync speed for portrait work and a few small issues, my biggest issue with the Pentax 645Z is its massive size and weight. As you have seen from the comparison above, the camera protrudes quite a bit more than a full-frame DSLR like the Nikon D810 and weighs almost twice heavier in comparison, which is a deal breaker for me. Not only is it more difficult to hand-hold for me due to carpal-tunnel syndrome on my hands, but it also makes it tough to travel with, which is even a bigger issue. For this reason, I am anxiously waiting to see how the other mirrorless medium format cameras from Fuji and Hasselblad will fare in comparison. If they check all the boxes, including image quality, and do not come at the expense of heft and weight, I might look into investing in such a system for professional work. Exciting times indeed!
The post Pentax 645Z Review appeared first on Photography Life.


