Being a Professional Photographer Takes Courage!

Picture© alphaspirit

                         “Life shrinks or expands in proportion to one’s courage.” Anais Nin

While this post is really about photographers, the challenge of courage applies to EVERYBODY in business today. The economy, technology, consumer trends, social media and competition are just a few of the never-ending speed bumps every small business owner is facing.

It’s a heavy duty quote above, but now apply it to your own courage in business as a professional photographer.  Think back to how nervous you were when you got that first job – it doesn’t matter if it was a wedding, a children’s sitting or a commercial product assignment. Your nerves were a little frayed and you might have had serious doubts about whether or not you were going to be able to get the shot. 

Now, take it one step further, and depending upon how long you’ve been a photographer, your camera might have been loaded with film. No digital and no “chimping” to see if you got the image a split second after clicking the shutter. You didn’t know if you got the shot until days later.


Picture

Go one more step and take this little exercise: Just think about how much your life expanded with that first paid click of the shutter.  (Check out “Why?” with Dan Cox. He was 17 when he landed the wrap around cover for the Eddie Bauer catalog that was the launch point for his career.)

Well, with that first paid click, just like Dan, you went from amateur to professional. But the step up to being a professional took more courage. You accepted a level of responsibility to your client, your friends and most of all to yourself.  You took that “double secret” oath to deliver quality, to exceed expectations, to be the eyes of your clients and even their hearts, when they were busy looking elsewhere.

The courage you had to launch your career has morphed into a lifestyle, a skill set unique to the way you see the world and share it. Your life has expanded. The places and people who came into your life will continue to help you grow as long as you keep having the courage to learn. You need to be involved in the community and the industry, adapt new technologies, network with new friends and keep your mind open to the challenges that make imaging so incredible.

The legendary Don Blair was once asked, “What’s the best photograph you’ve ever taken?”  His response: “I don’t know I haven’t taken it yet!”  He was almost 80 when he said that and had been shooting since he was 14!  He never stopped having the courage to adapt, to take on new technologies and in the end, his life expanded beyond anything he could have anticipated!

Just a thought today and maybe an explanation why I have so much respect for so many of you!


SkipCohenUniversity – SCU Blog

Posted in Photograpy How To | Tagged , , , , | Leave a comment

The Exposure Triangle – A Beginner’s Guide

For many starting out in photography, the relationship between aperture, shutter speed, and ISO can be confusing. To further muddy the water, the terms ‘stop’ and ‘f-stop’ are often used interchangeably but refer to different things. In this article, I would like to take some of the mystery out of these concepts by talking about the exposure triangle and why it is important to understand for those who are starting out. Please keep in mind that the concepts in this article are oversimplified to make it easy for beginners to understand, especially when it comes to ISO.

1) The Exposure Triangle

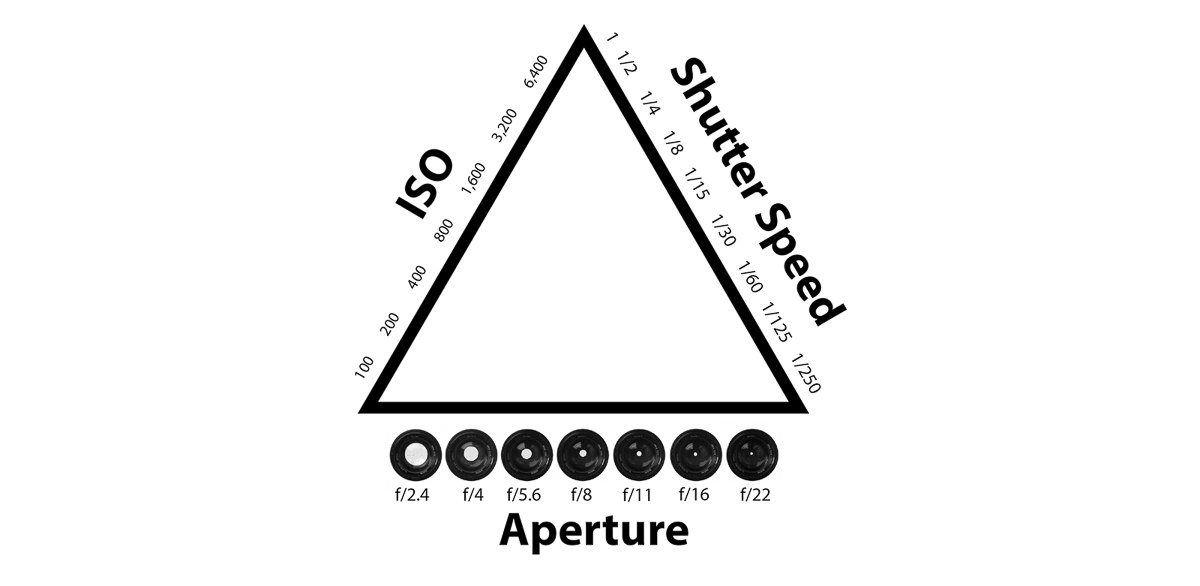
Aperture, shutter speed, and ISO make up the three sides of the exposure triangle. They work together to gather the amount of light needed for a correctly exposed photograph. If one variable changes, at least one of the others must also change to maintain the correct exposure.

The exposure triangle 2

2) Stop!

Before we go too far, let’s start our discussion by talking about a stop of light. Understanding what a stop is is key to understanding the exposure triangle. In photography, a stop refers to the doubling or halving of the amount of light that makes up an exposure. Each photo that we take requires a certain quantity of light to expose it correctly. Adding a stop of light by doubling the exposure will brighten an underexposed image. Conversely, decreasing an exposure by one stop (halving the amount of light) will darken an overexposed image.

So how do you add or take away a stop of light? To do this, we need to change the aperture, shutter speed, and/or ISO. Let us look at each of these individually.

3) Shutter Speed

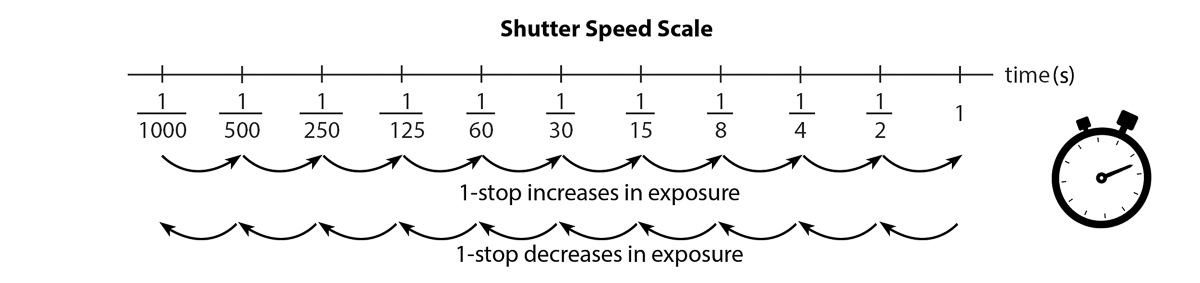
Shutter speed is the length of time light is allowed to hit the sensor. It is measured in seconds. Shutter speed is probably the easiest of the exposure triangle sides to understand. To double the amount of light, we need to double the length of the exposure. For example, moving from a shutter speed of 160 s to 130 s will add a stop of light because the shutter will remain open twice as long. Changing from a shutter speed of 1s to 1/8 s will decrease the exposure by three stops. Why? From 1s to 12 s is one stop. Then 12 s to 14 s is another stop. Finally, 14 s to 18 s is a further halving of the time the shutter remains open or the third stop.

Print

4) Aperture

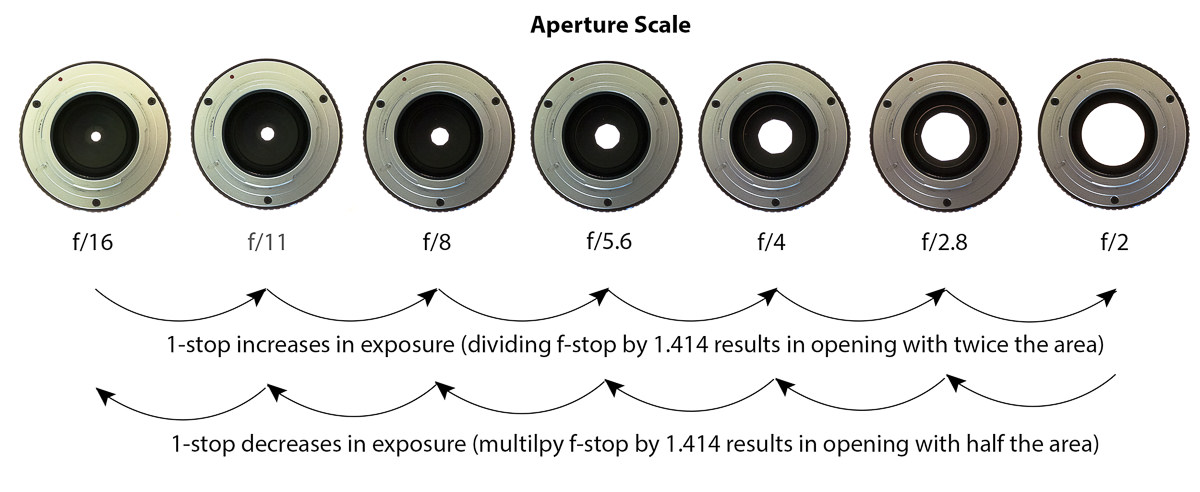
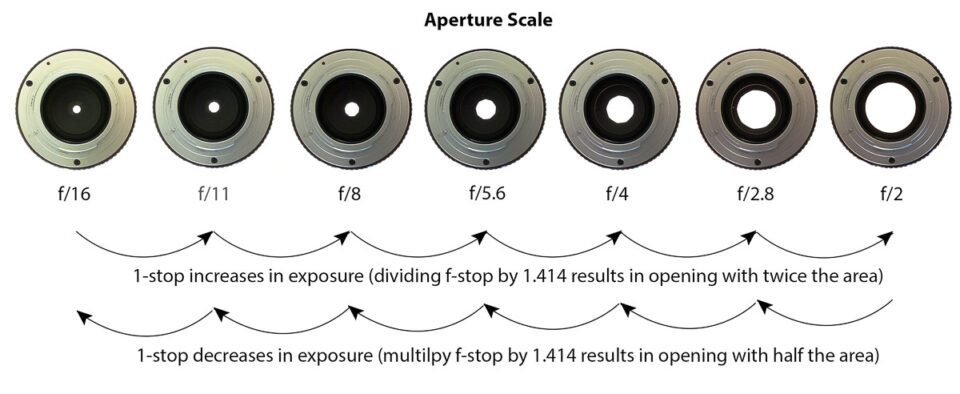
Aperture refers to the size of the circular hole in the lens that lets in light. The bigger the hole, the more light that reaches the sensor. In fact, each time you double the area of that opening, you double the amount of light or increase the exposure by one stop. On the other hand, if you half the area of the opening, you half the amount of light hitting the sensor. And you guessed it; that will decrease the exposure by one stop.

Now without getting too technical, an f-stop is a ratio that relates to the size of that opening. Mathematically it is equal to the focal length of the lens divided by the diameter of the lens. At first glance the values on the f-stop scale are confusing. The numbers don’t seem to make any sense. Why do small values correspond to larger openings and vice versa? For a simple explanation, keep reading.

To understand why large f-stop numbers refer to small openings and small f-stop numbers refer to large openings requires a bit of math. Don’t worry; I will try and keep it simple. If you take the ratio I mentioned above:

f-stop = focal length/diameter

and rearrange it for diameter, you get:

diameter = focal length/f-stop

What this means is that for any given focal length, we can calculate the diameter of the aperture by dividing the focal length by the f-stop value. But when you divide a given focal length by a large f-stop number, the result is a small diameter. Therefore, the area of the opening is small. Conversely, if you divide the same focal length by a small f-stop number, you get a large diameter. And a large diameter means a bigger area and more light passing through the opening.

Also, it turns out that to double the area of the opening, the f-stop needs to be divided by the square root of two (1.414). That is why the f-stops are not nice round numbers. To half the area, the f-stop needs to be multiplied by the square root of two.

aperture scale

If you are so inclined, prove this to yourself with a little geometry. Remember that the area of a circle is:

Area = (π/4)diameter2

Try calculating the area of the aperture for a lens with a 50mm focal length using different f-stop values. As you move up the f-stop scale, you should see the areas doubling.

5) ISO

The final variable in the exposure triangle is ISO. You can think of ISO as the sensitivity of the digital sensor (although it is a lot more complicated than that). Higher values of ISO mean that the sensor does not need to collect as much light to make a correct exposure. Low ISO values mean that the sensor will have to gather more light to make the exposure.

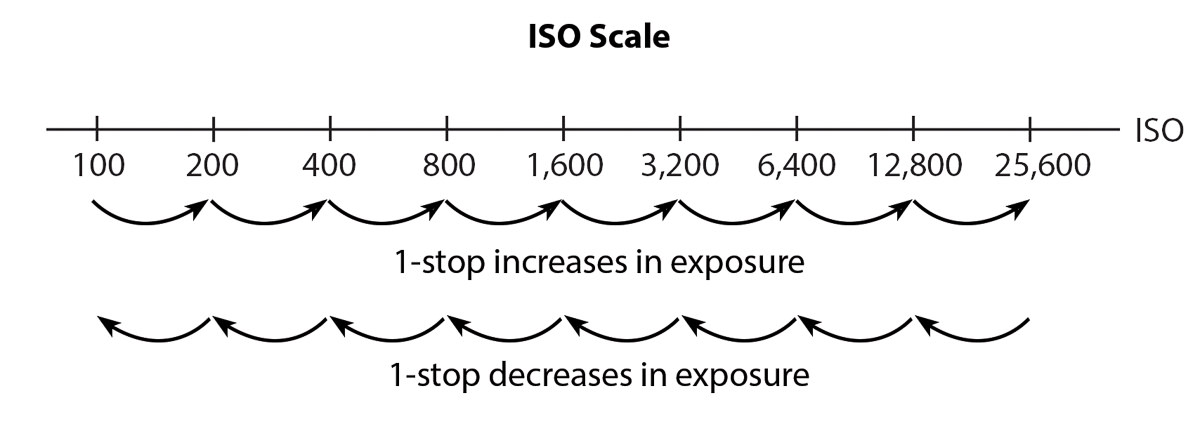
Here is the ISO scale. Like shutter speed, this scale is easy to understand. Doubling the ISO equates to a one stop increase in exposure. Halving the ISO leads to a reduction of the exposure by one stop.

ISO

6) The Bucket Analogy

For any photograph, there is only one mathematically correct exposure. However, there are hundreds of combinations of aperture, shutter speed and ISO that can be used to create that exposure. The combination we choose depends on what our artistic vision for that image is. For now, let’s just look at how the three variables in the exposure triangle work together. In my next article, I will talk about how to use aperture, shutter speed, and ISO artistically.

For any given exposure, if one of the three variables change, you must adjust one (or both) of the others in the opposite direction. For example, if you decided to decrease your shutter speed by two stops, you will need to increase your aperture or ISO by two stops. You could also change both aperture and ISO by one stop with the same effect.

As another example, say you increased your ISO by four stops. Then you would need an equivalent decrease of four stops in aperture or shutter speed (or a combination of the two).

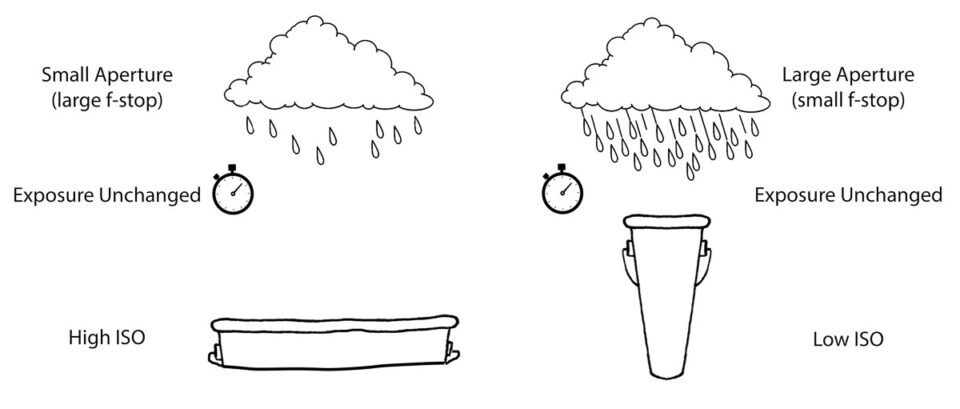
So lets put it all together using an analogy. Instead of light, let’s talk rain. Specifically filling up buckets with rain water. The exposure will be the total amount of water collected. Let’s say our ‘exposure’ is one gallon.

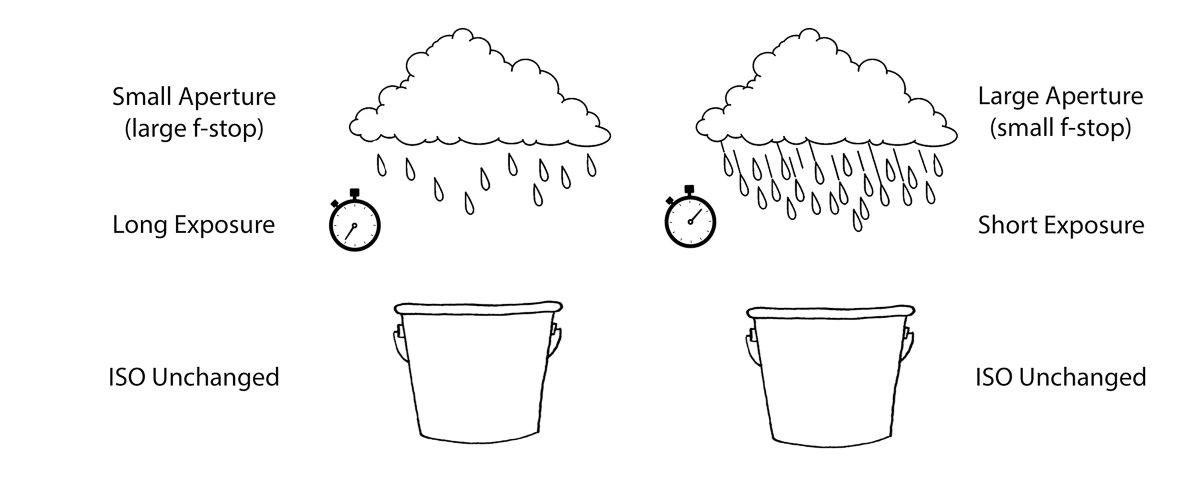
In this analogy, ‘shutter speed’ is the length of time we leave the bucket outside in the rain to fill up. How hard it is raining is our ‘aperture.’ A downpour would be a wide open aperture (large opening, small f-stop number) while a light sprinkle would equate to a tiny aperture (small opening, large f-stop value).

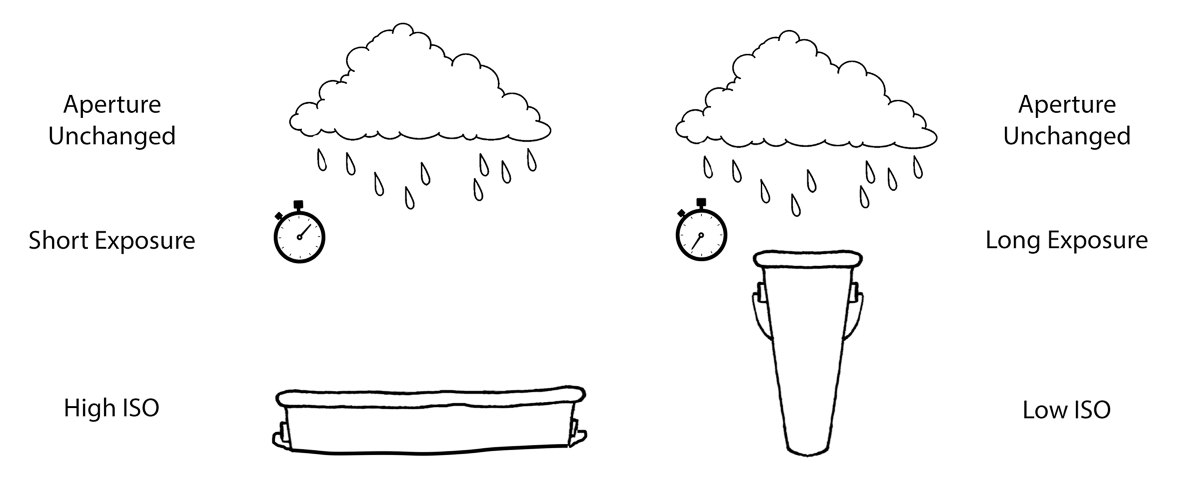
Finally, the width of the bucket represents ‘ISO.’ Now, all our buckets have to measure one gallon to collect the correct ‘exposure.’ However, a very shallow, wide bucket (think very sensitive, high ISO) will fill up much faster than a tall, skinny bucket (low ISO).

There are many scenarios which will collect our one-gallon ‘exposure.’ To make things a bit easier, we will fix one variable, and let the other two change. Let’s start by fixing ISO. If we have two buckets that are the same shape, we could put one out in a downpour for a short length of time to collect one gallon. Or, we could put the other out for a long time during a light sprinkle to collect that same gallon of water. However, if we put the bucket out for a long time in a downpour, we would over expose our image. Water would be spilling out onto the ground! Conversely, putting the bucket out in a light sprinkle for a short length of time would not fill up the bucket. Our bucket would be under exposed.

Fixed ISO Bucket

Here is another scenario. This time lets assume that there is a steady rain. If we have a wide bucket, we won’t need to leave it out for long to collect a gallon of rain. However, if we put out a skinny, tall one-gallon bucket in the same rain, it will take much longer to fill the bucket up.

Fixed Rain bucket

Lastly, let’s fix the time we leave the buckets outside. To collect one gallon of water we could put the wide, shallow bucket out in a light rain. Or, we could put the tall, skinny bucket out in a downpour for the same time to collect exactly one gallon of rain water.

Exposure Unchanged Bucket

As you can see, there are lots of combinations of ‘shutter speed,’ ‘aperture’ and ‘ISO’ that yield one gallon of ‘exposure.’ Is one combination better than another? Well, that depends on how you want your photograph to look. What is important is the understanding that if you increase or decrease one variable in the exposure triangle by a number of stops, you must make up for that by decreasing or increasing one of the others (or a combination of the others) by an equal number of stops.

7) Conclusion

A stop is the doubling or halving of the light that makes up an exposure. We can add or subtract stops by changing the aperture, shutter speed, or ISO. So the next time someone tells you that you need to increase your exposure by a couple of stops, you will hopefully know what they mean and how to do it.

I hope you found this article useful. If you have any questions, please feel free to ask in the comments section below.

The post The Exposure Triangle – A Beginner’s Guide appeared first on Photography Life.

Photography Life

Posted in Photograpy How To | Tagged , , , | Leave a comment

Nikon 24-70mm f/2.8G Review

This is an in-depth review of the Nikon 24-70mm f/2.8G ED lens that was released back in August of 2007 together with the 14-24mm f/2.8G ED lens. I have owned a number of different copies of the Nikon 24-70mm for many years, pretty much from the day the lens was announced and I have probably spent the most amount of time in the field shooting with this lens. Since it is a workhorse pro-level lens, I have used it for many different types of photography – from portraiture to landscapes. I have used it in hot summer days and freezing sub-zero temperatures; carried it from wet and humid climates to dry and dusty environments. Throughout many years of use and abuse, the 24-70mm f/2.8G ED has never let me down, so overtime, it became one of my most used Nikkor zoom lenses in my arsenal.

NOTE: This review has been updated with the latest data and images in preparation of the upcoming Nikon 24-70mm f/2.8E VR review, which I will post by the end of the week! I apologize for delaying the 24-70mm f/2.8E VR review for so long, but now that I have tested 4 different samples, I have all the information I need to complete the review. The Nikon 105mm f/1.4E review will be the next in line after that.

Nikon 24-70mm f/2.8G

1) Lens Overview

The AF-S NIKKOR 24-70mm f/2.8G ED lens is a truly versatile lens that can be used for many different kinds of photography needs – from wide-angle landscapes and panoramas, to portraits and events. With its constant aperture of f/2.8 (meaning the aperture does not change while zooming) and state of the art optics, the lens is targeted towards enthusiasts and professionals, who work in various conditions and need exceptional sharpness, color and contrast in their images – something the Nikon 24-70mm f/2.8G is made to deliver. It replaced the older Nikon 28-70mm f/2.8D lens and its optics were completely redesigned for superior performance and extra coverage on the wide-end. Featuring 15 lens elements in 11 groups, 3 out of which are ED (Extra-low Dispersion) glass elements that reduce chromatic aberration and increase sharpness, the lens is a heavyweight monster weighing a whopping 31.7 oz. (900 grams), which is heavier than many Nikon DSLRs! In addition to the Silent Wave Motor (SWM/AF-S) that provides fast, accurate and quiet auto focus, the Nikon 24-70mm f/2.8G also features Nano Crystal Coating technology, which helps reduce ghosting and flare. When it comes to weather sealing, the 24-70mm f/2.8G is designed to be well-protected against dust, moisture and tough weather conditions (see more under the lens handling section on the next page).

Why I Love Colorado (3)

NIKON D700 + 24-70mm f/2.8 @ 24mm, ISO 800, 1/1600, f/8.0

Along with the Nikon 14-24mm f/2.8G, the Nikon 24-70mm f/2.8G was specifically made for earlier FX (full-frame) DSLR camera bodies like Nikon D700/D3/D3s/D3x, but it also works quite well on most modern high-resolution DSLR cameras such as the Nikon D750 and D810. Along with the Nikon 14-24mm f/2.8G and the Nikon 70-200mm f/2.8G VR II, it used to represent Nikon’s “Trinity” of lenses, until it got replaced by the image-stabilized Nikon 24-70mm f/2.8E VR. Just like other Nikon full-frame lens, the 24-70mm works well on any DX camera, although with a crop factor of 1.5x (which makes it equivalent to 36-105mm in field of view), it might feel a bit too long on the wide end.

Why I Love Colorado (4)

NIKON D700 + 24-70mm f/2.8 @ 45mm, ISO 200, 1/100, f/10.0

As I have pointed out earlier, throughout the years of owning a number of different copies of the lens, the Nikon 24-70mm f/2.8G used to be my #1 workhorse lens for my photography needs. Whether I shot weddings, events or landscapes, I would not leave my house without it. Although I have used a wide array of different lenses, no other lens saw as much use as the 24-70mm. The primary reason is its versatility. Thanks to its very useful focal length range, along with a large maximum aperture of f/2.8, it worked out great for photographing many different types of subjects. Zoomed into 50-70mm, it also served me well as a portrait lens, thanks to its ability to beautifully render out of focus areas. So besides being my top travel and landscape photography lens, the Nikon 24-70mm f/2.8G saved me a few times during various photo sessions both in studio and outdoors environments.

In terms of optical performance, the Nikon 24-70mm is a superb performer, providing sharp and contrasty images, especially once stopped down. It has its issues for sure, whether it comes to significant levels of distortion and vignetting, or poor corner performance at large apertures, thanks to the rather heavy field curvature issues (as explained in the next pages of the review). It is a big and heavy lens, which can make it challenging to handle, particularly for those, who have problems with their hands, shoulders or backs. It is primarily because of my carpal tunnel that I decided to sell my copies of the 24-70mm f/2.8G and move down to the lighter and slightly more versatile (in terms of focal length) 24-120mm f/4G VR. However, thanks to its amazing build quality, the lens is made to last a lifetime – it can take a lot of beating in the field and it can survive all kinds of weather and environmental conditions.

Why I Love Colorado (21)

NIKON D750 + 24-70mm f/2.8 @ 60mm, ISO 100, 1/3, f/5.6

2) Lens Specifications

Main Features:

  • Fast, wide-angle to medium Telephoto AF-S zoom lens optimized for edge-to-edge sharpness on both the Nikon FX (23.9 x 36mm) and DX format image sensors.
  • Two Extra-low Dispersion (ED) elements and PGM aspherical lenses control chromatic aberrations while enhancing sharpness and contrast, even at the widest aperture settings.
  • Nikon’s Silent Wave Motor (SWM) enables ultra high-speed auto focusing with exceptional accuracy and powerful, super-quiet operation.
  • Focus as close as 14.9 inches.
  • M/A focus mode switch enables quick response to changing situations between manual and auto focus operation.
  • Enhanced optical formulas engineered to produce exceptional sharpness, contrast and color, rendering outstanding image integrity.
  • Exclusive Nano Crystal Coat further reduces ghosting and flare for even greater image clarity.
  • Internal Focus (IF) provides fast and quiet auto focusing without changing the length of the lens, retaining subject-working distance through the focus range.
  • Rugged construction with professional-grade dust and moisture resistance.

Technical Specifications:

  1. Mount Type: Nikon F-Bayonet
  2. Focal Length Range: 24-70mm
  3. Zoom Ratio: 2.9x
  4. Maximum Aperture: 2.8
  5. Minimum Aperture: 22
  6. Maximum Angle of View (DX-format): 61°
  7. Minimum Angle of View (DX-format): 22° 50′
  8. Maximum Angle of View (FX-format): 84°
  9. Minimum Angle of View (FX-format): 34° 20′
  10. Maximum Reproduction Ratio: 0.27x
  11. Lens (Elements): 15
  12. Lens (Groups): 11
  13. Compatible Format(s): FX, DX, FX in DX Crop Mode, 35mm Film
  14. Diaphragm Blades: 9
  15. Distance Information: Yes
  16. Nano Crystal Coat: Yes
  17. ED Glass (Elements): 3
  18. Aspherical (Elements): 3
  19. Super Integrated Coating: Yes
  20. Autofocus: Yes
  21. AF-S (Silent Wave Motor): Yes
  22. Internal Focusing: Yes
  23. Minimum Focus Distance: 1.2ft.(0.38m)
  24. Focus Mode: Auto, Manual, Manual/Auto
  25. Filter Size: 77mm
  26. Accepts Filter Type: Screw-on
  27. Dimensions (Approx.): 3.3×5.2 in. (Diameter x Length), 83x133mm (Diameter x Length)
  28. Weight (Approx.): 31.7 oz. (900g)
  29. Lens Case: CL-M3
  30. Lens Hood: HB-40
  31. Supplied Accessories: LC-77 77m snap-on front lens cap, LF-1 rear lens cap, HB-40 Bayonet Hood, CL-M3 Semi-soft Case

Detailed specifications for the lens, along with MTF charts and other useful data can be found in the Nikon AF-S NIKKOR 24-70mm f/2.8G ED page of the lens database.

Yellowstone Lake Sunrise

NIKON D700 + 24-70mm f/2.8 @ 32mm, ISO 200, 1/30, f/11.0

The post Nikon 24-70mm f/2.8G Review appeared first on Photography Life.

Photography Life

Posted in Photograpy How To | Tagged , , , | Leave a comment

2016 Holiday gift guide for photographers (& stocking stuffers!)

Are you ready for the holidays?

We’ve pulled together some of our favorite hand-picked products for the modern photographer to help you out with your shopping!

What to buy a photographer for Christmas at the Clickin Moms store

1. Mom’s Gonna Snap Tee: Wear this comfy shirt and you are sure to get a laugh from anyone that passes by! Tee features our new Mom’s Gonna Snap design on a slate colored, very flattering tri-blend tee that has a slightly longer body than most t-shirts. $ 25

2. The Westminister by Kelly Moore Bags: Handcrafted from premium ultra nappa full grain cowhide. This is a camera bag that gives you so much Moore. This relaxed, hobo bag can also double as a diaper bag that you’ll be proud to carry. $ 445

3. Lomo’Instant Sanremo + 3 Lenses: A perfectly sized instant camera to take wherever you go! The camera has a classy, retro brown design and it’s the most creative way to shoot marvelous photos which you can share anywhere and with everyone in an instant. $ 135

4. ONA Camera Bags: Pictured is the The Leather Capri, a chic, understated tote designed to protect a camera, up to three lenses and small personal items. Handcrafted with Italian-tanned leather that develops a rich patina over time, the Leather Capri has a personal items compartment that can fit a tablet or 11-inch laptop, two interior pockets for personal items and a zipped back pocket. Includes a detachable crossbody strap. $ 359

5. Coffee & Cameras Mug: A modern ceramic mug that features the saying “coffee & cameras” – a perfect gift for your favorite coffee or cocoa loving photographer! $ 15

6. Bloom Theory Camera Straps: Wear your camera with style! Fashionable scarf camera straps for the everyday photographer. 12 designs available. $ 79

7. It’s Golden Hour Somewhere Tee: It’s all about the light when you talk to a photographer! $ 25

8. eLearning Products: Learn a new skill, challenge yourself creatively or just gain some of the inspiration you crave with our huge range of eLearning opportunities. $ 30+

9. Capture The Moment Book: This modern guide to photography pairs big, bold images with short, focused tips for translating everyday life into stunning works of art. Featuring contributions by the members of Clickin Moms, the photography industry’s largest social network of female photographers, this guide captures the beauty of family life. $ 21

stocking stuffers for photographers from the Clickin Moms store

1. Coffee & Cameras Tee: “Coffee & Cameras” two of our favorite things! Wear it proudly with the light vintage print on a slate colored, very flattering tri-blend tee that has a slightly longer body than most t-shirts. $ 25

2. Hand Stamped Crossbar Necklaces: Wear your love for photography with style! These gorgeous necklaces are each handcrafted with your choice of the following sayings: “light seeker” in 14K Yellow Gold filled, “memory keeper” in Rose Gold filled, “snap happy” in .925 Sterling Silver! $ 35-$ 65

3. Wooden Camera Tape Dispenser: Now you can have a little retro flair on your desk while you work! A perfect gift for any photographer. $ 25

4. Capturing Couture Camera Straps: There’s no doubt about it…scarves are one of THE hottest trends…What better way to jump on this trend than our newly released Scarf Camera Straps! 4 styles available. $ 39

5. Canvas Totes: Shop in style with these cute, photography related canvas totes that are perfect for your on-the-go needs! 4 styles available. $ 20

6. Lensbender-Freelensing Solution: The Lensbender is a freelensing accessory designed to suspend your lens in front of your camera. $ 60

7. Photographer’s Charm Necklace: A fun accessory for any photographer lover. This necklace is not only stylish; the whistle really works and can grab any kids attention during a session! $ 30

8. Wooden Anagram Toy Camera: Let your child’s imagination capture those moments with this handmade wooden camera by Twig Creative!! It was inspired from everybody’s favorite app Instagram!! $ 35

With all of these great choices, we know you still may be having trouble picking out that perfect gift. If that’s the case, why not pick up a Click & Co Store Gift Certificate or a Click Magazine Subscription: the gift that lasts all year long!!

Clickin Moms photography forum

The post 2016 Holiday gift guide for photographers (& stocking stuffers!) appeared first on Clickin Moms.


Clickin Moms

Posted in Photograpy How To | Tagged , , , , , , | Leave a comment

Amazing Fuji XF Lens Deals!

I have just received an email from one of our readers, who pointed out an amazing deal that’s taking place right now at Adorama for the Fuji XF 23mm f/1.4R lens – one of the best lenses for the Fuji X mount. Basically, in addition to the standard Fuji rebates that are taking place right now, you get an additional discount in a form of a Gift Certificate. This means that the XF 23mm f/1.4R is getting discounted to $ 649 through the instant $ 250 rebate (original price of the lens is $ 899) and on top of that, you are getting a $ 100 gift certificate, bringing the total down to $ 549! Now that’s one killer price and it looks like a few other lenses are also discounted in a similar manner.

Fujifilm XF 23mm f/1.4 R

Here are all the best deals we could find at Adorama, with the additional gift certificates:

These are, without a doubt, some of the best prices we have seen on Fuji XF lenses! I am personally buying the 23mm f/1.4 R, along with the 56mm f/1.2 lenses, but if you don’t yet have the 35mm f/1.4 or the 14mm f/2.8, those are definitely worth buying for this price as well.

The post Amazing Fuji XF Lens Deals! appeared first on Photography Life.

Photography Life

Posted in Photograpy How To | Tagged , , , | Leave a comment