Ever since it was introduced back in 1993, the DC Nikkor 105mm f/2 DC has been a classic – it was one of the most favored lenses for film portrait photographers and when digital came about, many photographers continued using the stellar lens to create stunning portraits. It took Nikon 23 years to bring out an update in the form of the Nikon AF-S NIKKOR 105mm f/1.4E ED – a drastically different lens in every way. Although Nikon decided to eliminate the de-focus control feature on the new 105mm, the biggest change is in fact the maximum aperture: at f/1.4, it is a much brighter lens compared to its predecessor. A full stop brighter, which is a huge difference for a portrait lens of this class. With this update, Nikon claimed another “world’s first” title, since no other manufacturer has ever been able to make a 105mm telephoto lens with such a wide aperture. In this review, I will detail my personal experience with the new Nikon 105mm f/1.4E lens and compare it to its predecessor, the 105mm f/2 DC.
Keep in mind that it is very challenging to optically design f/1.4 telephoto lenses without making lenses outrageously big and expensive. It took Nikon engineers quite a bit of effort to balance size, weight and cost to make the 105mm f/1.4E, so that it is not significantly bigger and heavier compared to its predecessor. The Nikon 200mm f/2G VR II is one heck of a lens, but it is a monster – at 3 kilos and a price tag of $ 5,699, it is a hard lens to justify for many portrait photographers. Nikon obviously beefed up the 105mm f/1.4E with all the new technologies, including an electronic diaphragm, Nano Crystal Coat, fluorine coating and a total of 3 extra-low dispersion (ED) lens elements to make it a very sharp lens. In order to achieve ultimate sharpness and contrast, Nikon had to more than double the number of optical elements used in the lens – the Nikon 105mm f/1.4E has a total of 14 elements in 9 groups, whereas the 105mm f/2 DC only had 6 elements in 6 groups. All that extra glass obviously resulted in a lot more weight, some of which Nikon was able to shave off by using a plastic barrel vs a metal barrel used on the 105mm f/2 DC. Still, even with a plastic barrel, the 105mm f/1.4E ended up being 345 grams heavier in comparison. The price has also seen a rather noticeable increase, with the new 105mm costing $ 1K more. A pretty noticeable change for sure.

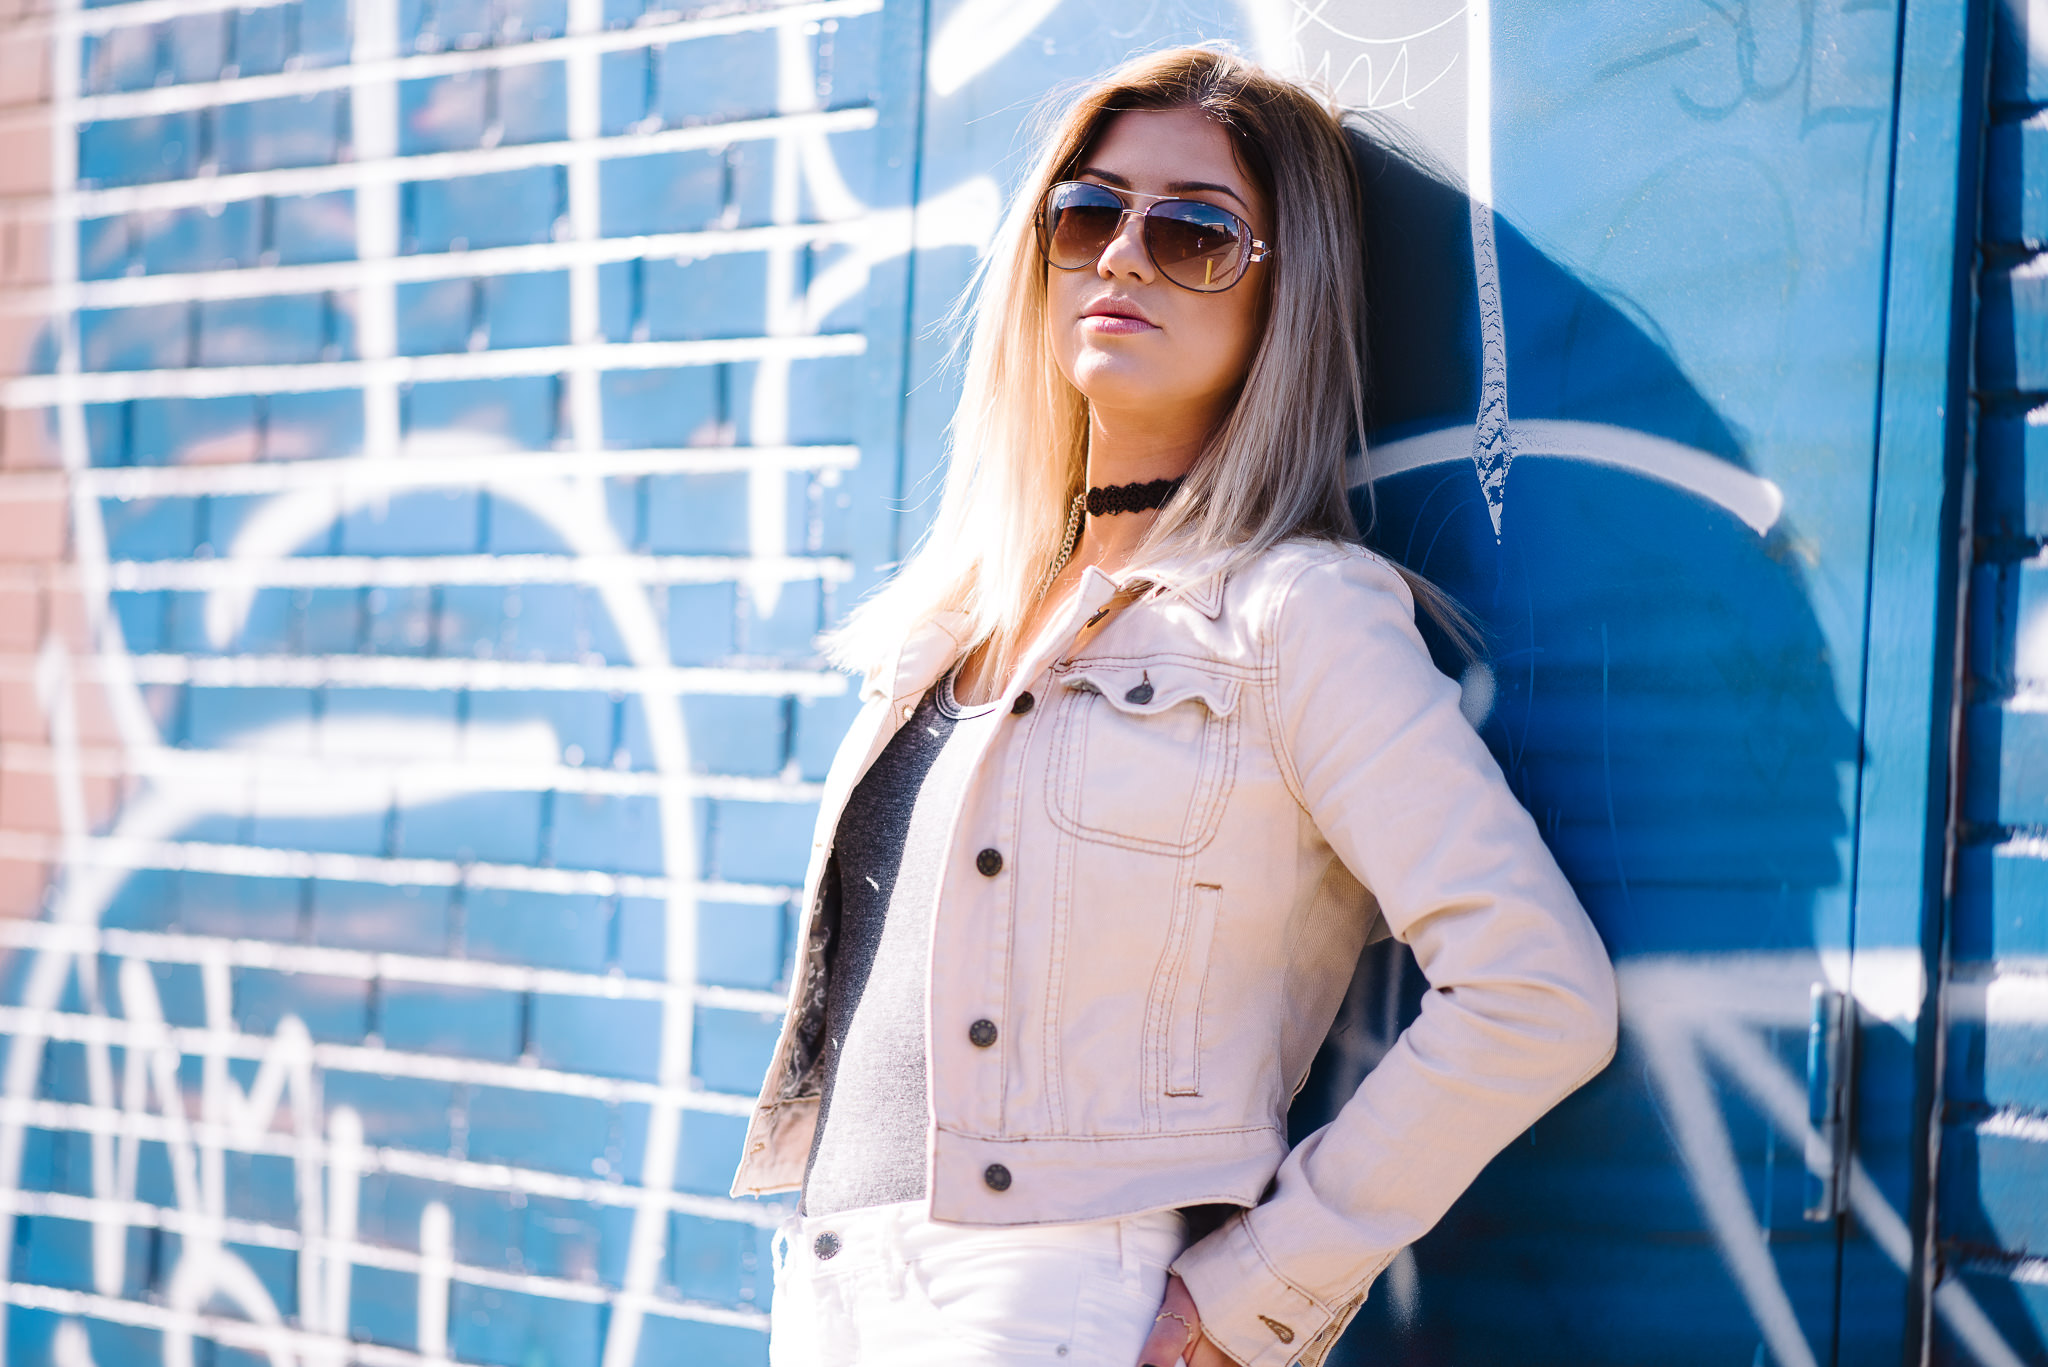
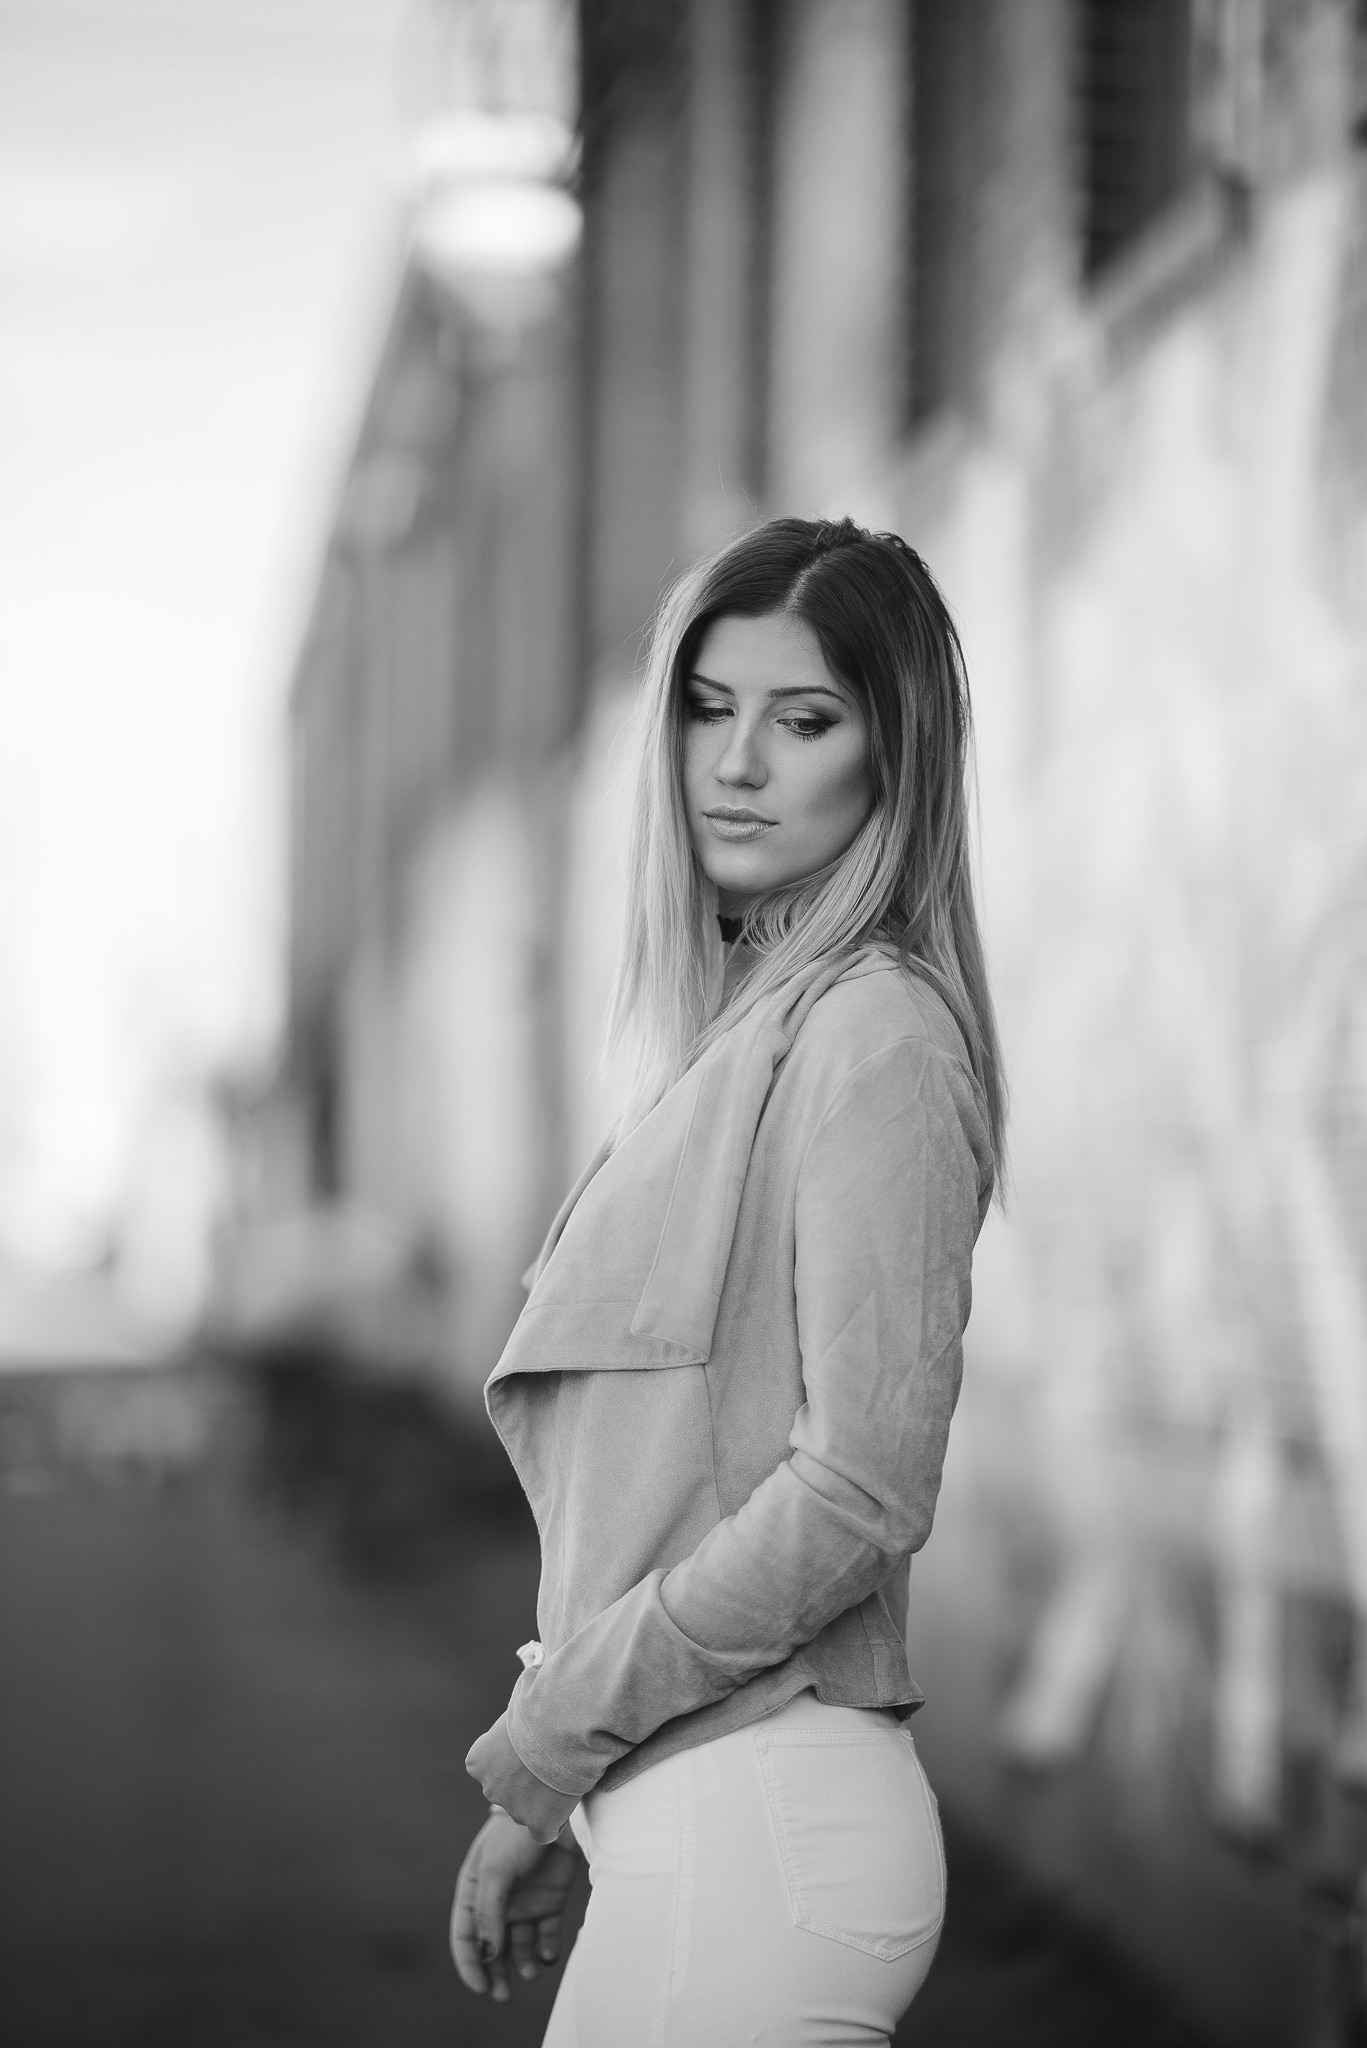
NIKON D750 + 105mm f/1.4 @ 105mm, ISO 200, 1/3200, f/1.4
Let’s take a look at the lens in more detail.
1) Lens Specifications
Key Features:
- World’s first full-frame 105mm with an f/1.4 maximum aperture
- A marvel of optical precision, distortion correction and craftsmanship
- Chromatic aberration, ghosting and flare is minimized by three Extra-Low Dispersion (ED) elements
- Nano Crystal Coat (N) outperforms conventional antireflection coatings over a broad wavelength range for maximum contrast
Technical Specifications:
- Focal Length: 105mm
- Maximum Aperture: f/1.4
- Minimum Aperture: f/16
- Maximum Angle of View: 23°10′ (15°20′ with Nikon DX format)
- Maximum Reproduction Ratio: 0.13x
- Lens Construction: 14 elements in 9 groups
- Number of Diaphragm Blades: 9 (rounded)
- Nano Crystal Coat: Yes
- ED Glass Elements: 3
- Fluorine Coat: Yes
- Autofocus: Yes
- AF-S (Silent Wave Motor): Yes
- Internal Focusing: Yes
- Minimum Focus Distance: 1.0 m/3.3 ft.
- Focus Mode: AF / Manual
- Electromagnetic Diaphragm: Yes
- Filter size: 82mm, screw-on
- Approximate dimensions: 94.5mm x 106mm / 3.7in x 4.2in
- Approximate weight: 985g / 34.8oz.
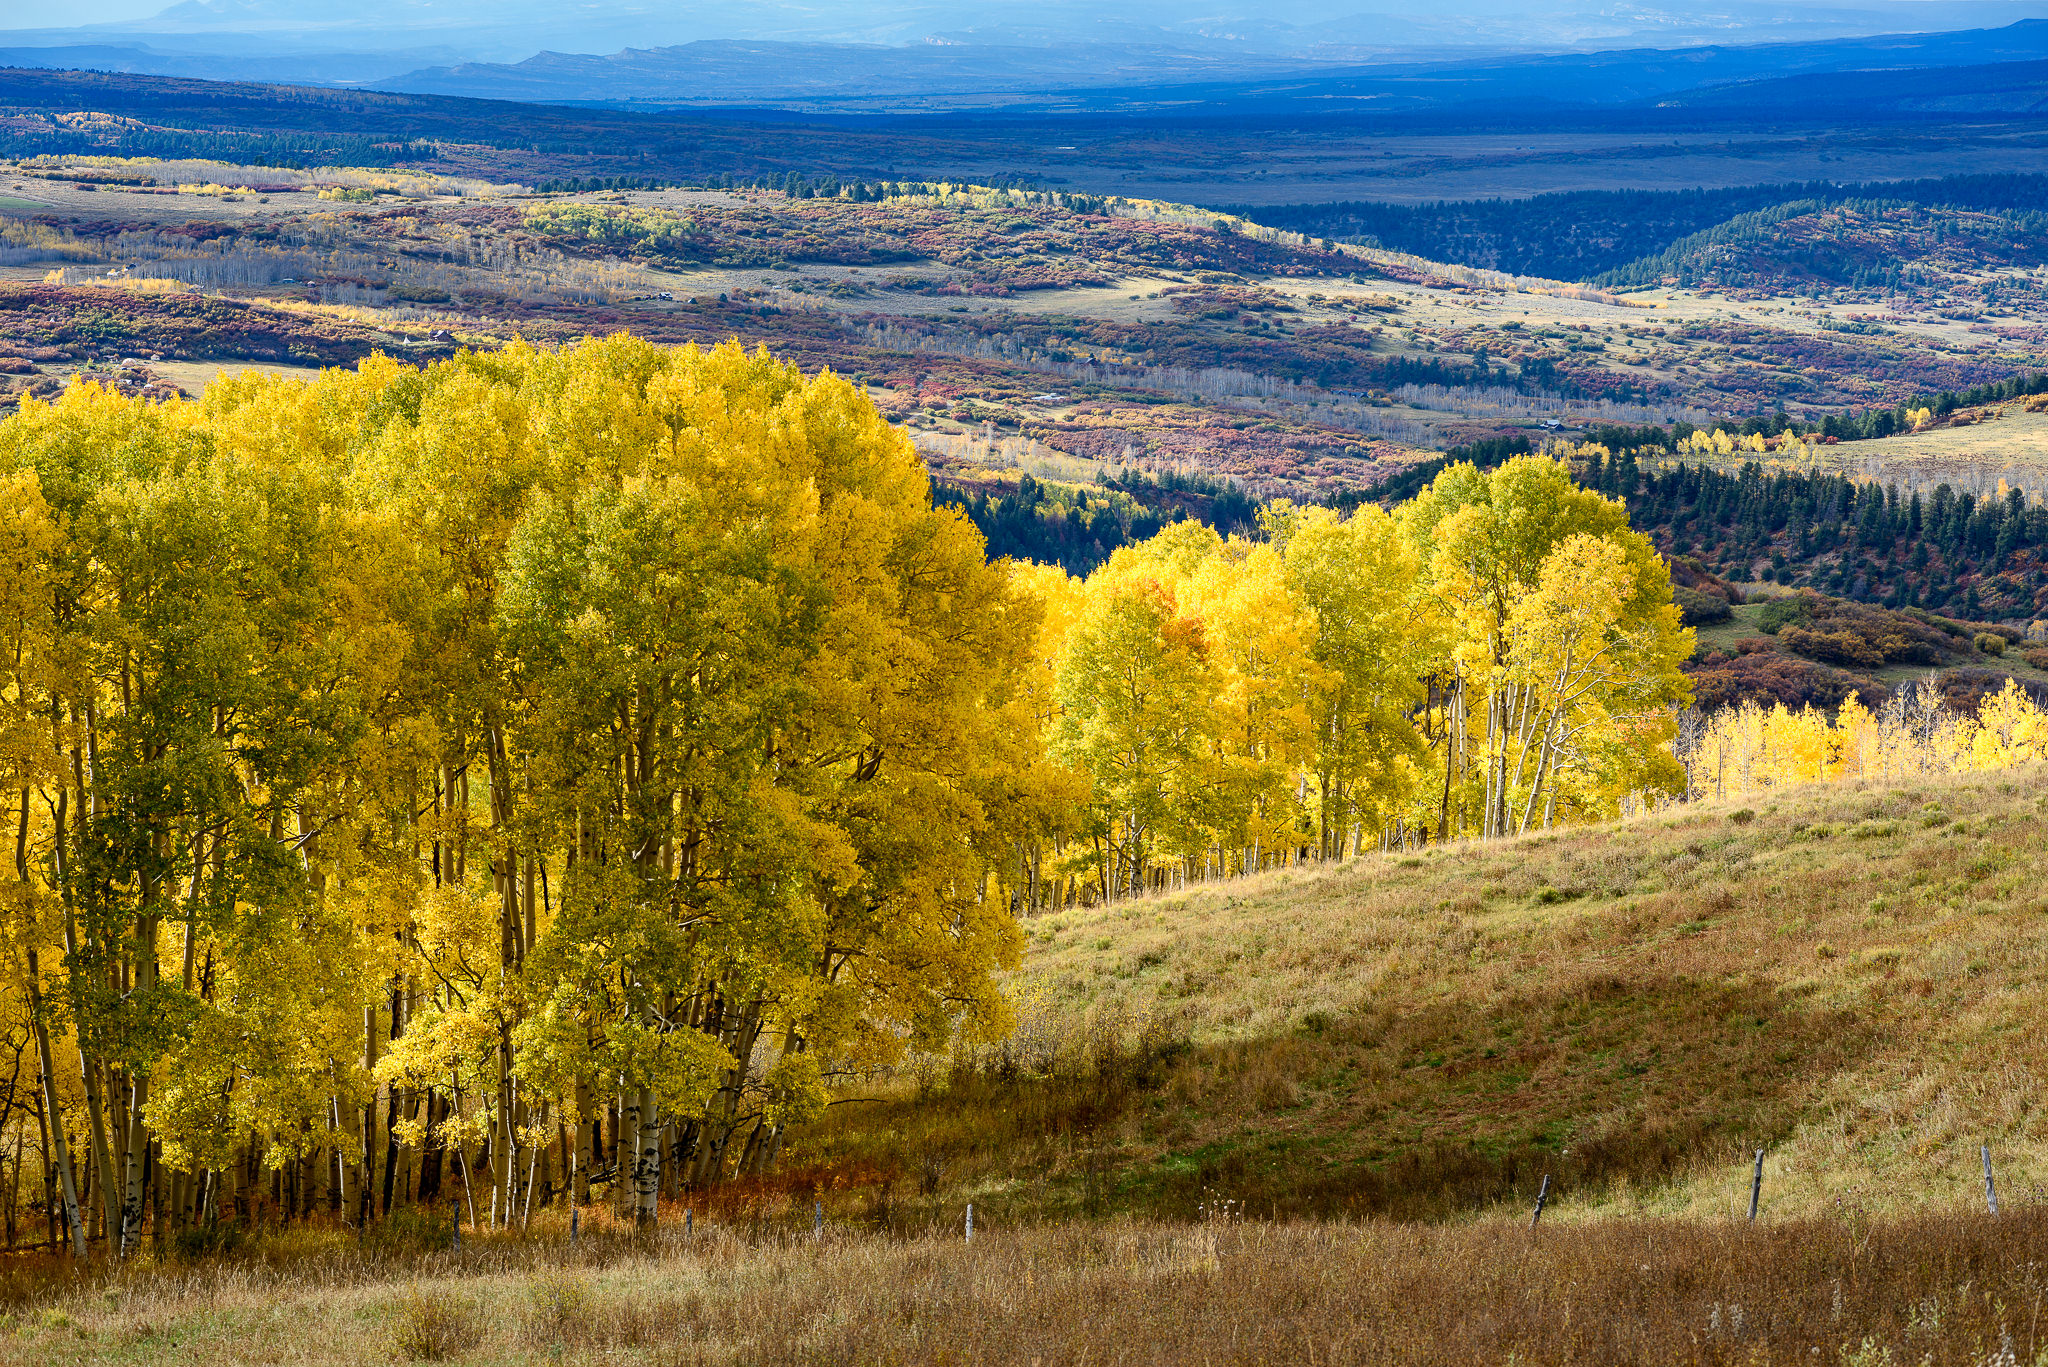
NIKON D810 + 105mm f/1.4 @ 105mm, ISO 100, 1/200, f/5.6
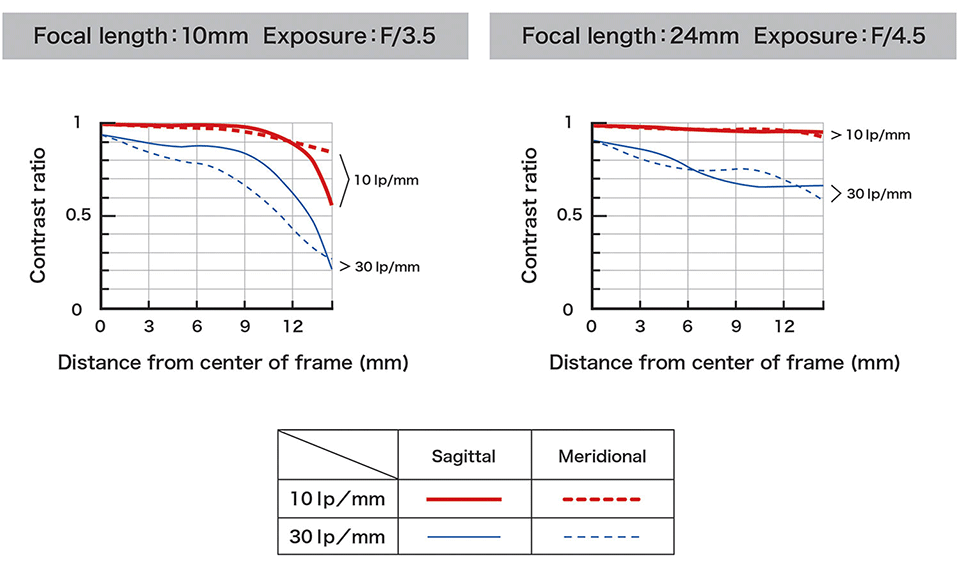
Detailed specifications for the lens, along with MTF charts and other useful data can be found on the Nikon AF-S NIKKOR 105mm f/1.4E ED page of our lens database.
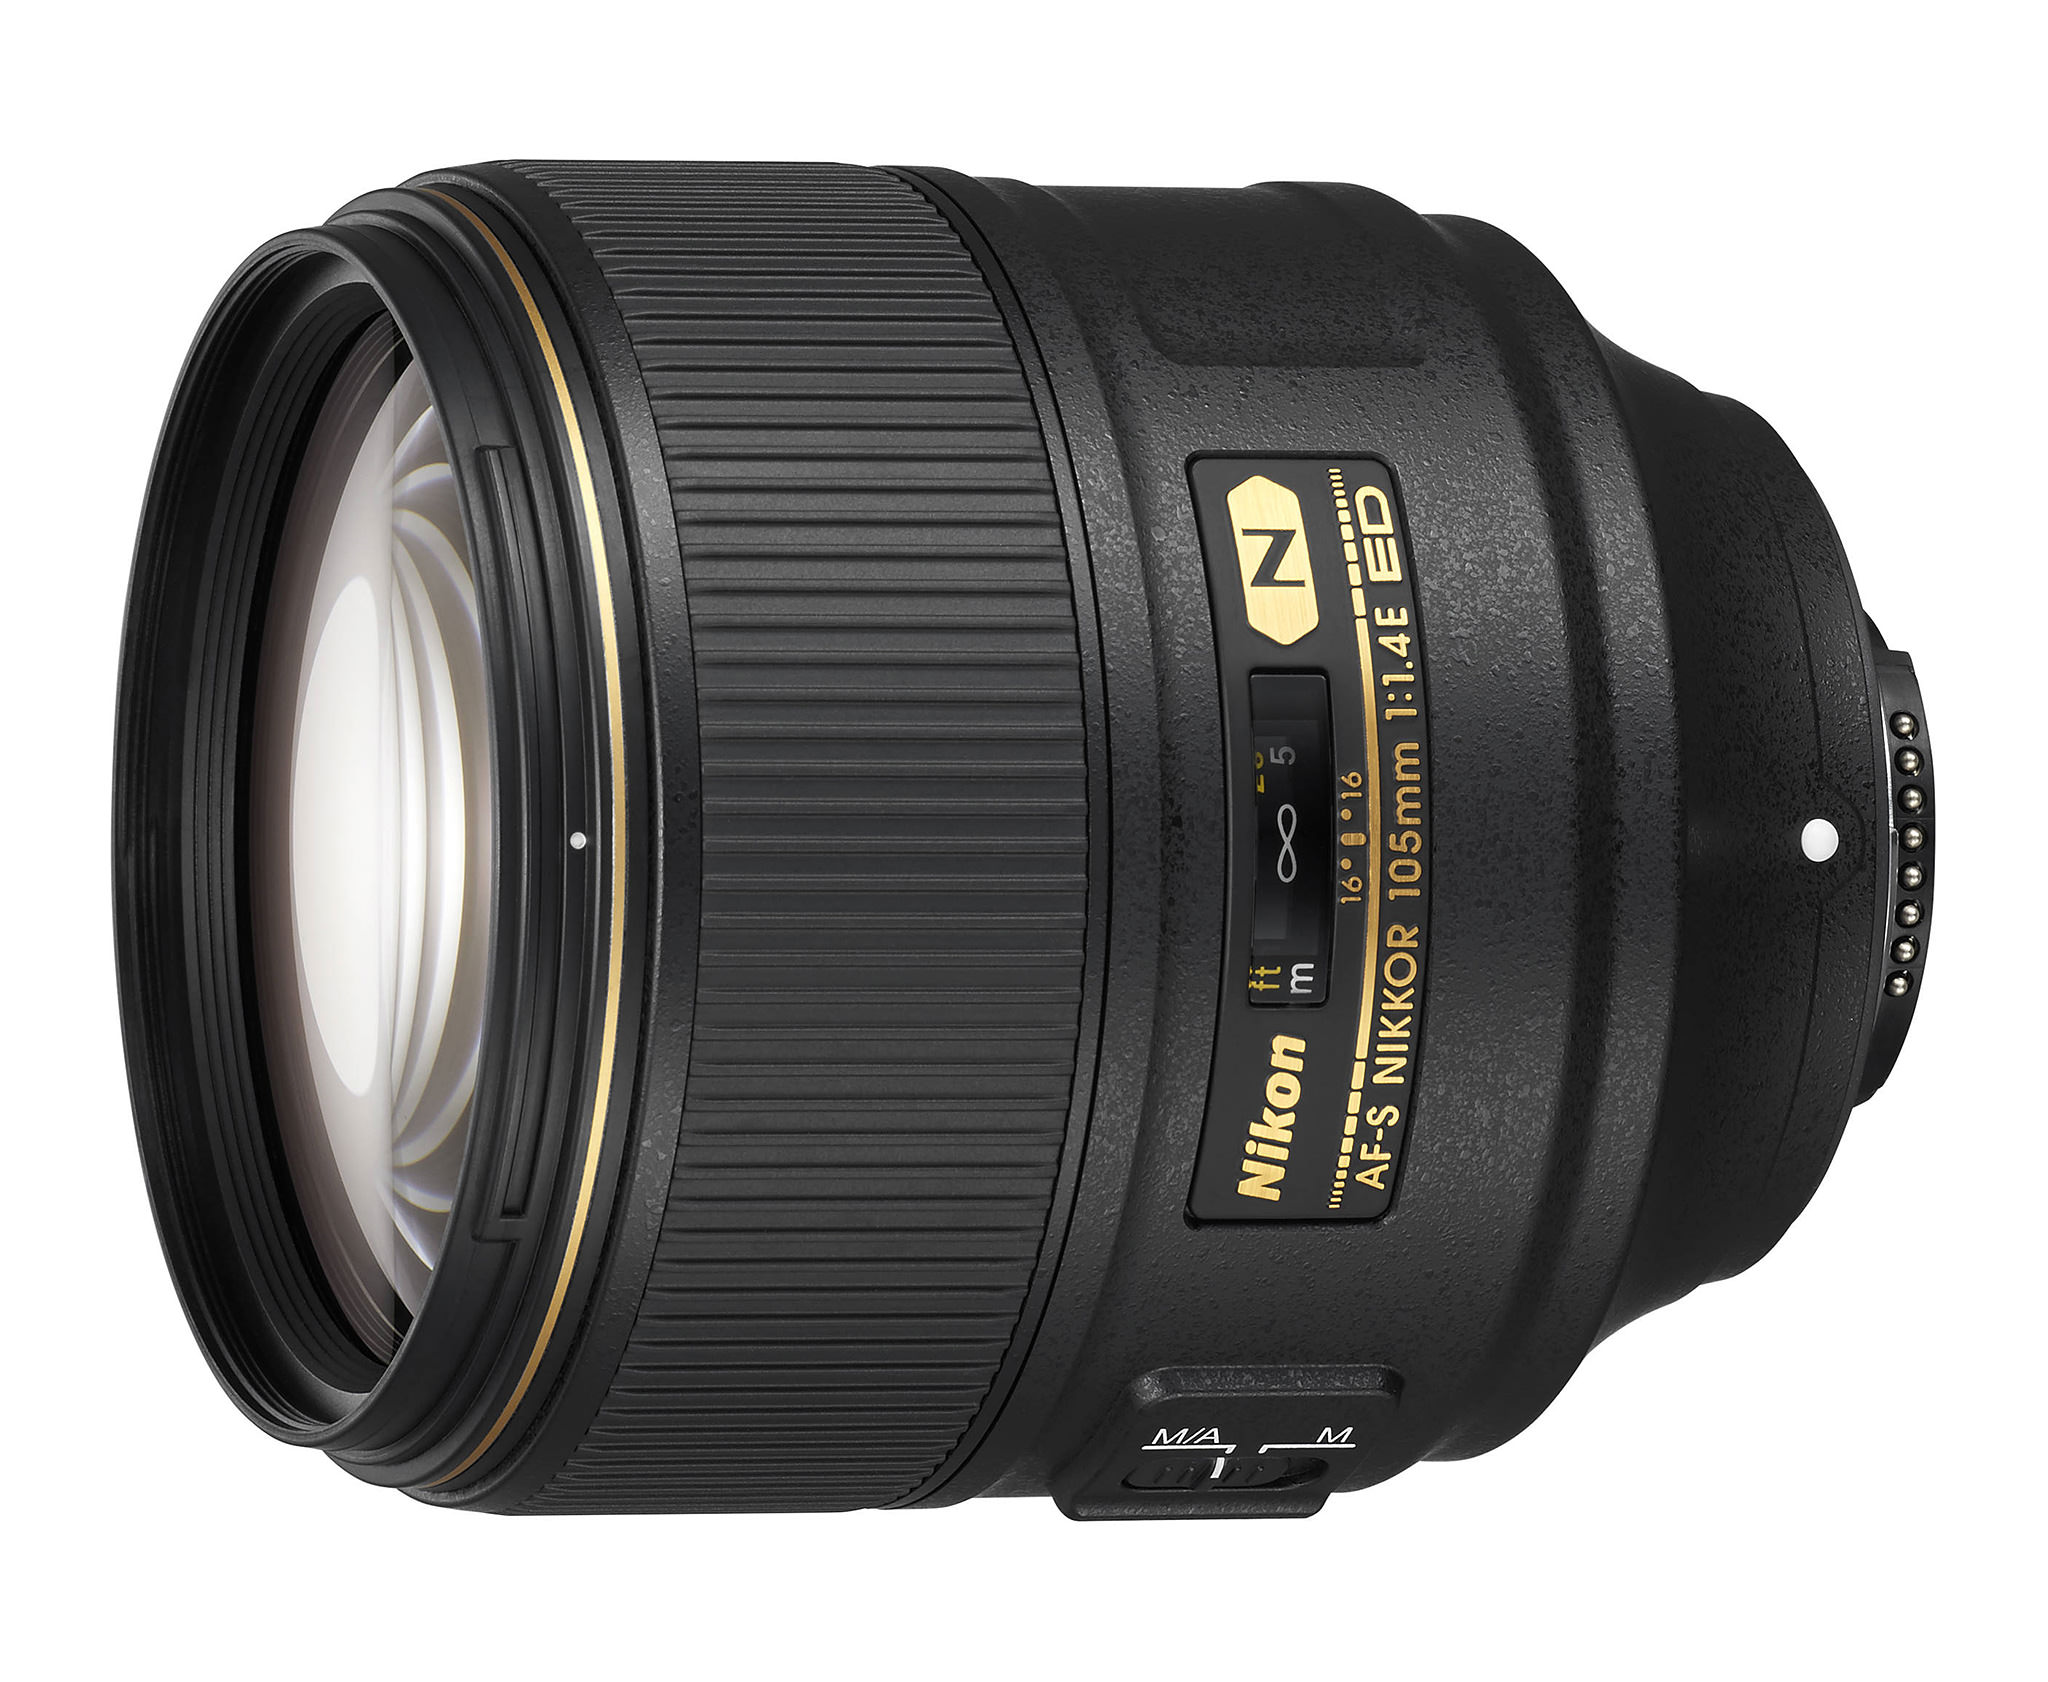
2) Build Quality and Lens Handling
Despite its plastic shell, the Nikon 105mm f/1.4E is built very well, similarly to all other recent high-end Nikon prime lenses. Aside from a boatload of glass, there are plenty of metal components in the lens, as noted by our friend Roger Cicala in this article, where he took the time to disassemble the 105mm f/1.4E. Unlike the 105mm f/2 DC (which also has quite a bit of plastic on its barrel), the finish of the lens is quite smooth and covered with some texture for a solid grip. The focusing ring is very large, which is very useful, as it not only helps with the grip, but also allows for easy focus override using the thumb, index and middle fingers. Similar to other high-end primes, the lower section of the lens has the distance scale with a large “N” imprinted in gold to the right of it, indicating Nano Crystal coating. To the left of the distance scale there is a switch that allows switching from autofocus with manual focus override to manual focus. The back of the lens has “Nano Crystal Coat SWM ED IF”, which basically re-iterates the coating, then the Silent Wave Motor type (SWM), extra-low dispersion optical glass used in the lens (ED) and Internal Focus (IF).
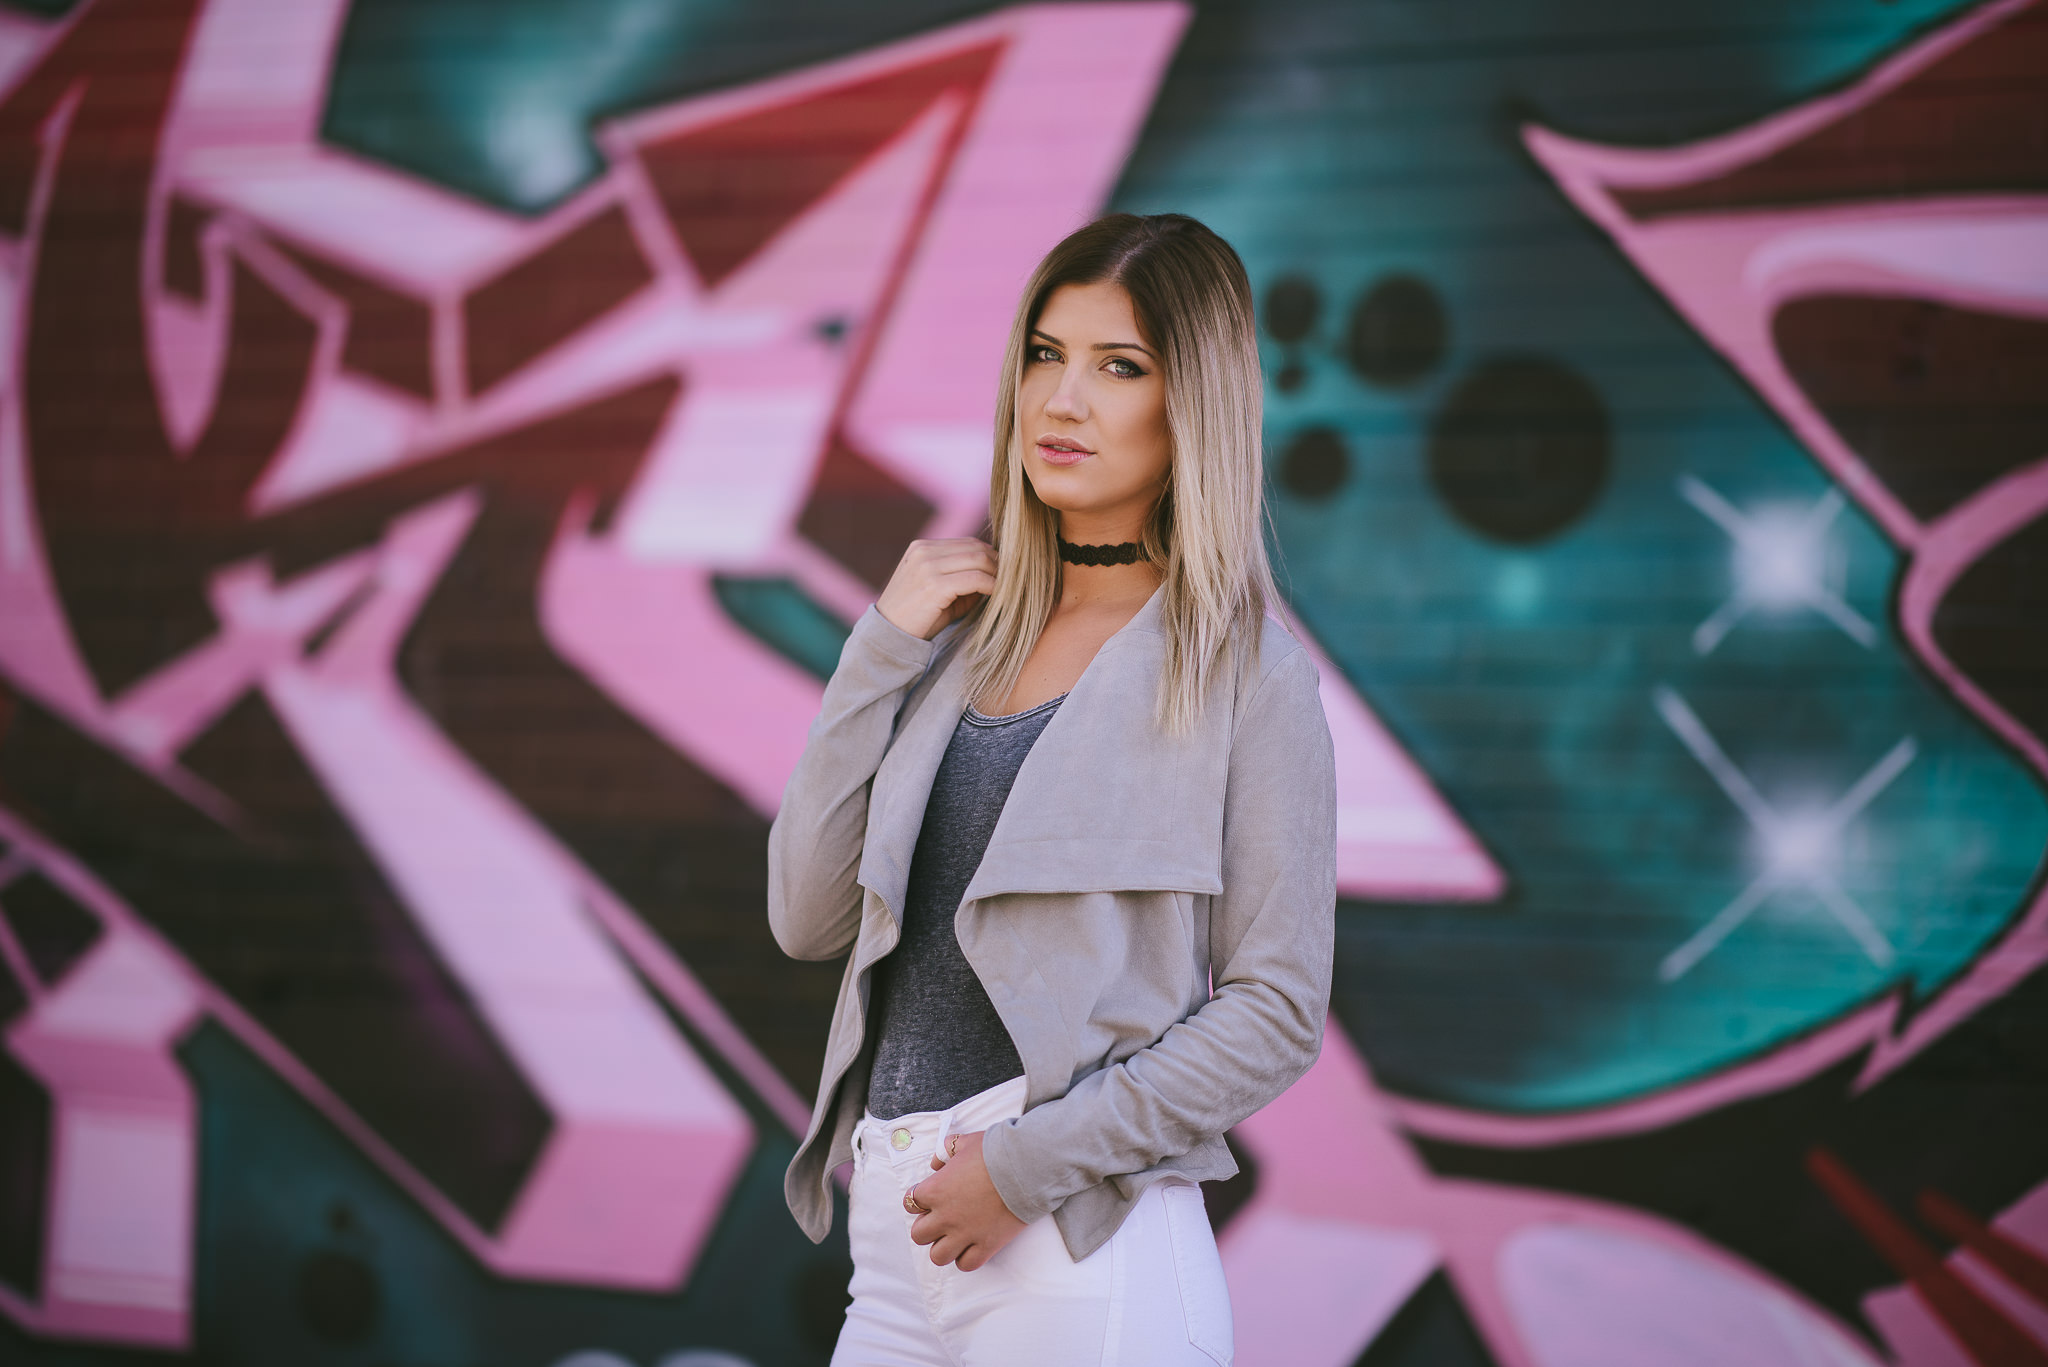
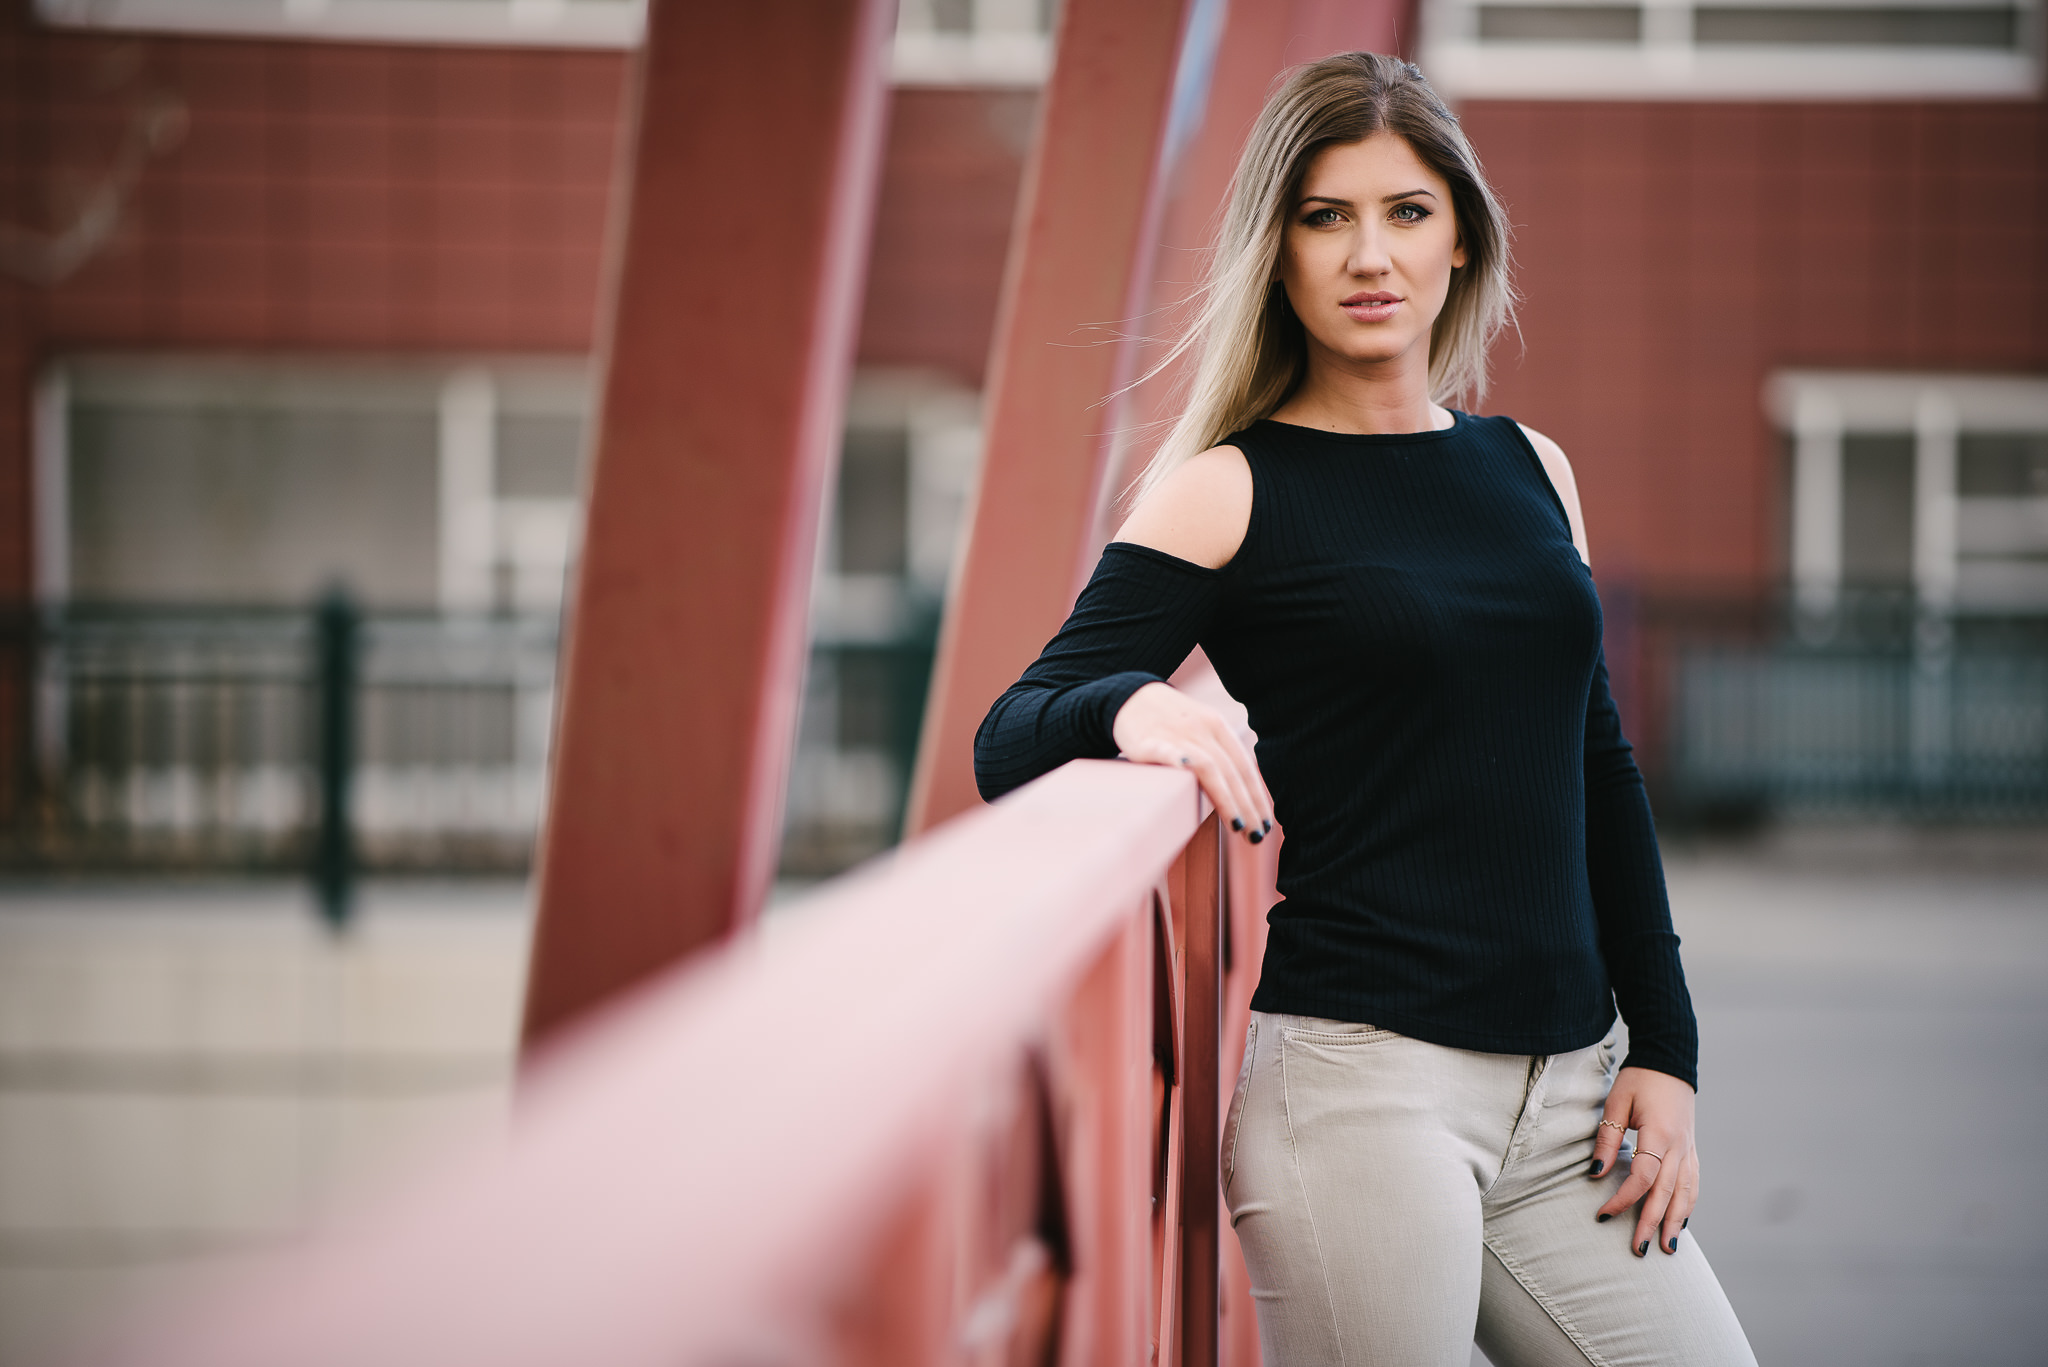
NIKON D750 + 105mm f/1.4 @ 105mm, ISO 200, 1/2500, f/1.6
There is also a mark for an 82mm filter size. Speaking of which, the 105mm f/2 DC has a much smaller 72mm filter thread, so there is huge jump in filter size between the two lenses. In addition, there is also a pretty big difference in terms of the size and the location of the front element between the two lenses. The 105mm f/2 DC’s front element is buried deep inside the lens barrel and its size is fairly small when compared to the much larger front element on the 105mm f/1.4E, which sits pretty close to the edge of the barrel. When focusing, the front element of the 105mm f/2 DC does not move and you cannot see any movement from the front of the lens, since all the focusing takes place with the rear lens group, which is located past the diaphragm of the lens. In comparison, the Nikon 105mm f/1.4E seems to have its focusing group located closer to the front of the lens barrel. It is also worth noting that due to the electromagnetic diaphragm used on the new 105mm f/1.4E, there is no more aperture lever on the rear of the lens and by default the lens is going to be at its widest aperture. Both lenses are protected with a rear lens element, which is great, as it can play a pretty significant role in reducing potential dust and other debris from getting into the lens from the rear opening. Compared to the older 105mm f/2 DC, the 105mm f/1.4E also has a rubber gasket on its mount, which can help a great deal in reducing potential dust from collecting around the rear element of the lens or getting into the camera. Another difference is the lack of the aperture ring, which has been eliminated on all modern “G” type and “E” type Nikkor lenses.

As can be seen from this image, the new Nikon 105mm f/1.4E (middle) is quite a bit thicker than both the 105mm f/2 DC (left) and the 85mm f/1.4G (right), although it is a little shorter in size compared to the 105mm f/2 DC
The home of manufacturing for the Nikon 105mm f/2 DC has always been Japan, but the new Nikkor 105mm f/1.4E clearly reads “Made in China” on the lens barrel. This can be disappointing news for those who are considering the 105mm f/1.4E and traditionally own Japanese-made lenses. To be honest, having tested various Nikon lenses made in Japan, Thailand and China, I have not seen much difference in quality between them. Nikon has pretty rigorous quality assurance standards in every manufacturing plant, no matter where it is located, so it should not be an issue. I have tested two 105mm f/1.4E lens samples and both of them seemed to have pretty similar performance overall, so the quality of manufacturing and assembly looks fairly consistent. In fact, I had to send the Japanese-made Nikon 70-200mm f/2.8E FL ED VR back while testing it and replace it with another copy, since the first sample was very inconsistent in terms of AF accuracy – even after dialing -15 in “AF Fine Tune” camera settings, I was not able to get good AF performance out of it. So in this particular case, a Chinese-made 105mm f/1.4E turned out to be better in terms of quality assurance compared to the 70-200mm f/2.8E VR, which is proudly made in Japan!
When it comes to lens hood, the Nikon 105mm f/1.4E comes with a plastic HB-79 bayonet lens hood, whereas the 105mm f/2 DC has a built-in metal hood that you can easily extend and mount by counter clock-wise rotation. Personally, I like the metal hood on the 105mm f/2 DC a bit better for its convenience and quality, since it is one less object to carry and mount in the field. It is also worth noting that since the 105mm f/2 DC’s front element is buried so deep inside the lens barrel, one rarely needs to worry about extending the lens hood, which is certainly an advantage when compared to the 105mm f/1.4E. Since it is expected to see ghosting and flare on long telephoto lenses, the 105mm f/1.4E should ideally have the lens hood attached when shooting in daylight conditions, as its front element will surely get a taste of sun rays due to its proximity to the front area of the lens barrel. While mounting the HB-79 lens hood on the 105mm f/1.4 is relatively easy, the plastic tends to bend when pushing the hood into its place, giving it a cheaper feel.
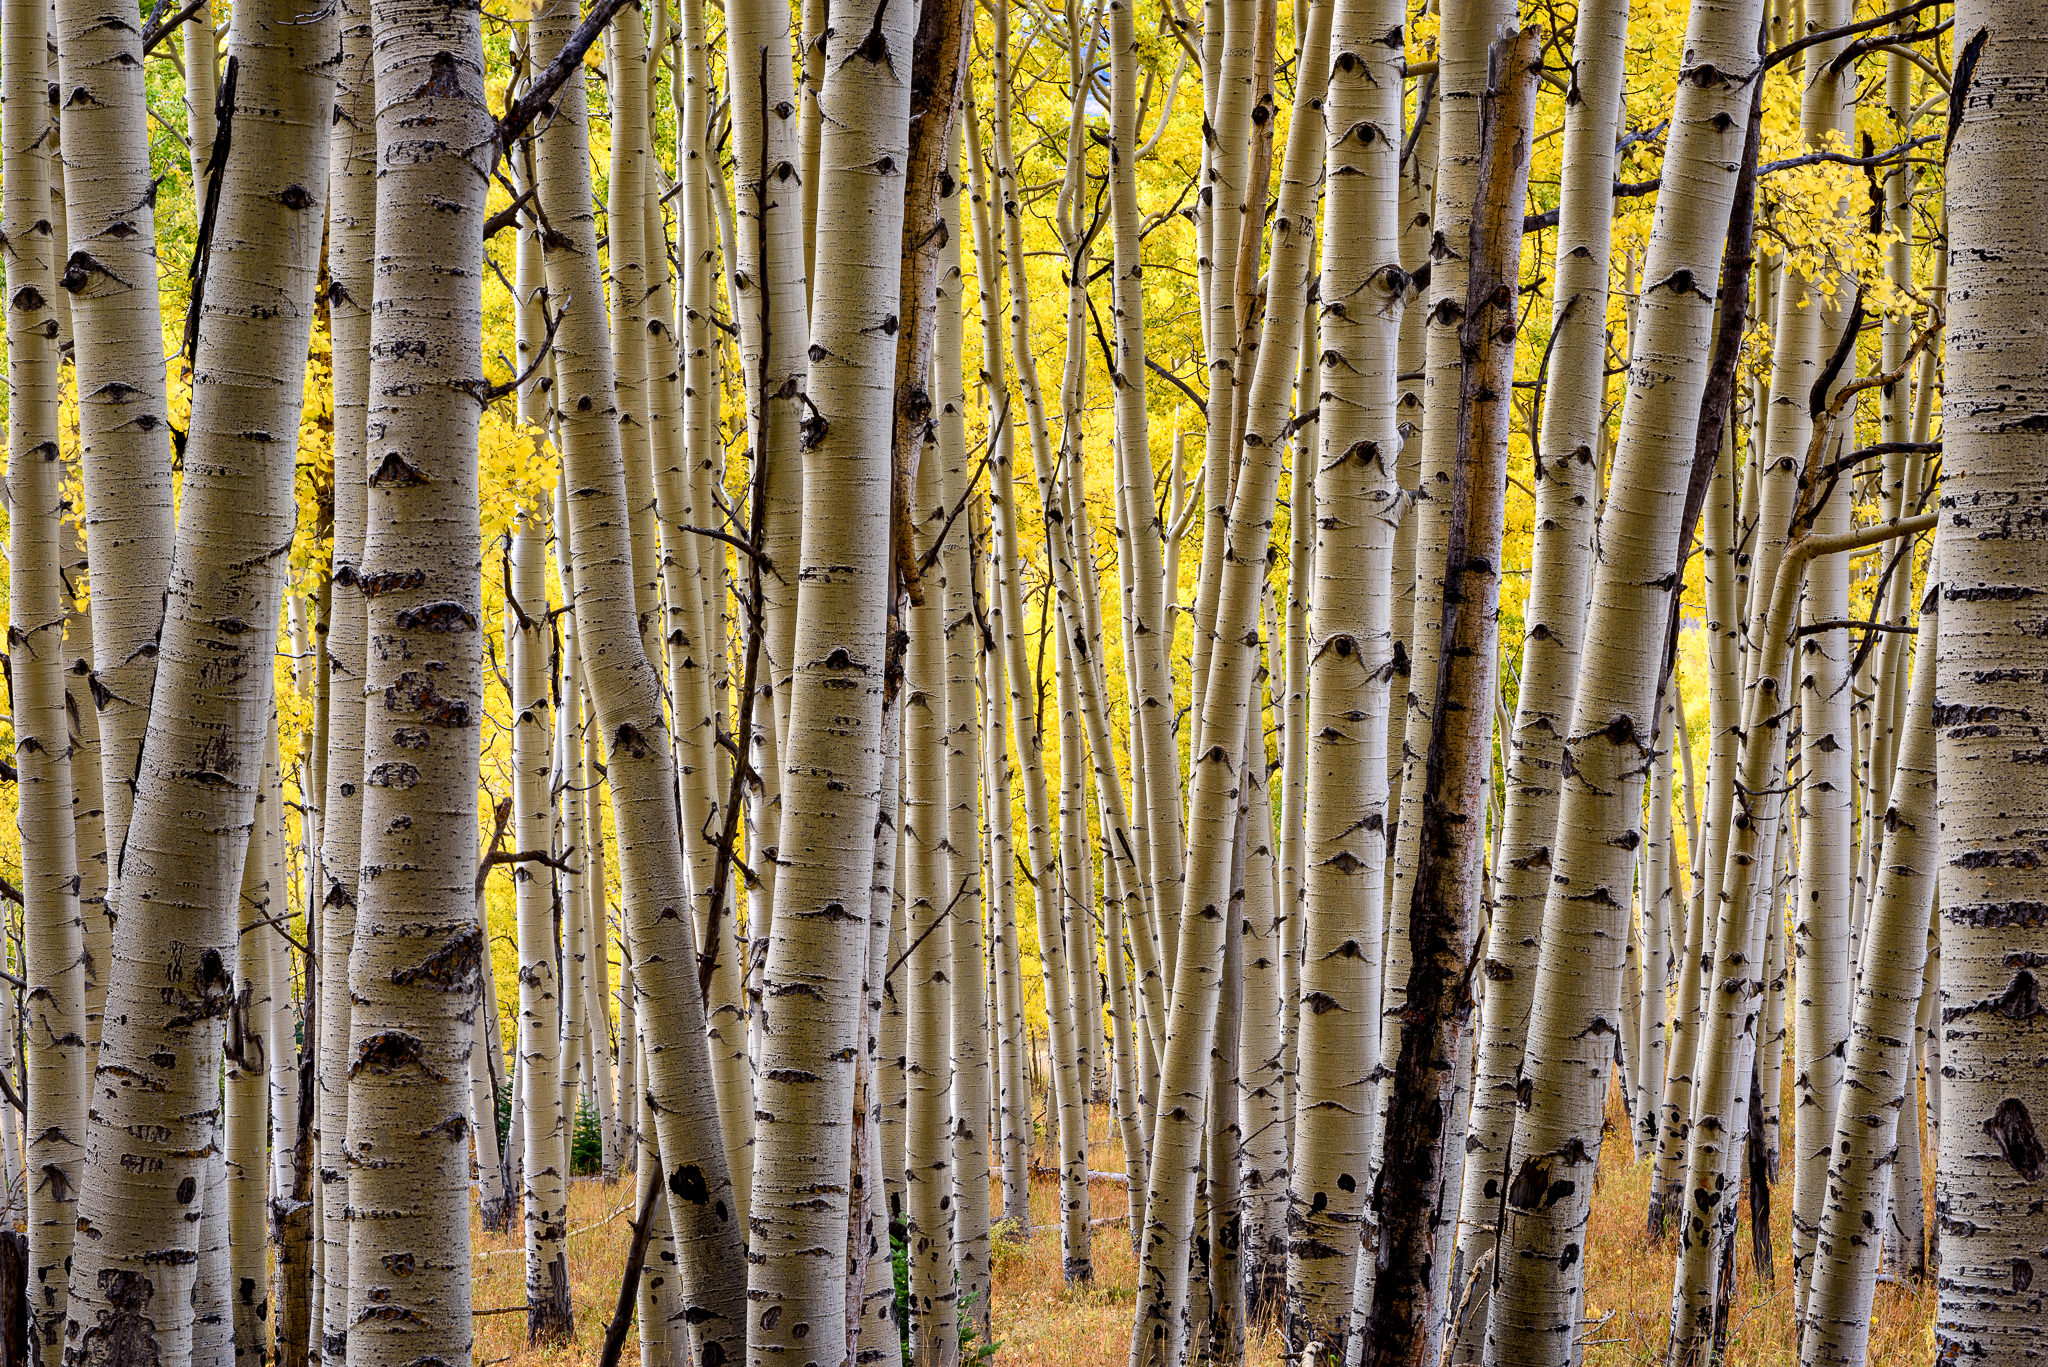
NIKON D810 + 105mm f/1.4 @ 105mm, ISO 100, 1/10, f/16.0
When handling both lenses, the 105mm f/2 DC is obviously more convenient to hand-hold, thanks to its thinner barrel and lighter construction. The 105mm f/1.4E is a noticeably heavier and bulkier lens in comparison, but not that much worse in terms of handling, since its large barrel nicely sits on the left hand and the zoom ring naturally aligns with the fingertips, allowing for quick AF override when needed.
Overall, the build quality and the handling of the 105mm f/1.4E are superb. Aside from the cheap feel of the bayonet lens hood, it feels like a high-quality lens that is built to last a lifetime.
3) Autofocus Performance
Before I talk about autofocus speed and accuracy, it is worth noting that the Silent Wave Motor used in the 105mm f/1.4E is of older, gear-based type instead of ring ultrasonic, as evidenced by Roger’s findings in the article linked above. While many found this news to be quite disappointing, I am personally not bothered with this, just like I am not bothered with recent lens releases that still have the old aperture lever on the back of the lens instead of the newer and more reliable electromagnetic diaphragm. One thing that certainly did bother me though, was the dishonesty about Nikon’s marketing about the SWM used in the 105mm f/1.4E, where they pointed out the advantage of the motor compared to “geared” motors. Thanks to Roger’s findings, Nikon quickly removed the wording and fixed the description on Nikon’s website, but still, it definitely did leave a bad taste in the mouth, didn’t it? Makes me wonder how many lenses that Nikon labels as “SWM” actually contain the ring ultrasonic mechanism…

NIKON D750 + 105mm f/1.4 @ 105mm, ISO 125, 1/250, f/1.4
Anyway, like I have already pointed out, I personally don’t care all that much for the type of AF motor used in the lens, as long as the motor is quick, silent and responsive. And it surely is on the 105mm f/1.4E – it feels no different compared to other primes I have used in the past. Unlike the “D” type lenses such as the 105mm f/2 DC, focusing is very quiet – all you hear is a little bit of “chirp” as the focus is adjusted. It does take a little bit of time to go from close distance to infinity and vice-versa, but that is expected, given that it is an f/1.4 lens with a much finer motor than found on older Nikkor lenses. Autofocus speed is quite fast and I found it to be good enough to photograph not only still portraits, but also moving subjects. Tracking fast, erratic movements can be a bit of a hit and miss depending on lighting conditions, but in very dim environments, I found the 105mm f/1.4E to focus better than both the Nikon 85mm f/1.4G and 85mm f/1.8G lenses. Similar to all other modern Nikkor lenses, the front element of the lens does not rotate when focus is adjusted.

NIKON D750 + 105mm f/1.4 @ 105mm, ISO 200, 1/2500, f/1.4
The finer motor definitely does a good job at delivering quite accurate focus. Keep in mind that there is a huge difference in depth of field between an f/2 and an f/1.4 lens. The full stop of advantage on behalf of the Nikon 105mm f/1.4E translates to paper-thin depth of field, which when put to use at very close distances can be very challenging in terms of nailing the focus. Both of the samples of the 105mm f/1.4E that I tested performed admirably in terms of AF accuracy and I did not have to dial any AF adjustments in the camera to nail focus, which is great. If your sample requires more than +- 10 adjustment, I would either send it back for a replacement, or send it to Nikon for re-calibration, since extreme AF values dialed through the camera never provide consistent, reliable autofocus. As you may already know, AF micro adjustments only work for a particular focusing distance, which can make it tough when switching from head and shoulders type portraits to a full body portrait. AF accuracy definitely goes down in poorly lit environments and you can expect the lens to behave very similarly to lenses like the Nikon 85mm f/1.4G.

NIKON D810 + 105mm f/1.4 @ 105mm, ISO 100, 4/10, f/5.6
4) Lens Sharpness and Contrast
With quite a complex lens construction comprised of a total of 14 elements, 3 of which are of “Extra-low Dispersion” (ED) type, one can tell that Nikon was aiming to produce a lens with a superb resolving power, capable of yielding extremely sharp results. Unlike the design of the Nikon 58mm f/1.4G, which was optimized more for its unique look and feel rather than sharpness, the 105mm f/1.4E is made to be extremely sharp at its widest aperture. That’s not to say that the lens does not produce beautiful depth like the 58mm f/1.4G does though! With this lens, the feel of depth is controlled more through the focal length of the lens and a very wide aperture, which already does a tremendous job at isolating subjects and making them “pop” from the scene. The Nikon 105mm f/1.4E was the first autofocus lens I held in my hands under $ 5K that combined extreme sharpness with soft, creamy and beautiful background rendering. The last time I saw such amazing sharpness combined with the special look was from the superb Nikon 200mm f/2 VR and if I were to explore manual focus lenses, a close contender would be the Zeiss 135mm f/2 Apo Sonnar, which is a class on its own.
I have owned the Nikon 85mm f/1.4G pretty much ever since it was released back in 2010 and while I love the way the lens is capable of rendering images wide open, it is nowhere close in sharpness to the 105mm f/1.4E – that’s how big the difference between the two is. Take a look at these images shot wide open, using the 105mm f/1.4E and 85mm f/1.4G lenses:


You can probably tell which one is which by looking at these two images. Since the field of view is vastly different, I had to step back with the 105mm f/1.4E a bit to have similar framing. As you can see, while the subject remains the same size in the frame, the rendering of the background is quite a bit different between the two, with the 105mm f/1.4E enlarging the background more, due to a much larger entrance pupil. And that’s one of the main reasons why one would want a longer focal length vs a shorter focal length lens, as the longer focal length allows the subject to be isolated more from the background and allows for a more intimate look, without any surrounding distracting elements. That’s why portrait photographers often prefer shooting on the long end of their 70-200mm lenses, since at 200mm they can separate their subject much more from the background than at 70mm.
But we were talking about sharpness, weren’t we? Let’s jump back to the above images, and this time, we will look at 100% crops from each image sample:

Obviously, web-sized images cannot really show the extreme detail of images, unless they are presented in 100% as I have done above. With a fairly good amount of sharpening applied in Lightroom to both images (just a rough 50/1.0/50 setting), you can see just how different the two look in terms of sharpness – the 105mm f/1.4E is vastly superior compared to the 85mm f/1.4G. To make sure that I did not miss focus, I asked the model not to move, while I switched to live view, zoomed in to 100% and focused on the model’s eyes before taking each shot. So even if you can nail focus on the 85mm f/1.4G, that’s the best you can get wide open with that lens. Some people might argue that they prefer to have a softer image from the 85mm f/1.4G, because it hides the skin features one might not want to see, but I disagree. If one desires to hide skin features, it easy to do so in post, provided all the details are there. However, if one wants to make a soft image sharper, it is impossible to extract more detail out of those images, because that information simply does not exist…
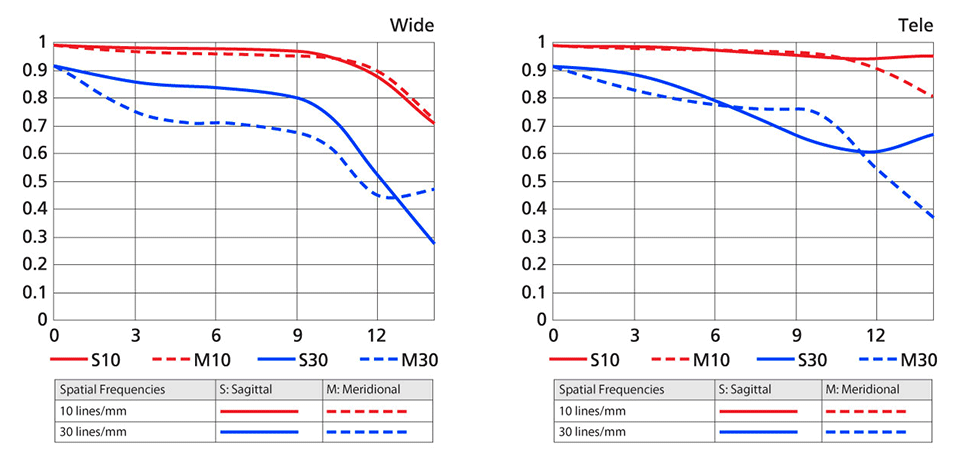
To make the comparisons more scientific, I went ahead and put the lens in my lab and measured its MTF performance using Imatest. Here are the results:

To appreciate just how amazing the above numbers look, take a look at some of the comparison charts below, where I put the data from the 105mm f/1.4E against the 105mm f/2 DC and 85mm f/1.4G. In short, this lens is one of the sharpest ones I have ever tested. Its wide open performance is stellar and once stopped down to f/2.8, you get insane amount of detail that you typically cannot get from most other Nikon primes. The Nikon 105mm f/1.4E’s center performance matches the performance of the superb Zeiss Otus 55mm f/1.4 and even surpasses it in the edges! The 55mm Otus is still a reigning champion when it comes to overall performance though, thanks to practically non-existent chromatic aberration, less vignetting and less distortion, but still, the 105mm f/1.4E is an absolutely amazing gem of a lens.
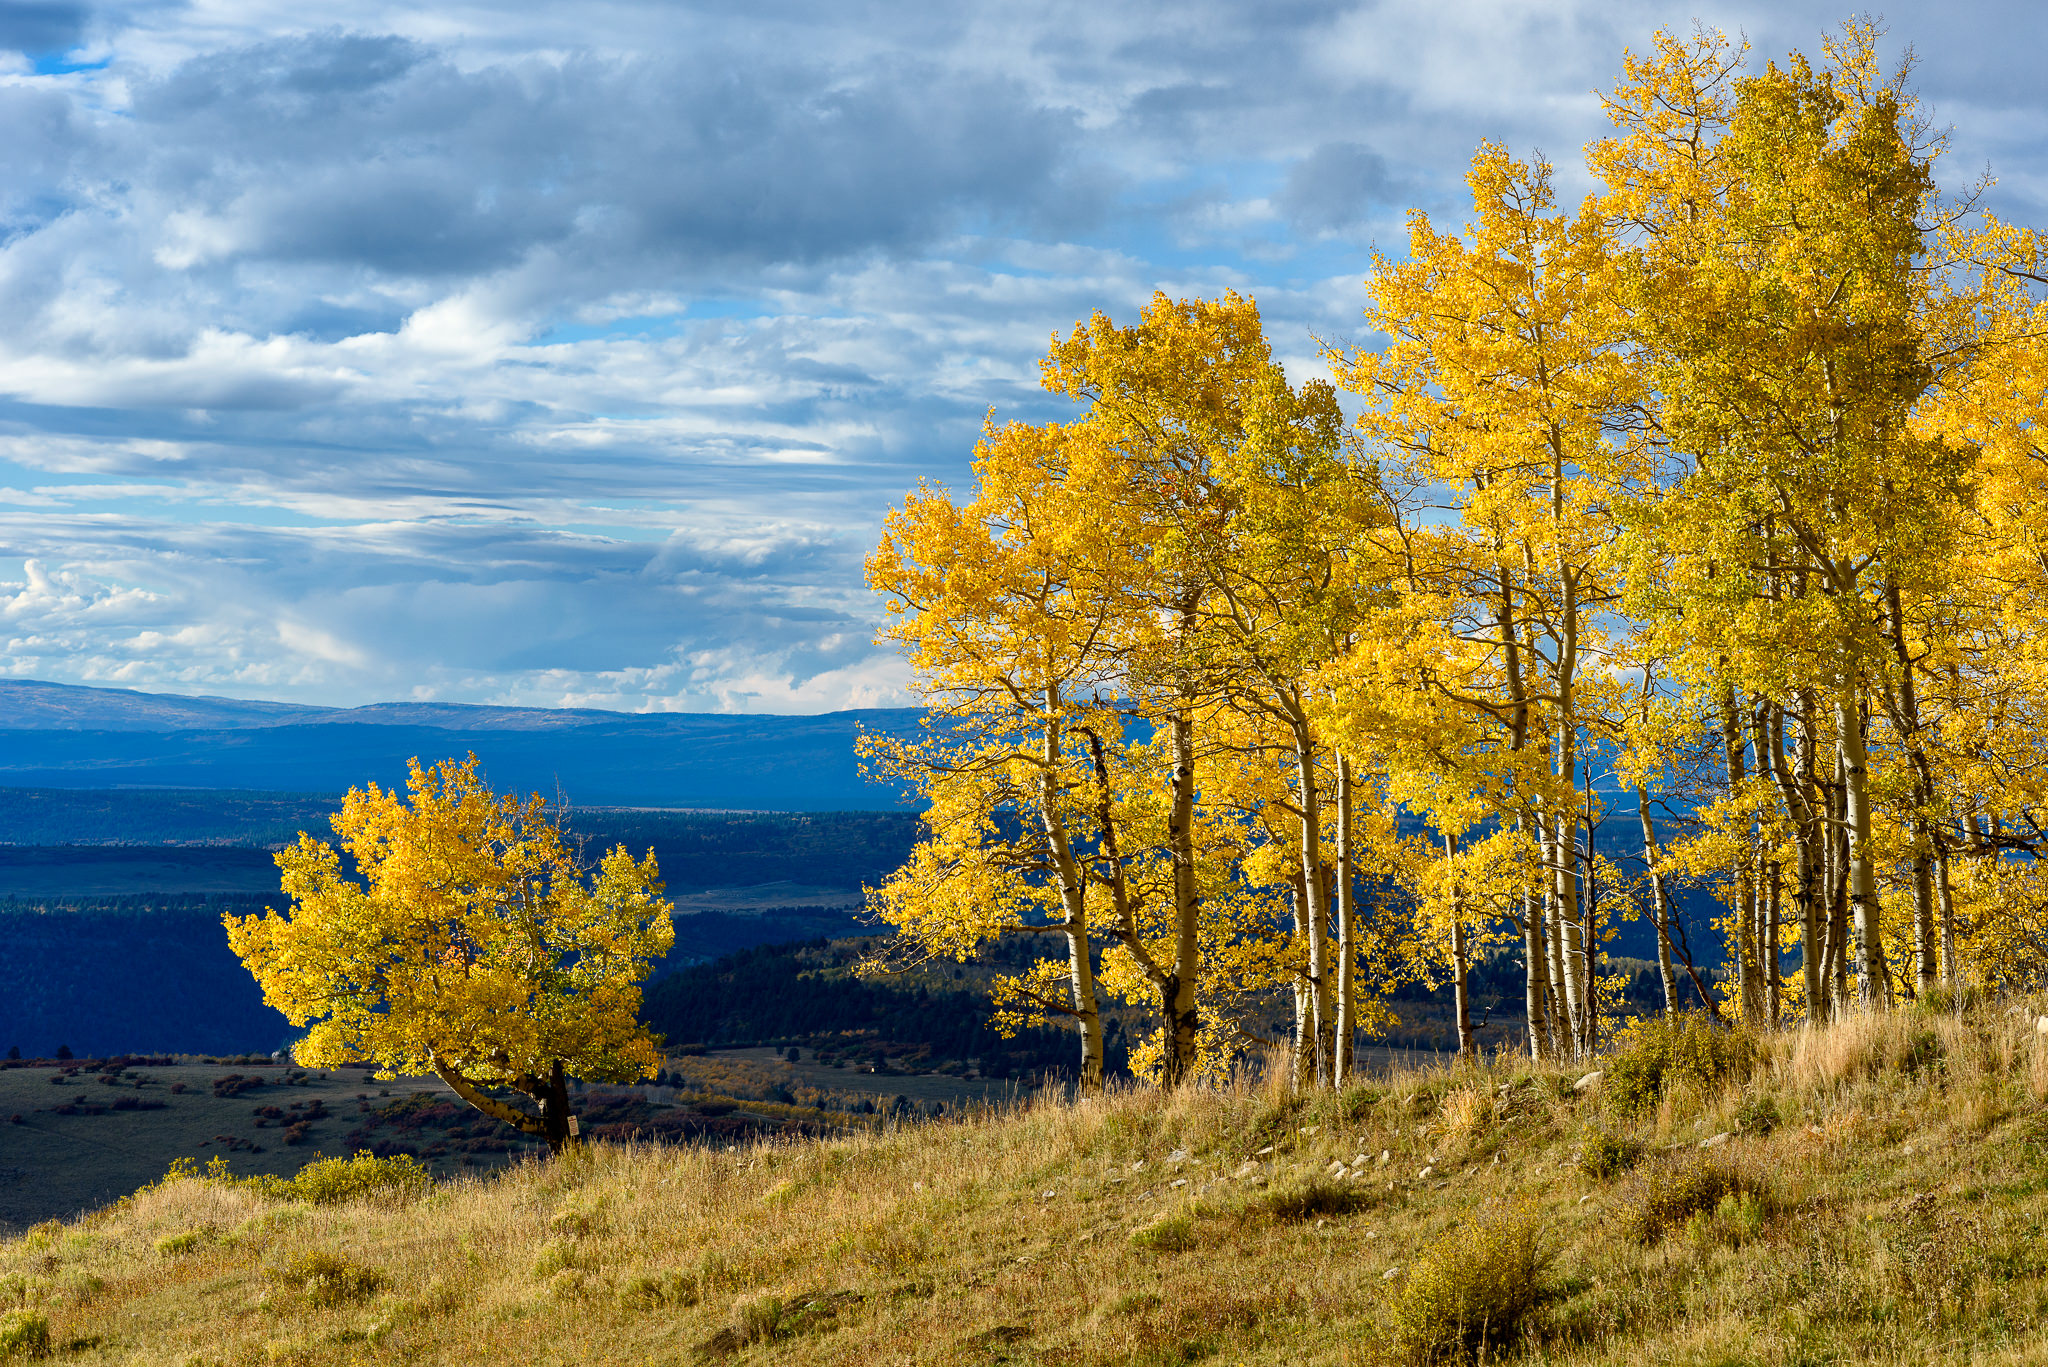
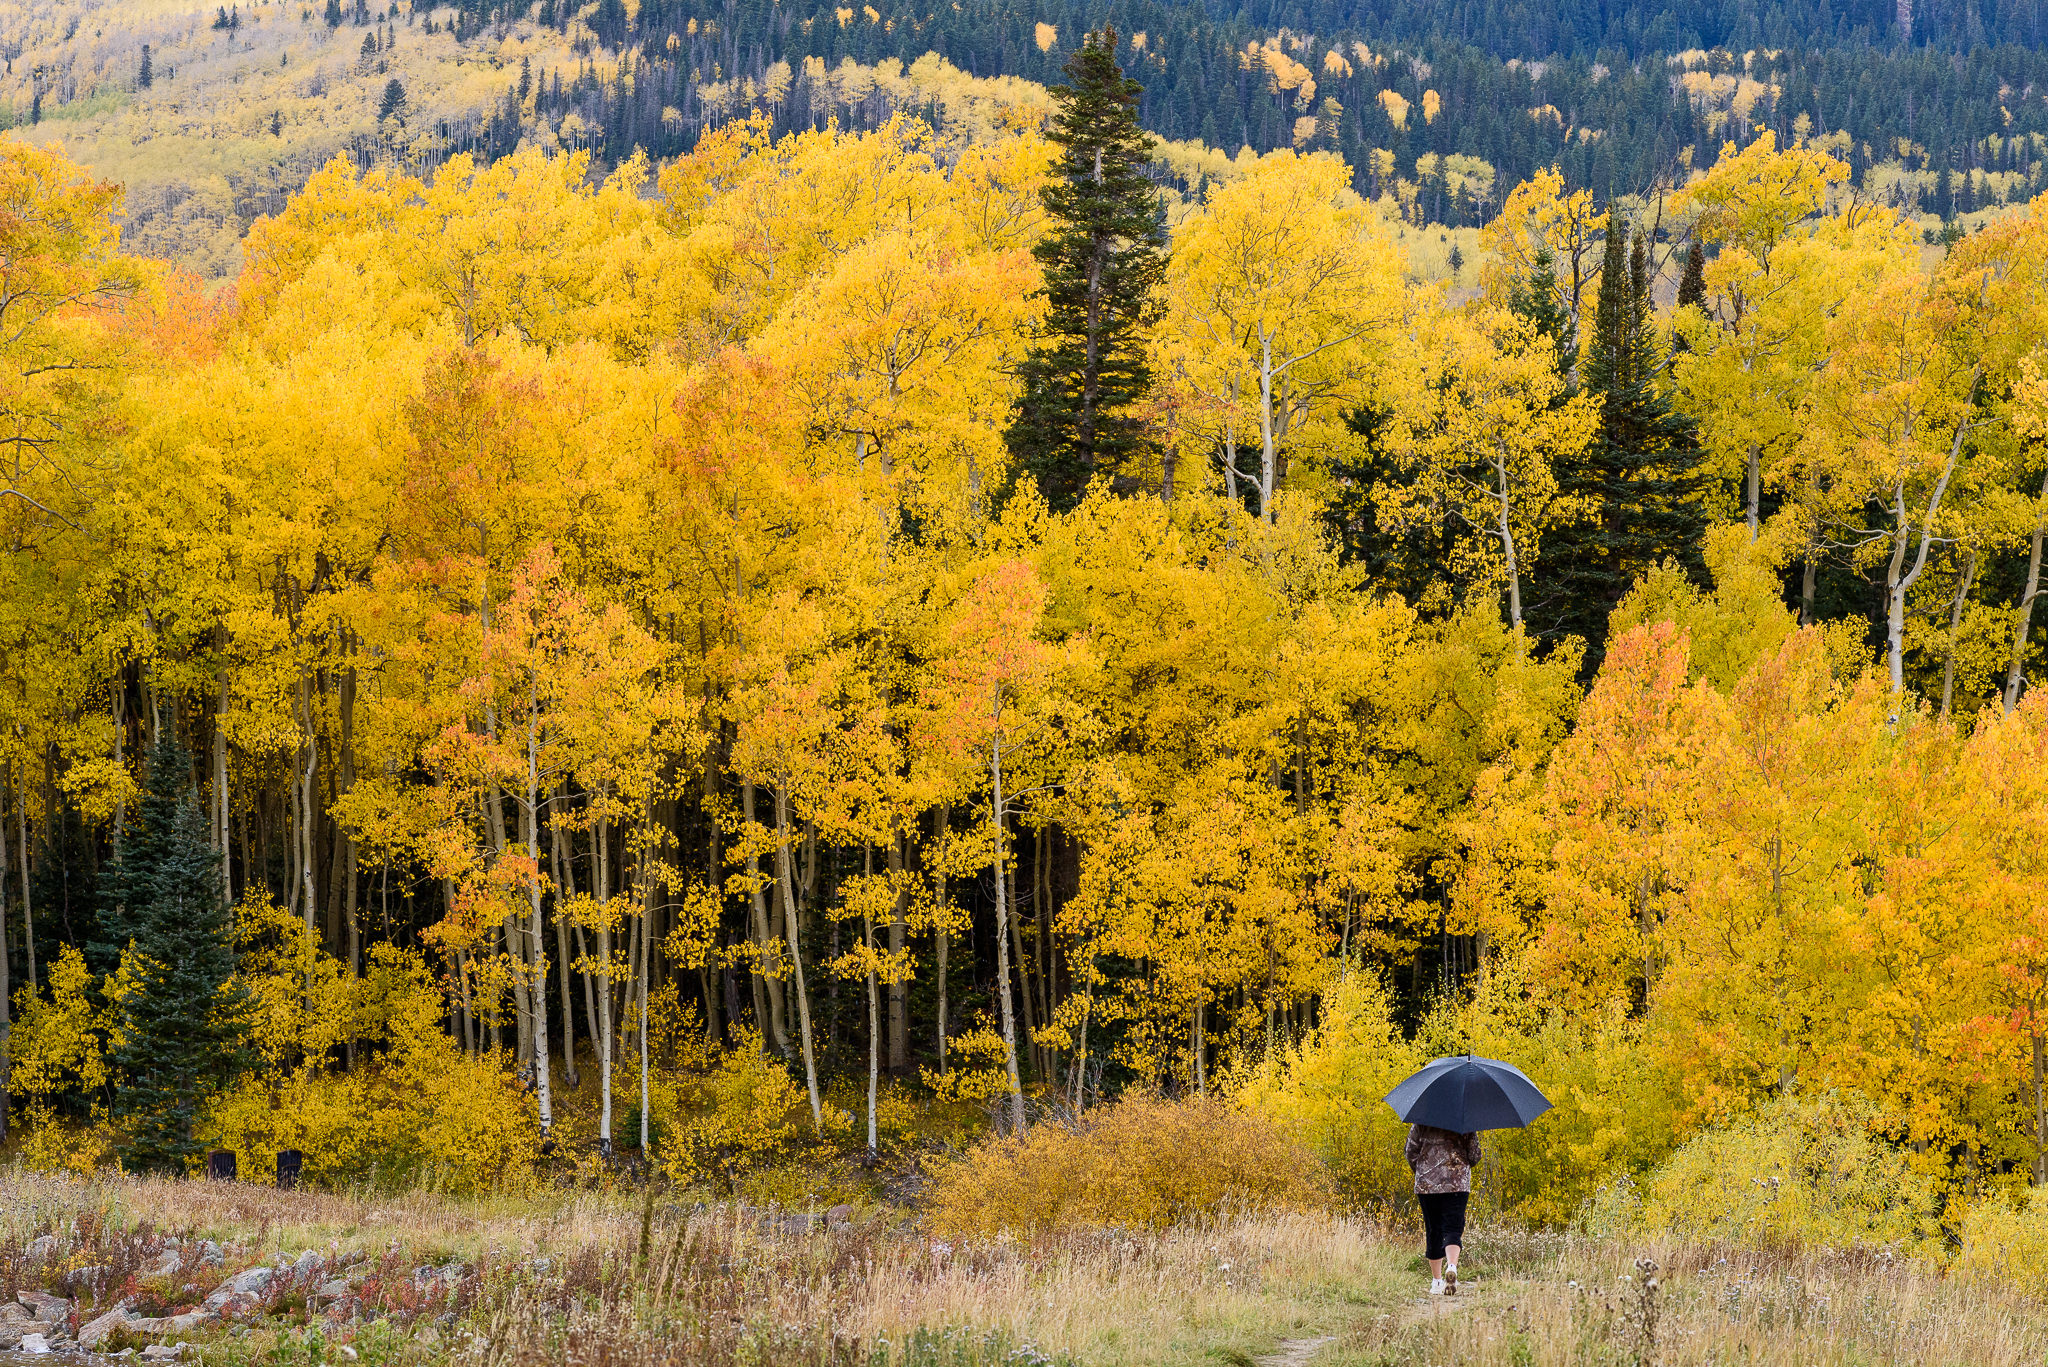
NIKON D810 + 105mm f/1.4 @ 105mm, ISO 200, 1/500, f/8.0
One thing to note, like many other primes, the lens does exhibit some field curvature. It is not bad by any means, but because of it, shooting a test target at large apertures would yield strong center performance at the expense of the corners. Obviously, the effect of field curvature is greatly diminished when stopping down, which is why the mid-frame and the corner performance figures above increase significantly as I stopped down. However, it also means that if you were to focus outside the center area of the frame, say towards the edges of the frame where your subject might be at, the sharpness might look drastically different than the presented chart above – it is likely to look much better! So don’t let the above chart lead you into thinking that this lens does not resolve enough details towards the edges at wide apertures, it certainly does.
The Nikon 105mm f/1.4E is so sharp wide open, that I would not hesitate to shoot it at its maximum aperture all the time when shooting portraits. Only stop it down when you need to increase depth of field, or if it is too bright out and you are maxing out on your camera’s shutter speed.
To give you an idea of what kind of sharpness you can expect from maximum aperture when shooting a landscape at infinity, take a look at the below image:

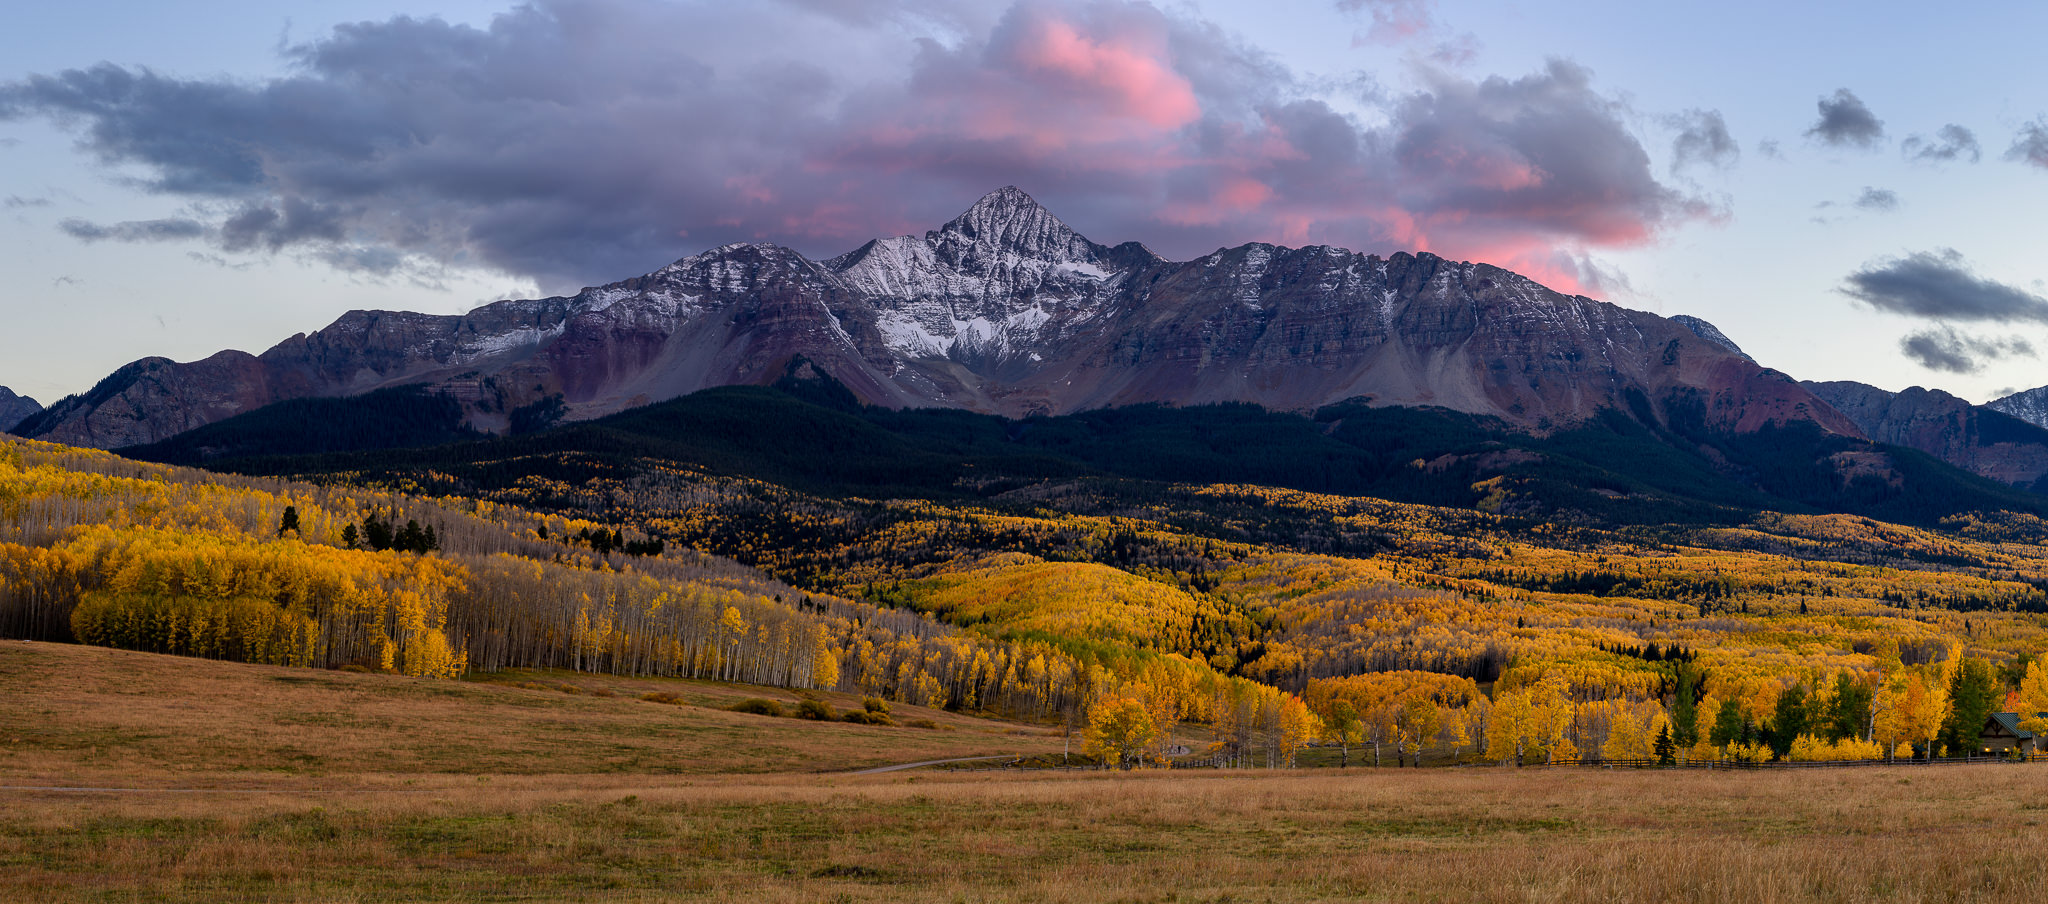
NIKON D810 + 105mm f/1.4 @ 105mm, ISO 100, 1/5000, f/1.4
5) Nikon 105mm f/1.4E vs Nikon 105mm f/2 DC
Let’s go ahead and compare the sharpness of the 105mm f/1.4E to the Nikon 105mm f/2 DC lens:

As you can see, the difference is pretty drastic – the new 105mm f/1.4E is a significantly sharper lens when compared to the 105mm f/2 DC, whether you are shooting wide open or you are stopping down. The 105mm f/2 DC was never made to be an ultra-sharp lens, that’s certainly not the point of it. For portrait photography, it has enough details to make stunning images, and with the ability to control the look of both foregrounds and backgrounds (with the Defocus Control ring), one can yield images with different looks – something the 105mm f/1.4E cannot produce. However, with the huge difference in maximum aperture and a completely different resulting “look” in images (which I personally favor the 105mm f/1.4E for), I really do not see much point in reintroducing the DC feature in lenses anymore. While the ability to defocus the foreground or the background sounds good on paper, DC lenses can be painful to use in practice. First, one has to constantly re-focus each time the DC ring is adjusted. Second, the additional rotating element certainly makes autofocus a lot less reliable, since AF shifts when DC adjustments are used. The bad part about it, is that AF can shift for each DC value! And if one already has challenges with autofocus in DC neutral position, AF reliability and accuracy can quickly go down the drain, making focusing very challenging. Third, having to adjust both the DC ring and the aperture at the same time can be a hassle in the field, particularly when working fast – if one forgets and uses a larger DC value than the aperture, the lens can add a really nasty “soft glow” effect. Soft glow might have been somewhat popular in film days, but it just never looked good in digital. And lastly, most photographers I personally know who shoot with either the 105mm DC or the 135mm DC lenses rarely ever touch the DC ring, so it does not seem to be that desirable of a feature in the first place.
NIKON D750 + 105mm f/1.4 @ 105mm, ISO 200, 1/4000, f/1.4
So if you are trying to decide between the 105mm f/1.4E and the 105mm f/2 DC and you have no budget constraints, I would get the 105mm f/1.4E without even giving it a second thought. If budget is an issue, I would encourage you to try out both the 85mm f/1.4G and the 105mm f/2 DC to see which one you like better. Personally, I favor the 85mm f/1.4G over the 105mm f/2 DC primarily because its AF is more reliable, but if you crave for the unique look and feel of the 105mm f/2 DC and the sample you are looking at does not have serious AF issues, then by all means go for it – it is certainly a beautiful lens.

NIKON D810 + 105mm f/1.4 @ 105mm, ISO 64, 1/1000, f/1.4
6) Nikon 105mm f/1.4E vs Nikon 85mm f/1.4G
The next lens to compare the sharpness to is the Nikon 85mm f/1.4G, which I personally own and have been using for many years, with wonderful results. Let’s take a look at the Imatest numbers:

Once again, we can see why the 105mm f/1.4E is an optical marvel – at wide open apertures, it out-resolves the 85mm f/1.4G by a pretty noticeable margin. I have already shown you the visual difference in images earlier and it is something you will certainly see when comparing the two side-by-side. This difference becomes even more noticeable with both lenses stopped down. At f/2.8, the 105mm f/1.4E is insanely sharp, reaching resolution numbers that most other lenses cannot even reach when stopped down to f/5.6. Still, having been using the 85mm f/1.4G for such a long time, I rarely complained about its sharpness, since images are so dreamy to look at. Unless you shoot with a high resolution camera like the Nikon D810, the softer look of images at f/1.4 probably won’t bother you that much and if it does, you can always stop it down a little to get a bit more crispness out of the lens.

NIKON D750 + 105mm f/1.4 @ 105mm, ISO 200, 1/640, f/2.5
Another alternative is to explore the Sigma 85mm f/1.4 Art, which I personally have not tested yet, but heard of being a very sharp lens (make sure to test its AF right away though, as many seem to have had issues with its AF accuracy). Or if you are open to exploring another third party offering, the Tamron SP 85mm f/1.8 VC is another great candidate, with built-in image stabilization – something no other 85mm lens for the Nikon mount offers. If you want to save even more money and you don’t care for an f/1.4 look or Nano Coating, you might want to give the Nikon 85mm f/1.8G a try. It is smaller, lighter and it is a sharper lens wide open. It obviously does not have all the bells and whistles of pro-level lenses (inferior build, no Nano Coating, etc), but for a third of the price of the 85mm f/1.4G, it is a real bargain!
7) Bokeh
By now, you have already seen plenty of examples of how beautiful the lens is capable of rendering bokeh. Compared to other lenses I have used in the past, including the 85mm f/1.4G, I would say that the 105mm f/1.4E is probably one of my top picks for its ability to yield pleasant-looking background highlights, certainly in a way that can be described as “creamy” and “dreamy”.

NIKON D810 + 105mm f/1.4 @ 105mm, ISO 100, 1/8000, f/1.8

NIKON D750 + 105mm f/1.4 @ 105mm, ISO 200, 1/3200, f/1.6

NIKON D750 + 105mm f/1.4 @ 105mm, ISO 100, 1/1250, f/1.4
The bokeh highlights look really good, with no thick borders around the circular shapes or onion-shaped rings inside those shapes, which typically happen when aspherical lens elements are used (and this lens has none). What happens when you put three world-class portrait lenses and compare their bokeh? Take a look at the below crops from the 105mm f/1.4E to the 105mm f/2 DC and 85mm f/1.4G at f/2:

Well, there are no real surprises here – all lenses look stellar, producing very pleasing bokeh. I looked hard between the different areas of the frame and apertures and to be honest, I could not pinpoint one lens that did better than others. All three look about the same! However, it is worth noting that the wider f/1.4 aperture certainly does make a difference in the size of bokeh highlights and how the background is rendered, since it has a full stop advantage over f/2. Also, note that there are always going to be differences between lenses shot wide open vs stopped down. The bokeh highlights from the 105mm f/1.4E and 85mm f/1.4G do not appear fully circular, since the aperture blades start impacting them.
Now keep in mind that the lens will yield “cat’s eye” bokeh towards the edges of the frame and that’s very normal (every prime lens will do that), since the shape of the background highlights will change in shape due to optical vignetting (caused by variations in angles of light):

NIKON D750 + 105mm f/1.4 @ 105mm, ISO 100, 1/1250, f/1.4
In fact, if you place the subject in the center and you have background highlights surrounding your subject, you will find these elliptical shapes swirling around your subject, which can give that special, pleasing look to your images. It might not be as extreme as the swirling bokeh produced by Petzval lenses, but it is definitely there.
8) Vignetting
As expected with any fixed f/1.4 lens, there is a considerable amount of vignetting present when shooting wide open @ f/1.4. Imatest measured 2.67 EV of vignetting for close focus and 2.90 EV of vignetting when shooting at infinity, as can be seen from the below chart:

And here is the worst-case scenario represented visually via Imatest, with the image shot at f/1.4, infinity focus:

Now keep in mind that the vignetting characteristics of a lens are often part of the lens design. Vignetting can be beautiful and it can help draw the viewer’s eye towards the center of the subject. However, if you happen to place your subject towards the edges of the frame and you want to address the vignetting issues, it is very easy to do so using post-processing software like Lightroom, which is capable of taking care of those issues with a single click.
Personally, when shooting with portrait lenses like the 105mm f/1.4E, I rarely ever correct vignetting in post, since I find their vignetting characteristics to be beautiful.

NIKON D750 + 105mm f/1.4 @ 105mm, ISO 100, 1/1000, f/1.4
9) Ghosting, Flare and Chromatic Aberration
Thanks to the Nano Crystal Coat that is applied to the lens elements, the Nikon 105mm f/1.4E is able to handle ghosting and flare really well in most situations. However, due to the long focal length of the lens, one should take precaution when shooting without the lens hood – with very bright sources of light at particular angles of the frame, light rays can really impact images negatively, adding some ghosting and flare to images. It is not bad by any means though and Nano Coating certainly does perform really well when shooting with the sun in the frame, even if you happen to leave the lens hood behind. Take a look at the below two images, captured with the lens at f/1.4 and f/5.6 apertures, without the hood:


As you can see, if you shoot with the sun right behind your subject, ghosting and flare might show up in your images. The effect gets a bit more amplified as you stop down and that’s very normal. And as expected, there is a definite drop in contrast as well, which might actually look far worse if you have a lot of dust on the front element of the lens, since light particles get bounced all over the place.
I would recommend to keep the lens hood on at all times to prevent accidental flares from showing up in your images. Also, if you use a low quality filter, you might get some nasty flare even with the hood on when pointing at a bright light source, so make sure to use only high-quality multi-coated “MRC” filters from B+W, Hoya or Tiffen for digital cameras.

NIKON D750 + 105mm f/1.4 @ 105mm, ISO 110, 1/250, f/1.4
When it comes to lateral chromatic aberration, the Nikon 104mm f/1.4E demonstrated fair results, on par with both the Nikon 105mm f/2 DC and the Nikon 85mm f/1.4G at large apertures. Imatest measured chromatic aberration right under a pixel, which unfortunately did not get any better as I stopped down the lens. Longitudinal chromatic aberration (LoCA) can also be pretty pronounced in images, especially in high contrast situations. If you take a closer look at the above image of a Star Wars stormtrooper shot at f/1.4, you can see quite a bit of that purple and green fringing on the helmet and the hands, which is a typical case of pronounced LoCA.
Here is how Imatest measured lateral chromatic aberration at different apertures:

10) Distortion
Distortion-wise, the Nikon 105mm f/1.4E exhibits very little of it. Imatest measured 0.79% barrel distortion, which is a bit worse than both the Nikon 105mm f/2 DC (0.23% pincushion distortion) and the Nikon 85mm f/1.4G (0.38% pincushion distortion). Anything under 1% is nothing to worry about and you won’t even notice it in images. If you are shooting straight lines and the lines appear a little curved, you can easily fix it in post-processing software like Lightroom, which already has a built-in profile for the lens.
NIKON D750 + 105mm f/1.4 @ 105mm, ISO 100, 1/1250, f/1.4
11) Summary
For many years now, Nikon shooters have been patiently waiting to see an updated version of the Nikon 105mm f/2 DC classic and it has finally arrived. The refresh was delivered in the shape of the Nikon 105mm f/1.4E, which turned out to be a completely different beast in comparison, thanks to its much larger aperture and a total optical rehash with over twice the number of elements, (three of which are of extra-low dispersion type), Nano Crystal and fluorine coatings, and a much faster, more accurate and silent autofocus motor. All this obviously made the lens not only noticeably heavier and thicker than its predecessor, but also significantly more expensive.
NIKON D810 + 105mm f/1.4 @ 105mm, ISO 64, 1/8, f/8.0
Since last year, I have been fortunate to test a couple of different samples of the Nikon 105mm f/1.4E and after putting the lens through quite a bit of use, I am happy to report that it is one of the best Nikon primes I have reviewed so far in overall performance. As you have seen from this review, the lens is stunning not only in terms of sharpness and other optical characteristics, but also in terms of its rendering capabilities. Thanks to the magic that Nikon put into this marvel, the lens is able to produce aesthetically pleasing images that rival the look of some of the best portrait lenses in the world. Its ability to beautifully isolate subjects from the background with creamy bokeh, while capturing incredible amount of detail at maximum aperture will surely keep its reputation high for many years to come, and make it the ideal tool for portrait photography. Although the Nikon 105mm f/2 DC and the 135mm f/2 DC have been favored by many portrait photographers in the past, those who wanted more subject isolation or sharpness found themselves reaching out to such lenses as the Zeiss 135mm f/2 Apo Sonnar and the Nikon 200mm f/2. In my opinion, the new Nikon 105mm f/1.4E fills the gap very nicely and if Nikon continues actively developing fast telephoto prime lenses, we might see another “world’s first” 135mm+ lens soon.

NIKON D750 + 105mm f/1.4 @ 105mm, ISO 100, 1/640, f/1.4
The Nikon 105mm f/1.4E is not without its faults though. Both lens samples I have tested produced some distortion, a bit higher than expected level of chromatic aberration and quite a bit of vignetting at maximum aperture, especially when shooting at infinity. However, these issues are relatively minor overall and can be easily dealt with in post-processing software, so I do not look at any of them as critical. Longitudinal chromatic aberration can be concerning when shooting at very wide apertures against bright backgrounds, resulting in visible purple and green fringing, but that’s quite normal for most prime lenses out there. Lastly, the steep price of $ 2,200 is not an easy pill to swallow, putting the 105mm f/1.4E out of reach from many photographers.
Overall, the 105mm f/1.4E is an absolutely amazing piece of glass that I can highly recommend. It is big. It is heavy. It is expensive. But it is worth every penny. If you are looking for the best telephoto portrait lens today, don’t look any further – the Nikon 105mm f/1.4E is the one.
12) Where to Buy
You can order your copy of the Nikon 105mm f/1.4E lens through our trusted partner B&H Photo Video.
13) More Image Samples
NIKON D810 + 105mm f/1.4 @ 105mm, ISO 800, 1/500, f/8.0

NIKON D750 + 105mm f/1.4 @ 105mm, ISO 125, 1/250, f/1.4

NIKON D750 + 105mm f/1.4 @ 105mm, ISO 100, 1/250, f/1.4

NIKON D750 + 105mm f/1.4 @ 105mm, ISO 100, 1/640, f/2.0

NIKON D750 + 105mm f/1.4 @ 105mm, ISO 200, 1/2500, f/1.6
NIKON D750 + 105mm f/1.4 @ 105mm, ISO 200, 1/3200, f/1.6

NIKON D750 + 105mm f/1.4 @ 105mm, ISO 200, 1/3200, f/1.6

NIKON D750 + 105mm f/1.4 @ 105mm, ISO 200, 1/4000, f/1.4

NIKON D750 + 105mm f/1.4 @ 105mm, ISO 200, 1/2500, f/1.4

NIKON D750 + 105mm f/1.4 @ 105mm, ISO 100, 1/800, f/1.4

NIKON D750 + 105mm f/1.4 @ 105mm, ISO 100, 1/640, f/1.4

NIKON D750 + 105mm f/1.4 @ 105mm, ISO 200, 1/2500, f/1.4

NIKON D750 + 105mm f/1.4 @ 105mm, ISO 100, 1/500, f/1.4
All Images Copyright © Nasim Mansurov, All Rights Reserved. Copying or reproduction is not permitted without written permission from the author.
The post Nikon 105mm f/1.4E Review appeared first on Photography Life.