Storage Considerations for Photographers

Many photographers and videographers often rely on using local storage within their computers to store media files. Once their computer drives fill up, they often end up purchasing external hard drives to offload some or all of the data, segregating the data and making it difficult for quick access and backup. Others choose dedicated storage arrays that handle all the data in a single location, albeit at a higher cost and sometimes questionable results. For a person who is not technology-savvy, choosing a proper storage solution can be a difficult task. With so many different DAS (direct-attached storage) and NAS (network-attached storage) solutions on the market, one can get quickly confused, ending up with many storage issues. Since mismanaging storage can potentially lead to data loss and other problems, it is always a good idea to revisit your storage needs and choose the best solution that will not only address the storage requirements you have today, but also help with growing your data in the future. In this article, we will go over different storage solutions in detail, identify pros and cons of each and hopefully help you in selecting the best storage solution for your needs.

Synology DS1817+
Synology DS1817+
A new generation of high-performance network-attached storage ideal for photographers and videographers

1) Handling Data Growth

Year after year, the resolution of both recording and output devices is increasing at a significant rate. While a few years back we used to deal with cameras that had at most 8-12 megapixels (MP) of resolution and typical monitors / TVs did not exceed 1080p, things have certainly changed since then. Common camera resolution has been bumped up to 20-24 MP now (with high resolution full-frame cameras pushing 50 MP), whereas most electronics stores don’t even stock 1080p screens anymore, with both TVs and monitors getting pushed to 4K and higher resolution. As a result of these changes, media size has also seen a significant increase. In just a matter of a couple of years RAW files quadrupled in size from 8-12 megabytes (MB) to 40-50 MB on average when shooting with 36 MP+ digital cameras, and 4K video presents a new level of storage challenges, not just in terms of storage space, but also in terms of storage speed to keep up with the large amount of flowing data. While you can do your best to reduce your backup needs, the larger files and the additional data you have to deal with on a daily basis do not make it easy to keep your storage needs minimal.

All this data growth makes it difficult to keep media stored on a single laptop or a computer, so most photographers and videographers end up purchasing large capacity external drives where they offload data. Once those drives fill up or a new year rolls in, they typically buy more drives to accommodate their new data, ending up with a collection of external drives that become a nightmare to manage. Since the data is segregated across many different drives, accessing older data becomes a hassle, performing routine backups gets difficult and the sheer number of different devices with different capacities and connectivity options make it difficult to manage data as a whole. And let’s not forget about the typically miserable speed of accessing data from external devices. Sounds familiar? It sure does to me, as I used to do it myself in the past. And I know a number of professional photographers who still rely on such workflow practices.

What if there was a way to streamline the process by putting all the data into a single location? Wouldn’t it make it easier to quickly access and manage the data? That’s where storage arrays come into play.

2) What is a Storage Array?

In simple terms, a storage array (also known as a disk array) is a dedicated box that can accommodate multiple storage drives (typically hard drives or SSD drives) to store and access data. The simplest and the least expensive storage arrays typically accommodate two to four drives, whereas higher-end storage arrays can accommodate five or more drives and offer fast speeds, more connectivity options and might even run their own operating system to handle different native and third party applications. Unlike typical local and external storage, higher-end storage arrays often have built-in error-detection and redundancy features to reduce the potential for data loss, making them more reliable and scalable in the long run.

Below are the major storage architectures you might come across today:

  • Direct-Attached Storage (DAS): any storage that requires a direct connection to a computer can be considered a DAS. For example, your hard drive or SSD drive on your computer is a DAS. An external drive or storage array connected with a Thunderbolt or a USB cable to a computer is also a DAS. DAS is typically only beneficial for a single computer setup and it is usually not designed to run autonomously. DAS provides “RAW” or block-level storage to a computer, so its storage volumes are typically managed through the computer it is connected to.

    G-Technology G-RAID
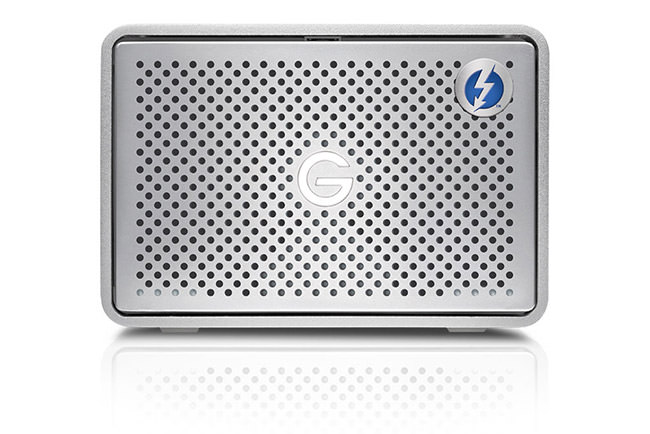
    G-Technology G-RAID Direct-Attached Storage (DAS)
  • Network-Attached Storage (NAS): as the name implies, network-attached storage connects to one or more computers via wired or wireless network (although wireless network connectivity options are typically not available due to wireless reliability issues). Since NAS is not directly connected to a computer, it requires its own CPU and memory in order to manage its storage and hence it is designed to run autonomously. NAS is ideal for a multi-user setup and as the next section reveals, has many advantages over DAS, especially when it comes to data access. Unlike DAS, NAS provides file-level storage that can be accessed from multiple computers at the same time.

    Synology DS1517+
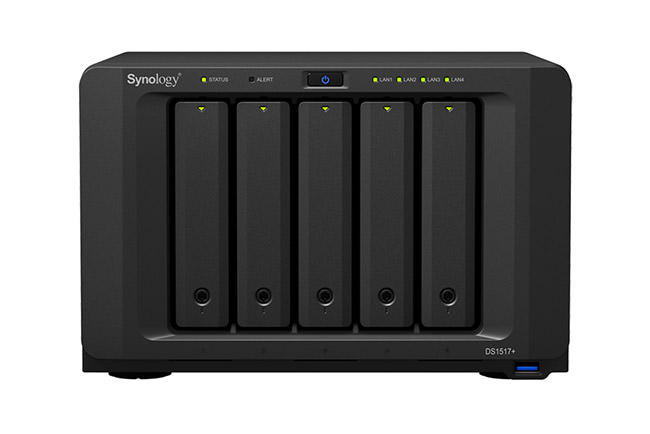
    Synology DS1517+ Network Attached Storage (NAS)
  • Storage Area Networks (SAN): storage area networks are more complex than DAS and NAS, and they are typically utilized in larger environments that need high-level performance, reliability, scalability and redundancy in datacenter environments, where a single large storage array can be used to provide block-level storage to multiple servers. Since SAN is overkill for most photographers, we will keep it out of scope of this article.

Depending on the architecture, storage arrays can be simple and can also be very complex. Simple, user-friendly storage arrays are typically going to be the most affordable, giving very few configuration options to quickly get started, whereas storage arrays designed for small to medium-size businesses can have many configuration and connectivity options, making them more difficult to implement and manage.

3) DAS vs NAS

Let’s take a look at the advantages and disadvantages of both DAS and NAS:

DAS Advantages:

  • Simple to Set Up: DAS is simple and everyone gets it. It acts as a drive on your computer. You can easily format it, resize it and partition it with standard operating system tools. It does not require a network or any other extra configuration.
  • Excellent Speed: When connected via Thunderbolt or USB 3.1, DAS can provide incredible speeds, taking advantage of everything the storage has to offer.
  • Better Latency: A direct connection is always going to have less latency than a network connection.
  • Low Cost: While there are some expensive DAS storage arrays out there, most DAS solutions start out really cheap. A simple hard drive in an enclosure is a DAS and you can even get a cheap DAS setup with two drives that can provide redundancy in RAID 1 (mirror) configuration.
  • Ideal for Travel: For those who often travel, a simple DAS enclosure with one or two drives is ideal, since it takes up very little space.

DAS Disadvantages:

  • Single Computer Only: DAS must be connected to one computer and its storage cannot be shared with multiple computers with multiple cables. Once connected, the storage can be shared with multiple computers over network through the computer’s operating system, but it requires the computer DAS is connected to be always on, which increases power usage.
  • Limited Options: Due to DAS always requiring a computer connection, it can be rather limited when it comes to things like external access. Instead of providing access to the storage array exclusively, one has to provide access to the computer DAS is connected to and set up a web or file server, which is a rather technical task. The DAS cannot be managed over the network, so if anything goes wrong, one must be able to access the computer to manage the DAS.
  • Potential Connectivity Issues: In order to be able to get the best performance, a DAS must have a fast controller + connection port on its side and the controller and port speed must match it on the computer, or the speed will be limited to the slowest connection. For example, if a USB 3.1 DAS is connected to a USB 3.0 port, it will slow down to half its speed. And if it is connected to the old USB 2.0 port, it will slow down to a crawl, leading to many frustrations. In addition, due to the frequent use of DAS devices, the process of connecting and disconnecting interface cables can lead to damage of cables and interface ports.
  • Risk of Data Loss on Simple DAS: When using a simple DAS with a single drive (one local drive or one external drive), there is a high chance of data loss in case the drive fails. Ideally, if one uses a DAS, it should be set up with at least two drives in RAID 1 / mirror configuration.

NAS Advantages:

  • Ideal for Multi-User Environment: One of the biggest benefits of network-attached storage, is that you can set it up for a multi-user setup. So if you have multiple computers on your network and you want to be able to reliably access the same storage from them without requiring one computer to always share a connection, you need a NAS.
  • Power Efficient: Since a dedicated NAS device has its own CPU and memory, manufacturers often use very power efficient processors and memory in order to reduce energy usage of the NAS device. While with a DAS you will be burning through a lot of power (computer power + DAS power), you will be saving quite a bit of money by going with a power-efficient NAS.
  • Better Redundancy: Most NAS arrays have built-in RAID controllers that provide excellent error-checking and redundancy options.
  • Dedicated for Storage: A NAS is a dedicated storage device that does nothing except providing storage for computers and other devices on the network. Because of this, it can be optimized to provide fast, reliable and scalable solution that can meet many storage demands.
  • Isolated Users and Permissions: Since NAS works autonomously, it can be set up with a different user and permission structure than your computer(s), keeping separate security and making it easy to grant access to particular folders.
  • Built-in Apps: Another great benefit of a NAS is that it comes with a set of native built-in apps that extends the functionality of the device and depending on its popularity, there might even be third party apps available for you to deploy. For example, you could easily turn a NAS into an entertainment device that streams audio and video content to TVs and other devices on your network. You could set up a NAS to automatically perform backups on your computers. You could set up a file server, a web server or even a telephone system.

NAS Disadvantages:

  • More Complex to Set Up: Compared to DAS, NAS is more complex to set up and configure. One needs to have a properly set up network, understand networking basics (such as assigning an IP address to a device) and have matching interface speeds on all devices and cables. For example, if a NAS device has 1 Gbit network connection, all cables, network cards and switches on the network that require 1 Gbit access must match that speed.
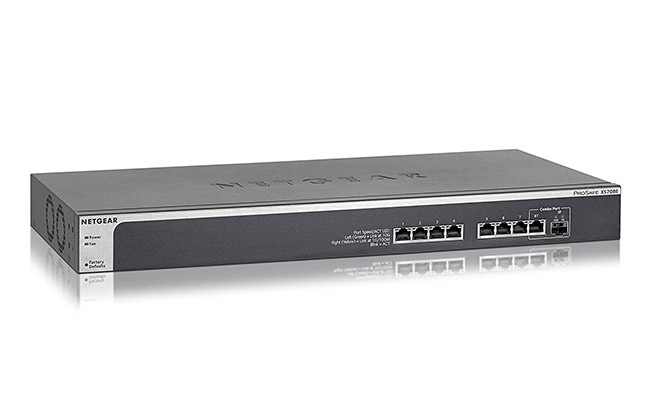
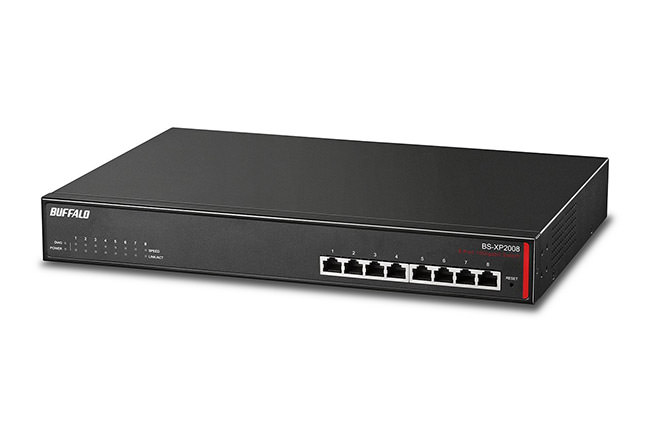
  • Network Throughput / Speed Issues: While modern DAS interfaces are optimized for speed to deliver 10 Gbit+ throughputs, modern networks have not been keeping up with the same pace. Even the latest generation laptops and computers are shipped with Ethernet ports limited to 1 Gbit throughput and most consumer-grade NAS devices are also limited to 1 Gbit ports. While manufacturers like QNAP and Synology ship their NAS devices with at least two ports to be able to allow for more network throughput via link-aggregation protocols, such setups require specific network switches and can be difficult to configure.
  • Slower Latency: Since all the data flows over the network, there might be issues with latency, especially if the network connection is already in heavy use.

As you can see, one is not necessarily better than the other – both DAS and NAS devices and storage arrays have their uses and their pros and cons. So before you make your purchase decision, you should understand them fully and be ready to deal with the potential issues you might encounter.

4) DAS and NAS Speed Considerations

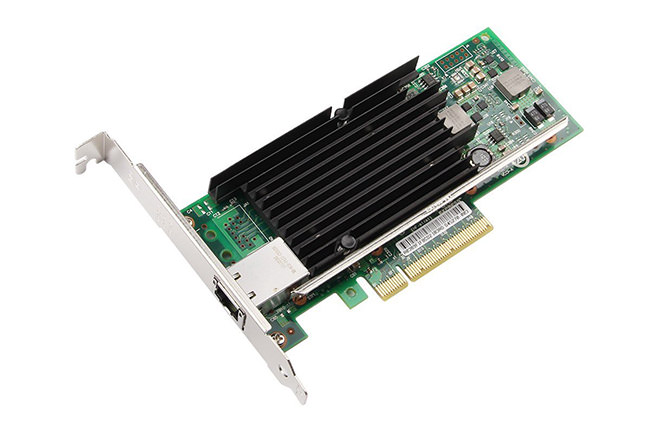
While direct-attached storage arrays are capable of delivering exceptional speeds (provided that one uses a fast interface such as USB 3.1 or Thunderbolt, as stated above), the biggest speed bottleneck of network-attached storage is the network. With most homes and offices wired with older CAT-5e cabling that limits network throughput to 1 Gbit, running a significantly faster network not only requires expensive switches and network cards, but also potentially new cabling, which can be very cost-prohibitive to replace (please note that CAT-5e and CAT-6 cables can potentially support 10 GbE at shorter distances).

One could argue that a DAS array would be a better solution, since it can handle a lot more throughput. However, NAS arrays have a lot of advantages over DAS arrays, especially in a multi-user environment. With a NAS device, your media can be accessed from any computer on your local area network (LAN) and if you need access to your files when traveling, you can download your data over the Internet as well, without having to keep one computer running all the time. NAS consumes a lot less power than a DAS connected to a computer and one can use all kinds of native and third party apps to get more functionality from a NAS, such as automated computer backups, automatic replication to other NAS devices and ability to stream media to home entertainment devices. Lastly, most NAS arrays are built to work 24/7 and are self-managed, whereas consumer-grade DAS arrays are usually not.

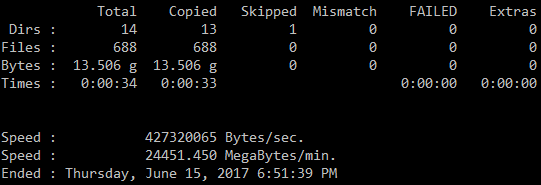
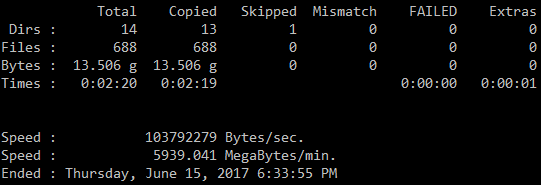
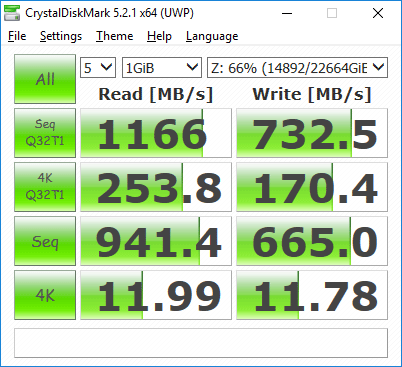
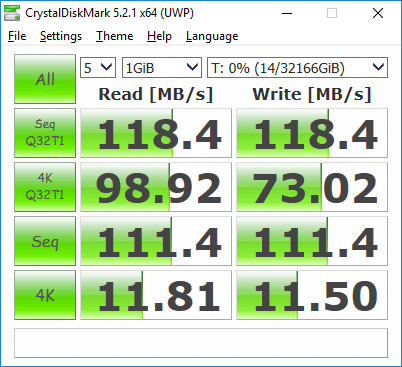
For these reasons, I highly prefer NAS to DAS as my storage solution to store photographs and video. While I have been quite happy with my Synology DS1815+ for the past few years, unfortunately, I cannot copy media faster than 100-120 MB/sec from a single computer due to the 1 GbE network interface limitation, even with link-aggregation enabled (link-aggregation can only handle more data when data is transferred over multiple computers). And since I often work with large RAW / TIFF files and video, plus my storage needs are only increasing overtime, the network bottleneck has definitely been a limiting factor. For this reason, despite the high cost of implementation, I have already moved up my network to 10 Gbit Ethernet and started migrating my data to the latest NAS models from QNAP and Synology with 10 GbE network interfaces.

So if you have been trying to decide on a NAS solution, do keep the above-mentioned network bottleneck issues in mind and make sure to plan for the future. If you work with 4K+ video content or have specific speed requirements and you do not need more than one machine accessing your storage, a high-performance DAS might be a better solution. And if you have any interest in pursuing a 10 Gbit Ethernet NAS setup, I will be working on a separate article with all the details next.

5) The Need for Larger and Faster Storage

Thankfully, with the growth of photography and videography material, storage manufacturers have also been working on increasing storage capacity. If a few years ago we were limited to 4 TB drives, there are now 10 TB consumer-grade hard drives available. Although the cost per GB still remains high, M.2 NVMe and SSD drives are also seeing increases in capacity, with 4 TB+ options already available on the market. As a result, we now have storage arrays that can deliver extremely large capacity volumes capable of handling a lot of data. And with the added benefit of creating large caches based on M.2 and SSD drives, one can push incredible speeds on such arrays as well. Lastly, thanks to the mix of different form factors and types of storage devices, we are now beginning to see tiered storage coming to consumer market, which is very exciting!

Let’s now take a look at some of the best storage solutions available on the market that we recommend to our readers.

6) DAS Recommendations

Let’s get started with the DAS storage arrays that we recommend to our readers. If you are just starting out and you do not want to spend a lot of money on an external drive, I would recommend to get a two-bay DAS / external drive. You can buy those pre-configured with capacities up to 20 TB (in RAID 0 / stripe mode). Personally, unless you know what you are doing and you have your backup fully figured out and in place, I would not recommend to run any storage in RAID 0 configuration. So as soon as you receive yours, I would change it to RAID 1 (mirror) mode, so that if one of the drives were to fail, you would still not lose the data. However, it is important to point out that RAID can never be considered to be a backup, so don’t just assume that your data is safe if you run a simple two disk array in mirror mode. Always make sure that you have a solid photography backup workflow in place. You could still lose all of your data if two disks were to fail at the same time, if the DAS was stolen or some other disaster took place.

So which specific DAS units would we recommend? Here is our list of favorites:

  • G-Technology G-RAID 2-Bay DAS Array – Wonderful DAS arrays for those who are starting out. These units have 2x Thunderbolt 2 and 1x USB 3.0 Ports and are both PC and Mac Compatible. They come with a hardware RAID controller and they also look great! Another option is LaCie’s 2big 2-Bay DAS Array, which provides very similar features at competitive prices.
  • OWC ThunderBay 4-Bay DAS Array – If you are a Mac user or you have a Thunderbolt adapter on your PC, the 4-bay storage array from OWC delivers excellent performance.
  • LaCie 6big 6-Bay DAS Array – if you want to step up big time in performance and total storage space, the LaCie 6big DAS is hard to beat.

7) NAS Recommendations

For the past few years, I have been relying heavily on Synology NAS arrays, which deliver superb performance, sleek and easy to use graphical user interface and excellent app ecosystem. QNAP storage arrays are new to my home as of this year and they also seem to be very solid, reliable and in some cases even offer more features than Synology. Although I have used a number of different NAS solutions in the past from a number of different manufacturers such as Drobo, Netgear and Promise Technology, I have had either bad or very mixed experience with them, bringing Synology and QNAP to the top of my list of favorites:

  • ioSafe 214 2-bay NAS – Based on Synology DSM, this 2-bay enclosure is what I have in my basement as my secondary backup. This little guy is fireproof and waterproof, so if you put two large capacity drives in it (I have 2x 10 TB drives in RAID 0 configuration), it can keep a backup of your data. I have it configured so that it automatically replicates changes from my Synology drive, which works great.
  • Synology DS1517+ 5-Bay NAS – This 5-Bay NAS unit is ideal for most photographers out there. It can accommodate up to 5x 10 TB drives. If you were to run it in RAID 5 configuration, you would end up with a total of 40 TB of available space, whereas RAID 6 would result in a 30 TB volume.
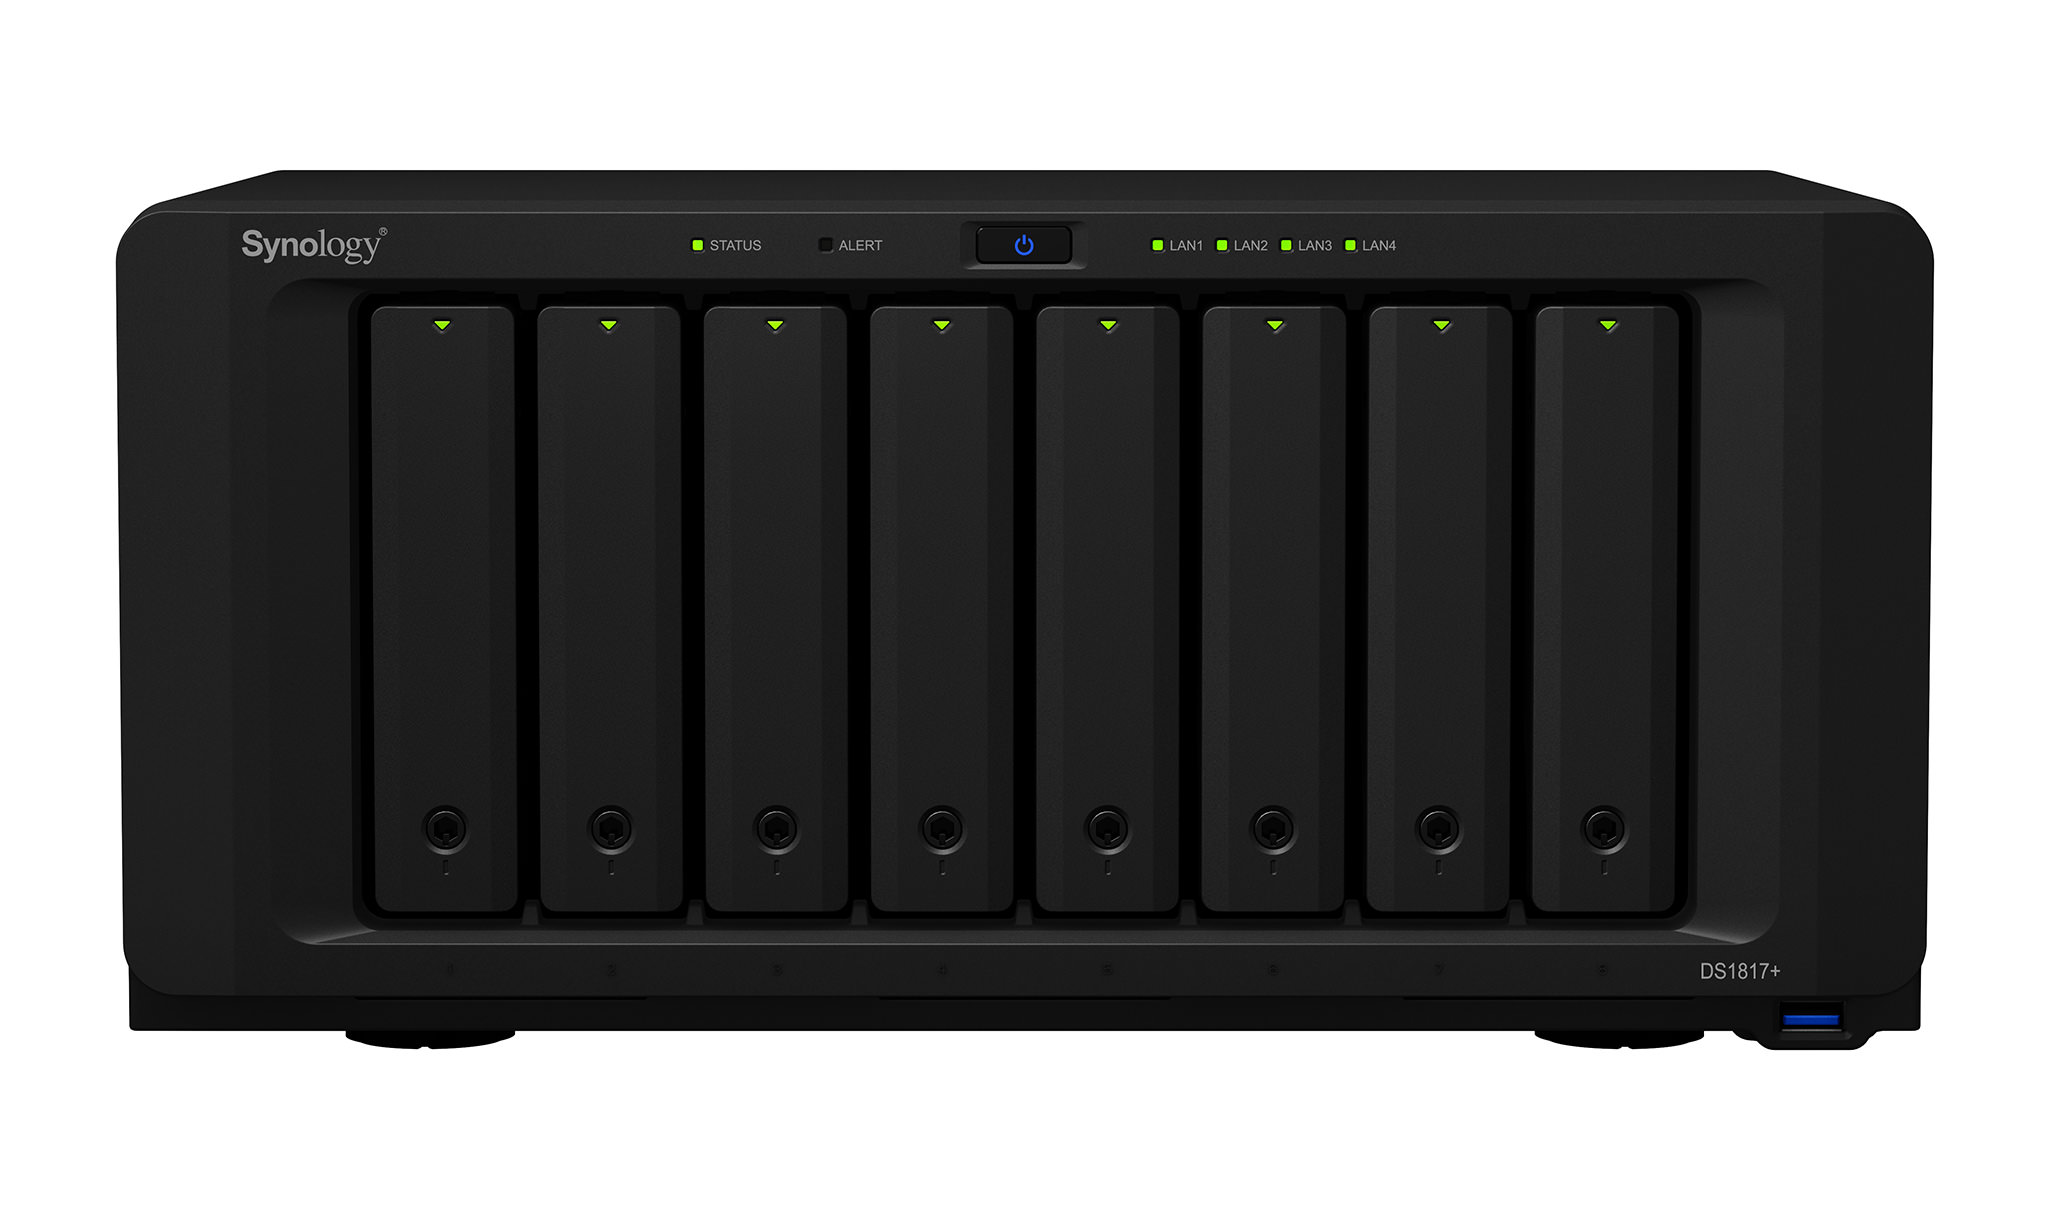
  • Synology DS1817+ 8-Bay NAS – If you have a lot of data, the Synology DS1817+ can accommodate up to 8x 10 TB drives, giving you 60 TB of total storage in RAID 6 configuration. This is what I currently have with a 2x 10 Gbit network card to take a full advantage of its insane speed. See our Synology DS1817+ announcement article for more details.
  • QNAP NAS – Similar to Synology, QNAP also offers a number of different products to suit every need. I have to say though, that their QNAP TVS-882T is an absolute monster. I have it running in a production environment with 5x 8 TB 7200 RPM hard drives, 2x 2 TB SSD drives in a tiered configuration and it screams on my 10 GbE network. It is not as energy efficient as the Synology DS1817+, but if you need the best performance with amazing flexibility, the QNAP TVS-882T is currently my favorite of the bunch. Lastly, unlike Synology storage arrays, QNAP can serve as DAS, NAS and SAN at the same time, on top of being able to output content to your monitor or TV.

I will be publishing the review of the QNAP TVS-882T later this week, with the Synology DS1817+ to follow.

8) Hard Drive Recommendations

When it comes to selecting hard drives, there are a number of great options out there. Always make sure to select drives that specifically say “NAS” on them, since they are built for 24/7 operation. Regular drives will work, but their failure rates might be much higher and that’s not what you want when continuously running drives. If you can get a hold of enterprise-grade NAS drives from any manufacturer, those would be the most reliable. However, they are also quite pricey compared to regular NAS drives.

Personally, I have been a huge fan of HGST NAS drives. I have been using them for 5-7 years now and I have never seen one fail. My personal pick would be the HGST 8 TB 7200 RPM NAS drive, which is what I use on my primary storage. They are very fast drives and they are my top choice for NAS storage. While my luck with Seagate has not been that great, the new generation Seagate IronWolf drives look great. The highest capacity drive at the moment is the Seagate 10 TB IronWolf 7200 RPM NAS drive, which is what I would pick if you want to maximize total storage space.

Western Digital also has some great options. The WD 10 TB NAS drive is limited to 5400 RPM, so it should be quieter and not as hot as 7200 RPM drives. It promises the same 210 MB/sec sustained data transfer rate as the IronWolf drives, although I am sure there will be differences when it comes to random IO, with 7200 RPM drives winning over. If you want to step up to 7200 RPM, the only option from WD is enterprise-grade WD 10 TB Gold 7200 RPM NAS drive, which is going to be more reliable in the long term.

Hope you found this article useful. If you have any questions regarding storage, please let me know in the comments section below!

The post Storage Considerations for Photographers appeared first on Photography Life.

Photography Life

Posted in Photograpy How To | Tagged , , | Leave a comment

Is 10 Gbit Ethernet Viable for Photography Needs?

Over the past few months, I have been testing the new generation NAS storage array devices with 10 Gigabit (Gbit) network interfaces to see how they perform when compared to 1 Gbit network. While I am pretty happy with a standard 1 Gbit NAS setup for photo storage, any time I have to deal with stacking large panoramas, saving large TIFF files with several layers in Photoshop or doing any video work, my performance starts to go down the drain due to the 1 Gbit network bottleneck. As a result, whenever I deal with such projects, I have been using my local SSD storage for working on files and after I am done, transferring images and video back to the NAS storage for future access. So when I found out about 10 Gbit options on new storage arrays from QNAP and Synology, I decided to try them out in a productive environment. In this article, I will go over my current 10 Gbit Ethernet setup with a QNAP TVS-882T and compare its throughput to 1 Gbit setup when copying both RAW images and video, then list out the costs associated with implementing 10 Gbit Ethernet to see if is a viable solution for working professionals.

1) The Pros and Cons of 10 Gbit Ethernet

As I have already pointed out in my Storage Considerations for Photography article, one of the biggest benefits of a Direct-Attached Storage (DAS) compared to Network-Attached Storage (NAS) is performance. Since DAS does not have the same latency and network throughput issues as NAS, as long as DAS is connected over a fast interface such as Thunderbolt or USB 3.1, one can get incredible read and write speeds. However, a DAS does not work well for a multi-user setup and does not provide all the benefits of a dedicated NAS, so those of us who need those features or have to work in multi-user environments have no other option but to go for a NAS, which is where we hit the network bottleneck.

That’s where 10 Gbit Ethernet (10 GbE) comes to the rescue. Compared to 1 GbE, 10 GbE has 10 times the network throughput potential, so it is as fast as USB 3.1 and first generation Thunderbolt, which is 1250 MB (megabytes) per second of throughput compared to 125 MB/sec limit of 1 GbE! That’s a lot of data one could move from a storage unit, so high performance is the prime advantage of 10 GbE.

With the growth in popularity of 10 Gigabit Ethernet (10 GbE) solutions based on SFP+ (optical fiber) or RJ45 (copper), we are now seeing this technology (which was once only available for large enterprises) becoming more widely available for small to medium-size businesses at much lower costs than before, and with time, the technology will eventually make it to consumer-grade products, desktop PCs and laptops as well. While one might think that they would be an early adopter of 10 GbE, that is certainly not the case – 10 GbE has been already available for many years and it has been thoroughly tested to work in enterprise environments, so there are no concerns about its future or its reliability.

However, due to lack of consumer-grade 10 GbE solutions on the market at the moment, implementing a 10 GbE network is still cost-prohibitive (as pointed out further down in this article), so its use is going to be currently limited to larger photography businesses that require shared storage for a multi-user environment.

2) 10 GbE vs 1 GbE Performance Comparison

While 10 GbE should be able to yield up to 1250 MB/sec throughput on paper, that number is practically impossible to reach due to a number of different factors. Transferring one large file is going to take less time than transferring many small files, because sequential read and write operations are always going to be faster. Therefore, in order to assess the potential of 10 GbE in a more realistic environment, we have to test transfer of both RAW and JPEG images, along with a separate transfer of large video files.

Let’s first take a look at the comparison of 10 GbE vs 1 GbE when transferring different images. For this test, I took a sample Photo folder containing a total of 688 files (a mix of RAW, JPEG, TIFF and XMP files), roughly 13.5 GB in size and copied the files 3 times to a NAS device (write operation) in order to yield the best transfer time. I used the “robocopy” tool to do this, since it shows the total amount of time it takes for the files to get transferred:

Robocopy 10 GbE Transfer
Robocopy file copy over 10 GbE
Robocopy 1 GbE Transfer
Robocopy file copy over 1 GbE

As you can see, the difference between 10 GbE and 1 GbE is pretty big, but not 10 times big. At its best, it took 33 seconds to transfer a total of 13.5 GB over 10 GbE (roughly 427 MB/sec), whereas the same amount of data was transferred over 1 GbE in 139 seconds (roughly 104 MB/sec). Still, that’s about 4.2x the amount of time you would be saving by transferring images over 10 Gigabit network.

Let’s now take a look at the performance differences using CrystalDiskMark:

QNAP TVS-882T Read and Write Performance
Read and Write Performance Over 10 GbE
Read and Write Performance 1GbE
Read and Write Performance Over 1GbE

For this test, I ran CrystalDiskMark three times on each interface and measured the results, then took the best result out of the three. As you can see, we can see a different picture here. We are talking about up to 1166 MB/sec read and up to 733 MB/sec write performance compared to a maximum of 118.4 MB/sec read and write time. We can see that in the second test, the bottleneck was the network, which explains why both read and write numbers never went past 118.4 MB/sec. That’s a pretty incredible difference between the two. For sequential reads, that’s roughly 10x difference in performance, whereas for sequential writes, it will depend on the maximum write speed your NAS can deliver. In this particular case, I saw a 6.2x difference, which is still huge.

So depending on the workload and what you are trying to transfer, expect to see anywhere from 4 to 10 times the performance when copying files over 10 GbE compared to 1 GbE. That’s a significant difference in performance.

3) The Cost of Implementing 10 GbE vs 1 GbE

Let’s take a look at how much money one would need to invest in a 10 GbE network infrastructure when compared to 1 GbE. Since most people are already familiar with 1GBASE-T using RJ45 connectors (standard CAT-5e or CAT-6 patch cable), it would make sense at look at the cost of implementing 10 GbE using 10GBASE-T for backwards compatibility and other reasons (in simple language, the connectors would look the same and the switches would have similar inputs as your existing ones).

3.1) Cable Runs – CAT-5e, CAT-6 or CAT-6a?

The good thing about running 10 GbE network, is that as long as your cables are not too long, you don’t need to upgrade your cabling to the newest CAT-6a or CAT-7 standards. So if you have a relatively small home / office with Ethernet cable runs not exceeding 45 meters, you can run a 10 GbE network using standard CAT-5e UTP cables! And if you have CAT-6 cables, you could push the length of cables to 55 meters. Anything longer than that will result in lots of errors and inconsistent performance, so you will need to run CAT-6a or better cables in those situations.

Unless you are planning to put your NAS device far away from your desktops, you should not need to worry about upgrading your cable infrastructure – your existing cables should be good enough. For this reason, I am not going to include the cost of CAT-6a / CAT-7 cabling as part of the cost.

3.2) 10 GbE Ethernet Switch

The biggest cost of implementing 10 GbE network is the switch and sadly, there are no cheap solutions on the market at the moment. If you want to take advantage of your existing cabling, my personal choice for a 10 GbE switch is the NETGEAR ProSAFE 8-Port 10-Gigabit Ethernet Switch (Model XS708E-200NES), which sells for $ 699:

NetGear ProSAFE 8-Port 10 Gbit Ethernet Switch
NetGear ProSAFE 10 Gbit Ethernet Switch

The good news is, NetGear is no longer the only company making these switches. Buffalo is also now competing in the same space and they have an even cheaper 8-Port 10 Gigabit switch that is currently selling for $ 542 on Amazon:

Buffalo 8 Port 10 GbE Switch
Buffalo 8-Port 10 GbE Ethernet Switch

I expect prices on 10 GbE switches to continue to come down in the future, but at the moment, they are still rather expensive for an average photographer.

3.3) 10 GbE Network Card

Lastly, for every PC that needs access to 10 GbE network, you will need to make sure that it has a 10 GbE network adapter to be able to take advantage of the speed. While many 10 GbE network adapters are rather expensive, I personally went for a third party adapter that has the Intel X540 chip. The cheapest one on Amazon is from a company called 10Gtek, which supplies network cards based on this chip with one or two ports. I personally went for the X540-T1 model that costs $ 190, but you can also get the dual port X540-T2 for $ 210:

Intel X540-T1 Based Card
Intel X540-T1 Based 10 GbE Card

These cards work really well and they have been solid for the past 6 months on both of my computers where they are installed.

If you are willing to go the eBay route, search for “Intel X540-T1” or “Intel 540-T2” and you will find plenty of options from companies in China. I was able to find Intel X540-T1 adapters as cheap as $ 85, which is significantly cheaper than what one can find on Amazon.

4) Total Cost

So let’s now calculate the totals for a 10 GbE infrastructure:

  • 10 GbE Switch: $ 542
  • 10 GbE Network Card: $ 85

For a total of $ 627 you could get one machine connected to a 10 GbE switch. If you already spent the money to get a 10 GbE SAN, this actually does not sound too bad in comparison.

Now the big question is, would a 10 GbE infrastructure be worth the investment for photography? That all depends on your needs. For me personally, moving up to a 10 GbE infrastructure was worth it, because I work in a multi-user environment where I need fast access to my data, especially when it comes to editing videos. Thanks to the 10 GbE network, I now use a NAS as a local drive and host all of my photos there, and my NAS can provide amazing speeds for me that even a local SSD drive could not provide. All of my photos and videos now reside in one location.

For most photographers who are starting out, it does not make sense to spend a lot of money on a NAS, let alone on 10 GbE network. However, if you are a busy working photographer and you want to future proof your investment, a solid NAS with 10 GbE might be worth looking at.

Let me know if you have any questions regarding any of the above!

The post Is 10 Gbit Ethernet Viable for Photography Needs? appeared first on Photography Life.

Photography Life

Posted in Photograpy How To | Tagged , , , , | Leave a comment

The Most Desired Future Nikon Lenses

One topic that many of us Nikon shooters often discuss between each other in local groups, online forums and various photography clubs, is lenses that we wish Nikon had. Sometimes a desired lens comes from our experience from using a lens from another brand, sometimes it is something that does not exist, but we wish existed to make our photography easier, more fun, etc. While Nikon has been doing a great job filling in the holes during the last several years, there are still plenty of lenses that Nikon should update or have in its arsenal. In this article, I will go over the most desired future Nikon lenses, the ones that have not been released yet, but I really wish to see come to life soon. I guess you can also call the below a “wishlist” of unannounced Nikon lenses.

Nikon Lens Wishlist

1) DX / APS-C Lenses

I will first start out with DX / APS-C lenses. I am not sure if Nikon is planning to keep its DX line in the future or not, since it has clearly failed to make a solid line-up of attractive DX lenses and has instead chosen to concentrate on bigger and heavier FX glass. If we look at what Fuji has done with its X-series lenses, it is clear that Nikon has been missing a lot of opportunities to make DX an attractive platform, especially for those who do not want to move up to FX in the future. Because of this, I have been rather pessimistic about Nikon’s DX future. Still, Nikon continues to release and sell DX cameras and there are still far more people buying DX than FX today. So if Nikon wants to keep its DX line alive and keep its DX shooters from switching to mirrorless, it should work on releasing more attractive glass that is designed specifically for the smaller sensor.

It is a known fact that the current DX lens lineup is weak. Aside from a couple of solid zoom choices like the Nikon 16-80mm f/2.8-4E DX VR and a few outdated primes, there is really nothing else to be proud of. The 17-55mm f/2.8G was excellent back in its days, but it desperately needs an update. Without a doubt, DX users need more great primes and better zooms!

  • Ultra-Wide Angle DX Primes: Aside from the Fisheye 10.5mm f/2.8G, Nikon has no ultra-wide angle lenses for DX shooters. Why not release something like 10mm f/2.8 DX, 12mm f/2.8 DX and 14mm f/2.8 DX? Make them cheap, make them good optically and people will buy them. Since it does not look like Nikon is going to add in-body image stabilization to its DX cameras, VR would be a bonus.
  • Wide-Angle DX Primes: Add 16mm f/2.8 DX and 18mm f/2 DX to the list of affordable primes.
  • Nikon 23mm f/1.4E DX VR: A small, pro-grade 23mm f/1.4 DX lens would be great. 35mm is a focal length of choice for many photographers, so this lens would fit the bill perfectly, especially if its made to be small and reasonably light. Fuji has made an excellent 23mm f/1.4 lens, so hopefully Nikon can design something similar.
  • Nikon 23mm f/2E DX VR: A budget-friendly version of the above lens. A 23mm f/2.8 pancake would be sweet as well.
  • Nikon 35mm f/1.4E DX VR: We already have a budget-friendly 35mm f/1.8G DX, so why not make a pro-grade version of it specifically designed for DX?
  • Nikon 50mm f/1.4E DX VR: Whether it is a 50mm f/1.4 DX or a 56mm f/1.4 DX does not matter, as long as it is light and has great bokeh for portraits. If Nikon can make an f/1.2 lens like Fuji has done with its 56mm f/1.2, it would be even better, but it will probably be too expensive. A budget-friendly f/1.8E version would be a good idea as well.
  • Super Telephoto DX Primes: The Nikon D500 is a very popular camera, so why not make super telephoto lenses specifically for those who want to shoot wildlife with DX and want to stay light? I would love to see 300mm f/2.8, 400mm f/4 and 500mm f/4 DX primes that are inexpensive. Imagine a D500 + 500mm f/4 VR DX kit that gives a 750mm equivalent field of view. Slap on a 1.4x TC and you have an ultimate super telephoto setup.
  • The DX Trinity: Ultimately, it would be great if Nikon could develop equivalents of Nikon 14-24mm, 24-70mm and 70-200mm lenses for the DX sensor. So a new “DX Trinity” with a Nikon 10-16mm f/2.8E DX VR, 16-50mm f/2.8E DX VR and 50-150mm f/2.8E VR DX would be ideal. These obviously won’t be cheap lenses to make, but Nikon should not price them higher than $ 900-$ 1,200.

If Nikon ever decides to go mirrorless, it might start off by making cameras with APS-C sensors first, like Canon has done with its EOS M line. And if that’s the case, then I really hope the company will start with a solid line-up of prime and zoom lenses optimized specifically for APS-C sensors.

2) FX Lenses

Nikon has a number of FX lenses that need to be updated as soon as possible. There are also many lenses that would be nice to add – from wide angle lenses, to super telephoto.

  • Nikon 14mm f/2.8E: Time to update the classic. It should be small like its predecessor, relatively lightweight and very sharp on high-resolution cameras. Slap on Nano Crystal Coat, fluorine coating and a weather-resistant design and it will be a very attractive lens for many.
  • Nikon 14-24mm f/2.8E VR: The Nikon 24-70mm f/2.8E VR and 70-200mm f/2.8E VR are already out, so it is time to update the classic with an electronic diaphragm and all the latest coating technologies.
  • Nikon 16-35mm f/2.8E VR: This can be either a 16-35mm or a 17-35mm lens for pros that need the quality and durability of a pro-grade lens. It will be heavy and it will be superb optically. Nano coated glass, fluorine coating, aspherical elements, rear focus with a protective rear element that is easy to clean. Unlike the 14-24mm, it should be able to take filters. Landscape photographers will drool over this lens.
  • Nikon 24mm f/2.8 PC-E: Yes, the new 19mm f/4E PC is excellent, but the old 24mm f/3.5 desperately needs an update. It is too soft on modern high-resolution cameras and Nikon needs to design it the same way as the 19mm f/4E PC, so that it has the same rotating capabilities.
  • Nikon 40mm f/2.8 Pancake: Canon has had its 40mm pancake for a while now, so why not make a cheap equivalent?
  • Nikon 50mm f/1.4E VR: The current 50mm f/1.4G is too weak optically, especially on the modern high resolution cameras. It is time for Nikon to bring 50mm back to life, with a pro-grade 50mm f/1.4 lens that performs well wide open. Yes, it will be heavy, sharp and expensive, and its bokeh will be beautiful. Add VR to it and it will hit the spot.
  • Nikon 24-70mm f/4E VR: Canon has had its EF 24-70mm f/4L IS model for a while and it is time for Nikon to respond. We need a cheaper version of the 24-70mm f/2.8E VR, which will have excellent sharpness wide open, with the latest generation VR on top. Or perhaps Nikon can find a way to make the 24-120mm f/4 sharper, especially towards the telephoto range. If we have to lose some focal length, so be it. How about a Nikon 20-100mm f/4E VR instead? That would be my ultimate landscape lens.
  • Nikon 85mm f/1.4E VR: The classic 85mm f/1.4G is excellent, but Nikon can do better. Add VR and all the latest coating technologies and make the new one optically superior, so that it can be sharp wide open on high-resolution sensors.
  • Nikon 135mm f/1.8E VR: The new Nikon 105mm f/1.4E is absolutely insane. Why not update the classic 135mm f/2D with an f/1.8 version so that it can compete with the new Sigma 135mm f/1.8 Art?
  • Nikon 200mm f/2E FL VR: Nikon has not updated its bokeh king, the 200mm f/2 for a long time now. It is time to push an update with fluorite glass, latest-generation VR and new coatings.
  • Nikon 200mm f/2.8E VR: Speaking of the 200mm f/2E, why not make a smaller f/2.8 version that does not cost an arm and a leg? It would be twice lighter and insanely sharp, reasonably priced.
  • Nikon 200mm f/4E VR Macro: This would be a macro lens that is insanely sharp, with VR for those of us that like to get close without having to physically get close.
  • Nikon 200-400mm f/4E FL VR + 1.4x TC: Time to update the 200-400mm and make it lighter, so that it looks as good as all the new FL versions. To compete with Canon’s 200-400mm, it would be a good idea to include a built-in teleconverter that is optimized for the lens.
  • Nikon 400mm f/5.6E PF VR: Now that the Nikon 300mm f/4E PF VR is out, why not make a 400mm PF version? If it is going to be close to the 300mm f/4E PF’s size, it will be an amazing lens for birding, especially once a 1.4x TC is attached! Hopefully Nikon does not price it above $ 2,000.

What lenses do you wish Nikon made or updated in the next few years? What is your most desired lens from the above? Please let me know in the comments section below!

The post The Most Desired Future Nikon Lenses appeared first on Photography Life.

Photography Life

Posted in Photograpy How To | Tagged , , , , | Leave a comment

How to take pictures of your newborn in the hospital

The first hours, the first moments.

As mothers, we believe that we will hold onto these memories for the rest of our lives, but the truth is that the memories are fleeting, and as our children grow and change, our hearts will grow and change with them.

I would give anything to go back and document that time in my life with intention, looking to capture every detail I knew I’d miss one day.

Photographing newborns in the hospital is a growing trend, and it is one that I am happy to include as part of my business, and something I love teaching other photographers to do as well. It is also what I hear the most about from participants of my recent Breakout, Newborn Stories.

There is so much emotion tied into this, from all sides. It’s a beautiful thing to document, and an absolute honor for me to do for so many families.

Whether you’re a professional newborn photographer, a hobbyist, or just a mother who wants to remember every little thing about the first moments with your new baby, this is for you.

Find and use the light

What am I looking for when I walk into a hospital room? Light, light, light.

Every hospital is set up differently, and where some will have large rooms with a wall of windows, others may be small with a tiny window tucked into a corner. My first mission is to locate a natural light source and place the bassinet in front of it.

I would give anything to go back and document those first few days with my newborn with intention, looking to capture every detail I knew I’d miss one day.

Use the traditional hospital items

I personally love the hospital issued swaddling blankets, hats, and shirts. The items may not hold personal meaning, but they speak to a very specific time period, one that cannot be mistaken.

So, with baby swaddled tight in pink and blue, I place her in the bassinet, still in front of the window, and shoot from various angles. When baby is warm and sleepy, I’ll remove the swaddle and capture the details like little feet and umbilical cord. I try to keep this quick as babies have a hard time regulating their body temperature.

I would give anything to go back and document those first few days with my newborn with intention, looking to capture every detail I knew I’d miss one day.

I would give anything to go back and document those first few days with my newborn with intention, looking to capture every detail I knew I’d miss one day.

Shoot in live view

Now mamas, you’ve just given birth. You’ve created a human being, and that is an incredible task! My favorite trick for hospital sessions is going to be your best friend.

It took me years of shooting dSLR to learn about this, mostly because I just didn’t see the benefit. I love using it to set white balance, but that isn’t the best part.

Live view will allow you to use angles and composition in ways that would require so much extra effort when shooting through the viewfinder. Another benefit is that you can set focus by zooming into your subjects, eliminating any errors or guessing that may occur.

I would give anything to go back and document those first few days with my newborn with intention, looking to capture every detail I knew I’d miss one day.

The How To?

  1. Switch your camera into live view mode.
  2. Hold your camera at the desired angle. If you have a tilting screen, you can get even more creative.
  3. Find the composition that you desire and toggle the focus box so that you can zoom into the desired area of the image.
  4. While zoomed in, set focus manually with your focus ring.
  5. Get your shot. You do not need to zoom out to do so, but I typically check the image to confirm it’s what I was going for.

The beauty of documenting your own baby in the hospital is that you can take your time.

Mama and Daddy, too

While individual portraits of baby are important, don’t forget to document the love and connection of other family members as well. I strongly encourage you to get in the frame, too, mamas. This is the perfect time to get your settings in place and give dad a quick tutorial on where to place the focus box and let him snap away.

I love to use side light for parent or sibling shots, whether that means standing to the side of the window, or sitting on a piece of furniture. Have the person hold the baby to their chest, ask them to be sure the baby’s face is toward the window.

I would give anything to go back and document those first few days with my newborn with intention, looking to capture every detail I knew I’d miss one day.

Another option is to have them hold the baby with bottom on chest, feet pointing up, and head cradled in their hands. This pose will allow for a variety of angles.

I would give anything to go back and document those first few days with my newborn with intention, looking to capture every detail I knew I’d miss one day.

I would give anything to go back and document those first few days with my newborn with intention, looking to capture every detail I knew I’d miss one day.

Include siblings

For younger siblings, a sturdy chair paired with a boppy pillow for support are always a hit. It’s also incredibly sweet to have a parent holding the baby with the older sibling snuggling up. No matter the situation, simplicity is key, as the emotion will take center stage.

I would give anything to go back and document those first few days with my newborn with intention, looking to capture every detail I knew I’d miss one day.

Hospital photography is a wonderful time to give up the idea of posing and perfection, and embrace the beauty of the moment. Everyone is filled to the brim with emotion, so in love with this new little life. Well, there are times that siblings take some warming up, but that’s worth documenting, too.

Over the course of your hospital stay, if you’re documenting this time for yourself, capturing the baby in the bassinet, and documenting the connection of family and friends with your baby is a priceless gift you’re giving to future you. If you’re a friend or a photographer coming in to document this new life, you can do so in under an hour, and in a way that requires no extra effort from the new parents.

The session itself is simple, but the images produced as a result are something to be treasured for many, many years. If you can’t tell, this is where my heart lies, and I’d spend every day documenting new life if I could.

take-better-pictures-with-the-help-of-the-Clickin-Moms-photography-forum

The post How to take pictures of your newborn in the hospital appeared first on Clickin Moms.


Clickin Moms

Posted in Photograpy How To | Tagged , , , | Leave a comment

16 close-up pictures that’ll make you feel like you’re right there

Winning image above by Kimberly Milano

Who doesn’t love a contest?

Every month on the photography forum, we throw out a theme and leave it up to members to interpret it in their images. Last month, we chose the theme ‘Close-up’.

What resulted was an amazingly beautiful collection of pictures that allowed us to catch a glimpse inside the lives of the members. We’ve compiled a few of them here for you to enjoy and we want to congratulate Jamie for winning a live Breakout seat from Click Photo School with her image above!

Alyssa Ahern

Alyssa Ahern

Anna Hurley

Anna Hurley

Brandi Markham

Brandi Markham

Clare Midock

Clare Midock

Elizabeth Loughran Partin

Elizabeth Loughran Partin

Erica Williams

Erica Williams

Gisele Queiroz

Gisele Queiroz

Julie Audoux

Julie Audoux

Julie Pease

Julie Pease

Kathleen Chapman

Kathleen Chapman

Kim Peterson

Kim Peterson

Kristen Ryan

Kristen Ryan

Monika Colichio

Monika Colichio

Shelly Waldman

Shelly Waldman

Tanya McSween

Tanya McSween

Would you like the opportunity to be featured in next month’s photo share here on the Clickin Moms Blog and possibly win a prize? For our next contest, we’ve asked for your best ‘Fatherhood’ photos which you can submit here.

Not a member of the forum? Join us and be on the road to becoming a better photographer today!

take-better-pictures-with-the-help-of-the-Clickin-Moms-photography-forum

The post 16 close-up pictures that’ll make you feel like you’re right there appeared first on Clickin Moms.


Clickin Moms

Posted in Photograpy How To | Tagged , , , , , , , | Leave a comment