This website is loaded with useful tips on photography that will help you get familiar with your camera settings. You will learn how to take good pictures and how to photograph like a pro using our photography tips.
On Father’s Day morning we had some very unsettled weather move through our area which brought with it some extremely strong winds. I couldn’t help but grab my camera and go out for a birds-in-flight practice session as I knew the very high winds would create ideal conditions for me. So, I headed out to Eastport Drive by Hamilton […]
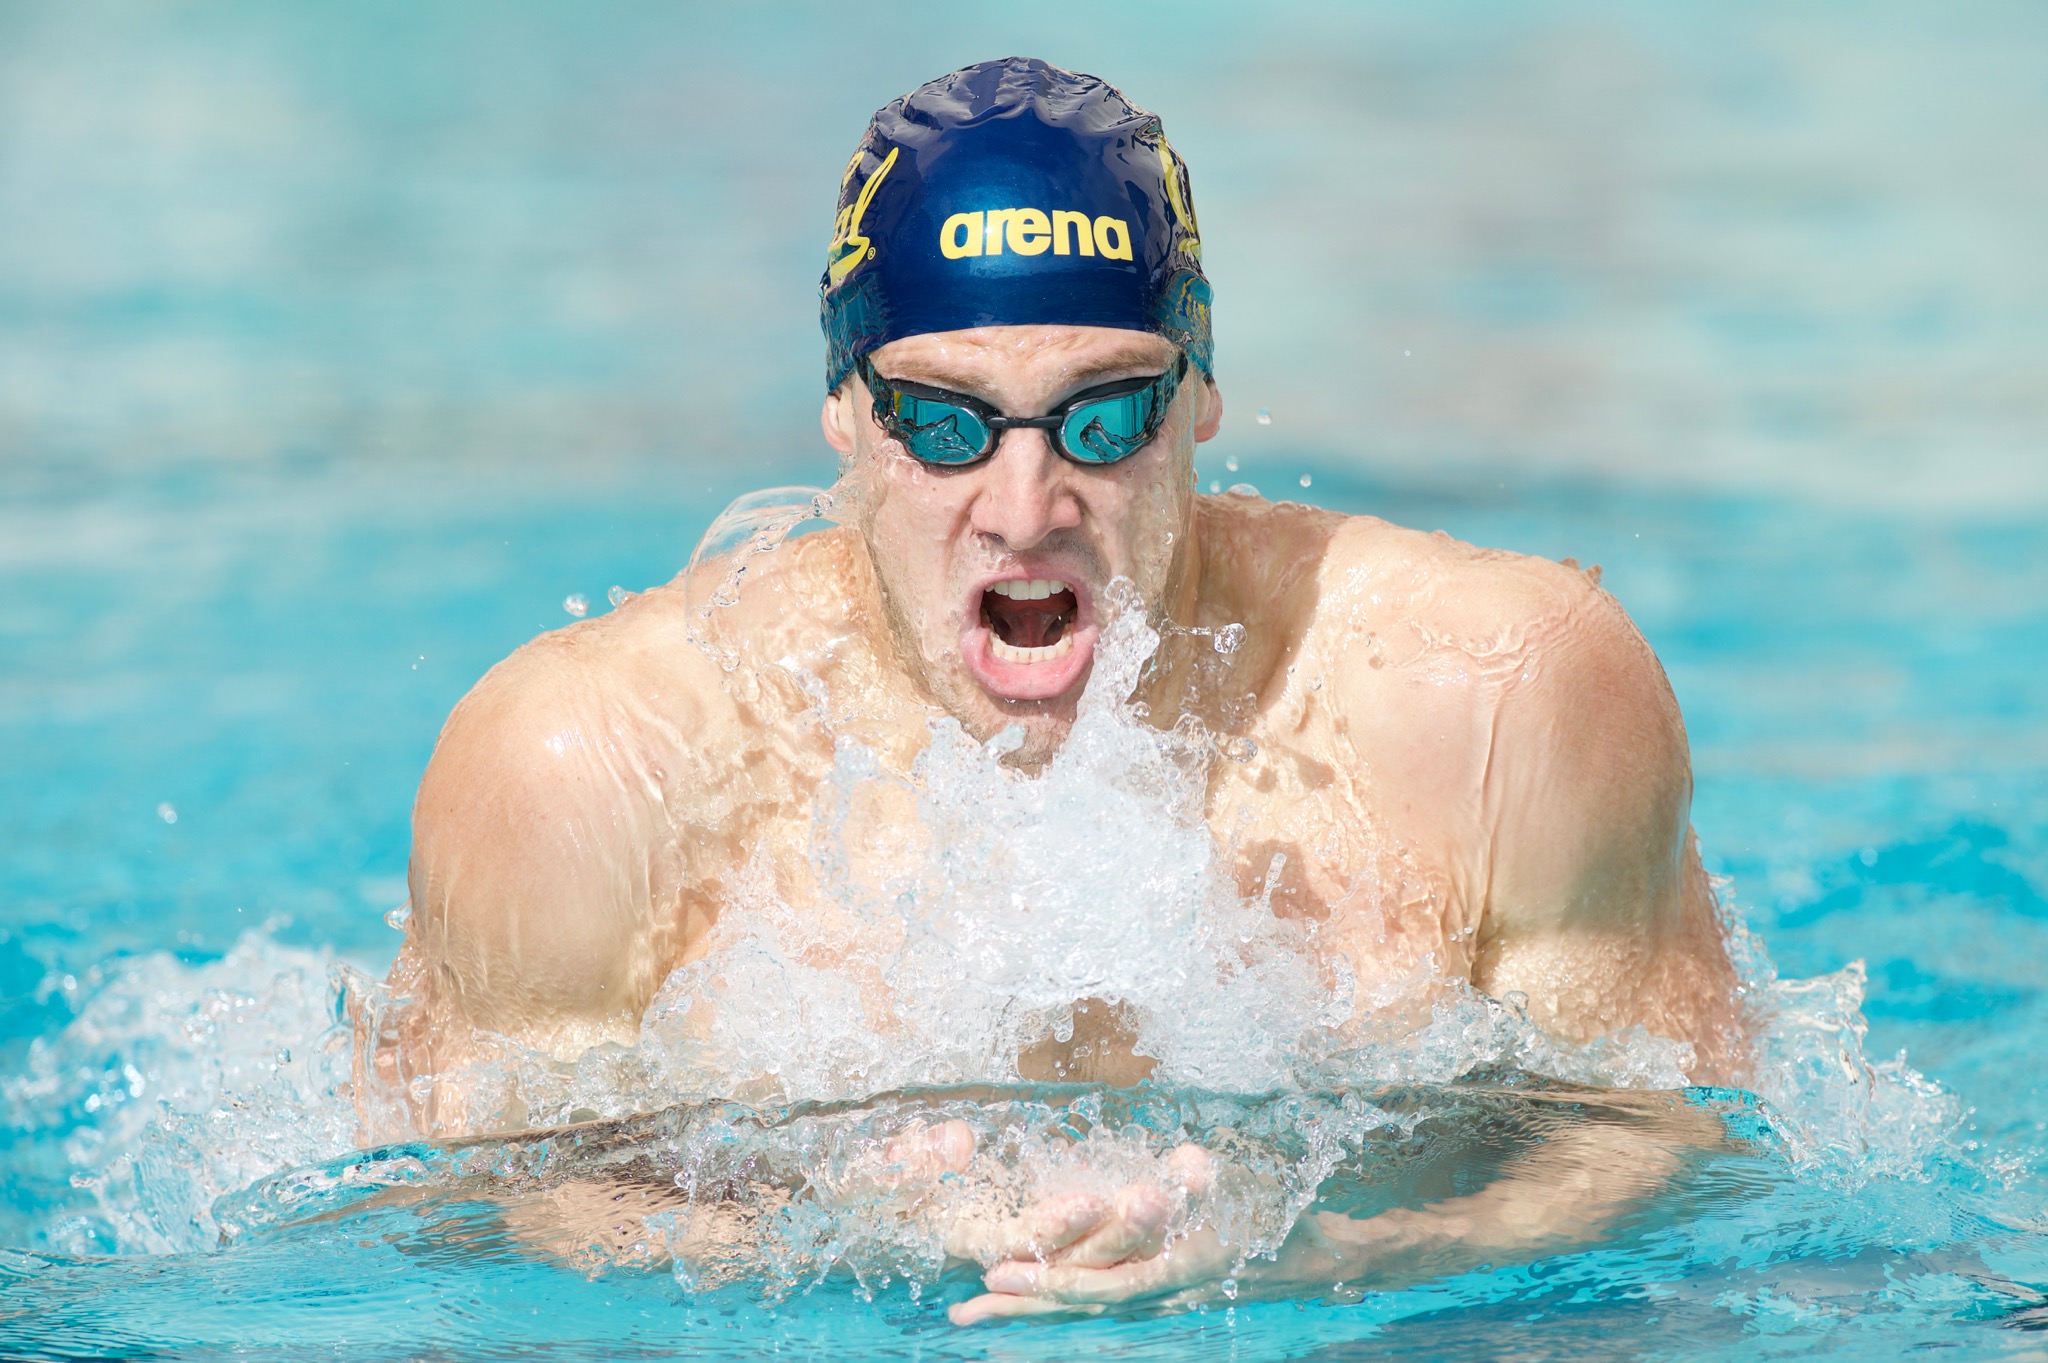
This post is the last in a three-part series dedicated to teaching sports photography at all levels of competency. In part one I covered the basics for photographers who are just getting started. Part two was geared towards intermediate amateurs who have mastered the basics and want to gain additional competency to bring their images to the next level. This part is for advanced amateurs looking to enhance their existing skills and create professional-looking images.
NIKON D4S @ 600mm, ISO 1000, 1/1600, f/5.6
1) Composition
A well-composed sports image will quickly attract the viewer’s attention and hold it. Filling the frame with powerful subjects is the goal. The guidelines for composing a sports image are simple: create a balanced picture free of distractions that tells a story. Let us go through those one by one.
1.1) Balance
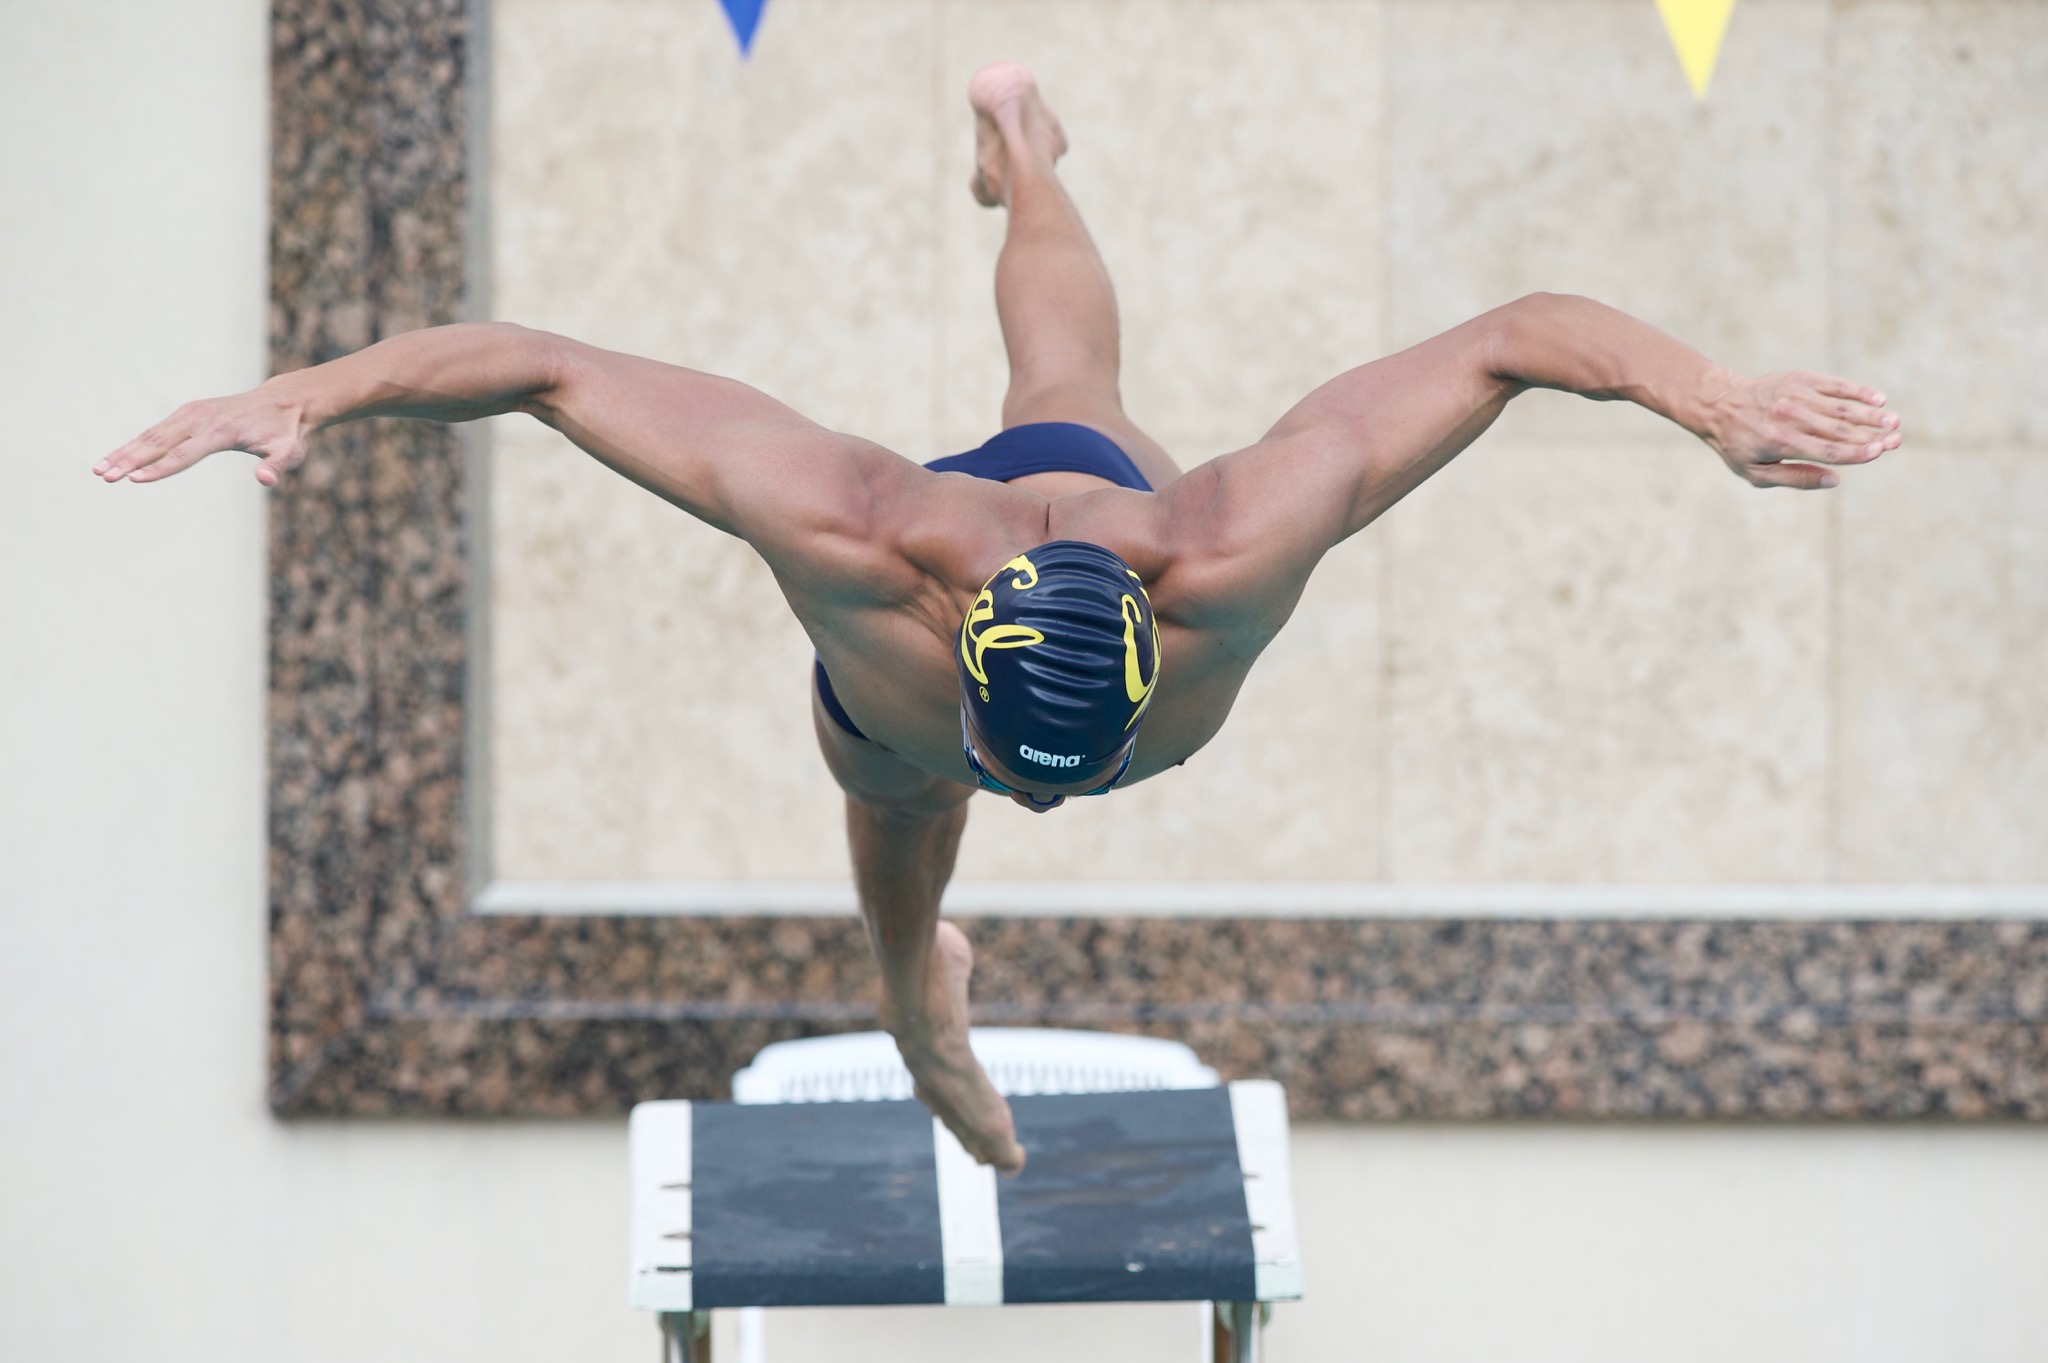
The easiest way to achieve balance is to put your subject in the center of the frame. Some photographers will balk at this assertion because they have been taught to rely on compositional tricks, such as the rule of thirds. Sports photography is distinct from other genres, like landscape or architecture, because the subjects we capture tend to be singular. With few points of interest we look to fill the frame from the center outwards. To be clear, the subject(s) should fill the frame, not just occupy a small area in the center.
NIKON D4S @ 420mm, ISO 280, 1/1600, f/5.6
1.2) Distractions
Sports images should capture the viewer’s attention immediately, and keep it. Maintaining attention means eliminating distracting elements, such as bright spots in the background or a mishmash of subjects. An easy way to remove distractions is to blur the background using a long, fast lens. But, do not stop there. Fast telephoto lenses only downplay distractions. One must rely on their shooting position to keep distracting elements out of the frame. Fences, porter potties, and cars are examples of distracting elements. Try low and high shooting positions to see what works best.
1.3) Telling a Story
Balanced and distraction-free images may sound boring, and that is because without an interesting subject they would be. The key is to frame a scene, whether it be one player or many, where action is taking place in a meaningful way. Here is a bad and a good example of story telling:
Bad: A pile of football players attempting to gain control of the ball. Chances are that there will be no clear subject, making the image uninteresting. Good: Two soccer players with visible, emotional faces vying for control of the ball.
NIKON D4S @ 420mm, ISO 4000, 1/1000, f/4.0
2) Post-Processing
One of the easiest ways to make your pictures stand out against the crowd is to do some quick and easy touch-ups in an image editor. I do not advocate for Photoshop-style image manipulation, but some cropping and lighting adjustments can do wonders. Here is my recommended process:
Make a selection of your best images from the event. I will shoot about 1000 images and choose no more than 50 to send to an organization/client.
Crop and straighten your images. A straight horizon and some cropping will do wonders for your composition.
Adjust brightness and white balance, if needed. Most images can benefit from boosting shadows, dimming highlights, and making colors look natural.
Add a touch of sharpness. Most digital cameras have an anti-aliasing filter that prevents moire patterns, but slightly reduces sharpness. Make your subjects look crisp.
NIKON D4S @ 420mm, ISO 900, 1/1250, f/5.6
3) Equipment
In the first two parts of this series I attempted to downplay the importance of good gear in sports photography because I feel that most photographers would be better served by improving their skills than buying fancy cameras. However, there comes a point when gear, not skills, holds you back from accomplishing your goals.
3.1) Camera Bodies
Full-frame: If you are not already in possession of a full-frame body, it is time to get one. The simple fact is that a full-frame sensor has over two times the surface area as an APS-C sensor, leading to about twice the image quality. This is especially important for indoor sports where light-gathering ability is at a premium.
NIKON D4S @ 135mm, ISO 5000, 1/1000, f/2.8
Frame rate: I am not a big advocate of the “spray and pray” methodology for capturing sports images. Good timing is more important than your camera’s frame rate. However, if you can capture more frames in a burst you are more likely to get a keeper image. Consider bodies capable of six or more frames per second. If you can get above ten, that is wonderful.
Physical size: Professional/flagship camera bodies (Nikon D5, Canon 1D X) are much larger than your typical camera. They feature a vertical grip, enhanced weather sealing, huge battery life, and other features not seen on most other cameras. Large bodies with built-in vertical grips make handling large lenses (200mm f/2.8 and larger) easier than when using a small body. For example, I can hand-hold my D4s and 300mm f/2.8 for extended periods. It is more difficult to do that with the much smaller camera bodies that do not balance well with large lenses.
NIKON D4S @ 420mm, ISO 200, 1/1600, f/5.0
Multiple bodies: Switching out lenses is not only time-consuming, it puts your gear at risk of collecting dust and dirt internally. I recommend using two bodies at any event where you expect to be creating images with subjects close by and far away. For example, during basketball games I will put a 70-200mm f/2.8 on one body and a 24-70mm f/2.8 on the other. The ability to switch between two cameras opens up many possibilities.
3.2) Lenses
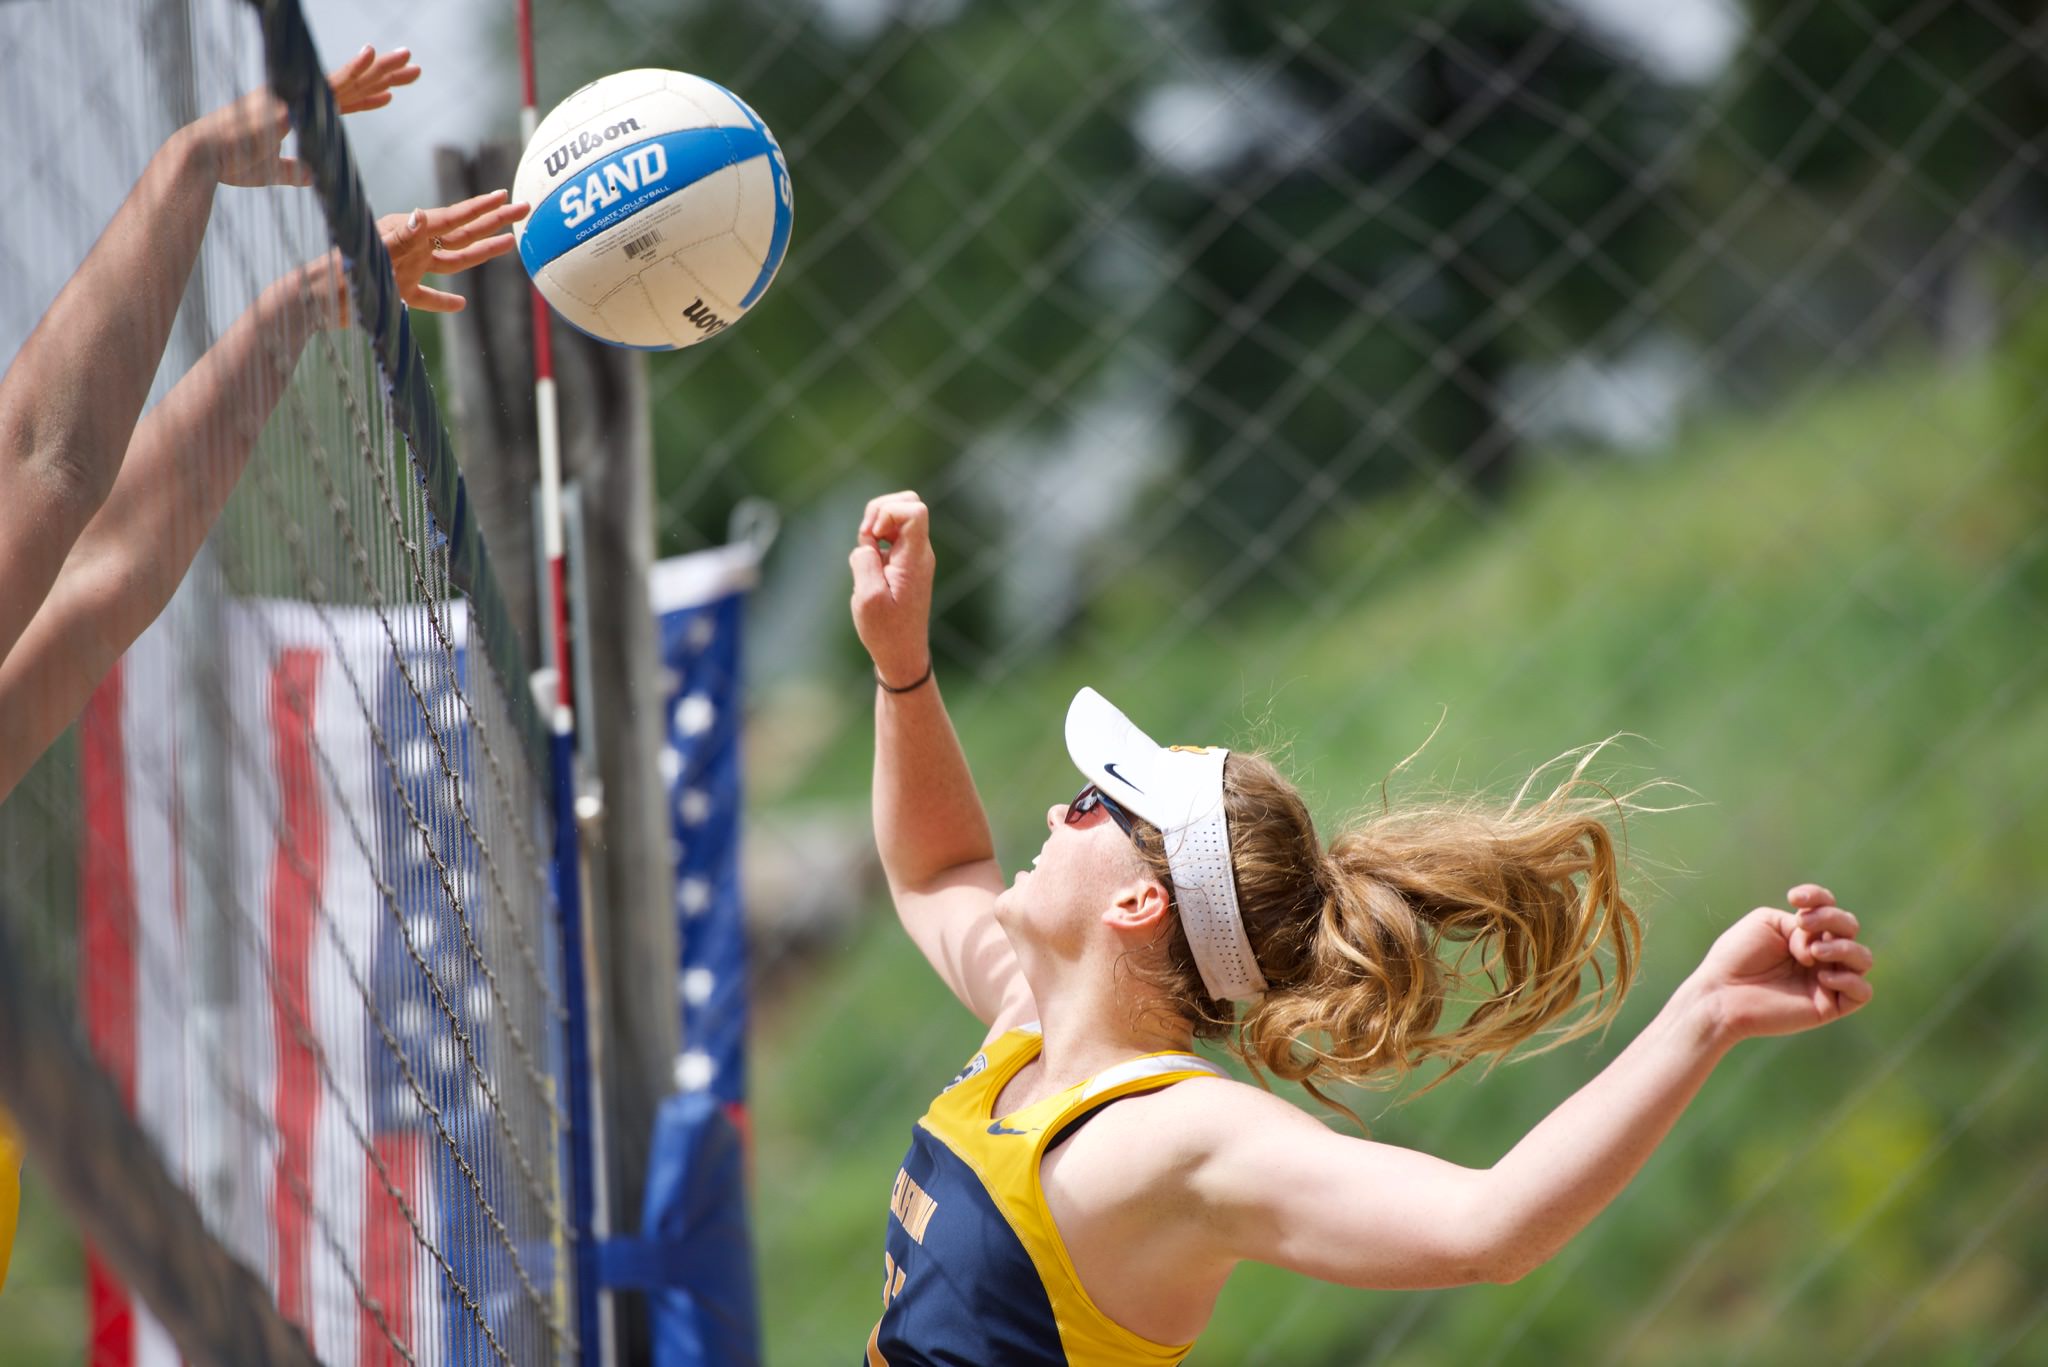
Wide and normal: A 24-70mm f/2.8 lens works well for sports that compete in relatively small venues. Swimming and basketball are two examples of sports where photographers can get close to the athletes and make use of wide and normal focal lengths. I have used my Nikon 24-70mm f/2.8G to shoot team huddles, swimming turns, basketball action close to the baseline, and venues/fans on the sidelines.
NIKON D810 @ 24mm, ISO 5000, 1/1000, f/2.8
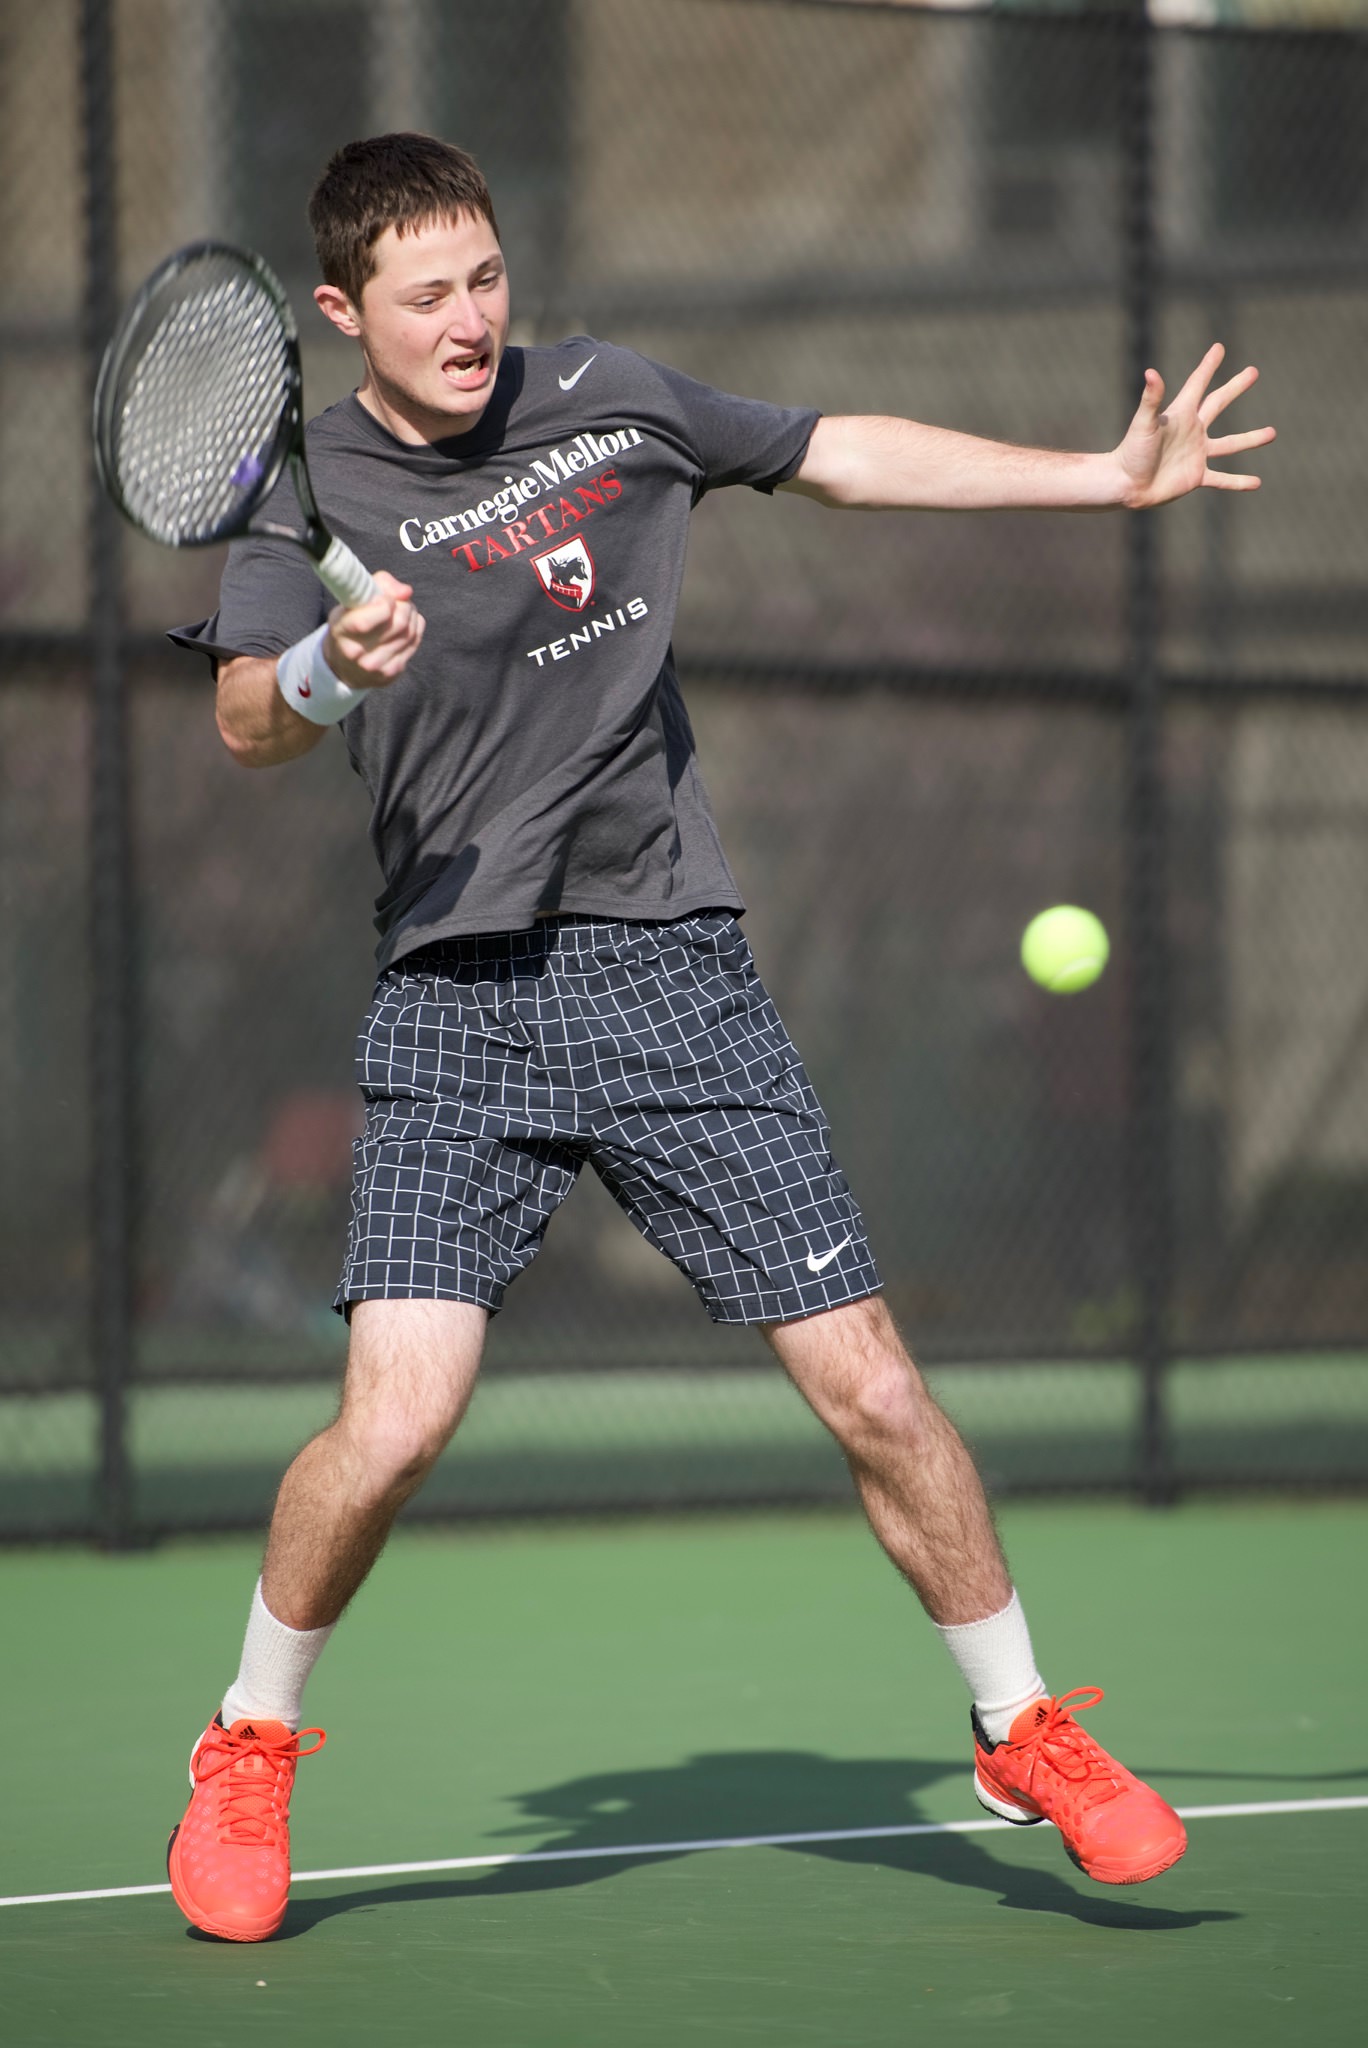
Telephoto: If you do not already have a good 70-200mm f/2.8, then you need to get one. Not only does this lens work well for most sports, it is a great general-purpose telephoto. This focal length is appropriate for just about any sport where action does not take place too far from the sidelines, like baseball. For a bit of extra reach you can add a 1.4x teleconverter to get an effective 100-280mm f/4. Another option for photographers working in extremely low light environments is a prime telephoto, like an 85mm, 105mm, 135mm, or 200mm. These primes offer a larger maximum aperture than a zoom at the cost of being less versatile. Be careful because huge apertures reduce depth of field which makes fast focusing a challenge.
NIKON D750 @ 200mm, ISO 160, 1/2000, f/2.8
Super-telephoto: Even though you can get pretty good results when limited to 200mm, I would advise serious amateurs to consider a super-telephoto lens to improve their ability to get tight shots of subjects from long distances. I chose to buy a Nikon 300mm f/2.8G VR II plus 1.4x and 2.0x teleconverters. Having a light-weight 420mm f/4 and 600mm f/5.6 with good image quality made it possible for me to get some really tight baseball shots this spring. If you primarily shoot field sports, then you might consider a 400mm f/2.8. The downside to this lens is its huge cost and weight. Photographers that work mostly in daylight might enjoy the versatility of a zoom, like Nikon’s 200-500mm f/5.6 or Canon’s 100-400mm f/4.5-5.6.
NIKON D4S @ 600mm, ISO 800, 1/1600, f/5.6
3.3) Accessories
Sports photographers should be prepared to deal with any weather conditions, from freezing rain to blazing sun. Here are some accessories you might consider using:
Hat: I wear a Tilley hat to most outdoor events to protect myself from sun and rain. Gloves: A warm pair of gloves is critical for cold environments. Plastic covers: Most professional camera gear is resistant to moisture, but do not take this for granted. Get a few cheap plastic covers to save you the headache of a waterlogged lens when shooting in the rain. Folding stool: I do not have one of these, but I often wish I did. Sitting on the ground for long periods of time can get uncomfortable. Monopod: If you are using a heavy lens, then you need a monopod to save your muscles. You can get a good carbon fiber monopod for less than $ 200, and aluminum for under $ 100. ExpoDisc: If you commonly shoot in tough indoor lighting, a custom white balance tool can be helpful.
NIKON D810 @ 200mm, ISO 200, 1/1600, f/3.2
4) Finding Events
If you do not have children that participate in sporting events, then you may be wondering how to get involved with a team. For most of us, sports photography is a hobby and not a full-time job. The best way for hobbyists to find events is to make connections in their community. Friends involved with athletic teams and fellow photographers are great assets. Through these connections you can find opportunities to shoot.
If you are new to an area or are otherwise scarce on connections, then consider reaching out to high schools and colleges in your area. Many of these organizations will welcome you to their athletics events in exchange for free photographs. Ideally, you should be able to show a basic portfolio when you make contact with the organization. Explain who you are and why you are interested in shooting for them.
Note: Some professional photographers dislike the practice of others giving away images free of charge. From my experience, most photographers at college and high school events are amateurs. Major league sports tend to have very few amateurs, and this is where professional shooters should focus their attention.
NIKON D810 @ 24mm, ISO 220, 1/1600, f/4.0
5) Event Format
It is best to get to athletic events early in order to sign in and/or get your credential and get settled before the action starts. Say hello to your contact on the team, and ask what locations you may shoot from in order to avoid issues when the action starts. Be respectful of the athletes, coaches, officials, staff, and fans. Your job is to capture the action, not to become part of it. After the event, if you are shooting for an organization, then getting your photos sent or uploaded in a timely manner is important.
NIKON D810 @ 24mm, ISO 5000, 1/1000, f/2.8
6) Closing Words
I hope that you have enjoyed the final addition to my three-part series about sports photography. My goal in writing these articles is to provide helpful information to sports photographers at all ability levels. Sports photography is so much fun; getting close to the action and capturing iconic moments can be more rewarding than just watching the game. If you have questions or feedback I would welcome them in the comments section below.
It was the last Saturday of May and it was already time to go. After spending more than a week in the Fiordland National Park, walking around this New Zealand’s jewel, and a few days in Invercargill waiting for the weather forecast to get better, it was now or never. The forecast predicted a splendid weather until the following Monday, perfect to finish the 3 days of trekking on the Rakiura Track, one of the 9 Great Walks of New Zealand.
The ferry was scheduled to leave the Bluff harbor at 9:30 PM in the direction of Oban. This city is the only one on Stewart Island, with 381 inhabitants, which is almost all of the population of the island. It’s also named Rakiura, a Maori name with several meanings, but we will go by the Glowing Skies translation, a reference to the sunsets or to the Aurora Australis. The Southern light, which I dreamt about seeing there, is probably one of the best places easily reachable on this side of the globe.
Once arrived in Oban, I booked the huts in the DOC (Department of Conservation) office, Port William for the first night and North Arm for the second night. The track doesn’t really start from Oban but 5km further. While a shuttle could have gotten me there, I decided to walk. Instead of staying on the asphalt road, I choose to walk along the Horseshoe Bay, a magnificent beach introducing me to the beauty of the island. A few minutes later, I left the last houses behind me to enter the Rakiura National Park.
The track, which is well maintained by the DOC, goes along the coast, sometimes sinking into the forest. It offers a unique sight and reveals one of the treasures of Rakiura: spectacular beaches where the vegetation overflows from all sides as if it was trying to push back the sea. Yet, even if it is a calm day, it is this same vast expanse which draws the outlines of the island, cuts off the cliffs and refines the curves of the sand stretches. Although the coast is mainly composed of rocks, the low tide sometimes brings out these pristine beaches, the opportunity to avoid a section of the track in the forest. The vegetation isn’t so different from the South Island but its inhabitants are, especially the birds. Several species are only present on a few New Zealand islands including the Stewart Island. The best known and the most sought-after bird by visitors is the Stewart Island brown kiwi, a subspecies of the Southern brown kiwi (Apteryx Australis). The kakapo (Strigops habroptilus), a large nocturnal and herbivorous parrot, is also unique in its kind. Besides living at night, it shares another common trait with the kiwi: it doesn’t fly. It is easy to understand why these birds almost disappeared with the arrival of humans and the predators they brought with them. On the island, predators are much rarer.
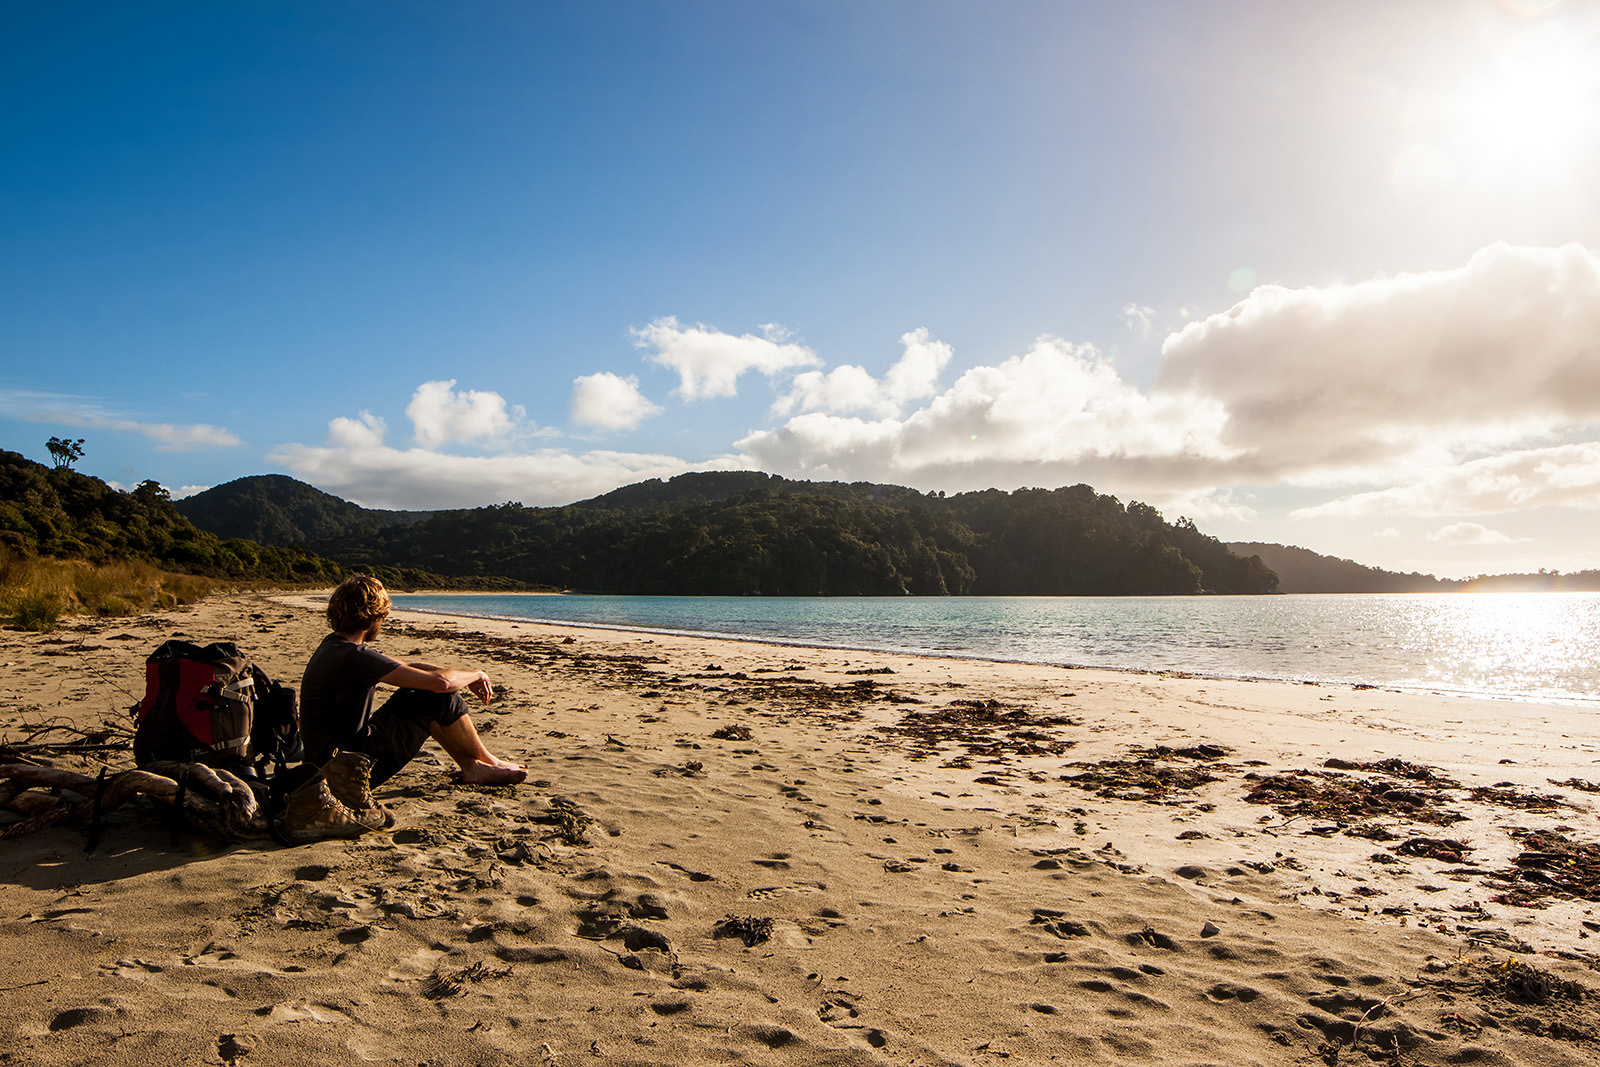
After two hours of walking, I reached Māori Beach and decided to take a break, alone in the middle of nowhere. Well, almost alone. The sandflies (these lovely flies sucking your blood) gave me a warm welcome, especially when I decided to remove my shoes to feel the sand between my toes:
Canon EOS 500D ISO 100, 1/1000,
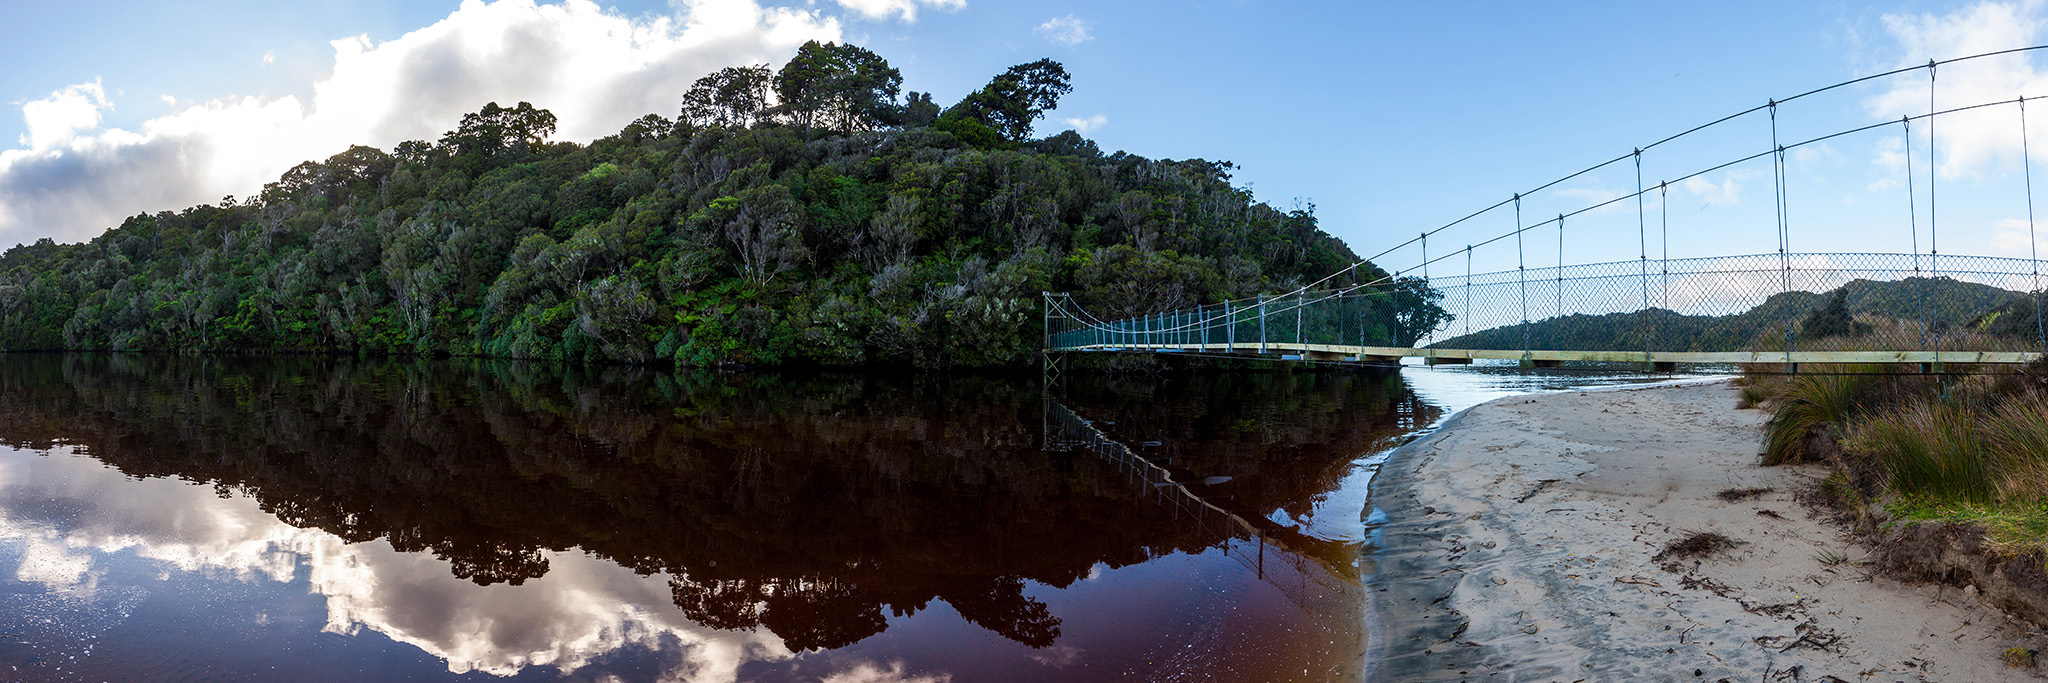
I only had 4 km of walking to do before arriving at Port William, the last stop of the day. A suspension bridge made me plunge back into the already dark forest while it was only 3 PM. The days are short on the island at this time of year.
Canon EOS 500D ISO 200, 1/100,
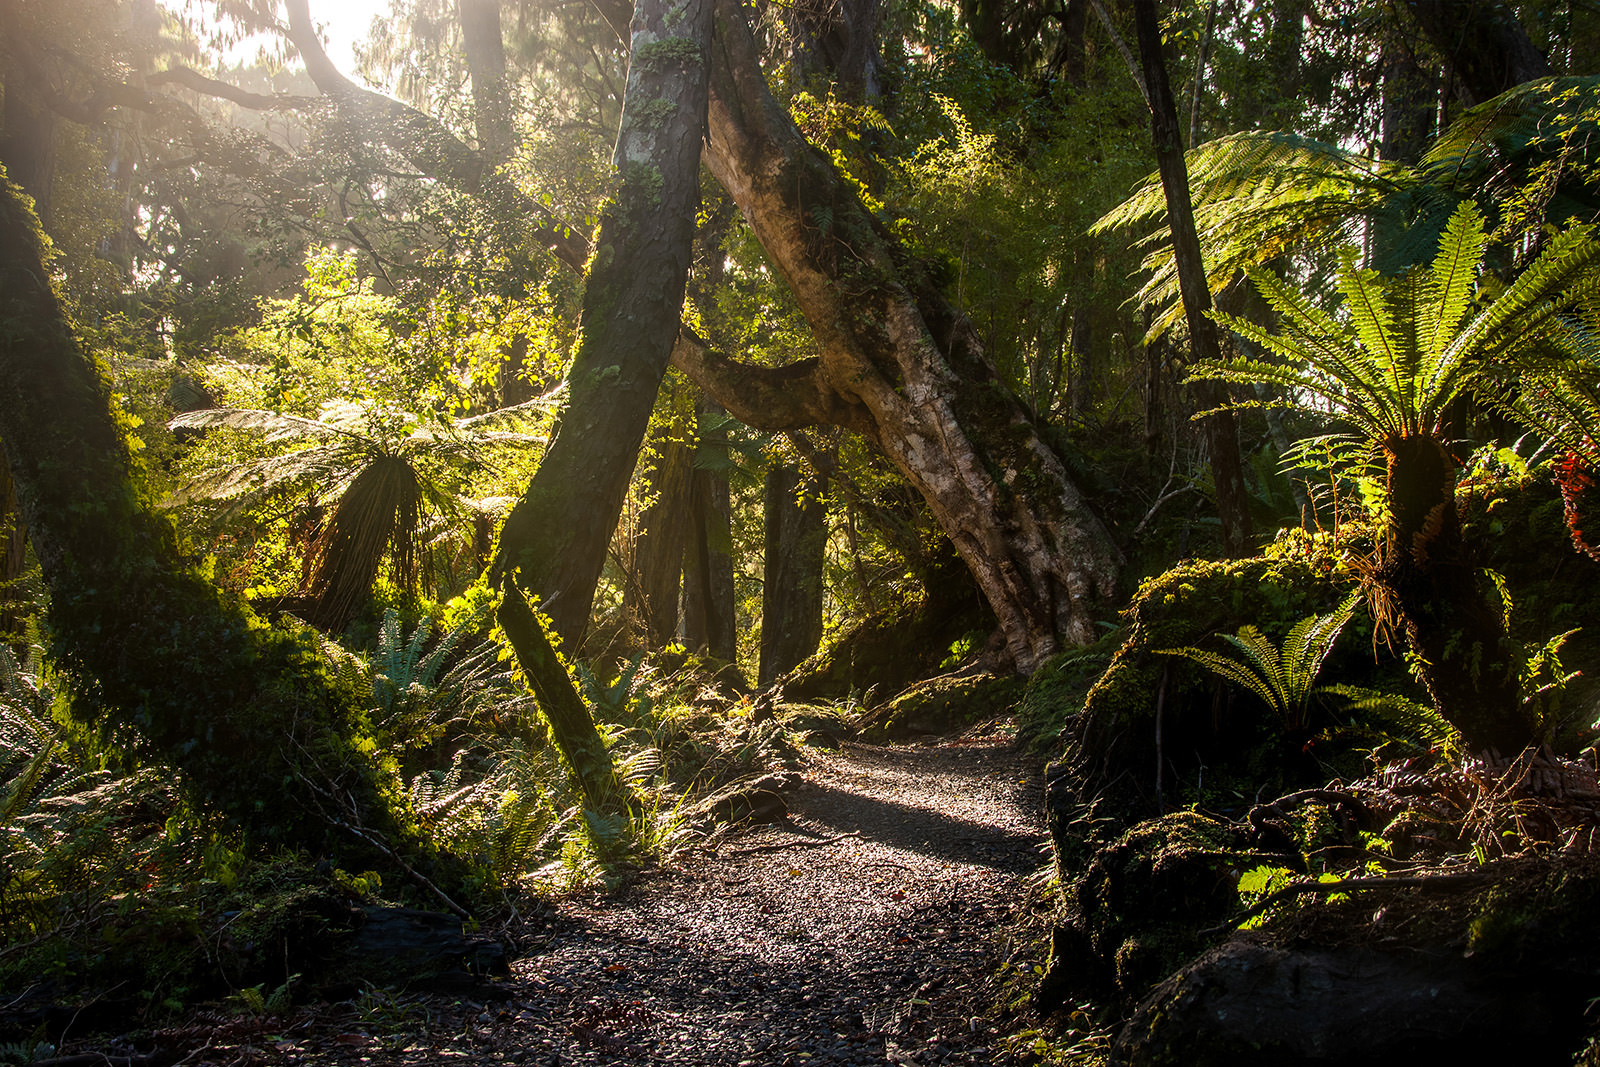
The sun, however, occasionally pierces the dense cover formed by one of the southernmost Podocarpaceae (a family of conifers) forest in the world, or the widespread rata and kamahi.
Canon EOS 500D + 18-250mm @ 37mm, ISO 100, 1/15, f/11.0
I arrived at the hut before sunset and sat down next to the wood-burner already lit by two other hikers. The night fell and there were no solar lights or candles to light up the room: it was time to eat before going on a kiwi “hunt”! While waiting for the others to get ready, I decided to go outside for a quick look at the sky, hoping to see light coming from the south. Nada. Before coming on the island, I followed the forecasts for Aurora Australis. A solar flare happened earlier that week, announcing Southern light likely to be seen during the weekend, depending on the speed of the solar wind. The Southern light takes place when electrons and positive ions eject from the upper atmosphere of the Sun and penetrate into the Earth’s atmosphere near the Southern pole. These particles, once in contact with the atoms of our upper atmosphere, lead to a reaction that produces light, the color of which depends on the nature of the ions and therefore on the altitude at which the reaction is caused. The intensity of the Aurora is related to several parameters: the speed of the solar wind, its density and the direction of the magnetic field, also called Bz. The Bz is probably the #1 influencing factor in whether or not an Aurora will be visible within the next hour. In the southern hemisphere, the larger the negative number, generally the brighter the aurora. For example, a Bz of -20nT will produce a brighter aurora than a Bz of -5nT. A planetary index, the kP, is generally used to indicate and predict the strength of the geomagnetic storm, from 0 to 9. Above 4, the Aurora is usually visible in southern New Zealand. There is, however, a problem with this index: the kP is an average of k-indices from around the world. This data comes from 8 sensors and only 1 of them is located in the southern hemisphere. This makes the kP index biased to the northern hemisphere. Well, I didn’t have any phone reception there anyway, so I did not really care about this issue.
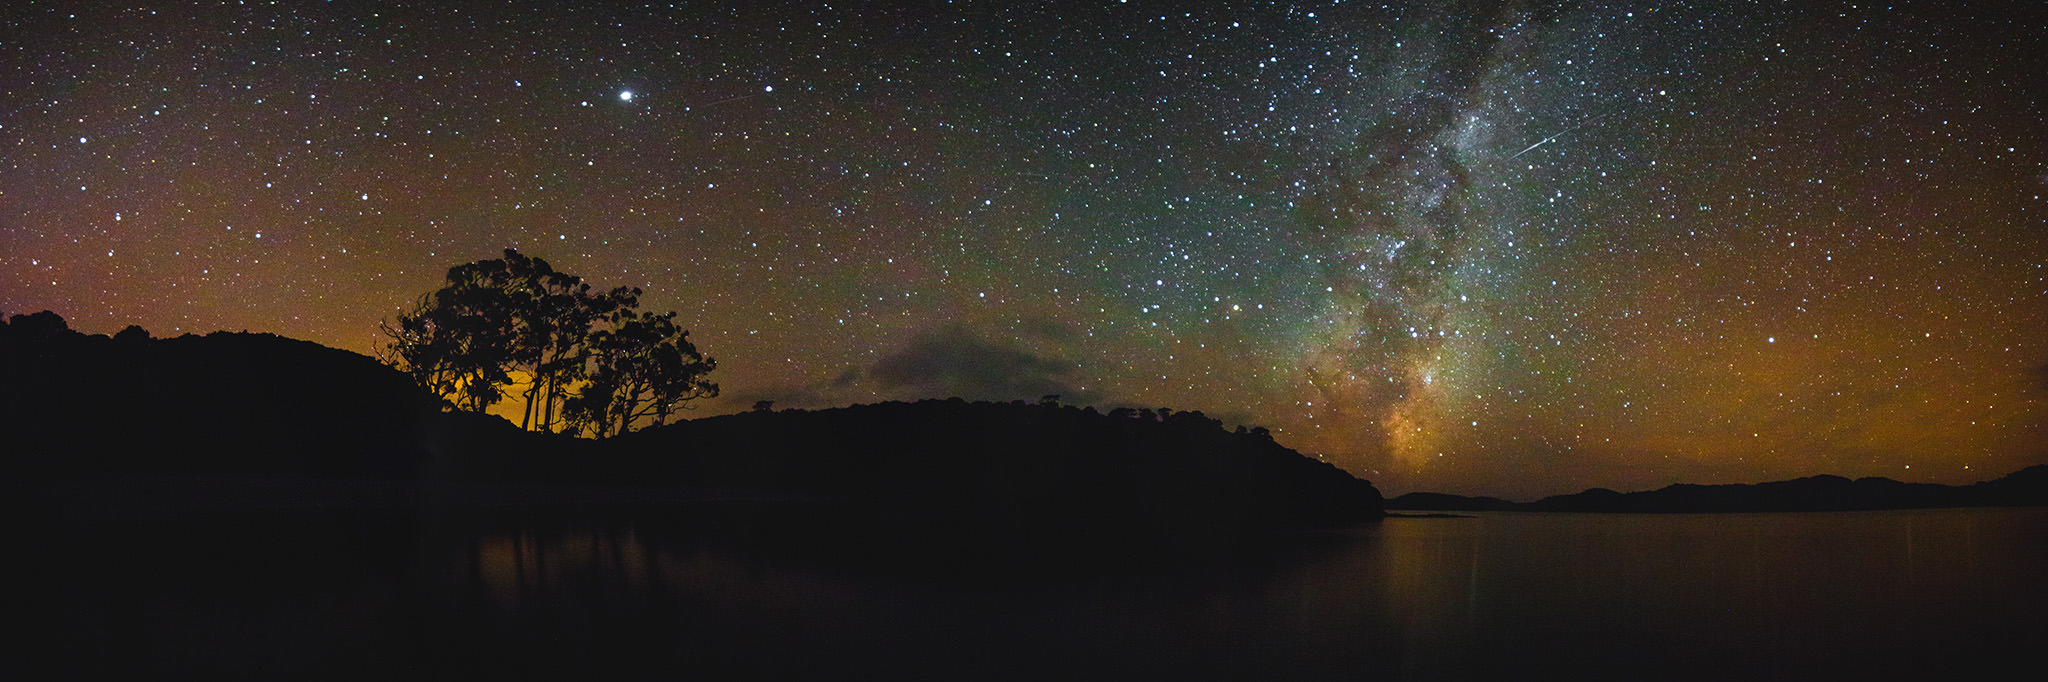
Although the Aurora didn’t show up, the Milky Way started to emerge. I seized the moment and positioned myself at the end of the wharf of Port William giving an incredible panoramic view on the bay. While there is no light pollution in the vicinity, the sky reveals orange glows on the horizon. A shooting star gratifies me of its passage next to the Milky Way in one of the seven pictures of this panorama:
Canon EOS 500D
After staying a few more minutes to admire one of the darkest skies I have ever seen, I decided to move and look for the discreet kiwi. Discreet? Not all that much actually. It is not difficult to hear it, but to see it is a whole different level in comparison. This nocturnal bird likes forest edges, sometimes venturing to an open environment where it’s certainly easier for it to move. I decided to wait for it in the Port William campsite. I could hear it scream and walk in the forest, its steps being as loud as a human who would seek his way through the bush. But I could see nothing. I moved to another location in the hopes of seeing it, but still got nothing. I then came back to the campsite and…waited, arming myself with patience and silence. The kiwi was getting closer, its steps were louder and louder and then…there it was! A first kiwi came out from the forest and walked towards me, obviously too busy to worry about my presence. It completely ignored me. A second one appeared later, but it was the first, the much bigger than its neighbor, which attracted my attention. This animal is incredibly strange, funny and truly captivating. I was amazed by its quick movements to look into the grass, using its long curved beak. The kiwi was only a few meters away from me and I really thought about taking a picture, but I decided to instead enjoy the moment with my own eyes, since the photo would not have been able to capture the fast and the erratic-moving bird anyway. A few minutes later, it disappeared as it appeared – not without discretion. That night will remain in my memory for a long, long time…
The alarm went off at 7 AM the following day. At that moment, I could hardly imagine what Rakiura was going to offer. I covered myself up, took my tripod, my camera, my two lenses and I was on my way to enjoy my first sunrise on the island of the glowing sky. A slight mist rose from the calm waters of the bay. The sun shone through the bay and ignited it for a few moments.
Canon EOS 500D + 18-250mm @ 31mm, ISO 100, 1/500, f/10.0
I then lost myself admiring the patterns on the beach, multiple veins drawn by the water flow on the sand:
Canon EOS 500D + 18-250mm @ 61mm, ISO 100, 1/13, f/11.0
I went back to the hut to have a quick breakfast before launching myself into the track. The others were already all gone – I didn’t even realize that I spent nearly three hours to contemplate and photograph the awakening of the island. I decided to walk this section of the track, entirely forest, in one go. Less than four hours later, I was in the North Arm Hut after 12 km of walking. But I actually took a break on the way. Lost in my thoughts, I paid little attention to what was going on around me until the flapping of rather noisy wings made me raise my head. A parrot! Well, obviously it was not the kakapo, unless it learned to fly somehow. It was the New Zealand kaka (Nestor meridionalis). Nestor didn’t seem to be disturbed by my presence, sometimes approaching me as close as a few meters, as it frantically removed the bark of the trees:
Canon EOS 500D + 18-250mm @ 250mm, ISO 1600, 1/100, f/6.3
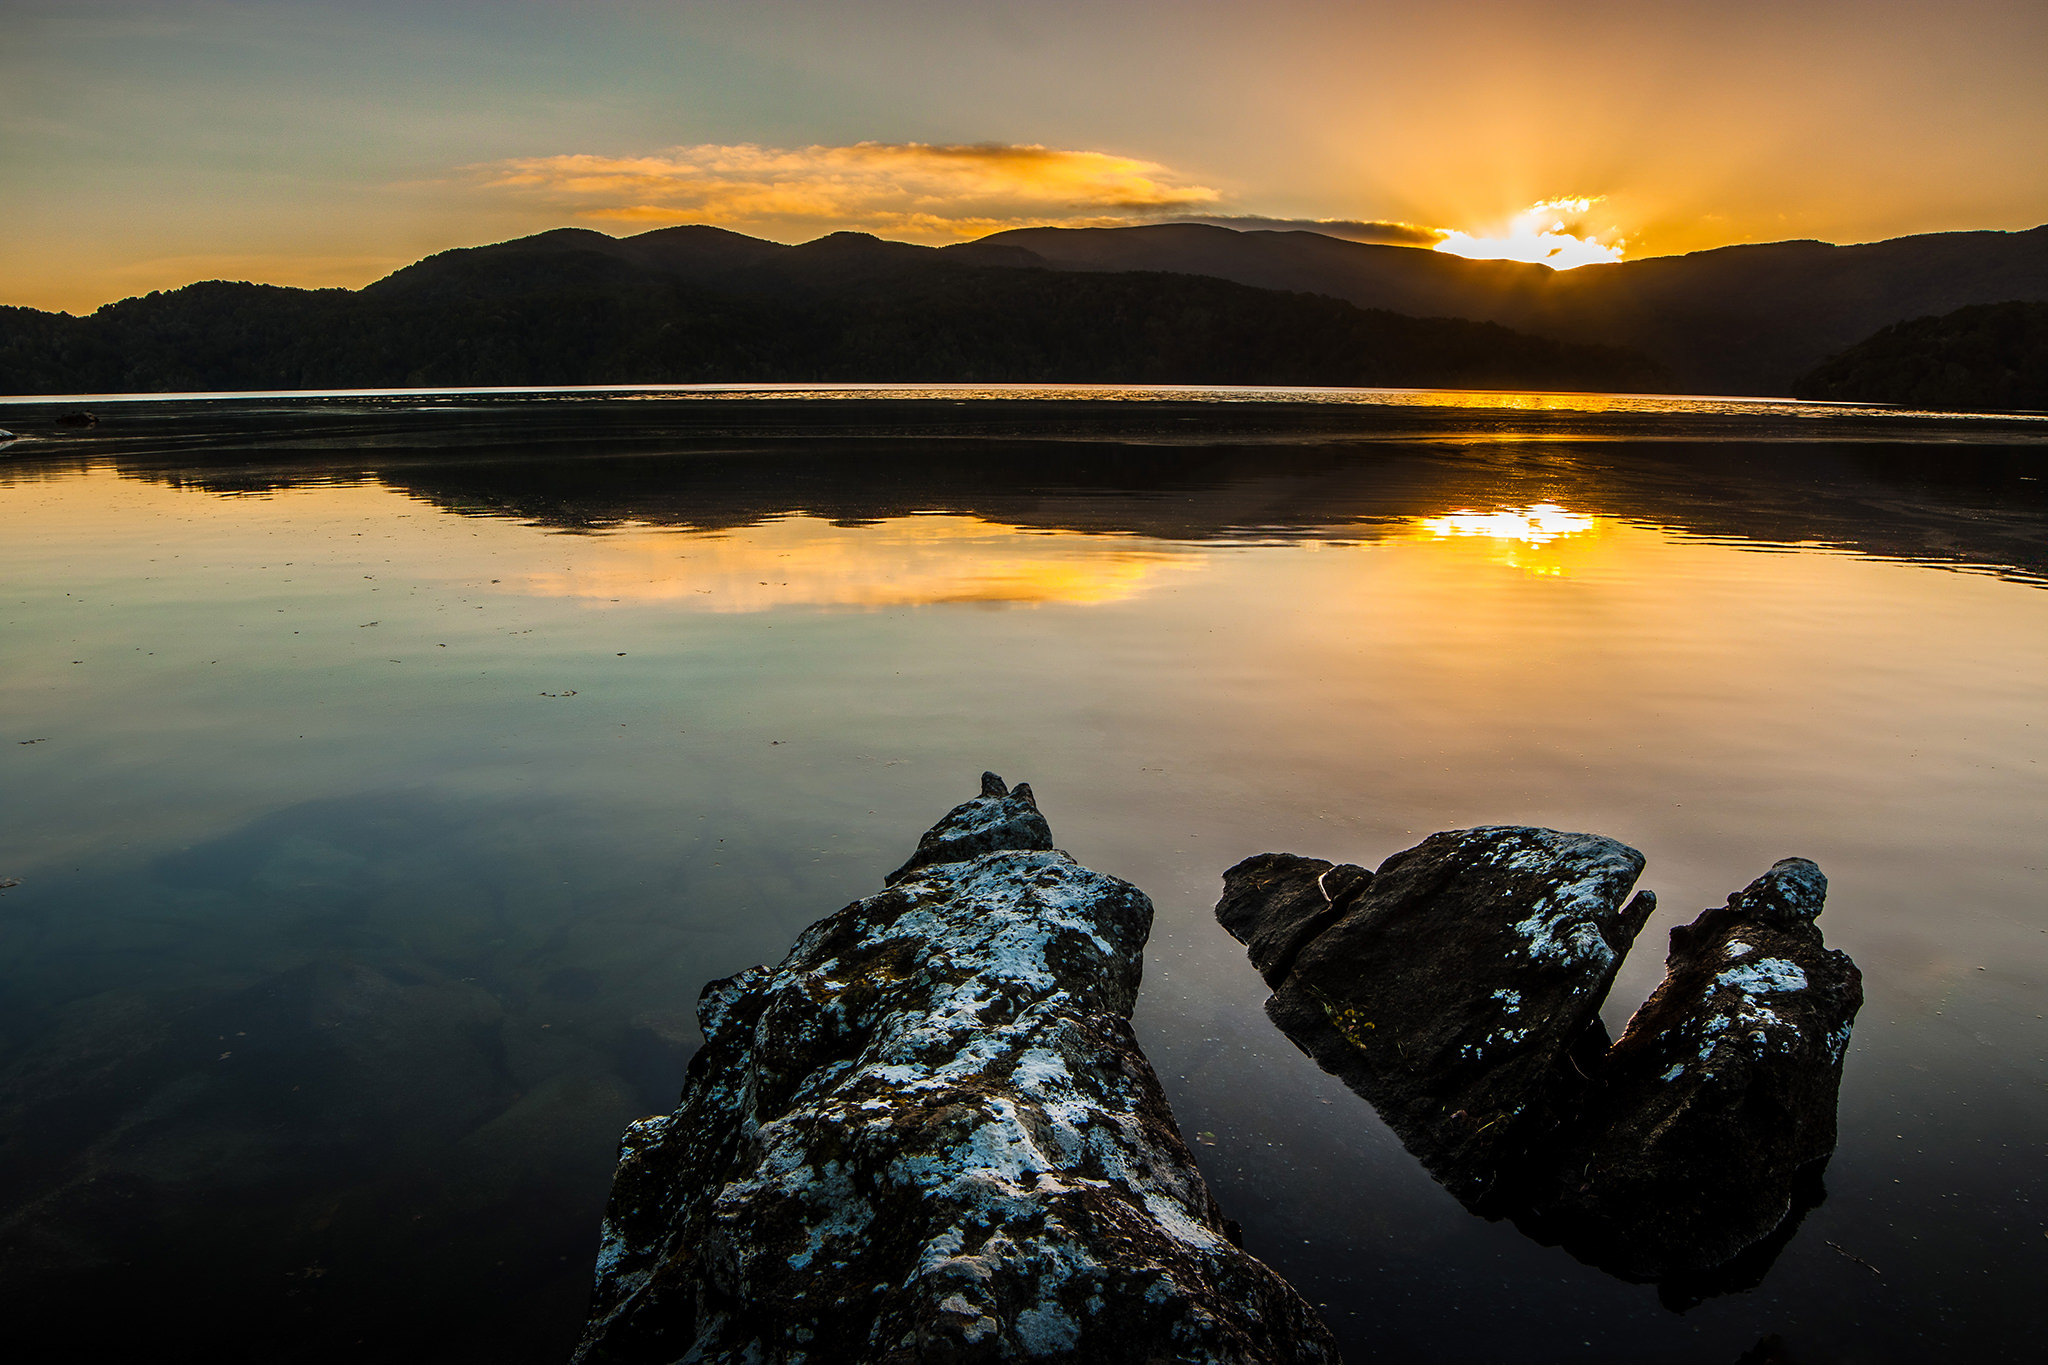
It was 4 PM and the sun was already close to the horizon. I dropped my backpack off at the North Arm hut and headed for the bay. The track to get there, of no more than a hundred meters, leads to emerged rocks oriented towards the west, the beach still being under the water. Perfect for the sunset!
Canon EOS 500D ISO 100, 1/125,
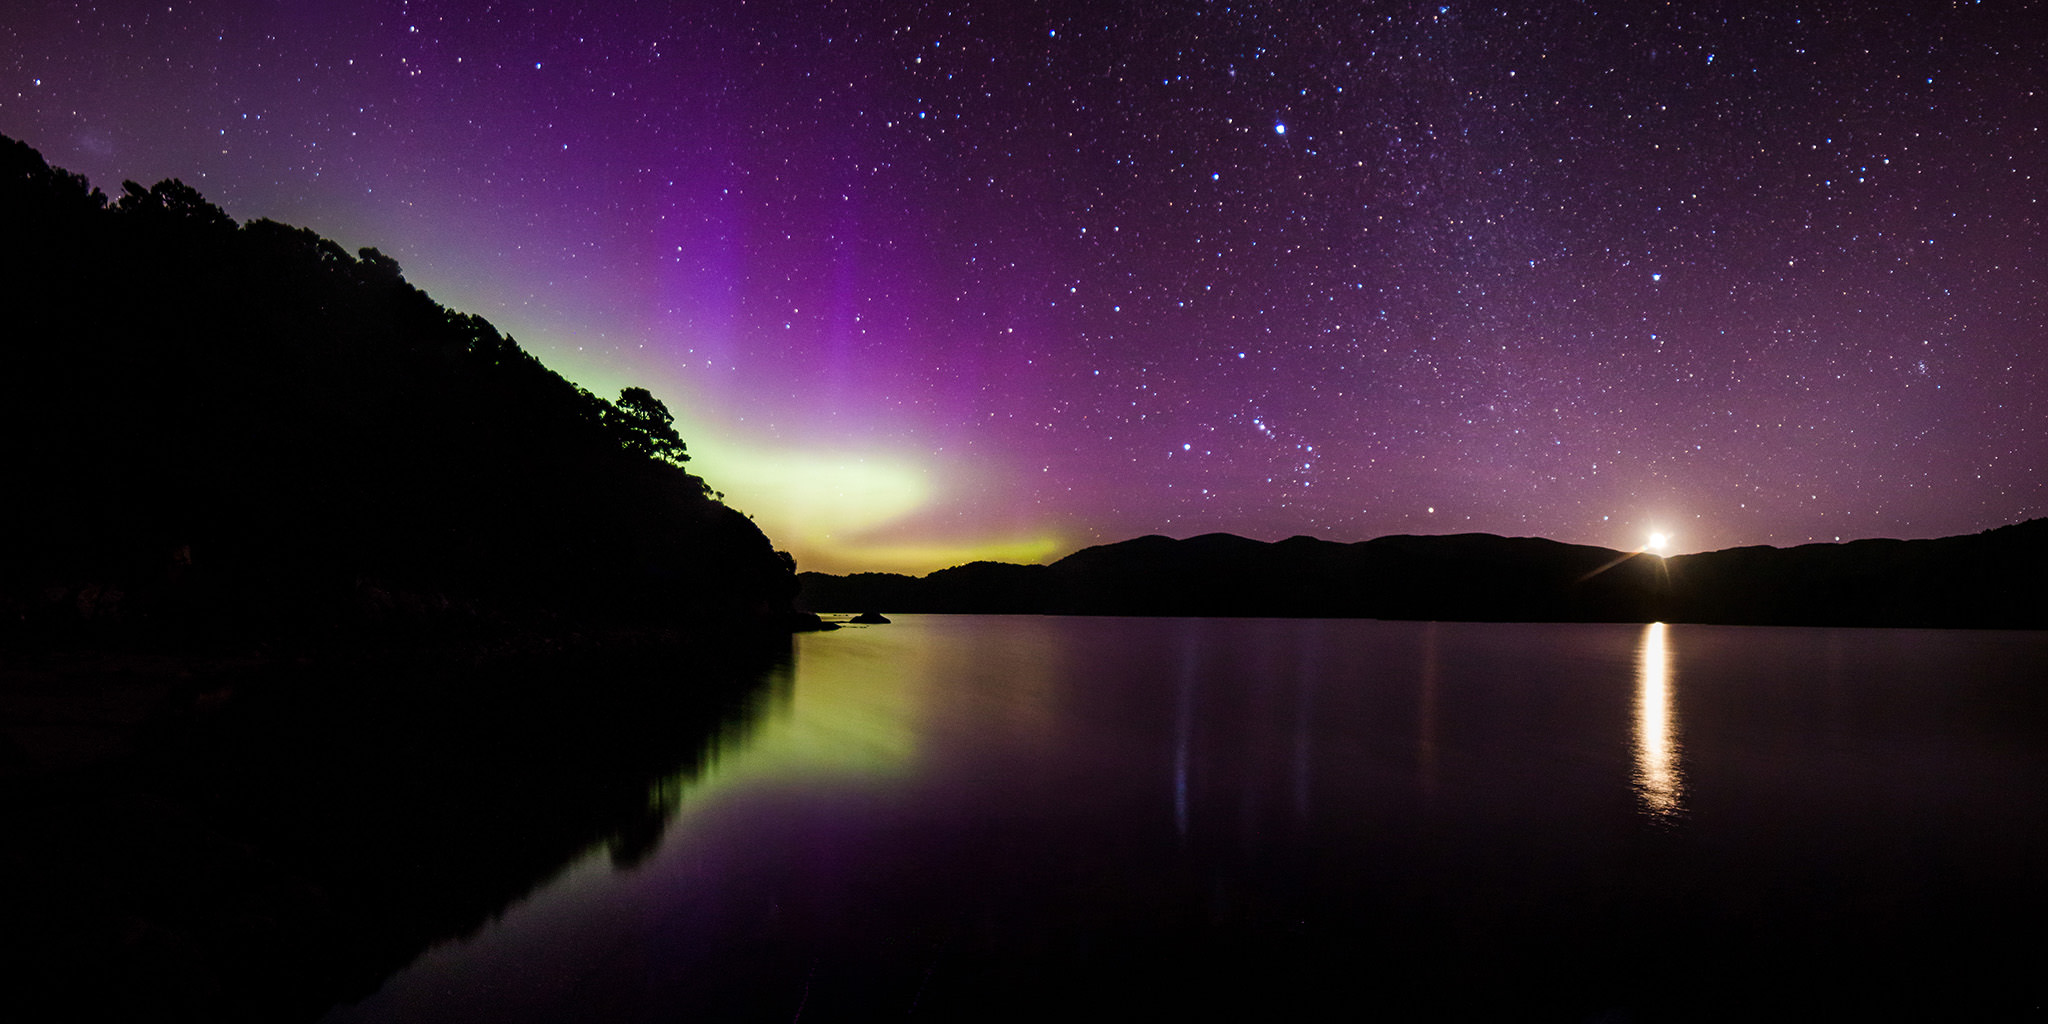
Once the sun was hidden by the hills, the cold began to invade the bay. It was time to get warm and eat some noodles. This time, a few candles allowed us to keep the room lit up and play cards. Like the previous night, I left the hut at around 6 PM to get some fresh air and look for kiwis. I put on my hiking shoes, tied my shoelaces, stood up and looked at the sky. The thin crescent moon was still awaken, bright enough to illuminate the surroundings. I then stared at Orion and its easily recognizable belt, which, like the moon, would soon pass under the horizon. I started to raise my eyes up following the Milky Way and eventually stopped on a bright area in the sky next to the Large Magellanic Cloud. There is usually nothing like that in this part of the sky. I kept on gazing at it for a few seconds and…it moved! It moved! No doubt, it was a beam. It was, however, hard to see the light coming from the south as the forested hill didn’t allow to have a clear view. I could not be the only one watching this show – I had to let the others know.
We headed towards the bay with a few motivated people hoping for a better view on the southern light. All right, the show started! I set my camera on a tripod and connected the camera remote. 30 seconds later, we were all speechless while looking at the camera LCD. I was like a kid and could not wait to take the photo I visualized, while watching the moon landing on the hill.
Canon EOS 500D
Even if I was really happy then, it would’ve been way more spectacular the previous night, simply because the viewpoint was perfect at Port William. In North Arm, the forest was far too imposing to reveal most of the Aurora… So, why would I stay there? I grabbed a map of the area and tried to find an accessible place from the track which could allow a clear view towards the south. The only way was to go north and head for the Freshwater Hut on the North West Circuit, weaving along the bay. This track is a 125 km circuit that goes around the northwest of the island, to be done in 9-11 days. This section on which I decided to walk wasn’t part of the Great Walk. That’s important detail. The DOC clearly spends less time clearing and setting up this track. Another important detail: on Rakiura it rains almost 275 days a year. Now think about the mud that can accumulate on the track at the end of autumn. It isn’t uncommon to sink up to the knees in there. But hey, I was not going to miss the Aurora just because of some mud!
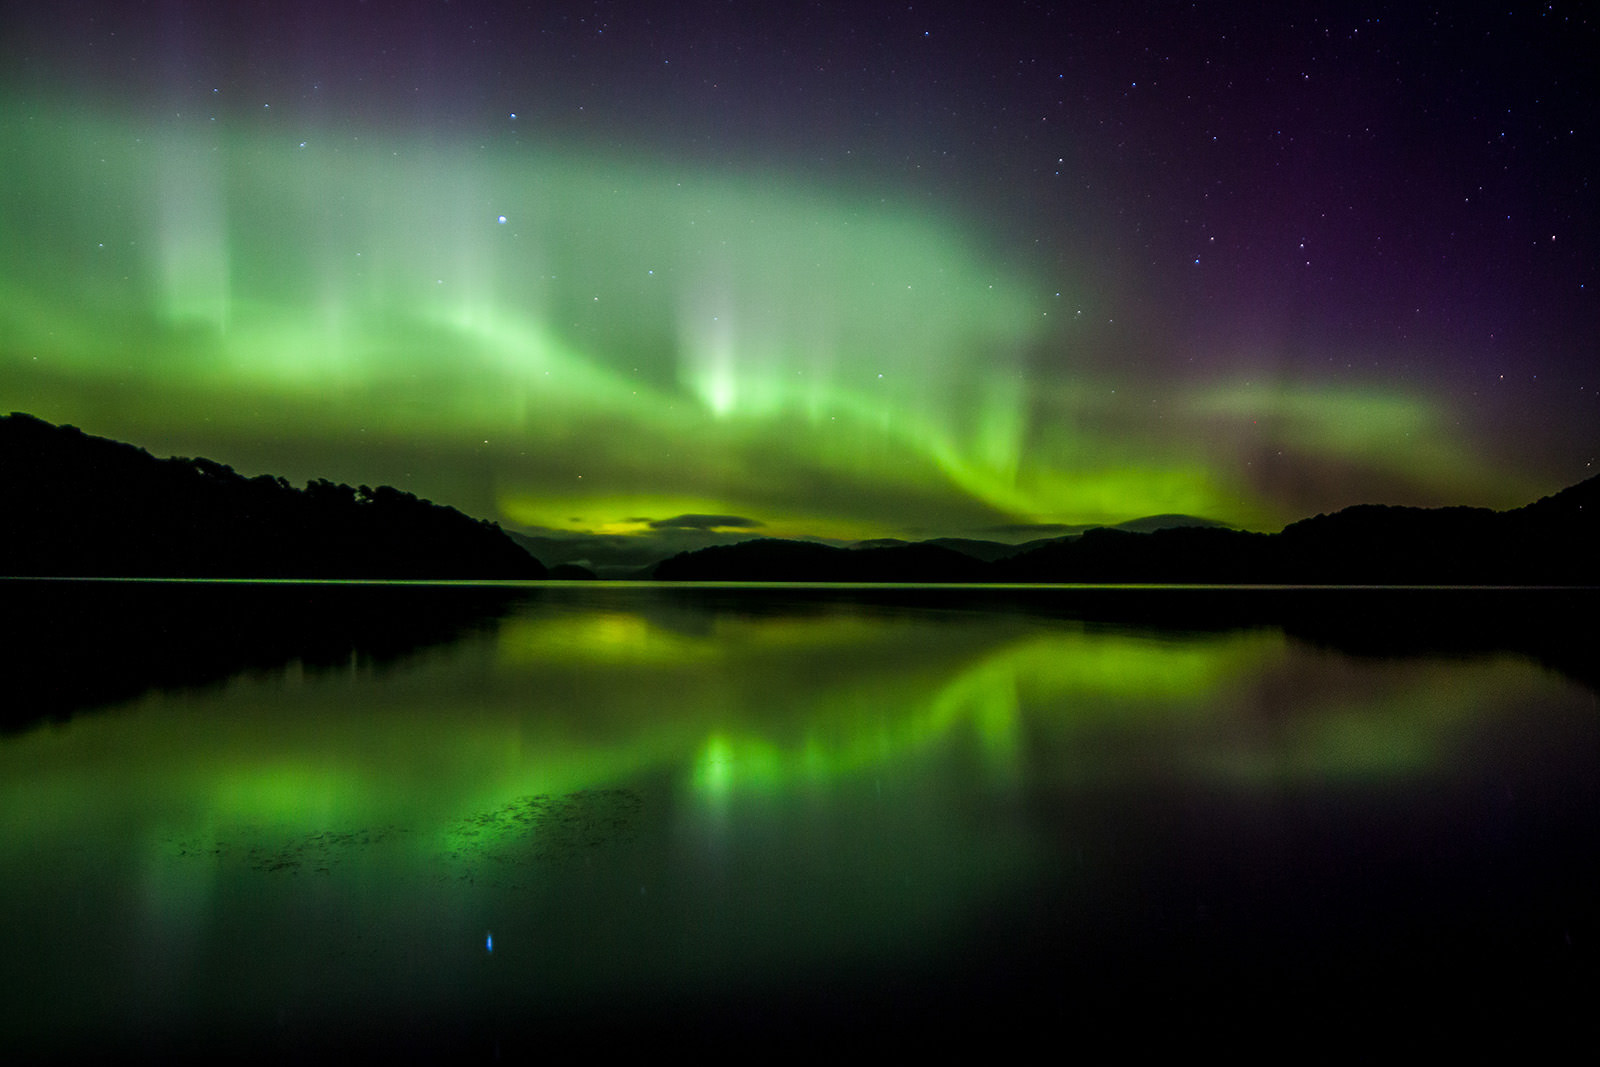
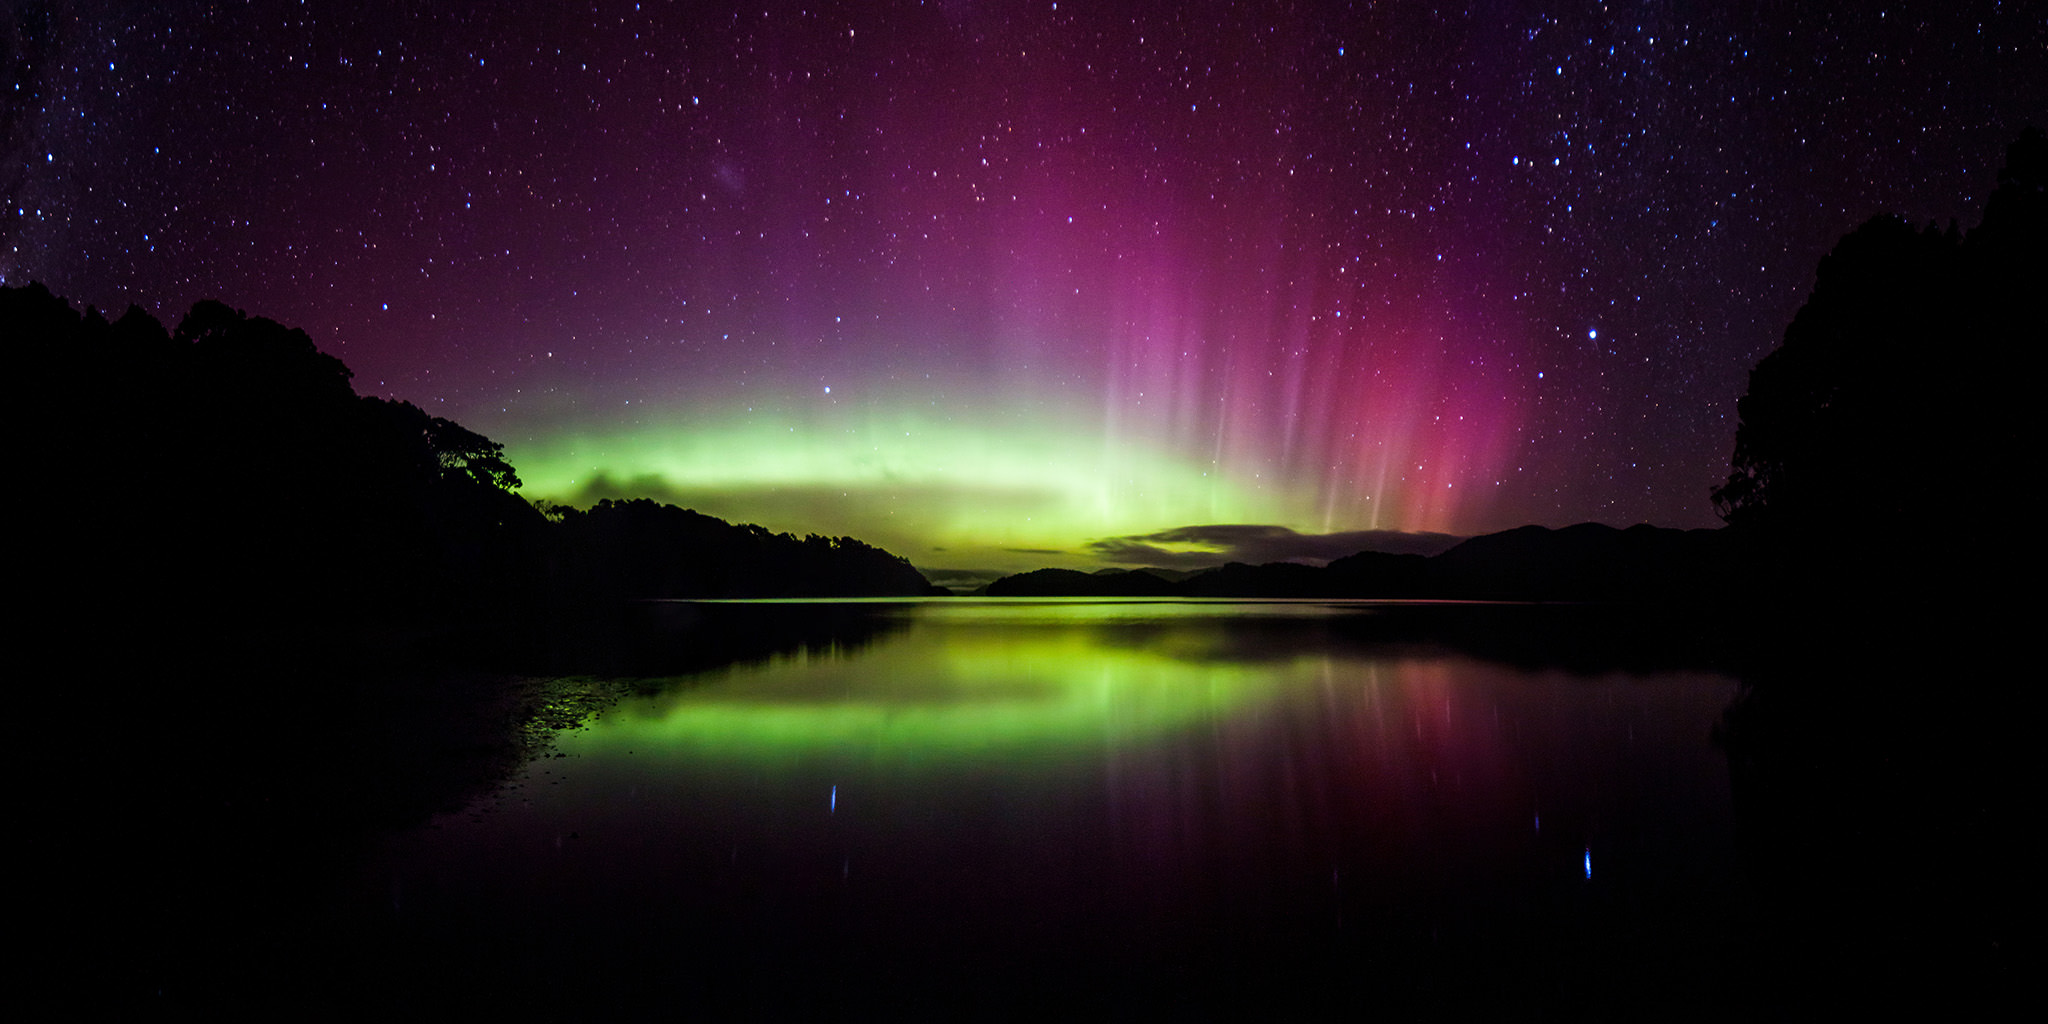
I then set my headlamp to its maximum lighting capacity and sank, not in the mud but in the forest, at night, on a path that I didn’t know, looking for a place that may be inaccessible. I started to worry when the track went up and seemed to be moving away from the shore. I turned around from time to time, turned off my lamp and checked if the Aurora was still there, fearing that it would weaken before I reached my destination. Half an hour after I left the hut, the track was going down and seemed closer to the bay. I then crossed a stream and saw a gap in the forest on the left. I chose to follow the stream and after a few steps, I miraculously landed on a beach! That one seemed to be accessible only at low tide, which was right on time! The complete absence of any breeze allowed the bay to form a perfect mirror, reflecting the enthralling shapes of the Aurora:
Canon EOS 500D ISO 1600, 15/1,
The view was ideal and, to my great surprise, the Southern light had only grown since I left. Its beams danced and created waves as hypnotizing as ephemeral. The light was so strong that my first photo was completely overexposed. I then adjusted the settings and, once again, the result displayed on the screen was staggering. The colors were unreal and yet, even if the human eye doesn’t perceive them as well as my camera, they were there, the fruit of a confrontation between our atmosphere and the solar energy.
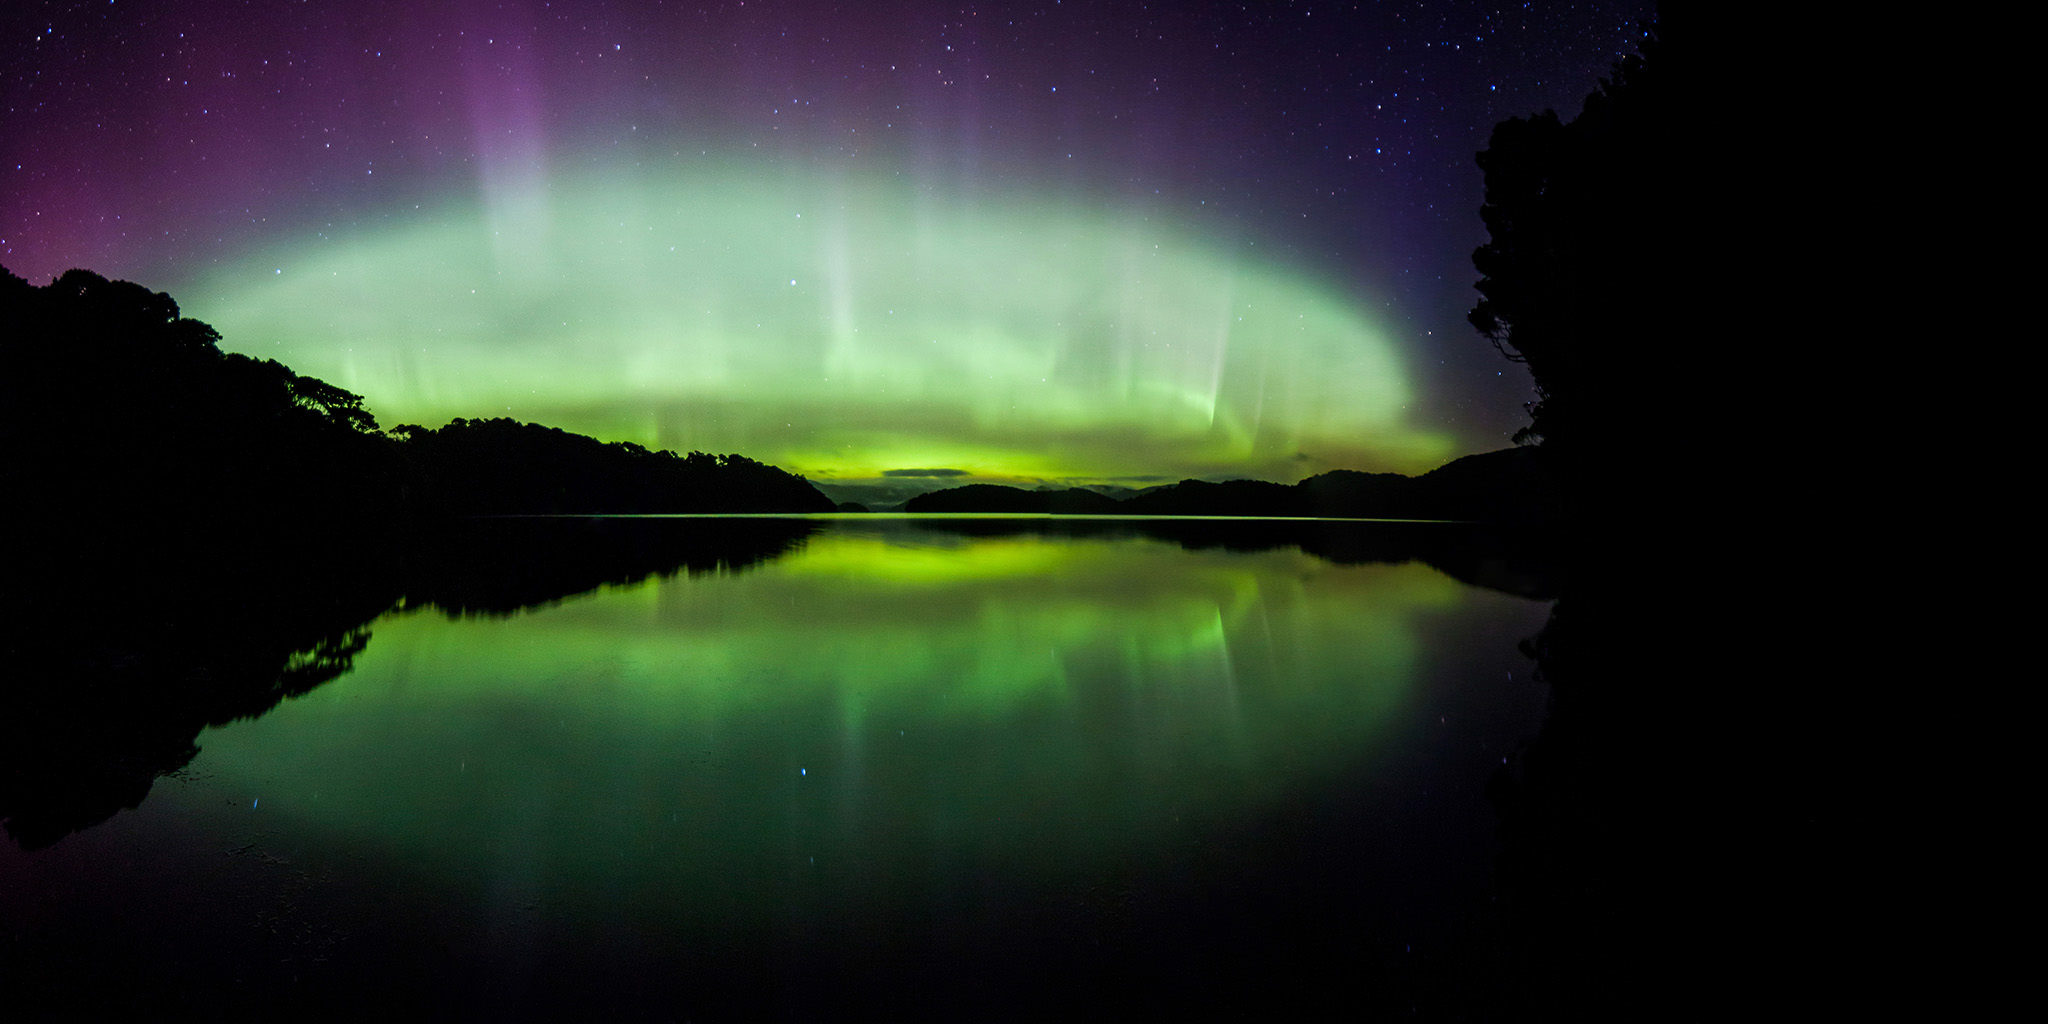
The show was fascinating. Its rarity made this moment even more precious. After a few shots, I tried to find another point of view by moving up on the track again. New surprise of the evening: I bumped into a kiwi on the track, which froze 2 meters away from me! It then plunged back at full speed in the bush. The attempt to find another access was a failure. I hastened to finally return to my first stop and admire the end of the show. The beams rose so high in the sky that I decided to take several pictures in portrait mode in order to create two main panoramas, covering the whole extent of the Aurora:
Canon EOS 500D
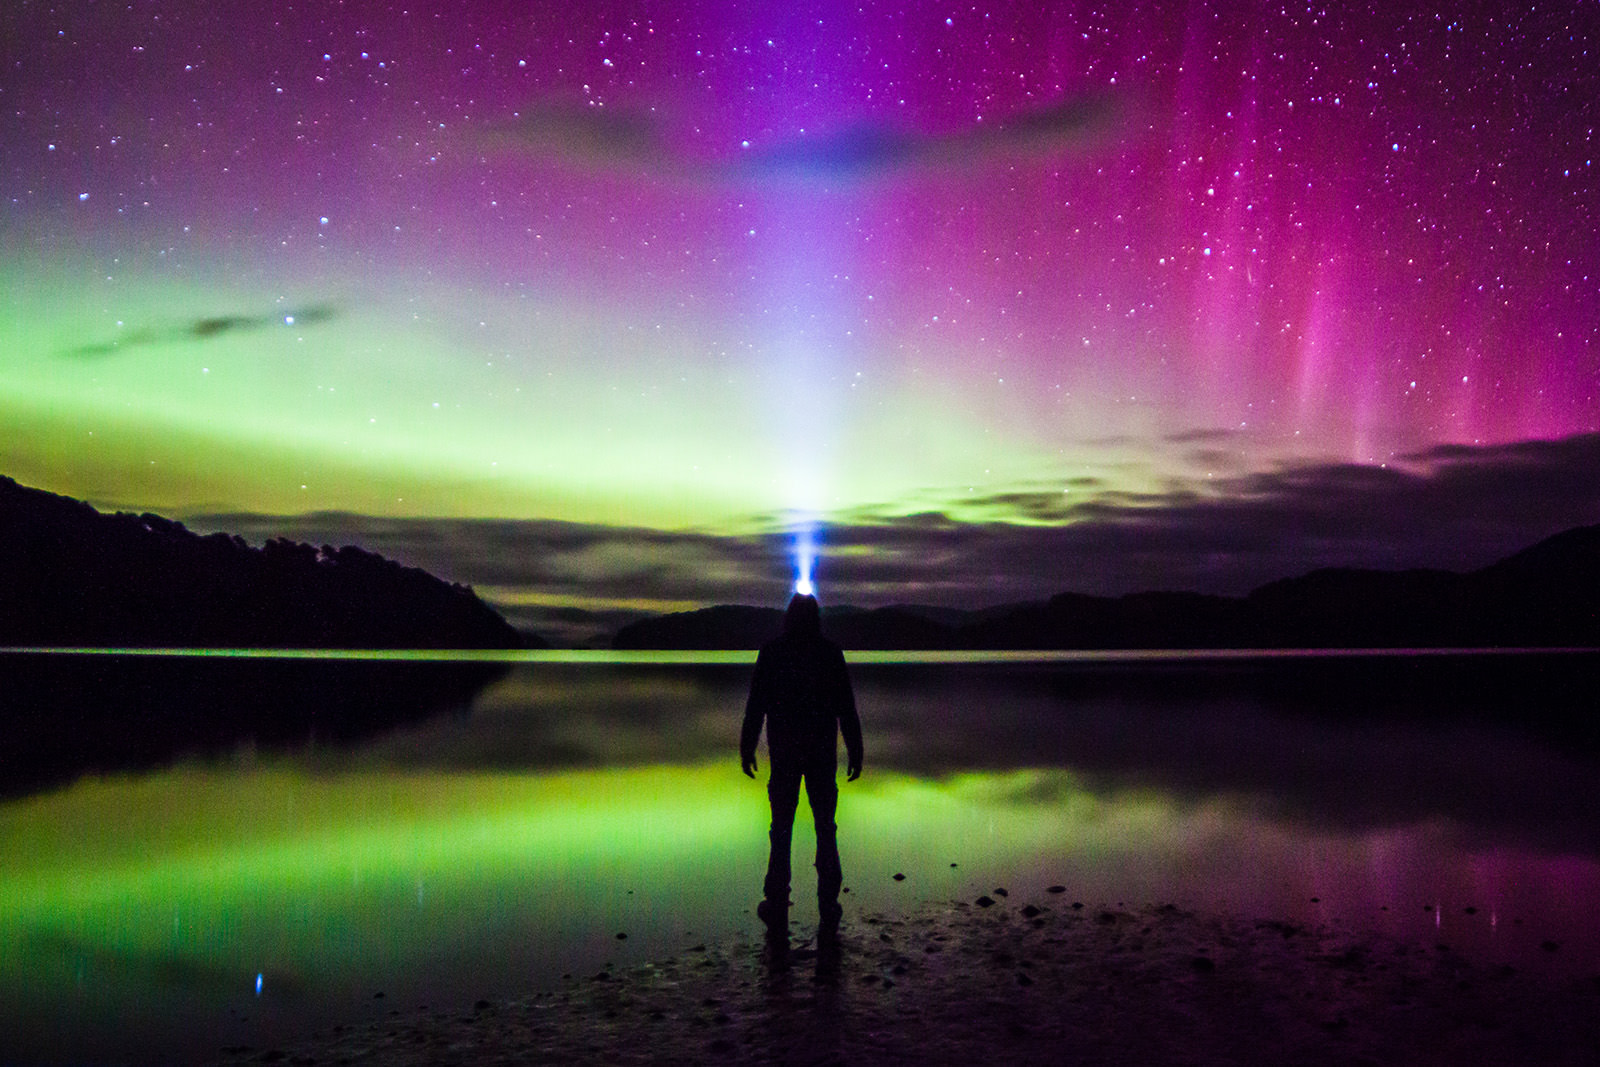
The Aurora started to fade away. Before it was too late, I took the last picture, a selfie, while illuminating the sky with my lamp. Here it is – my time has come – the aliens are abducting me:
Canon EOS 500D ISO 1600, 20/1,
The walk back to the hut was done without a hitch and once I was there, I was asked how it was. Not bad? I grabbed a mattress from the dormitory and put it on the floor in the main room near the wood stove, just like everyone else. I fell asleep, my head full of images. What a day!
The following Monday everyone woke up in the hut at 7 AM. I still had more than an hour ahead of me before the sunrise. Enough time to drink a hot tea and eat a couple of cereal bars. I headed towards the bay, still occupied by a thick morning fog. It would soon vanish and allow the expected light to enter though. The same mirror, as during the aurora, is there:
Canon EOS 500D ISO 100, 1/6,
The low tide allowed me to walk along the edge of the water further than the previous night and reach a small paradisiac beach. Only the singing of birds broke the silence. Or rather the cries, those of the Oystercatchers which came in numbers to enjoy the food left by the tide. I tried to compose some pictures with those posing on the isolated rocks, seeming to float on the bay:
Canon EOS 500D + 18-250mm @ 183mm, ISO 400, 1/30, f/6.3Canon EOS 500D + 18-250mm @ 61mm, ISO 200, 1/30, f/5.0
I came back to the hut, grabbed my bag and started the third and the last part of the Rakiura Track. The day then passed very quickly, walking the 12 km of this section of the track in two and a half hours. Once I arrived in Oban, I waited for the ferry with other trekkers. We left the island at 3 PM. A few albatrosses were seen from afar when we arrived the first day were now very close to the boat. Once in flight, their silhouettes weren’t hard to distinguish with any other, as their ease to fly effortlessly. Indeed, they exploit air currents formed by the waves in order to glide perfectly, a motion called dynamic soaring.
The crossing of one hour towards Bluff gave us enough time to play cards for the last time, but also to talk about what we had experienced those three days and the luck we had. The surprising kiwis, the magical Aurora Australis, the marvelous Milky Way, the fabulous wild beaches and the legendary sandflies (I already miss them). Why was I hesitating to explore this treasure?
Some people pushed me to go there – without them I would have missed this incredible adventure. Thank you, for making me live those three unforgettable days, those three days on Stewart Island, those three days at the end of the world.
All the pictures were taken with my old and faithful Canon 500D with either the Sigma 18-250mm f/3.5-6.3 or the Rokinon 14mm f/2.8.
This guest post was contributed by Maxime Sacré, nature and macro photographer based in France. To see more of his work, you can visit his webpage and if you are interested in following his photographic experiences in New Zealand, he regularly posts pictures on his Facebook page.
The sweltering January sun offered little respite from the hounding mosquitoes which prowled the ruins of Chichen Itza in the Mexican Yucatan. Known since the early years of the Spanish conquest, the once glorious city had been eroded by centuries of isolation by the time British explorer and archaeologist Alfred Maudslay first set foot there in 1888. While strong willed and greatly experienced by his previous forays in the ancient Mayan cities of Guatemala, Maudslay endured tremendous hardships for his ultimately successful creation of a detailed plan of the extensive ruins of Chichen Itza. He set up camp in one of the chambers found on top of the building known as Las Monjas (“The Nunnery”) which had served as a palace for Mayan royalty over 800 years before. It is from this base camp that Maudslay was able to map out the site with remarkable accuracy and thoroughness, while also capturing a particularly iconic still photo of an overrun Pyramid of El Castillo among many others. In the final days of his expedition, after five months of hard work in the spiteful heat of the Yucatan coupled with a bout of Malaria, Maudslay’s health greatly declined to the point where he had to return home. It took him six months to recover from his ordeal, but his expedition to Chichen Itza would not be the last time he would venture deep into the heart of the Mexican rain forest in the hopes of documenting the lost relics of the Maya. In this article, I will go over some of the best photography locations in the Yucatan Peninsula, Mexico.
SLT-A77V @ 16mm, ISO 200, 1/320, f/9.0
1) Chichen Itza
Today, the Pyramid of El Castillo is no longer blanketed by the jungle that had once devoured the entirety of the site. Partially cleared of the heavy undergrowth, the ruins at Chichen Itza and the other ancient Mayan cities which dot the Yucatan are far more accessible then they were in Maudslay’s time. No longer is it necessary to traverse harsh terrain to reach the ancient cities, nor is it imperative to sleep inside the ruins themselves. With modern hotels a short walk away from most of the archaeological sites and with clearly defined pathways inside them, traveling to see the lost cities of the Yucatan has never been easier.
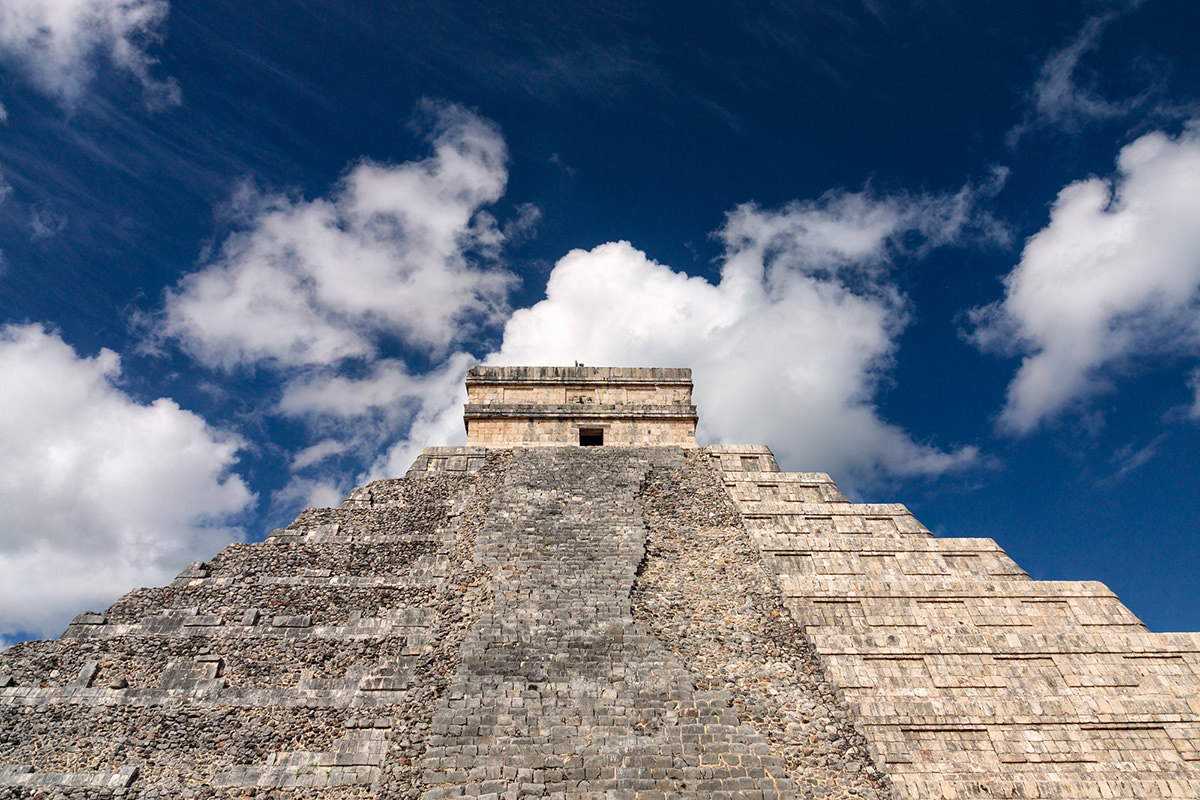
Beginning south from Cancun into the heart of the Peninsula and ending in the state of Chiapas in southern Mexico, our journey navigates between the most fabled of the Mayan cities while also exploring the relics of the Yucatan’s colonial past. Exactly 200km west of Cancun following highway México 180D, the Ancient City of Chichén Itzá has proven to be the most popular tourist attraction in the Yucatan Peninsula. An immense complex of both restored and unrestored structures, the city played an important role in the Yucatan’s history from about 600 A.D. until about 1000 A.D. The details of its past were mostly lost with the Spanish conquest of the peninsula in the 1500’s, but the ruins themselves are exceptionally well preserved with the crown jewel of the city being the world famous El Castillo Pyramid.
DSLR-A700 @ 11mm, ISO 200, 1/200, f/13.0DSLR-A700 @ 16mm, ISO 200, 1/200, f/8.0
Towering prominently above the flat plain below, El Castillo is the first structure to greet newcomers to Chichén Itzá. Built over an older pre-Toltec temple, the 30 meter high temple-pyramid was dedicated to the Mayan serpent deity Kulkulkan (“Plumed Serpent”). The structure is actually a massive Maya calendar formed in stone. Each of El Castillo’s nine levels is divided in two by a staircase, forming 18 separate terraces that commemorate the eighteen 20-day months of the Mayan Year. The four stairways have 91 steps each which together with the top platform add up to the number 365, representing the number of days in a year. Tourists are no longer allowed to climb to the top, but with a bit of experimentation the pyramid offers excellent photographic opportunities. In the photo below I used a group of local school girls who were running a race around the base of the pyramid as a story-telling element to help convey the immense size of the structure.
DSLR-A700 @ 20mm, ISO 200, 1/125, f/8.0
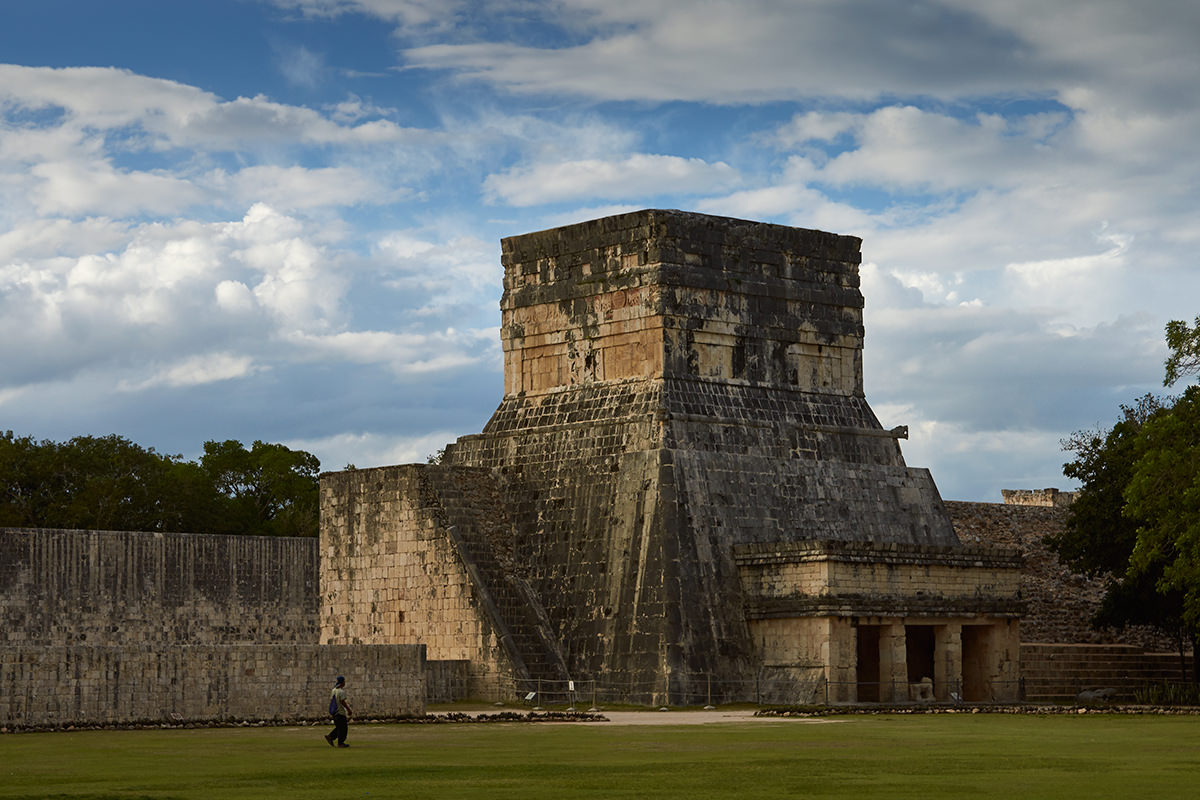
North-West of El Castillo lies the Great Ball Court. An immense court used for playing the Mesoamerican ballgame, a sport not dissimilar to racquetball found throughout the Ancient Mayan world. The court’s call to fame is its immense size. Stretching over 168 meters in length and 70 meters wide, it is by far the largest of the 13 ball courts found in the city.
DSLR-A700 @ 50mm, ISO 200, 1/160, f/7.1SLT-A77V @ 50mm, ISO 200, 1/160, f/9.0SLT-A77V + Sony DT 16-50mm F2.8 SSM (SAL1650) @ 16mm, ISO 200, 1/320, f/9.0
From El Castillo you can walk east toward the Temple of the Warriors and the Group of a Thousand Columns or you can head south in the direction of The Observatory. I recommend going to both though the former is quite difficult to properly photograph because of its immense size. The walk to the latter leads past the Osario and Casa del Venado group.
The small Casa del Venado is a small half standing building representing the western most section of the ruins at Chichen Itza.
DSLR-A700 @ 50mm, ISO 200, 1/250, f/7.1
El Caracol (“The Snail”) is located a few hundred meters south-west of Casa del Venado. It gets its name from the spiral staircase found within the observatory situated on top of the platform. The circular nature of the building has led researchers to theorize that it was used as an astronomical observatory, specifically to track the movement of Venus across the sky.
DSLR-A700 @ 40mm, ISO 200, 1/500, f/7.1
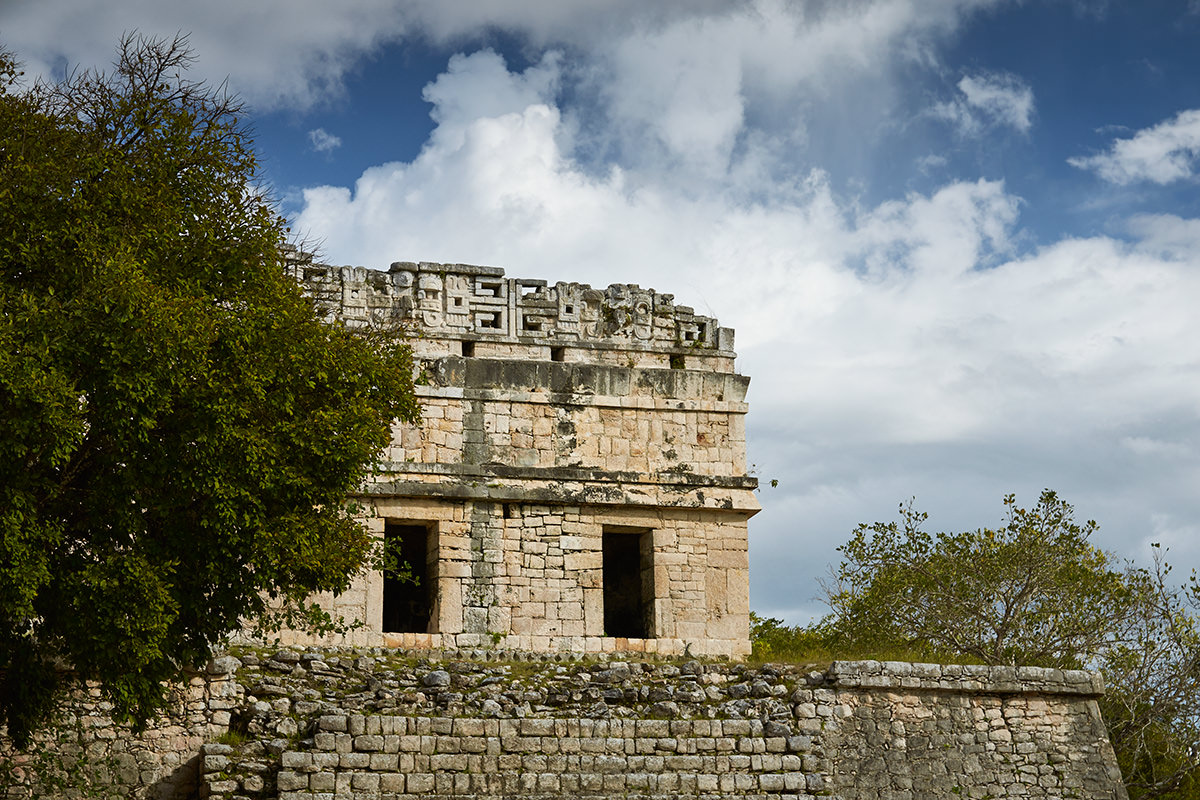
Lying at the southern tip of the city, the Edificio de las Monjas marks the end of the tour of Chichen Itza. Composed of number of different rooms and sections, the Las Monjas palace is one of the more notable structures at Chichen Itza. It is in one of these rooms that Alfred Maudslay set up a study and sleeping quarters during his expedition to the city over 129 years ago. Next to the palace is the unique La Iglesia (“The church”) which is decorated with elaborate masks and hieroglyphic texts which tell stories of the city’s past. Below is an image taken of Alfred in his study inside the Las Monjas palace during his stay in the city.
Canon EOS-1D Mark III @ 420mm, ISO 1000, 1/250, f/5.0
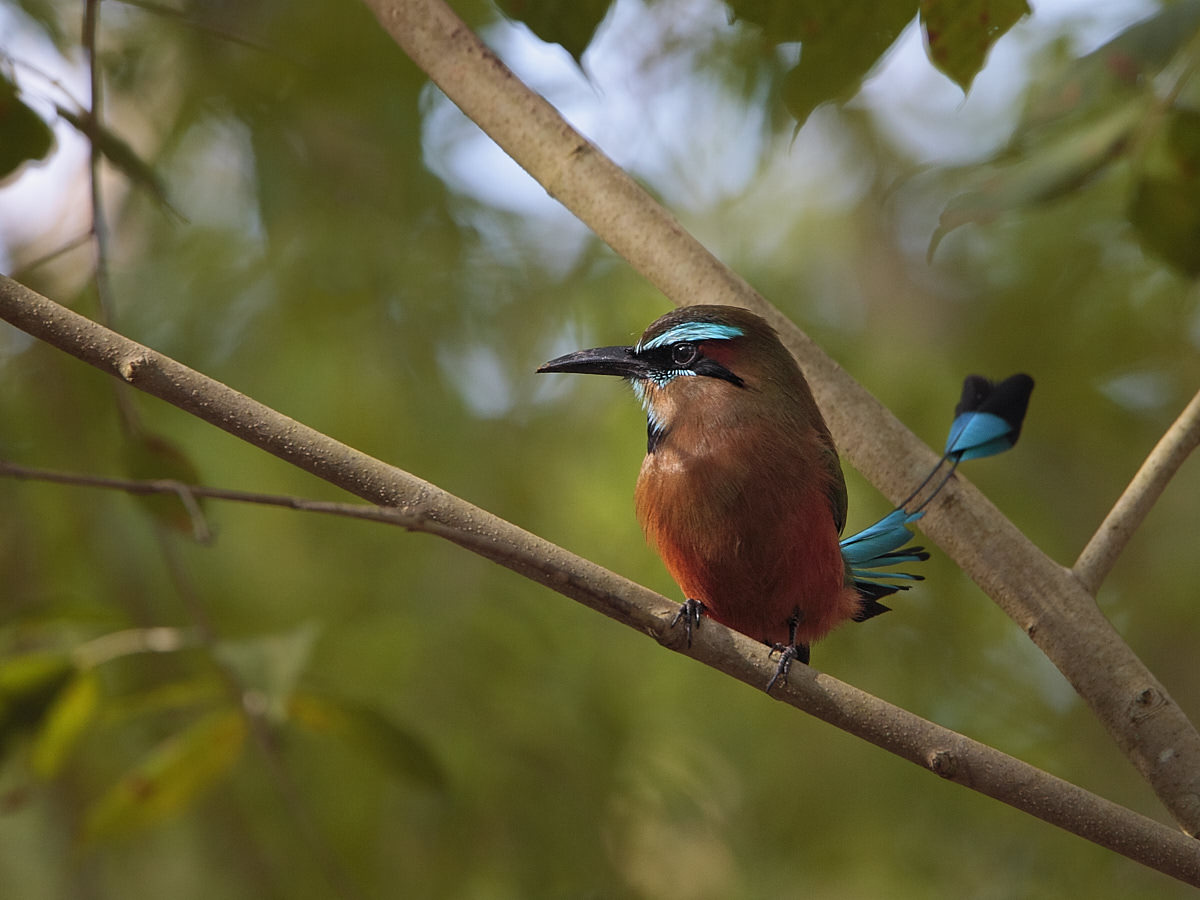
While not known for its wildlife, the site is also home to a number of beautiful bird species which take refuge in the surrounding forests. With some patient forays into the side trails between the ruins, you can probably find some beautiful species like the colorful Motmot or Ocellated Turkey.
Canon EOS-1D Mark III @ 420mm, ISO 800, 1/320, f/4.5
2) Merida
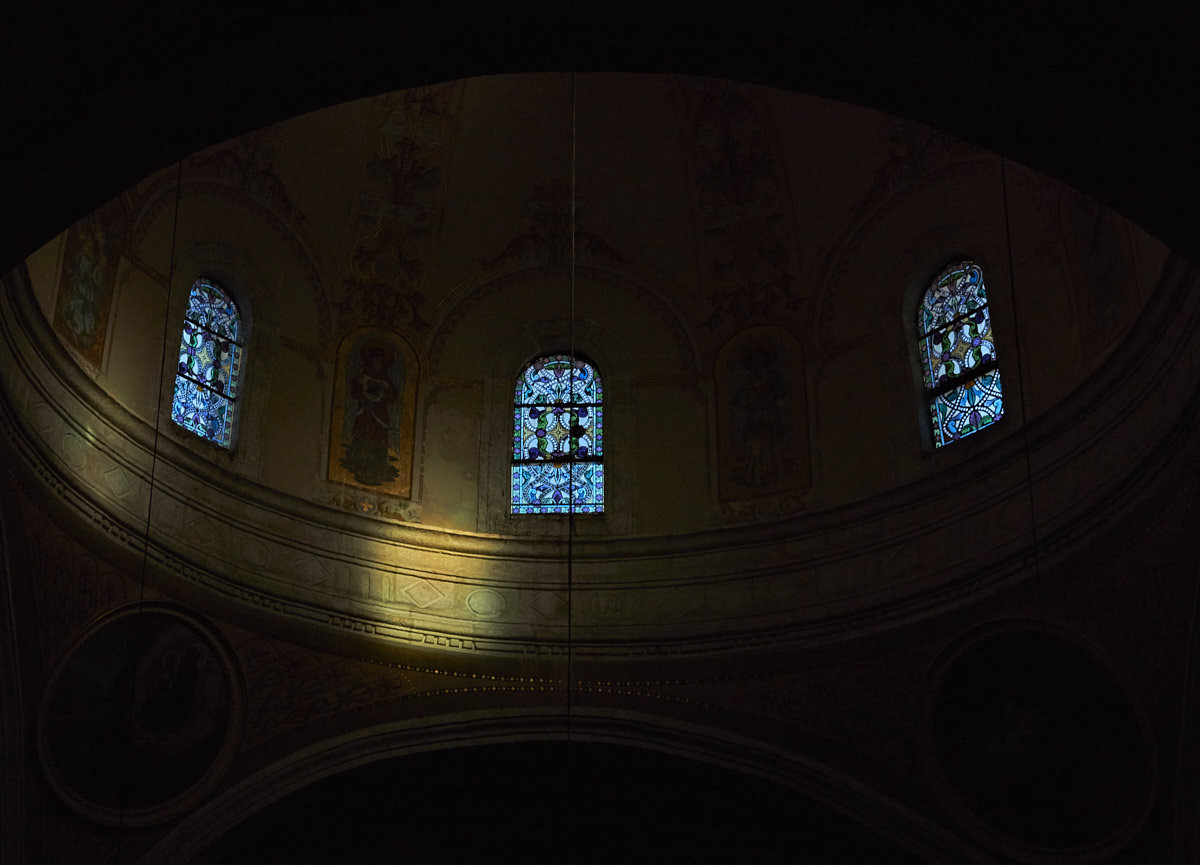
Moving west on highway 180D leads to to Merida. A crossroads between Chichen Itza and the Mayan city of Uxmal, Merida has long been the cultural capital of the Yucatan Peninsula. Steeped in colonial history, the city offers beautiful Spanish colonial architecture with especially beautiful churches of the era. The city is very much a tourist town, but its small size and more distant location separate it from the resorts that dot the Eastern shores of the Yucatan. At the heart of the city lies the Plaza Grande, the downtown’s bustling main square. From good ice-cream to interesting photo-ops of locals, the Plaza Grande is the best starting point for an exploration of the city.
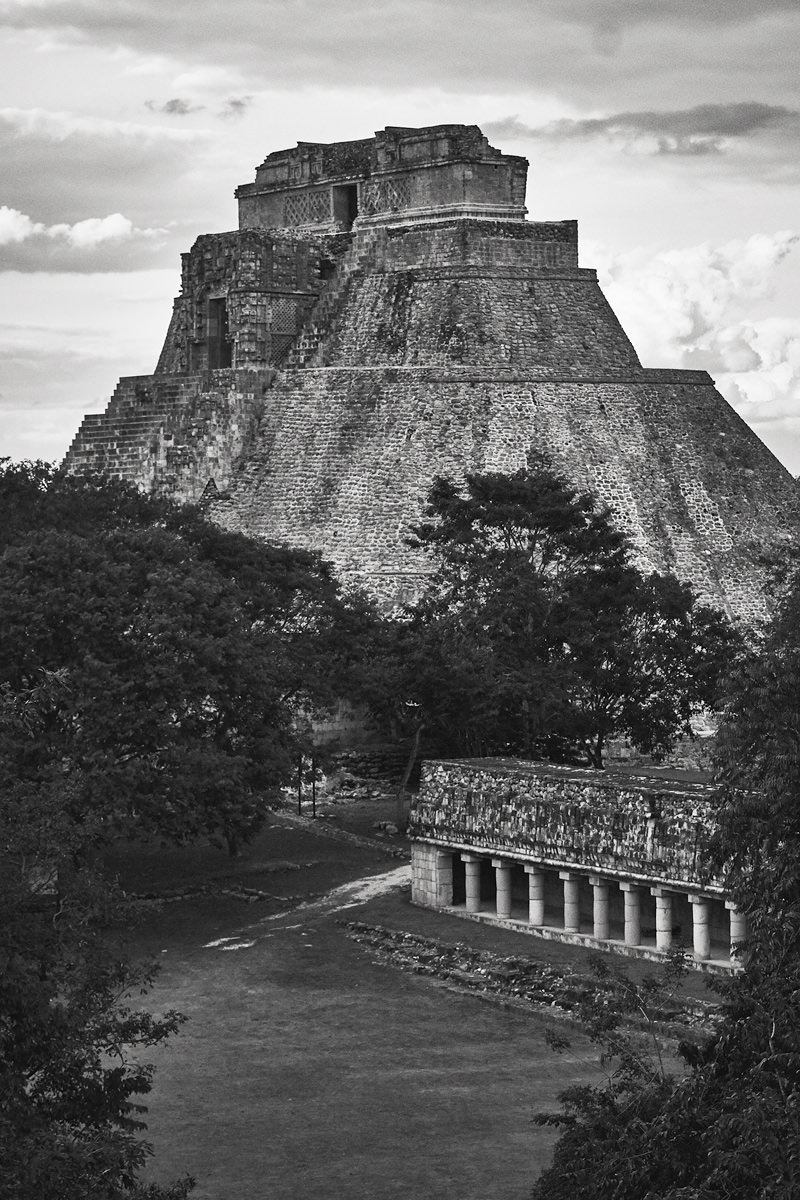
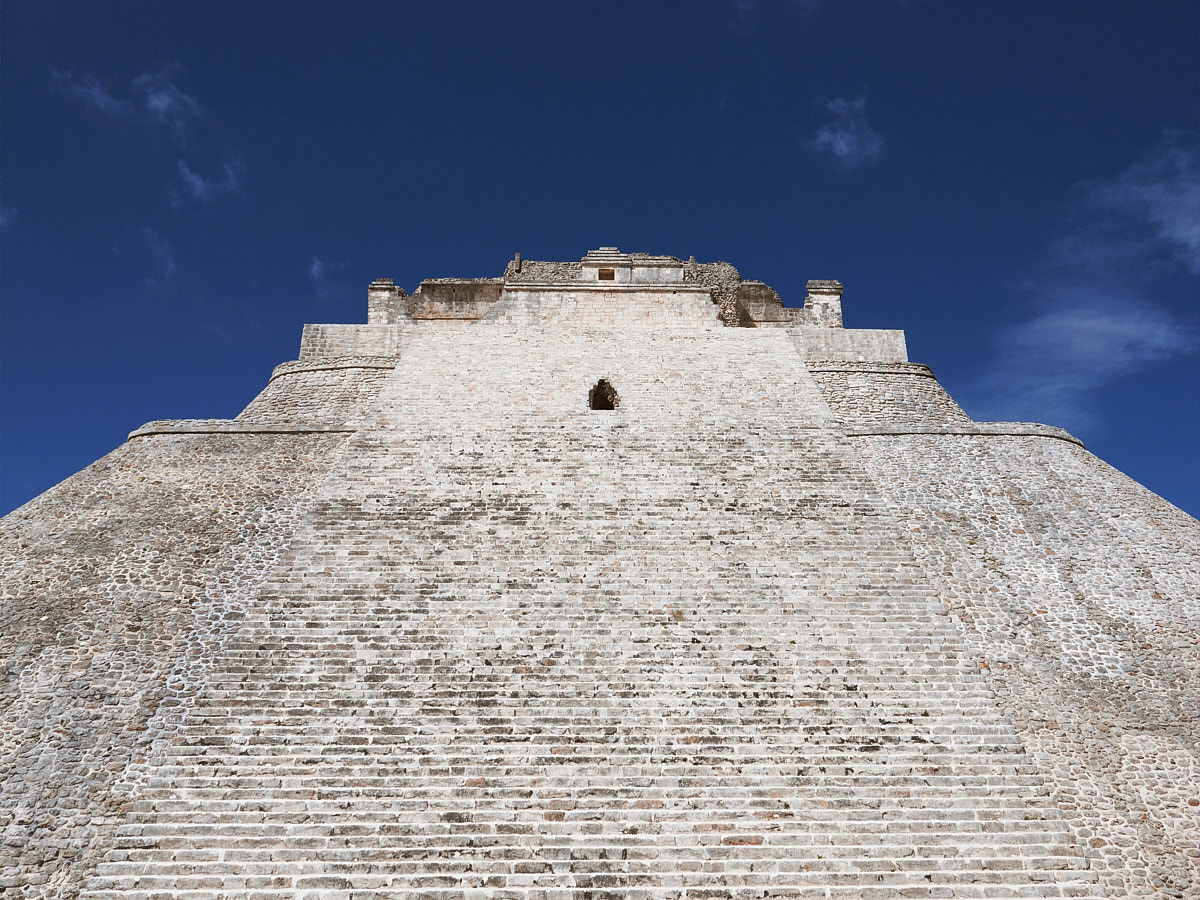
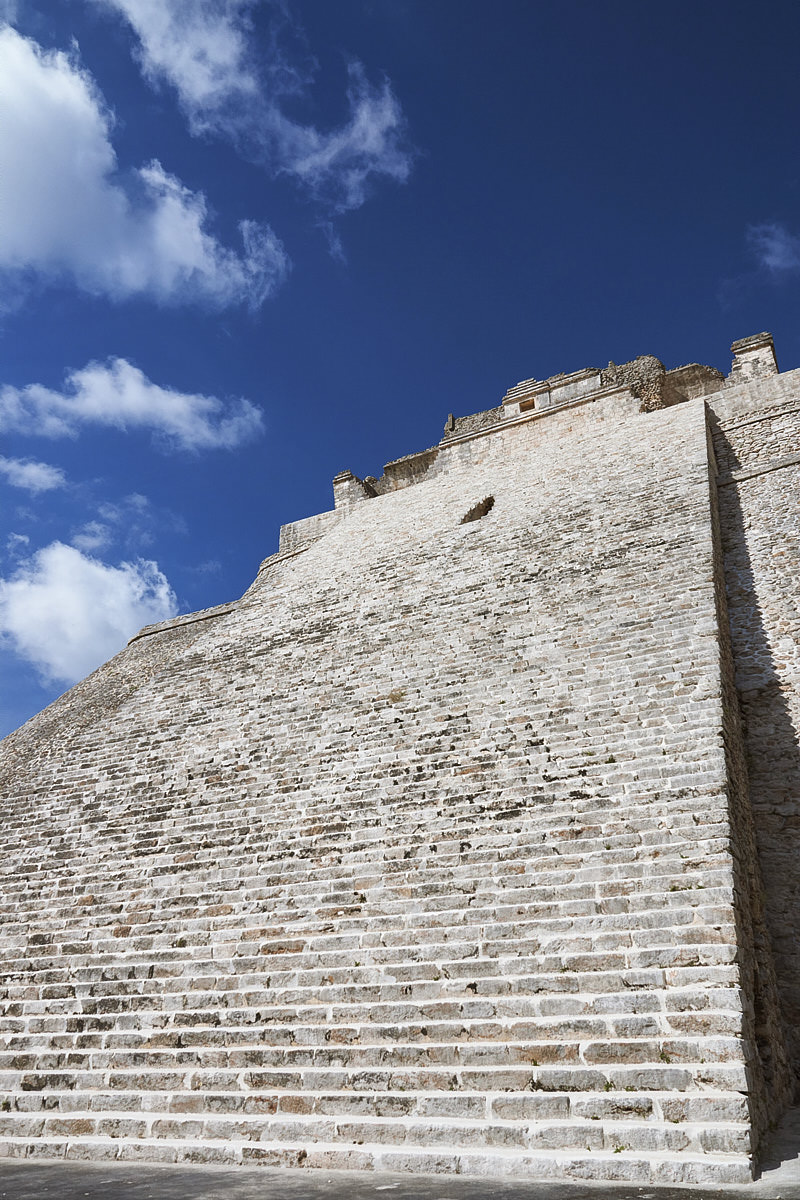
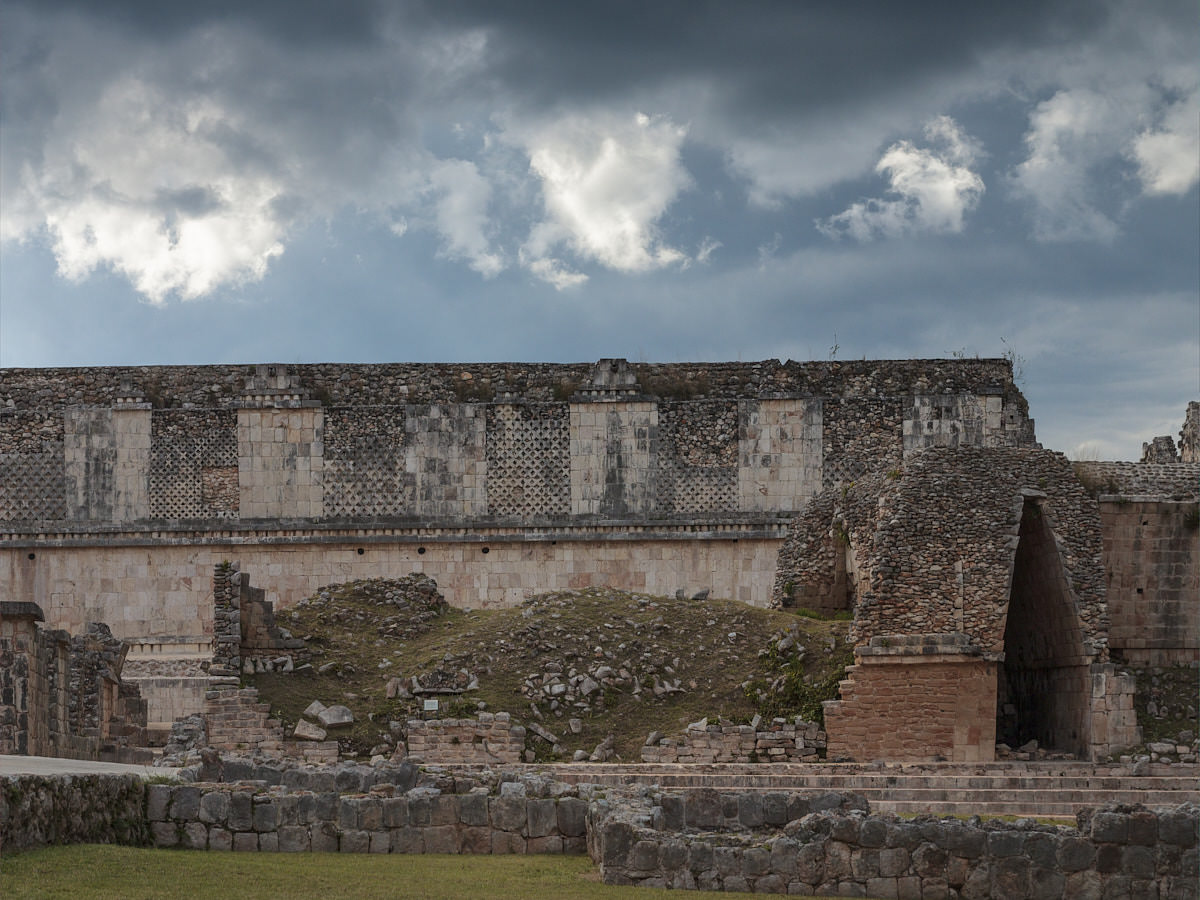
Nestled near the Puuc (“hills”) region of the Yucatan an hours drive south from Merida on Mexico 261, Uxmal is among the most beautiful of the ancient Mayan cities. The name Uxmal means ‘thrice-built’ in Mayan. The name references the construction of its highest structure, the Pyramid of the Magician which was built on top of existing pyramids.
DSLR-A700 @ 70mm, ISO 500, 1/250, f/7.1SLT-A77V + DT 16-50mm F2.8 SSM @ 16mm, ISO 200, 1/400, f/7.1
Akin to Chichen Itza, Uxmal flourished during the late Classic Period (around 600-900 AD) of the Pre-Columbian era before succumbing to the rule of neighboring settlements. Because of the city’s location on the Puuc Route, Uxmal is a distinctive example of entirely Puuc architectural style in contrast to other Mayan cities of the era which incorporated a combination of architectural influences. Buildings in the Puuc style are characterized by their simple lower sections, rounded corners, and small arched entry ways. The upper sections are highly decorated and reflect a distinct layering of stone work.
Greeting visitors immediately as they enter the archaeological site is the Pyramid of the Magician. The pyramid stands at an impressive 38 meter and was built on an elliptical base, an unusual style found in few Mayan pyramids.
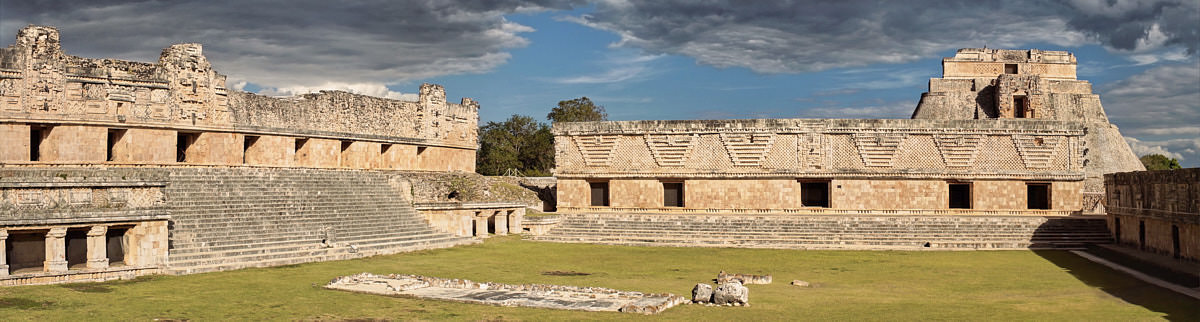
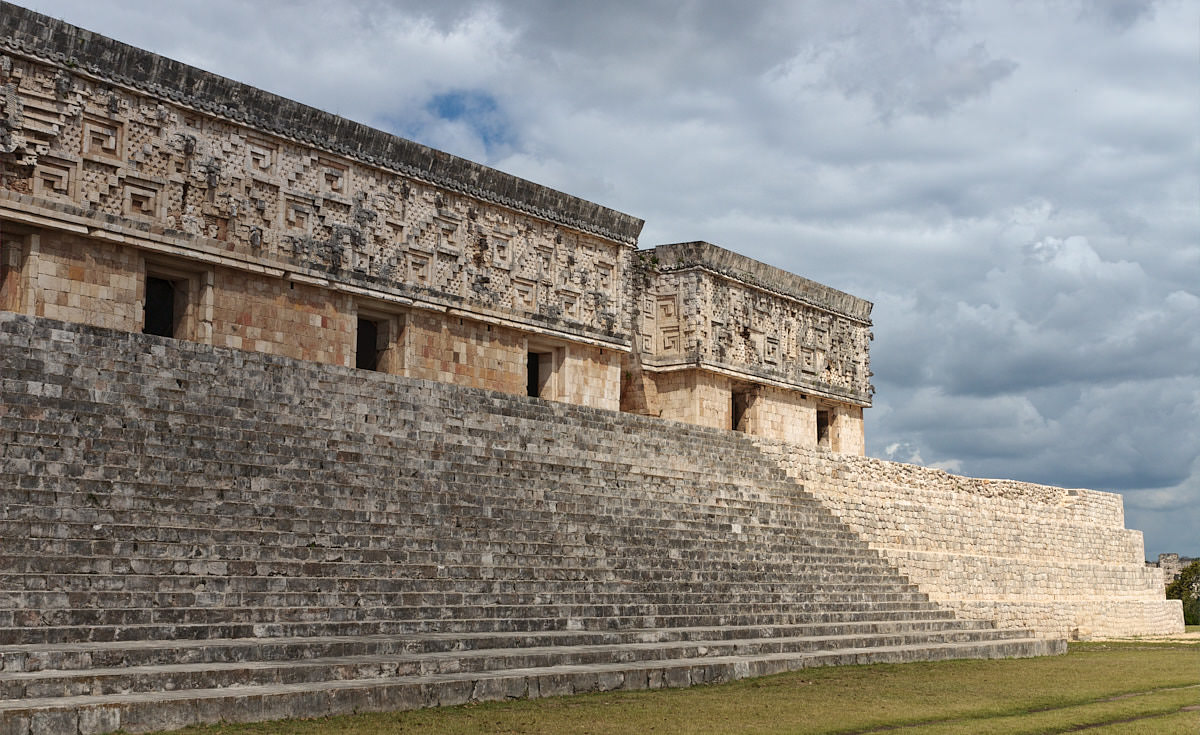
Past the Magician’s Pyramid lies the Nunnery Quadrangle, a collection of four buildings composed of 74 small rooms that face an inner courtyard and thus create an enclosed space akin to a large nunnery. Each of the four buildings has a unique ornate facade making the Nunnery a wonderful example of typical Puuc architectural styles including Chac masks, serpents, and lattice works.
Situated atop a hill overlooking the Quadrangle is the Governor’s Palace. Constructed in the last days of the cities heyday, sometime around 987 A.D. the palace represents one of the best examples of Puuc architecture found in ancient Mayan archaeology. To the east of the palace lies the Great Pyramid of Uxmal which can be climbed and offers a beautiful vista of the ruins.
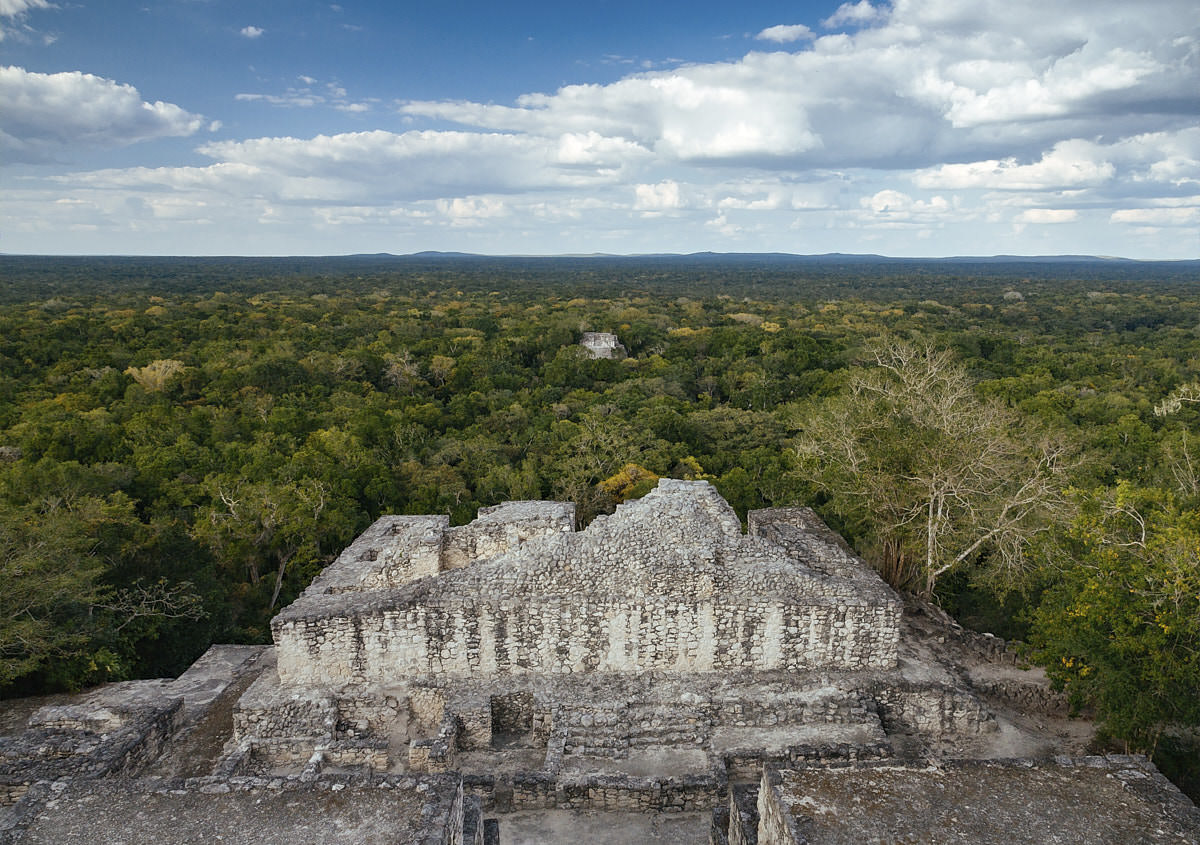
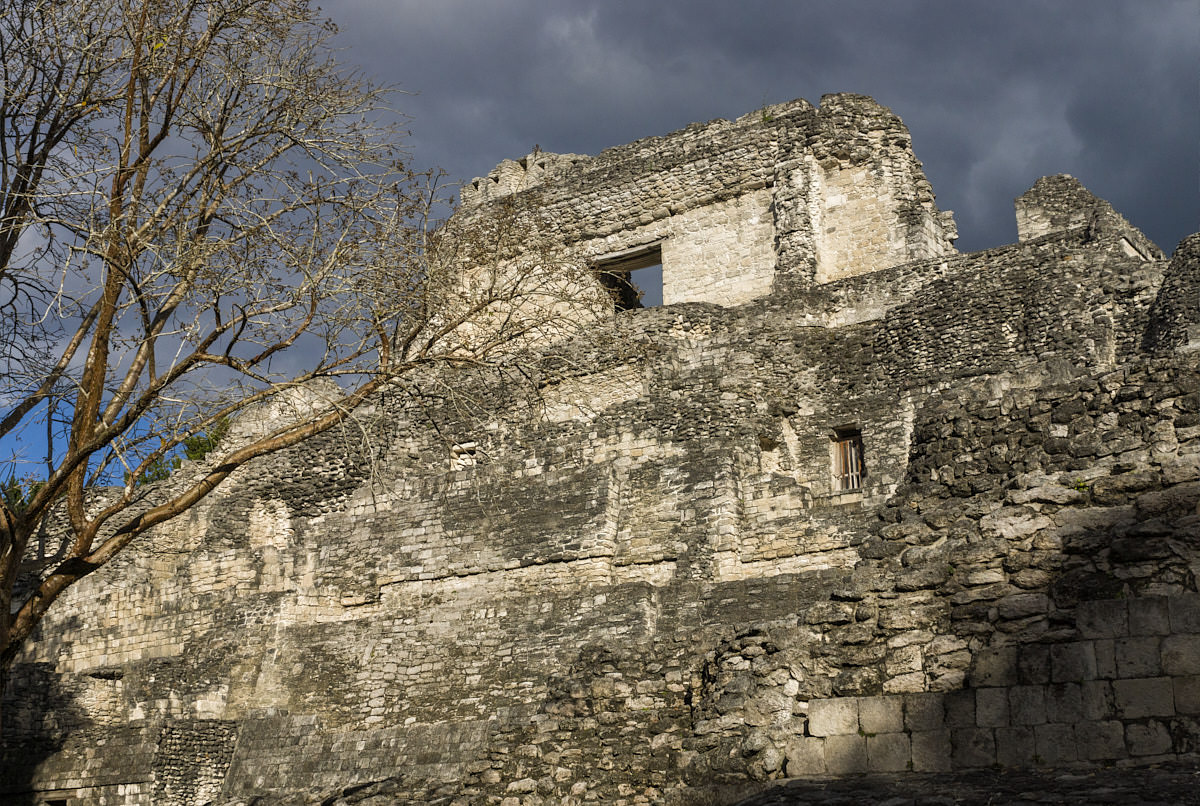
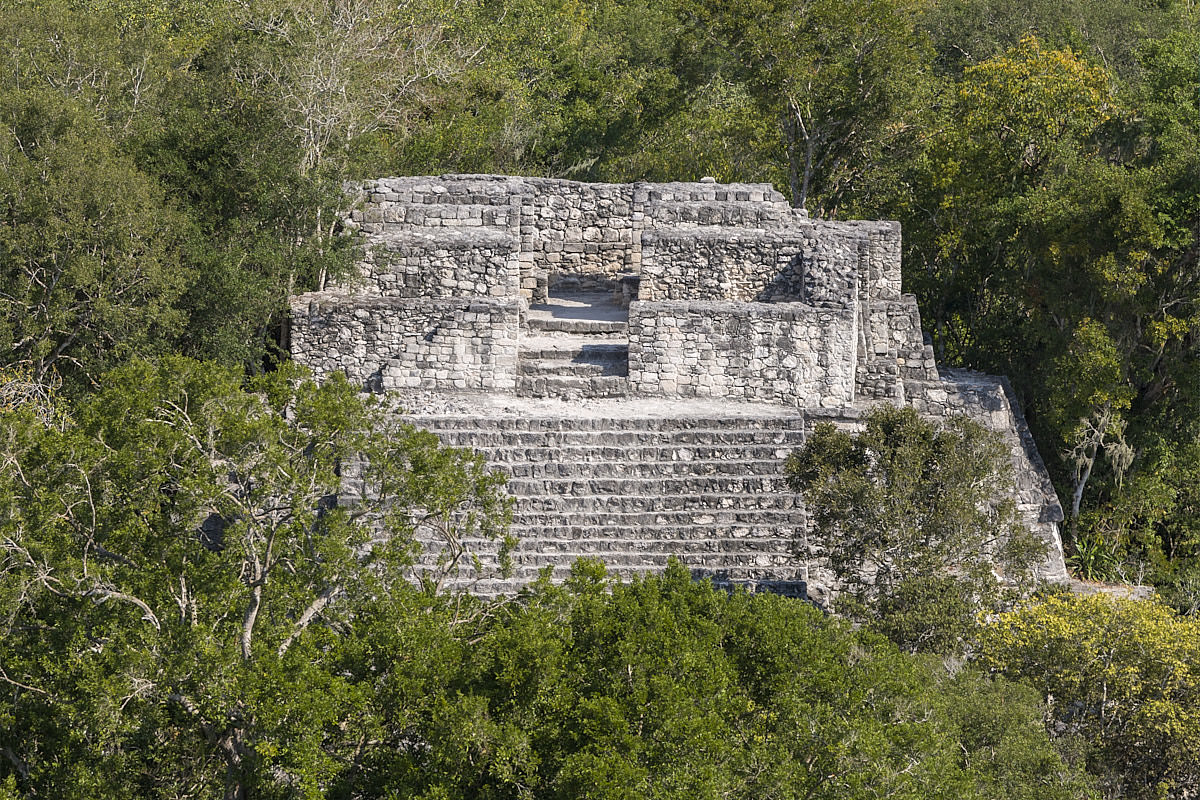
After winding its way along the coastline, Mexico 180D reaches a crossroads at Escarcega from where a left turn onto Mexico 186 leads to the Calakmul Biosphere Reserve, making the overall journey a little over 400km. The 7231km reserve represents the last great tract of rain-forests found in Mexico, with most of the countries forests felled and cleared by human activity. The jungles host an immense biodiversity of wildlife, with 86 different species of mammals and over 385 species of birds. Concealed within the rain forest and just a few kilometers from the Guatemalan border hide the ruins which give the reserve its namesake, The Ancient City of Calakmul.
Meaning “City if the Two Adjacent Pyramids” in Mayan, Calakmul’s origins can be dated all the way back to 550 B.C. and was inhabited until its downfall at around 900 A.D. The city belonged to a coalition that included the Maya settlements of El Mirador, Uaxactún and Becan in the Mayan lowlands. Calakmul was the largest and most powerful settlement in this alliance, and was in constant conflict with its southern neighbors, mainly the city of Tikal located across the contemporary border of Guatemala.
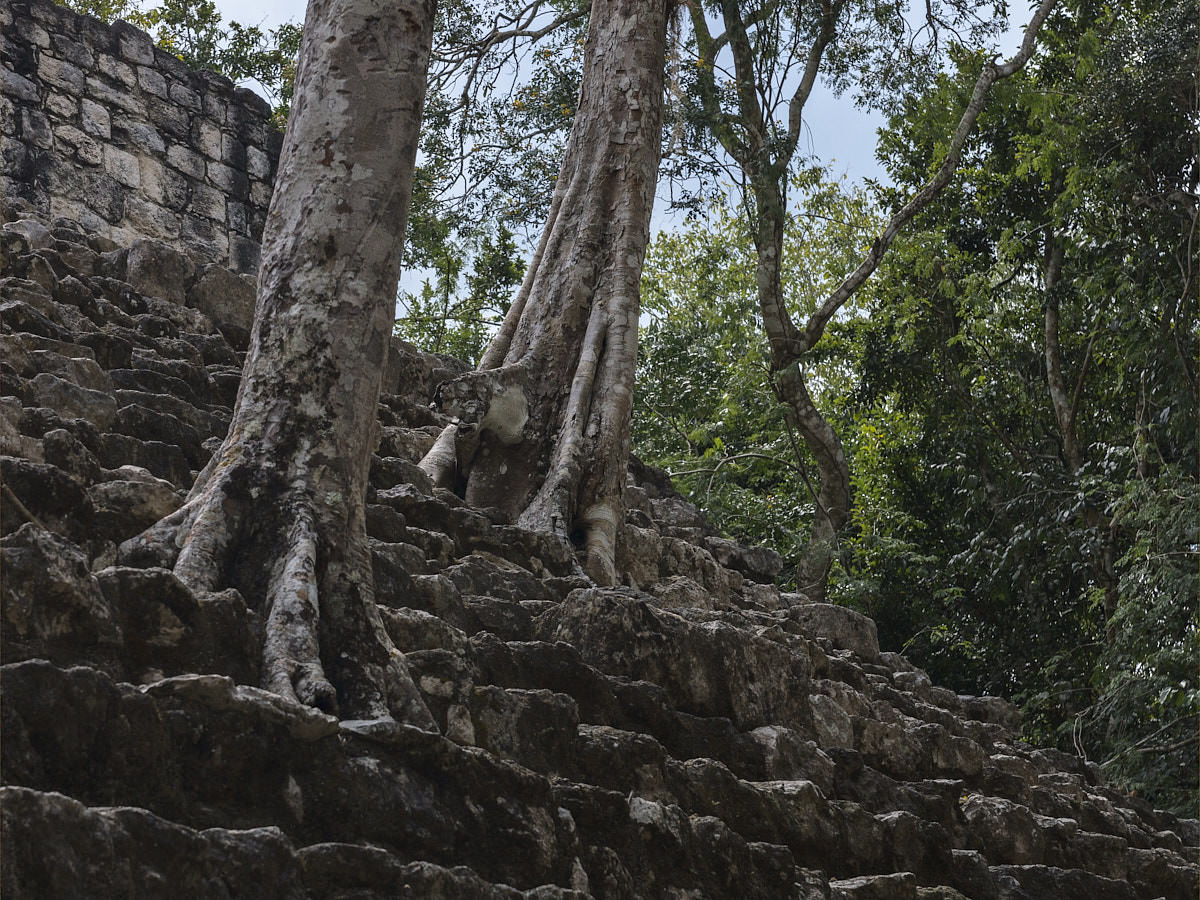
Calakmul offers a wide variety of photographic opportunities for those who are patient. The archaeological site has far fewer rules restricting visitors as to where they can go and what they can climb, and as such, so there are many more opportunities for different compositions. The city’s restored central plaza consists of a large group of platforms and buildings to the west and a smaller group lying to the east. In between these buildings is the central zone with the Structure II pyramid. This pyramid is the largest in the Mayan world, with a base measuring over 120 square meters and tower at over 45 meters high. In fact, the pyramid is so large, that there is no way to take a photo of it in its entirety from the ground. After a tiring climb to the top, one which I do not recommend for those with a fear of heights, the rest of the city and surrounding forest can be seen for kilometers around. The Pyramid also offers wonderful bird watching opportunities because its height places you at eye level with the forest canopy, where the local toucans and parrots can be found.
DSLR-A700 + DT 16-50mm F2.8 SSM @ 35mm, ISO 200, 1/125, f/7.1SLT-A77V + DT 16-50mm F2.8 SSM @ 30mm, ISO 320, 1/640, f/9.0Canon EOS-1D Mark III + EF300mm f/2.8L IS USM +1.4x @ 420mm, ISO 640, 1/500, f/5.6
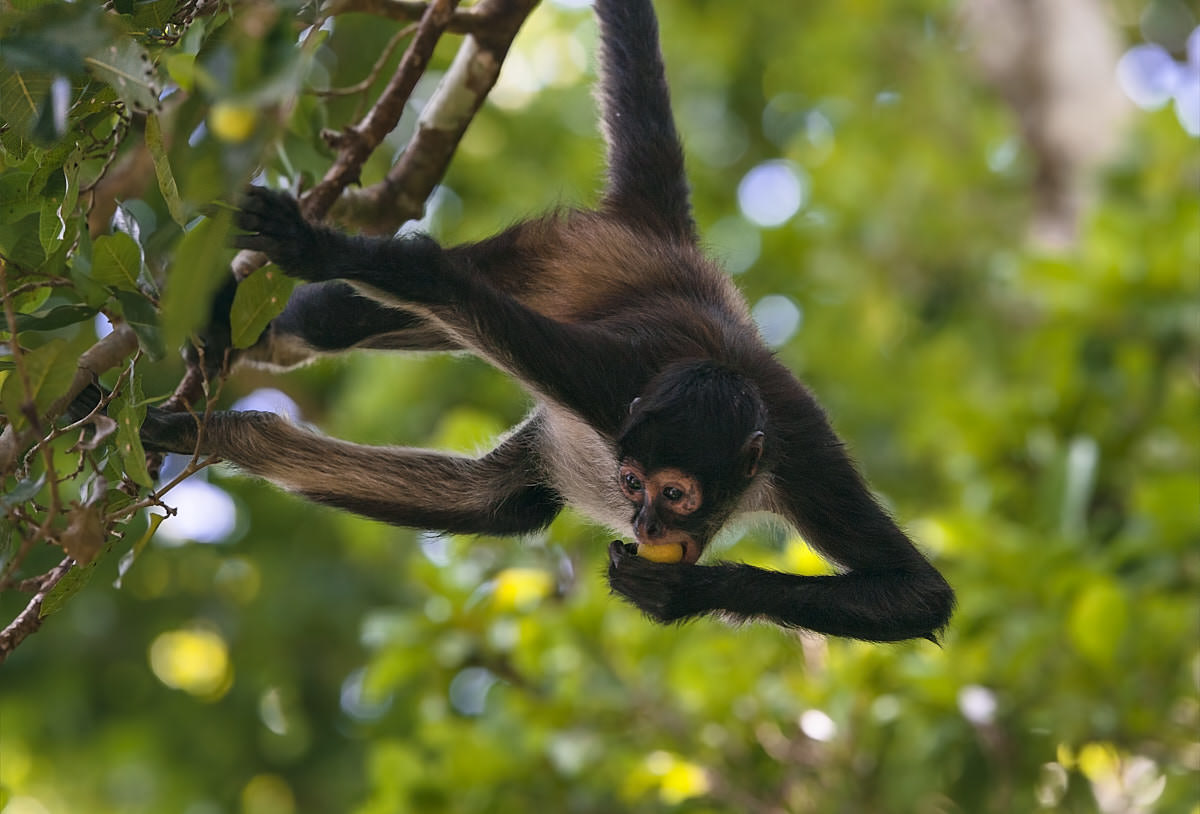
The forests which have tamed the once great city offer a diverse range of wildlife for photographers with some patience and a keen eye. The rain forest’s floral composition is mainly a mixture of mahogany, ceiba and ficus trees whose seemingly endless canopies stretch as far as they eye can see. The reserve’s wildlife can often be found within the cities ruins, with views of Ocellated Turkeys, parrots and toucans quite common. It is also possible to see or hear spider and howler monkeys, with large groups of the endangered Geoffrey’s Spider Monkey often seen foraging from one fruiting tree to the other.
The Endangered Geoffrey’s Spider Monkey foraging for fruit:
Canon EOS-1D Mark III + EF300mm f/2.8L IS USM +1.4x @ 420mm, ISO 800, 1/1000, f/5.0Canon EOS-1D Mark III + EF300mm f/2.8L IS USM +1.4x @ 420mm, ISO 400, 1/500, f/4.5
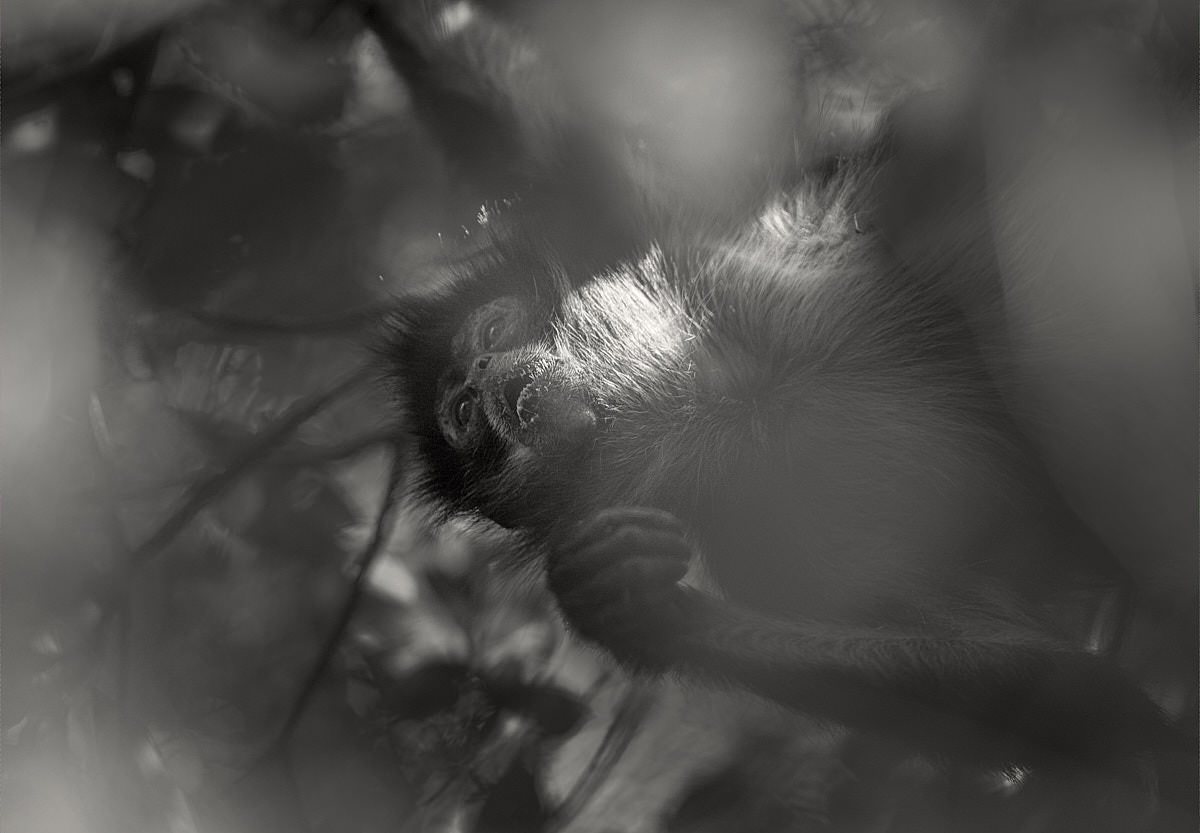
An Endangered Geoffrey’s Spider Monkey foraging mother and son:
Canon EOS-1D Mark III @ 420mm, ISO 400, 1/640, f/4.5
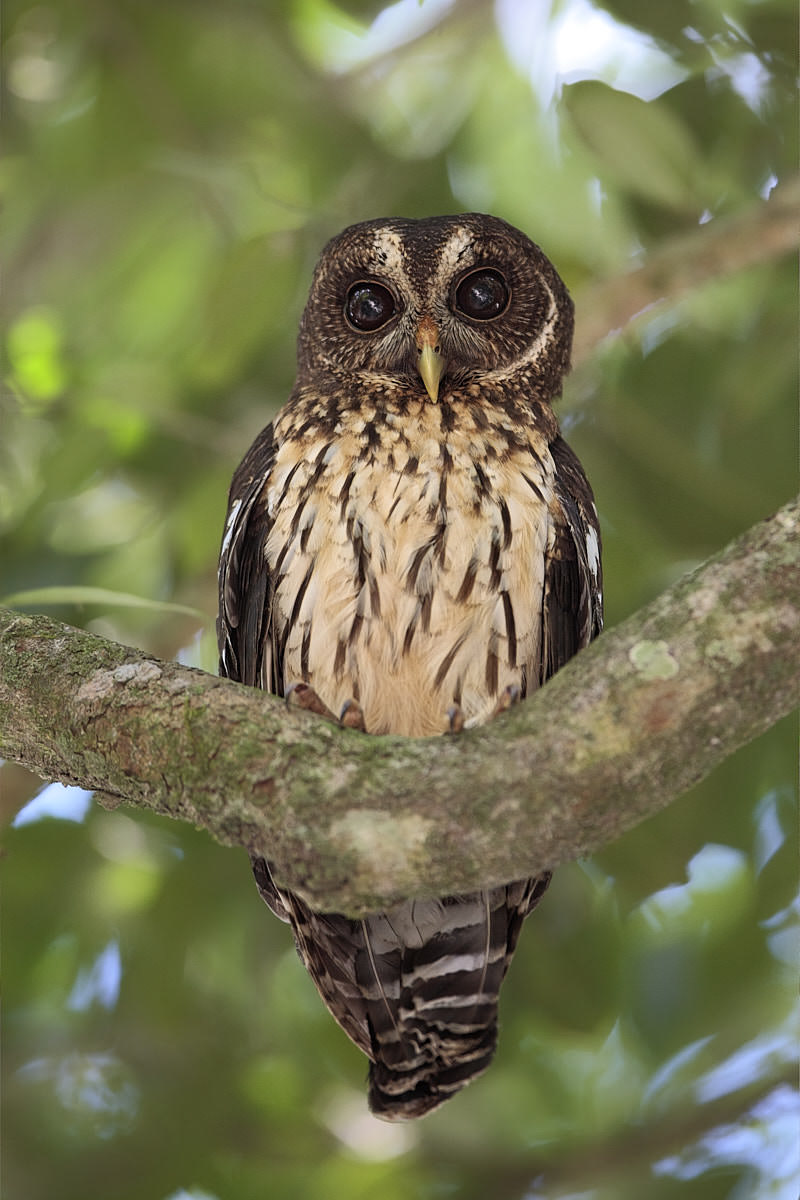
Other more shy bird species are also present at the site and the surrounding reserve, but it takes some patience and understanding of their behavior to locate them.
The shy Mottled Owl resting out the hot midday sun in the under canopy:
Canon EOS-1D Mark III @ 300mm, ISO 800, 1/200, f/3.2
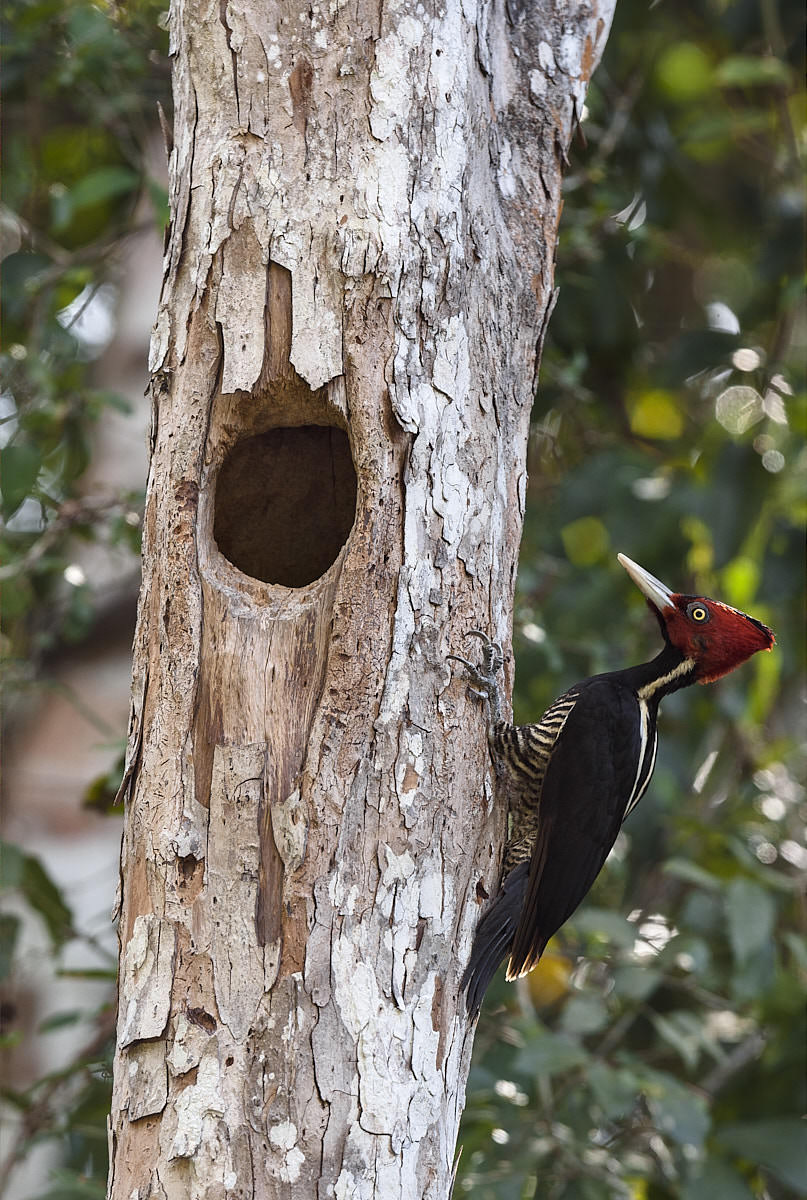
A Pale Billed Woodpecker with its nest in a tree cavity:
Canon EOS-1D Mark III + EF300mm f/2.8L IS USM @ 300mm, ISO 400, 1/400, f/5.0
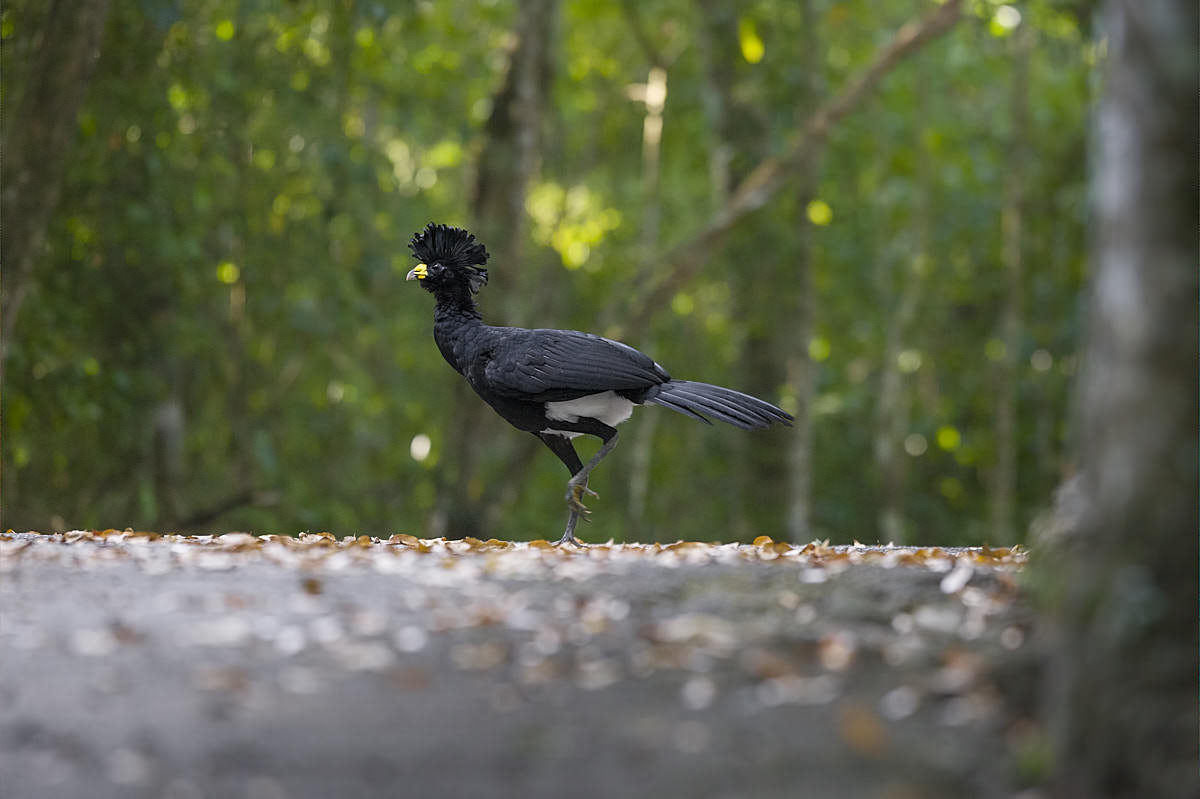
Always heard but almost never seen, the elusive Curassow go out of their way to remain hidden from any would be photographers:
Canon EOS-1D Mark III + EF300mm f/2.8L IS USM @ 300mm, ISO 1600, 1/500, f/3.5
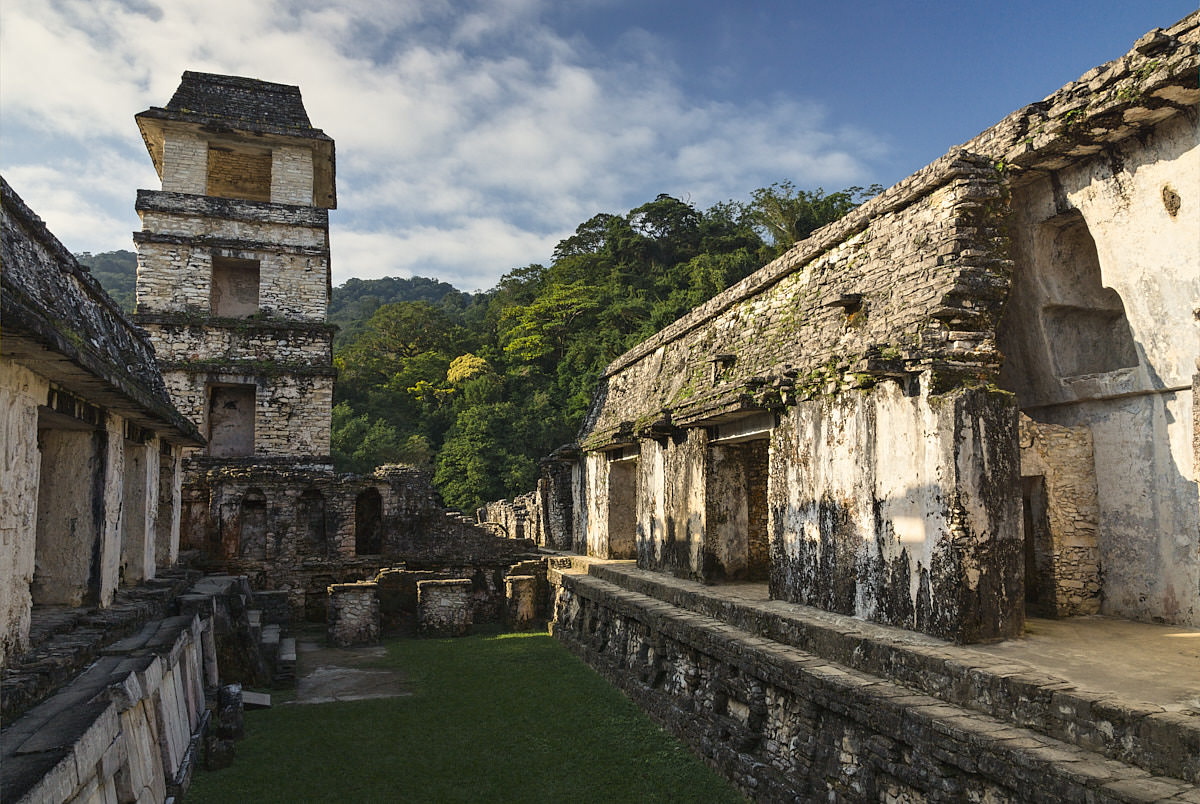
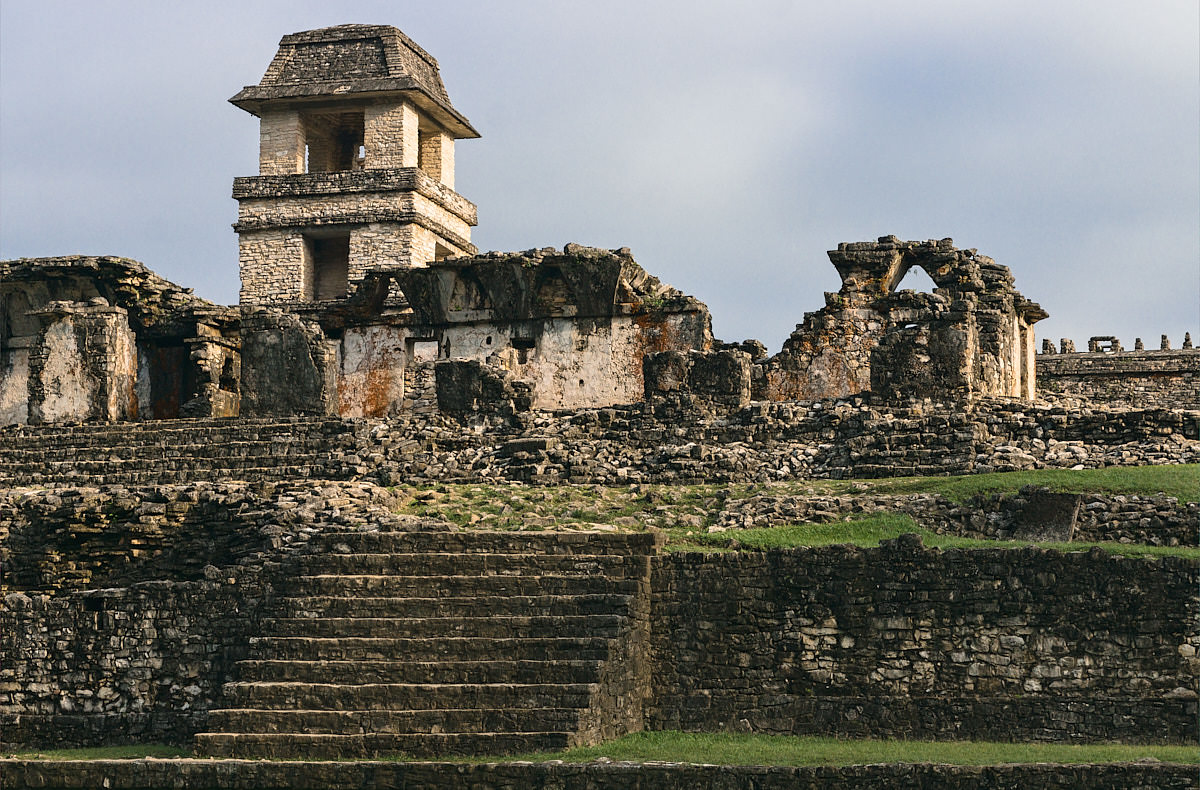
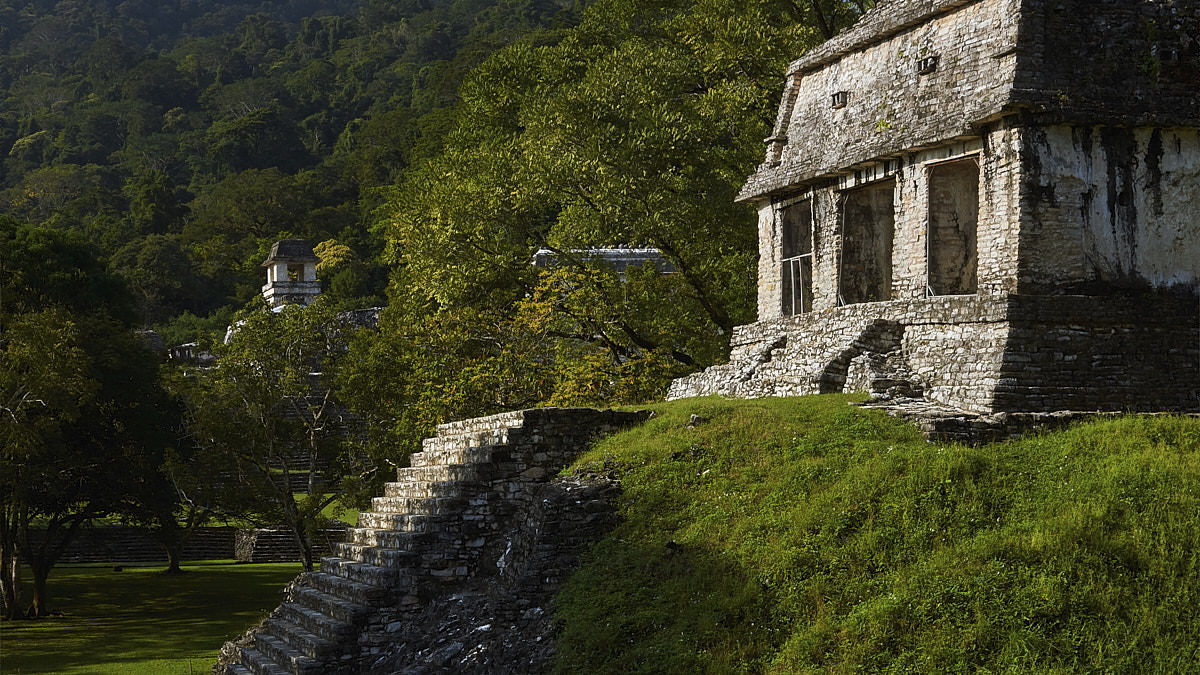
5) Palenque
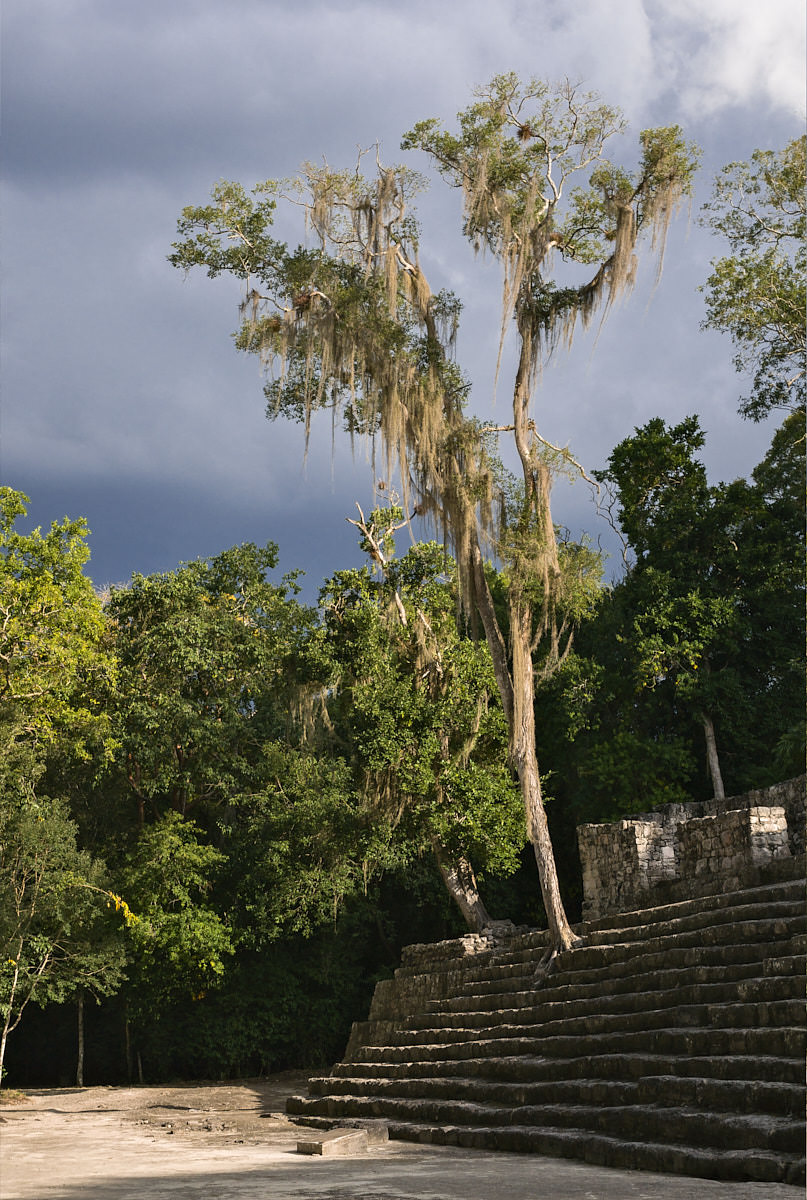
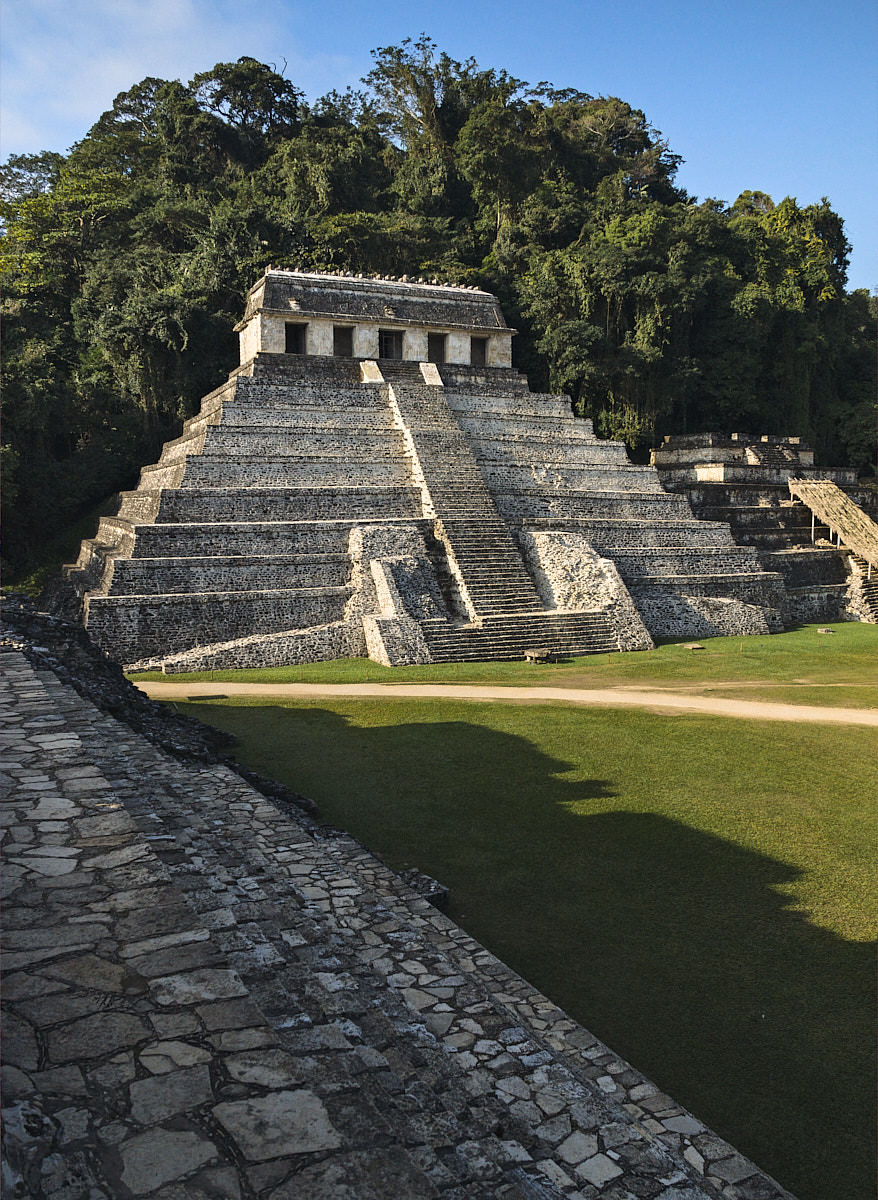
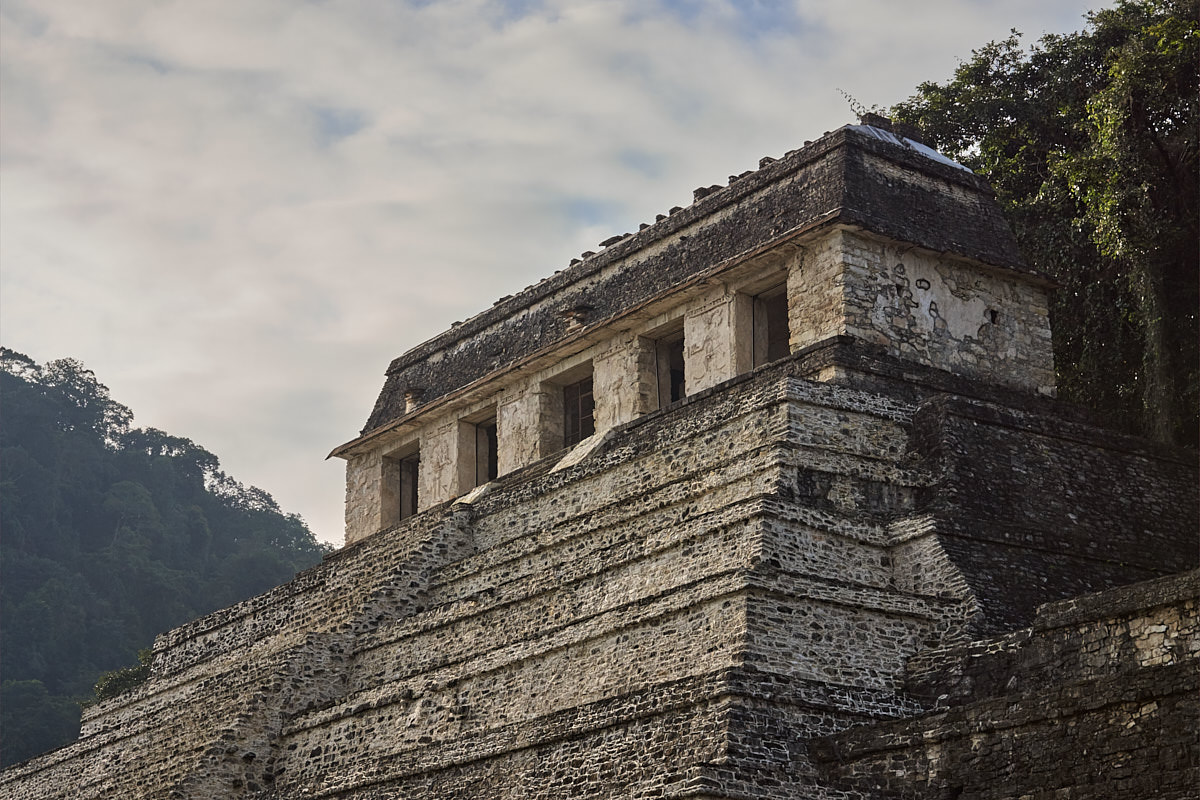
From here, our journey shifts outside out the Yucatan on a four and a half hour drive on Mexico 186 to the state of Chiapas. It is here, situated in the Tumbalá mountains, that the Mayan city of Palenque was built into the side of a hill overlooking the lush jungles below. Though quite small in size, the city’s combination of geography along with its delicate platforms, temples and palaces gives it a unique sense of artful harmony.
Greeting visitors upon entering the city, The Temple of Inscriptions, constructed sometime in 675 A.D. in honor of King Pakal, is perhaps the most important structure found in the city. Pakal the Great reigned in Palenque from 615 to 683 A.D. and is thought to be the most significant ruler in the city’s history. Upon his death, his first son was appointed ruler and ordered the construction of the Temple of Inscriptions as both a tomb for his father and as an homage to the city’s history.
Equally impressive is The Palace, a complex of several connected and adjacent buildings and courtyards which served as a home for Mayan aristocracy. Carved within the buildings hallways are numerous sculptures and bas-relief carvings which hint at the structure’s glorious past. Perhaps the Palace’s most unusual and recognizable feature is the four-story tower known as The Observation Tower.
The archaeological site’s lush rain-forests are home to a range of different wildlife. A species which is often heard but not seen is the Guatemalan Black Howler Monkey. Found high up in the tree canopy, they can prove difficult subjects to photograph, but with some luck you can capture reasonable photographs and hear their mighty call. They are most active late in the day and it is well worth spending the late evenings looking for the monkeys up in the high canopies while the soft reddish glow on the branches signals the end of the day and our journey.
Canon EOS-1D Mark III + EF300mm f/2.8L IS USM +1.4x @ 420mm, ISO 800, 1/640, f/5.0
From Palenque, it is a grueling 8.5 hour drive back to Cancun. Yet reflection on the drive back rarely comes to mind while gazing down Palenque’s vast stretches of thick canopy from atop The Palace. It is tempting to think that here is nature’s domain and the search for wonders of a lost peoples a mere pipe dream, that the overpowering ferocity of the forest’s regenerative power is insurmountable. Perhaps in 1890 when Maudslay, by then in his early 40’s and fully recovered from his ordeal with Malaria, returned to Mexico and sought out the city of Palenque, he too stood back in awe at forest’s enormity, regretting the folly of his mission to uncover its ancient structures. But perhaps also, like the modern observer standing atop a magnificent pyramid with the canopy splayed before him, he saw the dotting peaks from afar and decorated stones at his feet all indicating the presence of a truly magnificent civilization; one well worth exploring.
Canon EOS-1D Mark III + EF300mm f/2.8L IS USM @ 300mm, ISO 100, 1/250, f/8.0
6) A Note on Photography
Photography in the archaeological sites offers a unique challenge that stems from the rules and limitations set in place in most of the ruins by the Mexican government. In no place is this more obvious then Chichen Itza, where most of the buildings are closed off and can only be photographed from afar. This presents a problem because of the lack of available angles in ones attempt to create a special shot. This becomes especially obvious to those interested in making dynamic wide angle photography of the buildings, and thus one needs to know these limitations and work around them. My first suggestion to combat this is to walk around with two DSLR bodies. One with a regular zoom lens (24-70mm) while the other has a longer zoom lens (70-200mm) ideally with a 1.4x teleconverter to allow for a longer range as well as some wildlife photography. I did use my Tokina 11-16mm DX on a few occasions, but it usually coincided with a bit of luck (the Iguana with El Castillo in the background) or in ruins like Calakmul, an archaeological site with far less restrictions. This sounds obvious but make sure to have a comfortable backpack to carry your gear inside for the long and inevitable hikes involved in fully exploring the ruins. A general rule for all archaeological sites all over the globe is to arrive as early as possible, as it will allow you to somewhat beat the large crowds (Calakmul is an exception since it is relatively off the beaten path) and allows for the best light. The closing times of all the ruins but Calakmul is around an hour or so before sunset, making for sunset photography difficult. Because of this, days with more clouds not only offer more interesting skies, but also help soften the light a bit. I also recommend using polarizing filters, they really help bring out the texture in the rocks and give the sky a punch. Lastly, tripods are not allowed in any of the ruins and this is something that is quite heavily enforced. Plan for using slightly higher ISO because of this.
Here is my recommended kit for the Chichen Itza, Uxmal and Palenque:
Camera body with 24-70mm Lens (16-50mm on crop) with a Polarizing Filter
Camera body with 70-200mm Lens + 1.4x TC
Ultra-Wide Angle Lens
Recommended kit for Calakmul:
Camera body with 24-70mm Lens (16-50mm on crop) with Polarizing Filter
Camera body with a fast super telephoto lens (such as 300mm f/2.8)
Do you ever see a beautiful sunset and want to capture your kids playing in front of that gorgeous backdrop?
Or a beautiful couple kissing in front of a cotton candy sky?
You happily start taking photos, check your LCD screen only to realize your sky is completely blown! Or even worse, you capture that beautiful sky, but your subject is too dark to even make out!
How the heck are you supposed to get a nicely exposed subject AND a well exposed sky without a flash? Here is how I like to do it:
as shot
edited
In camera:
I typically expose for skin and then sometimes even overexpose a stop or two more. Sounds crazy I know!
Most people do the opposite and expose for the sky, but I am OCD about having my subjects be too dark/underexposed. Having to try and bring back the skin in post processing is a pain and for me, usually results in lots of grain and skin that is still underexposed and blotchy.
Usually I can only see a hint of the clouds/sky on my LCD screen – it’s not completely blown out, but it’s a little bright. Don’t let this scare you! We are going to fix that in post processing.
as shot
edited
Post processing:
For editing, I start in Lightroom. The first thing I always do is bring the highlights way down. Sometimes I even bring them all the way down. It’s always somewhere between -70 and -100. This will help darken your sky and bring out those clouds.
Next I bring the shadows up. This helps brighten your subjects a TON without affecting the sky much. Usually +25 or more.
After making a few other small adjustments (white balance, sharpening, etc) I bring my image into Photoshop.
Now it’s time to darken my sky and really bring back those clouds.
as shot
edited
There’s two ways I will do this depending on the location of my subjects and both involve a curves layer. When making the curves layer to darken an image, I grab my midpoint and drag it down and a little to the right. The more you drag it, the darker it will get. I stop dragging when I get the sky the way I like it.
If my subjects are touching the sky at all, I do the curves layer on the whole image and paint it off my subjects and foreground very carefully.
If the sky is on its own, no subjects touching it, I invert my curves layer and paint it on the sky only.
I finally move onto my subjects.
I like to make a brightness/contrast layer, bring up the exposure to about +10, give or take, and carefully paint it on my subjects to brighten them even more.
And that’s it!
Hopefully these tips will help you achieve both a great sky and properly exposed subject using only natural light!