5 easy ways to have fun taking your next self-portrait

Anytime I hear people talk about taking a self-portrait, I also hear about how intimidating or scary it can be to jump in front of the camera.

But I don’t think it has to be scary or intimidating at all, especially considering it’s just you and the camera.

Taking self-portraits can and should be a fun (and honestly, sometimes funny) experience. Here are 5 tips to help you have a successful self-portrait session.

1. Tell a story

Before you set up your self-portrait, it can be helpful to decide on the story you want to tell. Your story doesn’t have to be super elaborate, just have in mind the message you want to convey.

Once you’ve decided on your story, it becomes easier to decide what you want to wear, what you want your backdrop to be, your posing, etc. Deciding on the details comes after you’ve decided on what you want your self-portrait’s story to be as a whole.

The story I wanted to tell for the following self-portrait was the story of hope – of me seeing the light among the shadows. This helped me decide to wear something fairly simple (a t-shirt) and use dappled light against the side of the house, positioning myself in one of the bright spots facing the sun, with a big smile.

Taking self-portraits can and should be a fun (and honestly, sometimes funny) experience. Here are 5 tips to help you have a successful self-portrait session.

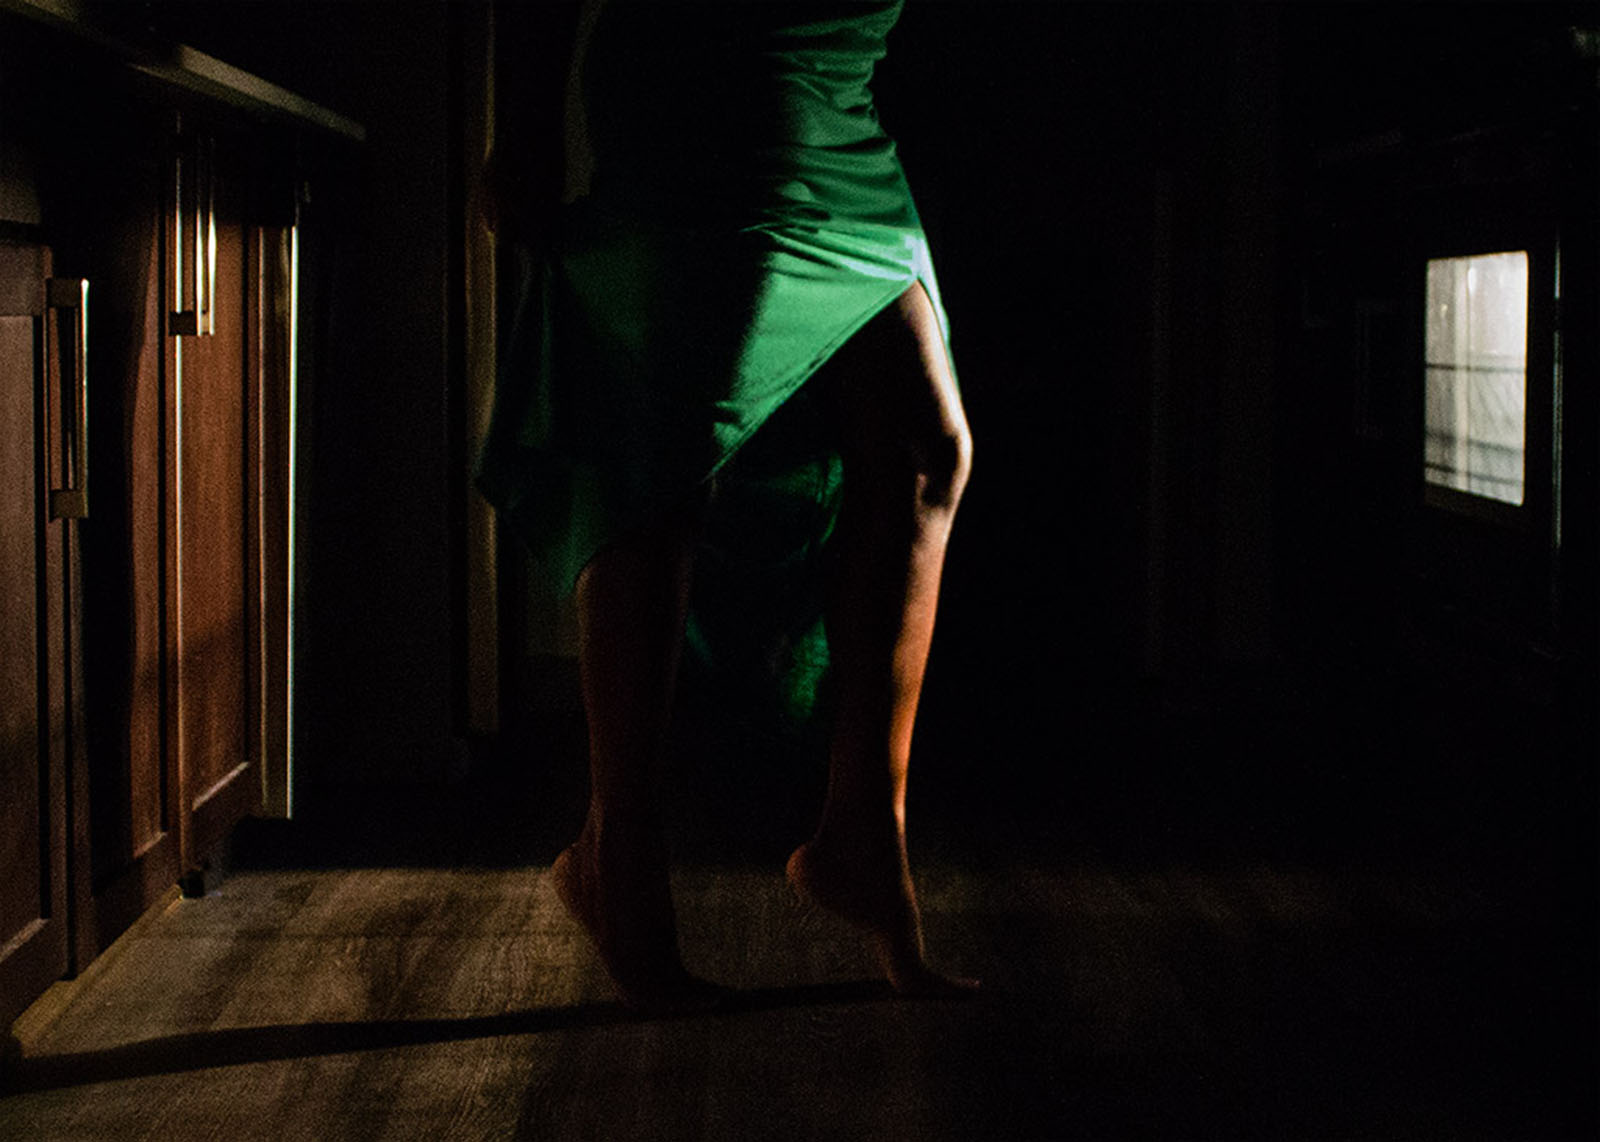
For this self-portrait I wanted to tell the story of solitude and loneliness. I knew I wanted it to be a low-lit portrait and I chose a pose where my body is very closed off, almost as if I’m protecting myself from my surroundings. My clothing is minimal to express vulnerability and rawness.

Taking self-portraits can and should be a fun (and honestly, sometimes funny) experience. Here are 5 tips to help you have a successful self-portrait session.

Here I wanted my story in this image to be quiet confidence. I knew I wanted the lighting to be fairly simple and my body language to be pretty relaxed with a smile. I also decided to go without makeup, because I wanted to feel confident in my skin without any enhancements and portray that in the photograph.

Taking self-portraits can and should be a fun (and honestly, sometimes funny) experience. Here are 5 tips to help you have a successful self-portrait session.

Related: 7 things to consider before taking self-portraits

2. Get creative

If you’re feeling shy about being in front of the camera, you can take a creative self-portrait that doesn’t even incorporate your face. This is a good way to get comfortable taking self-portraits without completely putting yourself out there.

You can take a faceless self-portrait where you use your body language to convey your message.

Taking self-portraits can and should be a fun (and honestly, sometimes funny) experience. Here are 5 tips to help you have a successful self-portrait session.

Creating a silhouette is always an option, too.

Taking self-portraits can and should be a fun (and honestly, sometimes funny) experience. Here are 5 tips to help you have a successful self-portrait session.

You can also focus on a body part besides your face. There’s legs, hands, etc. So many body parts to choose from so don’t feel limited to just your face!

Taking self-portraits can and should be a fun (and honestly, sometimes funny) experience. Here are 5 tips to help you have a successful self-portrait session.

You can even get super creative and do a composite.

Taking self-portraits can and should be a fun (and honestly, sometimes funny) experience. Here are 5 tips to help you have a successful self-portrait session.

There’s so many ways to avoid having your face in the frame if you’re uncomfortable when you’re first starting out with self-portraits. All it takes is a bit of brainstorming to come up with a concept that allows you to be present yet anonymous at the same time.

3. Incorporate a person/item to interact with

Figuring out what to do with your hands in a self-portrait can be super awkward. Do you include them in the frame? If so, what are they going to be doing? Should they be posed? Should they be relaxed?

There’s so many options, and sometimes it can be overwhelming to figure it all out. Incorporating an item or person into the frame for you to interact with can make these decisions so much easier.

Incorporating flowers gives you something to hold AND can double as a way to take a faceless self-portrait.

Taking self-portraits can and should be a fun (and honestly, sometimes funny) experience. Here are 5 tips to help you have a successful self-portrait session.

When in doubt, hands in the hair always works for me. Again, incorporating flowers automatically gives your hands something to do and incorporates another interesting item into the frame.

Taking self-portraits can and should be a fun (and honestly, sometimes funny) experience. Here are 5 tips to help you have a successful self-portrait session.

4. Be realistic

Don’t go into a self-portrait session thinking every photo is going to be a keeper. Because they’re not. It’s just not possible. It’s going to be just like any other session you do. There’s going to be times when you catch yourself blinking, or you look constipated, or your pose is awkward.

Out of maybe 100 frames I take (and yes, I can take that many frames for a 30-minute self-portrait session), there’s only about 20 I keep and consider editing. Then out of that 20 there’s usually only about 5 I actually end up liking enough to share.

Realize that you’re not perfect, but your flaws are what makes you unique. So jump in front of the camera anyway and embrace them!

Taking self-portraits can and should be a fun (and honestly, sometimes funny) experience. Here are 5 tips to help you have a successful self-portrait session.

Taking self-portraits can and should be a fun (and honestly, sometimes funny) experience. Here are 5 tips to help you have a successful self-portrait session.

Taking self-portraits can and should be a fun (and honestly, sometimes funny) experience. Here are 5 tips to help you have a successful self-portrait session.

5. Have fun!

Taking self-portraits should be a way for you to get to know yourself and build self-confidence. It doesn’t have to be super stressful or intimidating at all. At the end of the day, no one even has to see the photos if you don’t like any. Simply scrap them and start over with a new idea!

Taking self-portraits can and should be a fun (and honestly, sometimes funny) experience. Here are 5 tips to help you have a successful self-portrait session.

Taking self-portraits can and should be a fun (and honestly, sometimes funny) experience. Here are 5 tips to help you have a successful self-portrait session.

The post 5 easy ways to have fun taking your next self-portrait appeared first on Clickin Moms.


Clickin Moms

Posted in Photograpy How To | Tagged , , , , | Leave a comment

iPhone 7 Plus Camera Review

iPhone 7 Plus Image Sample Large #7

Less than a year ago, Apple introduced the iPhone 7 and iPhone 7 Plus phones to the market. The iPhone 7 Plus was the first Apple phone to have a dual lens design (28mm wide-angle and 56mm telephoto equivalent), so Apple put quite a bit of emphasis on photography with this model. Although I was quite happy with my iPhone 6 Plus at the time of the announcement, I decided to upgrade to the latest version, primarily because of these camera features the phone offered. Since then, I have captured thousands of images in different environments, which not only allowed me to get a deeper understanding of the camera capabilities of the phone, but also understand its many issues and limitations. In this review, I will be going over my experience with the iPhone 7 Plus camera and discuss its pros and cons.

[Read More…]

Photography Life

Posted in Photograpy How To | Tagged , , , | Leave a comment

What is aperture? A beginner’s guide for photographers

You’ve heard of the word aperture but what is it, exactly?

Aperture is one very important part of what photographers call the exposure triangle, the relationship between ISO, shutter speed, and aperture.

These three settings work together to control the overall exposure of an image. When one goes up, another must go down in order to maintain the proper exposure.

What does aperture mean and how do I adjust it?

The aperture is like the pupil of your eye

The photograph above shows a camera shutter “closed down” to take a photo (no shutter is actually 100% closed because than no light at all could enter). Notice the hole in the middle? The size of that opening is the aperture, and it’s measured on a scale of millimeters. The size of the hole lets more or less light into the camera, like your pupils.

When you walk outside on a bright sunny day, your eyes are being inundated with light. You’ll squint and hold your hand up to block the light while your eyes adjust, shrinking your pupils. Once your pupils are tiny little black dots, it becomes a little easier for you to see because less light is able to get into your eye.

The opposite occurs when you enter a dark room at night. With little light to help you see, your eye adjusts resulting in large pupils, which let in as much light as possible. After a few minutes, your eyes have adjusted and you can see more detail than you could when you first entered the dark room.

Keeping this analogy in mind, imagine your camera’s aperture as the pupil. Only instead of the aperture automatically adjusting based on lighting conditions like your pupil does, in manual shooting modes you must act as the brain for the camera and make the adjustments manually.

Aperture and depth of field

Unlike shutter speed and ISO, aperture is unique in that it affects both light and depth of field, which makes it a setting often adjusted for practical and artistic purposes.

Returning to the eyeball analogy, I’ll propose another scenario. You’re at a café and there’s a specials board across the room. You can’t quite make out what it says but your seat is blocked in making it more trouble than it’s worth to try and get up, so you squint. Ah, much better. The steak fries are on special today!

Without getting into how a lens works, when you squint, you’ve effectively stopped down the aperture of your pupil, or made it smaller. So not only is less light entering your pupil but the way light enters your pupil and focuses inside your eye creates a slightly clearer image across your field of vision.

The same thing happens when you stop down the aperture on your camera. An image taken at f/2.8 is going to have a smaller depth of field, or area in which the image is in focus, resulting in that blurred background which we call bokeh.

Portrait photographers will often shoot “wide open”, keeping the focus on the subject’s eyes and letting the rest of the face and background fall off into blur in order to limit distractions. On the other hand, landscape photographers prefer shooting “stopped down” to f/16 or f/22. The resulting image has a larger depth of field and the entire image (relatively speaking) is crisply focused.

What does aperture mean and how do I adjust it?

Aperture: f/1.2

What does aperture mean and how do I adjust it?

Aperture: f/16

Tying it all together

Okay, so how do you know what f-stop to choose for your photos? Start by experimenting on your favorite lens.

Working in Av mode, select the widest aperture the lens can handle, whether that’s 1.8 or 2.8 or 4. Set your camera’s ISO to auto, then find a subject and take a photograph. Stop your aperture down a few notches, take another photo, and continue the cycle until you can no longer stop down. The camera will adjust the shutter speed for you to keep the exposure consistent.

On your camera’s LCD screen, you should be able to display the settings for each image as you view them (my Canon 6D has an INFO button, but check your camera’s manual). Note what has changed as you look through the series of images. The background should come into focus as your aperture gets smaller and the shutter speed (Tv) should have gotten longer to compensate for less light coming into the smaller aperture opening.

Your camera always wants to give you a proper exposure, so as you change the aperture along the way, the camera adjusts elsewhere. When you eventually move to full manual mode (M), you’ll have to make those adjustments on your own.

Eventually you may get to a point where you may have a preferred f-stop to use, or maybe you’ll find a ‘sweet spot’ on a particular lens. Folks who prefer to shoot ‘wide open’ or close to it often do so because of the extra light that comes into the camera.

Shooting with a wide aperture like f/1.2 with its very narrow depth of field can result in a more ethereal, dreamy sort of look that you can’t get at f/22. Alternatively, landscape photographers will usually stop down their aperture so that they can achieve crisp images with a large depth of field, so that the fore, mid, and background are all in focus. On darker days, this means adjusting the shutter speed and/or ISO to make up for the light lost with that tiny aperture opening.

When selecting your aperture, ask yourself a few questions:

  • What is my environment like?
  • Am I indoors on a cloudy day, or outdoors in bright sunlight?
  • What kind of look am I trying to achieve?
  • Do I want the background to fall out of focus quickly or am I trying to photograph an entire scene in focus?
  • What is the subject I am trying to photograph?

As with everything in photography, practice as much as you can. Digital cameras make it easy to experiment over and over, so play around with various apertures to get a feel for how they work with light.

Flip through a photography magazine like Click – they’ve helpfully included the camera settings with most of the images featured, which will help you build that mental relationship between aperture and depth of field.

The math and science behind aperture

What is an f-stop? Why is aperture written with an f/ in front of it? Why are the smaller numbers considered larger apertures?

Let’s get nerdy for a minute. After all, with a background in math and science, I feel like I owe it to myself to dig into optics for a bit.

Don’t let this scare you off! You won’t need to memorize equations, but I think they’re helpful to see in order to understand aperture. Some smart folks at your camera’s manufacturing company put these equations into the camera’s innards so all you need to do is pick a focal length and an f-stop number, and it figures out the actual aperture (diameter) for you.

Go back to the image of the ‘closed’ shutter. The size of that opening has a diameter (which we call aperture), expressed in equation form as D. If you need a refresher in math, the diameter is the distance from one side of a circle to the other side. Your camera uses the following equation to figure out how large or small to make the diameter/aperture:

D =  Focal Length (f) / Stop Number (S)

Let’s break that down now. Based on your choice of lens, your focal length may be adjustable (like on a zoom lens) or fixed (like on a prime). I’ll use a prime 50mm lens for an example.

Say I turn my camera on in Aperture Priority (Av) mode. I’ll select a value, called the f-stop number, and the camera will adjust the shutter speed for me to maintain a proper exposure. I select a random f-stop of 4.

Remember the equation above: Diameter = Focal Length / Stop Number. If f=50mm, and the stop number is 4, the diameter of the opening will be 50/4, or 12.5mm. The shutter will close down enough to leave an opening 12.5mm across to let light flow into the camera’s sensor.

But when have you ever seen or heard a photographer refer to their aperture as 12.5mm? Because the amount of light necessary to reach the sensor depends on the focal length (in this case 50mm), it’s easier to express aperture as a fraction paired with the focal length (e.g. 50mm at f/4).

Aperture vs f-stop

While the terms aperture and f-stop are often used interchangeably, they are actually two different parts of the same equation. The aperture is the diameter of the opening, or pupil, in the lens, shown in the equation as D.

The f-stop number (S in the equation above), while it seems arbitrary, is actually a way to dictate how much light should come into the camera based on the focal length. With each move up or down in the f-number scale, the amount of light will either double or halve. f/2.8 creates an aperture with double the area of f/4 given the same focal length, and thus double the amount of light can enter the camera. f/4 will allow for double the area/double the light of f/5.6. And so on, and so forth.

How aperture works by Alicia Bruce

This is why your aperture value is written as f/4 (or 2.8, 5.6, 8, etc) – it’s actually a fraction! The f is just standing in, algebra style, waiting for you to choose a focal length. Your camera will then determine how large or small to open the aperture.

Now that you know that the fancy f isn’t just there for aesthetics – it represents the focal length you choose based on your lens – let’s create another example.  We’ll use the same 50mm lens but choose a different f-stop, like 2.8. Written as f/2.8, we know that f is 50mm. So 50/2.8 = 17.8 mm.

When using a 50mm lens, the opening of your shutter will be 17.8 mm across if you choose f/2.8, and only 12.5mm across if you choose f/4. We’ll stick with the diameter rather than figuring out the area but remember the area of f/2.8 is double the size of f/4.

In either case, this explains why a seemingly smaller stop number like f/2.8 results in a larger diameter/aperture opening, than a higher number like f/4. The aperture is actually a fraction, and just like 1/2 teaspoon is larger than 1/4 teaspoon, f/2.8 is larger than f/4. The opening is wider and if all other pieces of the exposure triangle (ISO and shutter speed) remain the same, more light will enter the f/2.8 aperture resulting in a brighter image.

What does aperture mean and how do I adjust it?

f/3.5 in Av mode

What does aperture mean and how do I adjust it?

f/7.1 in Av mode

The post What is aperture? A beginner’s guide for photographers appeared first on Clickin Moms.


Clickin Moms

Posted in Photograpy How To | Tagged , , , | Leave a comment

Experimenting with Flower Photography at f/1.2

PL flower abstract 12

Like many other photographers I enjoy letting my mind wander, seeing if it will lead me to some kind of new photographic experiment that I haven’t tried in the past. The idea of photographing flowers with a prime lens and an extension tube fell out of my old, porous brain this week. So, for a couple of mornings I grabbed one of my Nikon 1 J5s, my 1 Nikon 32mm f/1.2 prime lens (efov 86.4mm) and a 10mm Vello Deluxe extension tube, then headed out for my daily 5km early morning walk. This article shares some images created while experimenting with flower photography at f/1.2. Except for the last image in this article, all photographs are displayed as 100% captures without any cropping.

[Read More…]

Photography Life

Posted in Photograpy How To | Tagged , , , | Leave a comment

Could the Nikon D850 Have a Hybrid Viewfinder?

Pentaprism and OLED Screen

The news of Nikon developing the next generation high-resolution D850 DSLR camera have been generating a lot of buzz all over the photography community. The Nikon D810 has set such a high benchmark for a DSLR, that any thought of an upgrade is certainly getting a lot of people excited. Nikon’s promise to deliver a product that will exceed customer expectations is surely intriguing Nikon fans, and there are all kinds of talks in regards to the not-yet-revealed specifications of the camera. One of the hot topics that is surrounding the upcoming Nikon D850 is its viewfinder – people are speculating whether the camera will feature a hybrid viewfinder, something we have never previously seen on a DSLR before. If Nikon does indeed make it happen, we could see the very first DSLR with a hybrid viewfinder. Interestingly, I wrote a detailed article about how this could happen two years ago in an article titled “Transitional DSLR with EVF Capability“. Let’s revisit that article and shed a bit more light on how this might change the way DSLRs work today.

[Read More…]

Photography Life

Posted in Photograpy How To | Tagged , , , , | Leave a comment