
As a photographer and a photography business owner, I go through a number of activities at the end of each year to close it out, just like many businesses do when performing year-end activities. These activities have become an essential part of my photography workflow, allowing me to continue using a very consistent and reliable method to not only store and archive my images, but also to be ready for future data growth and potential hardware changes. If you have not yet considered year-end activities for your photography, I would recommend to give the below article a read and see if it would suit your workflow. Basically, I have developed a set of procedures that I run on either December 31st, or the first few days of each new year to ensure that my data stays consistent, secure and fully backed up. Most of these procedures highlighted below are related to my current post-processing software of choice, Adobe Photoshop Lightroom, but if you run any other software, you should be able to run through similar steps to make sure that you are set for another year of successful shooting.
1) Lightroom: Catalog and File Synchronization
Throughout the year, I will be making plenty of edits and changes to my existing images when working in Lightroom. During this process, I might also go through some images and physically delete them (mistakes, blurry images, etc). Unfortunately, despite my efforts to keep a consistent Lightroom catalog, this process often leads to images going out of sync – that’s when images in the file system do not fully match the images that are present in the Lightroom catalog. As discussed in detail in our Level 1: Workflow and Post-Processing Course, when running a hybrid file management system, you do have to make sure that your files look good both at file system and Lightroom catalog levels. This way, if I ever want to switch to another post-processing tool to edit my images, I can do so with ease and my Lightroom catalog always looks consistent.
Gladly, Lightroom has built-in tools to make file and catalog synchronization easy. All you have to do, is click on your parent folder structure within Lightroom’s Library module, then click “Synchronize Folder…”:

After that, you will see a window just like this one, which scans through your Lightroom catalog for potential inconsistencies:
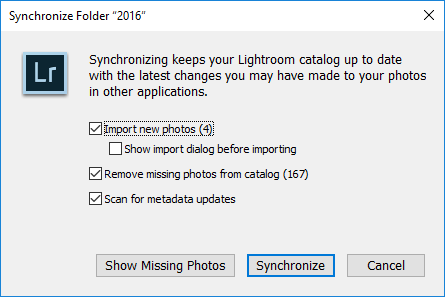
As you can see, it looks like I have 167 images that need to be removed from Lightroom (they are no longer in my file system) and four images need to be imported into Lightroom (they are missing in my Lightroom catalog). From here, you can click “Show Missing Photos” that will show you all the missing images (perhaps you want to find them instead of deleting them), or you can click the “Synchronize” button to start syncing your folder. If you want to see all the images that are missing in Lightroom, but present in your file system before synchronization, make sure to select “Show import dialog before importing”. Be warned that if you have a lot of images, selecting this checkbox might take a very long time, since Lightroom needs to rescan every single folder once again. I personally never check this box. Instead, once the import is complete, I simply click on the “Current Import” link under “Catalog” in the Library module, which shows me the images that were imported.
After running through this process, you should have your images fully synchronized between your file system and the Lightroom catalog.
If you run any other software that contains a separate database for your images, you might want to run through a similar tool to ensure that you are working with fully synchronized data.
2) Image Folder Reorganization
The second step of my year-end process is to go through each folder within my image catalog and make sure that images are where they should be. Whichever file management system you end up choosing, you still need to make sure that the files reside where they should be residing and not stored all over the place. Depending on the software you use, this process can be somewhat time consuming, as you need to click through each folder and make sure that you do not have any images that do not belong to that particular folder. If you are a Lightroom user, the process will be quite simple, but still might take some time, especially if you have a lot of images.
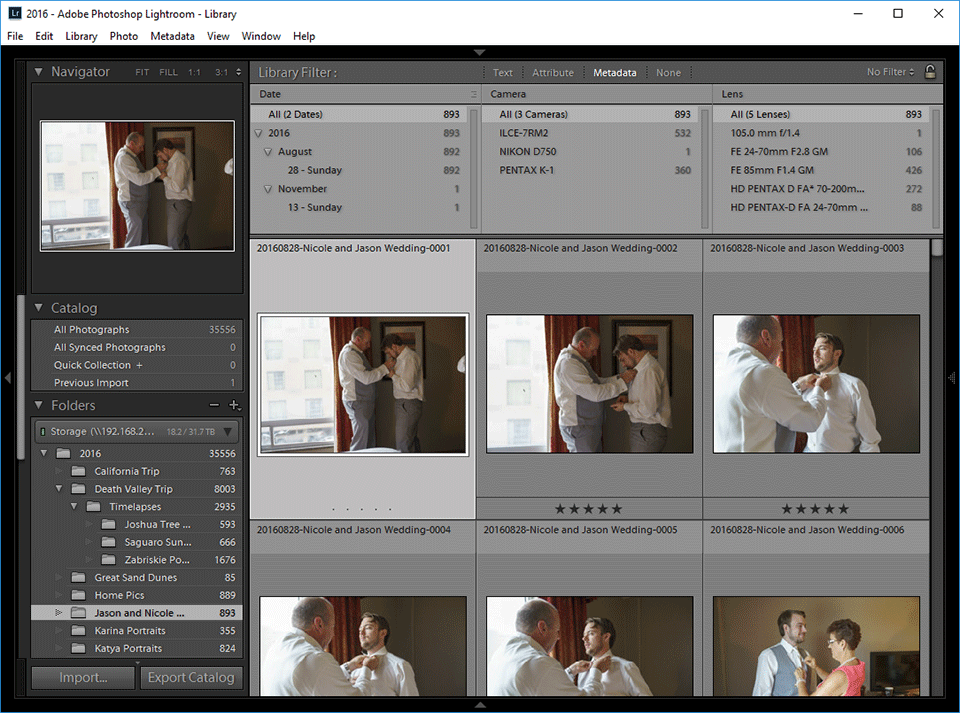
When looking through each folder, you can use the built-in filter tools to identify potential images that do not belong. For example, you can use the handy Library Filter to see the dates on which images were captured. In the below screenshot, you can see that I have 892 wedding images from August 28th. However, there is also one image from November 13th, which is most likely something that should not belong in that folder:
By clicking on November 13th, I can drill down to the image that was most likely moved into this folder by accident:
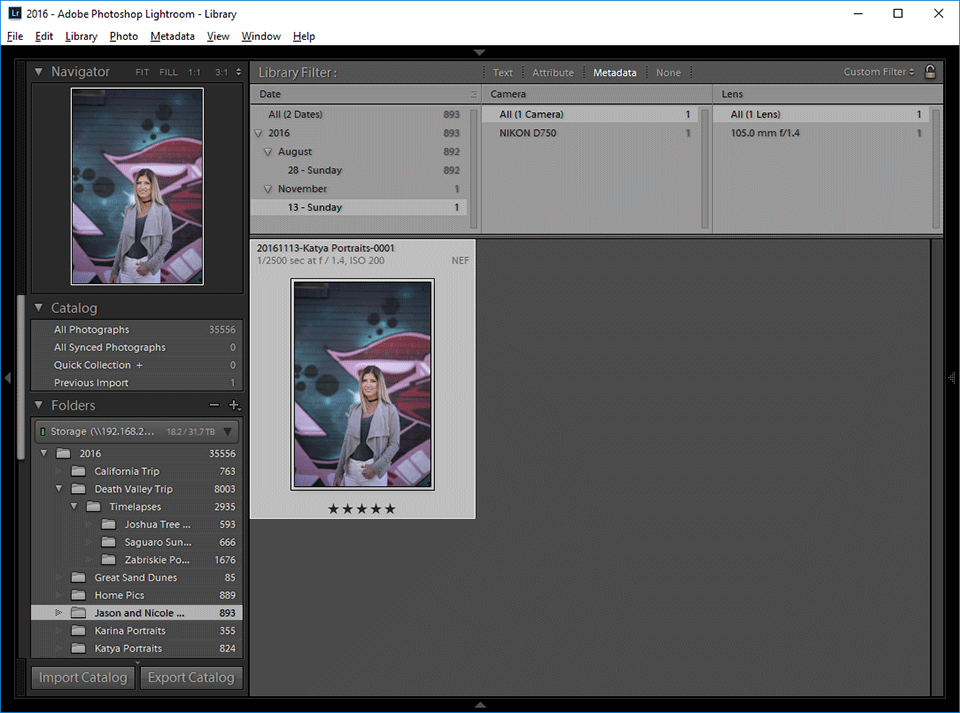
By dragging the image into its correct folder, I was able to quickly take care of this issue and only be left with the images from the wedding.
I would recommend to go through each folder in your image catalog and make sure that you only have the images that should be there. If you don’t use Lightroom, simply use your operating system file browser to preview images – you will need to switch to a thumbnail view to preview your JPEG / RAW files. Often, by just looking at the photos, you should be able to properly organize them.
3) Lightroom: Batch Renaming
Once all the images are in their right places, the next step is to batch rename them. Why is this necessary, you might ask? Well, for me, file names need to make sense when running a hybrid file management system. This way, if I ever need to find an image, I need to be able to quickly identify the following information by just looking at the file names:
- Year, month and date the image was captured
- The name of the event, irrespective of where the image is located
- File sequence number to properly sort images in file system
- File extension to understand if it is a JPEG, RAW or TIFF image
Since I always rename my images during the import process with appropriate file names (for details, see Level 1 Workflow and Processing course or How to Organize Photos in Lightroom article), I normally don’t need to worry about running this step. However, since both Lola and I work on the same Lightroom catalog, sometimes one of us can either forget to run through the proper import procedure, or perhaps rush and do things quickly for the client without properly running through the correct steps, which can result in incorrect file names. In addition, editing images in Photoshop from Lightroom can yield funky image titles with “Edit” or other words added to each image, potentially messing up the naming structure. So at the end of each year, I go through every single folder and batch rename all images, so that I have all images named consistently.
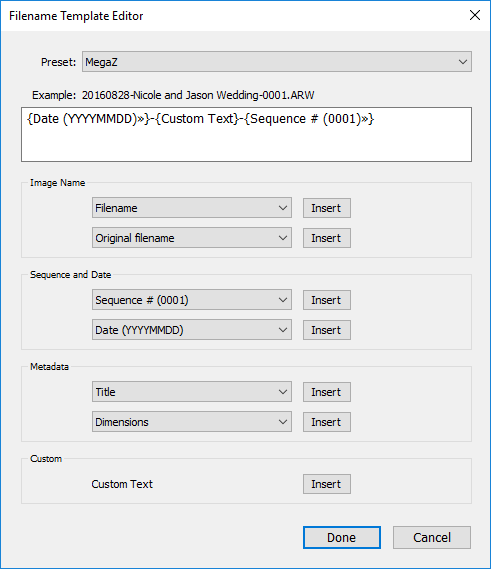
The easiest way to batch rename images in Lightroom, is to select all images in a folder by first clicking on the folder, then pressing CTRL+A (Command+A on Mac) on the keyboard, which will select all files in a given folder. But before you do that, make sure that you first sort your images by capture time, so that the images don’t get renamed based on whatever sorting method you are using. Go to “View->Sort->Capture Time” and make sure “Ascending” is chosen on the bottom to resort your images based on the date/time the image was captured. From there, all you have to do is press F2, or go to “Library->Rename Photos…” on the menu. You will see a “Rename # Photos” window pop up:
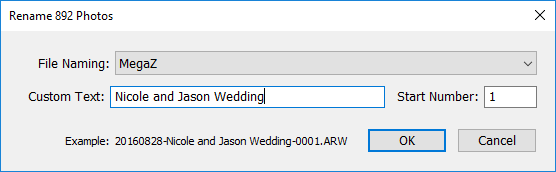
As you can see, I already have a template set up that allows me to mass rename images – all I have to do is type “Custom Text”, which in this case represents the event. To its right, I have a “Start Number”, which is a sequence number for the first image. Lightroom will start with this number and increment sequence numbers for the rest of the images accordingly. If you don’t already have a template set up, check out my template below:
Run through each folder and batch rename all the images. If you have previously already named the files properly and this is the second time you are doing it, Lightroom might run into file naming conflicts, resulting in weird sequence numbers. If this ever happens, all you have to do is give it a different name temporarily, and batch rename all the photos again with the correct name. Another method is to give a very high sequence number (like 10,000), then restart the batch rename process with the sequence number 1. Both methods will work well and you won’t lose any files.
4) Lightroom: Optimize Catalog
Now that you have all the images in full sync and the images are correctly named, the next step is to now optimize your Lightroom catalog. Whenever you deal with a lot of batch operations in Lightroom, it is always a good idea to optimize your Lightroom catalog, since things might have moved in the database quite a bit and running optimization will make the database work faster. The process of optimizing a catalog is very simple – just go to “File->Optimize Catalog…” and you will be presented with the following pop-up window:
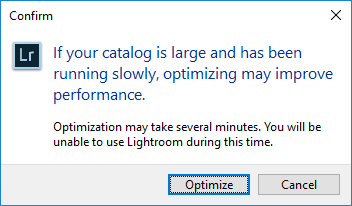
Click “Optimize” and Lightroom will go through the process of optimizing your catalog. Depending on the size of your catalog, it might take some time. Once the catalog is optimized, you will get a message that says “Your catalog has been optimized”.
5) Lightroom: Save All Edits
Did you know that Lightroom has a way to store all your edits within your images or sidecar files, so that if you ever lose your catalog you could still start over and not lose any of the edits? That’s certainly a powerful feature and something you should definitely use. At the end of each year, I make sure to save all changes that I have made in Lightroom to my images for this reason and I recommend you do the same.
While there is a setting in Lightroom Catalog Settings where you can force Lightroom to automatically save all the changes to sidecar / XMP files, I do not recommend using this option, since it slows down Lightroom. You can find this option under “Edit->Catalog Settings…” menu option, within the “Metadata” tab:
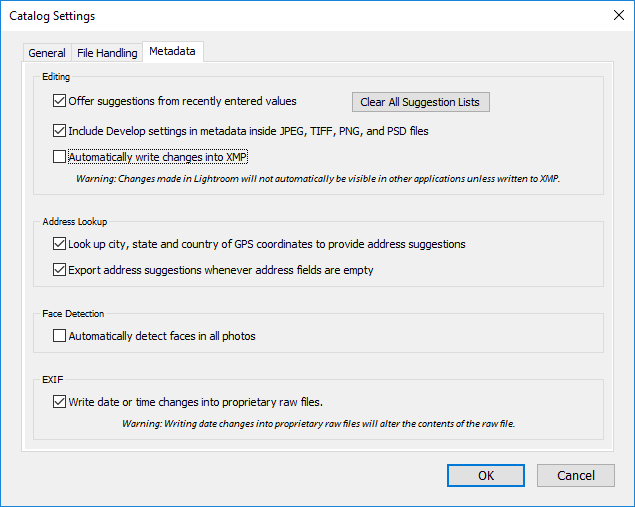
If you keep the “Automatically write changes to XMP” option turned off like I do, make sure to write all the edits into images as part of the year-end activities. To do that, all you have to do is go to the parent folder where your images reside in Lightroom (in my case it is 2016), then press CTRL+A (Command+A in Mac), then press CTRL+S (Command+S in Mac). Or you can go to “Metadata->Save Metadata to Files” in Lightroom:
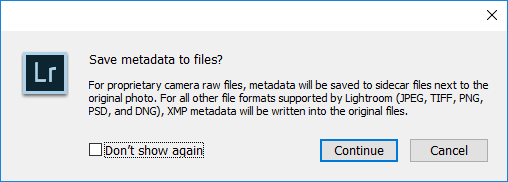
Lightroom will present the above window. Now keep in mind that this process will take a long time, so arm yourself with a cup of hot coffee or hot chocolate, grab a nice Book (our Landscape Photography eBook would be a good read :)) and get ready to wait…for a long time. Lightroom will go through each image and write changes to either the file directly (in case you use the DNG format) or XMP sidecar files.
After the process completes, all of your edits will be saved, so if you ever happen to lose your catalog, you won’t lose your edits. Now keep in mind that the above process does not save the history – only the latest edits will be preserved!
6) Back Up Lightroom Catalog and Images
The next step is to back up your Lightroom catalog and your images. This step, without a doubt, is the most important one in your list of year-end activities. Running a full backup is important, as it will ensure that your files for the year are in multiple locations and your data is safe. Keep in mind that you should always keep your data in at least 3 different locations per “3-2-1 Backup Rule“, which definitely applies to a photography workflow. If you don’t know where to begin, check out my Photography Backup Workflow article for more details. We have also covered backup in detail in our Workflow and Post-Processing course.
Note: Make sure to close out of Lightroom before backing up your Lightroom catalog!
Since your Lightroom catalog and your images are kept in two separate locations, make sure to back up both. Backing up one without the other is a huge mistake. Even if you choose not to backup your Lightroom catalog, you should always back up your images. While you can start over with a new Lightroom catalog by re-importing images (without losing your edits), there is absolutely no way to restore your RAW files from your Lightroom catalog alone.
7) Test Your Backups
It is absolutely essential to have backups, but backups are only good if they actually work. When was the last time you have actually looked into your backup routine and tried to recover a file? Has it been a while? Perhaps it is now time to test your backups and make sure they work as intended. Start by renaming a folder in your computer (do not delete in case your restore procedure fails), then try to restore backups from your main backup first, then your off-site location. If you store hard drives in a different location, plug each one of them into your computer and make sure that they all still function without any issues. If you have any doubts about off-site storage, it might be a good idea to redo it from scratch, even if it takes a very long time and lots of effort. While onsite backup is something many of us make sure takes place, many of us often neglect off-site backup, sometimes completely. I personally have too much storage to back up into the cloud, but buying a few large capacity drives and dropping them off at a safe deposit box or your friend’s house might be worth the effort, even if you only do it once or twice a year. If you do any commercial work, I would highly recommend to have a robust off-site backup solution!
8) Lightroom: Close the Catalog and Start a New One
Once you are done with all of the above tasks, if your Lightroom and folder structures are organized by year (which I highly recommend), you might consider starting a fresh catalog and closing your current year catalog, making it only available for future exports and edits. From here on, you should not use that catalog for importing images next year or any other year in the future! Unfortunately, there is no way to lock a catalog from further imports in Lightroom, so you will have to remember to only import images in the current year catalog.
Go to “File->New Catalog…” to create a new catalog in Lightroom. Make sure to navigate to the same folder that hosts all your existing Lightroom catalog. I personally store my catalogs in a folder called “Lightroom” (My images are always stored in a folder called “Photos”, so I know right away where to put my Lightroom catalogs):
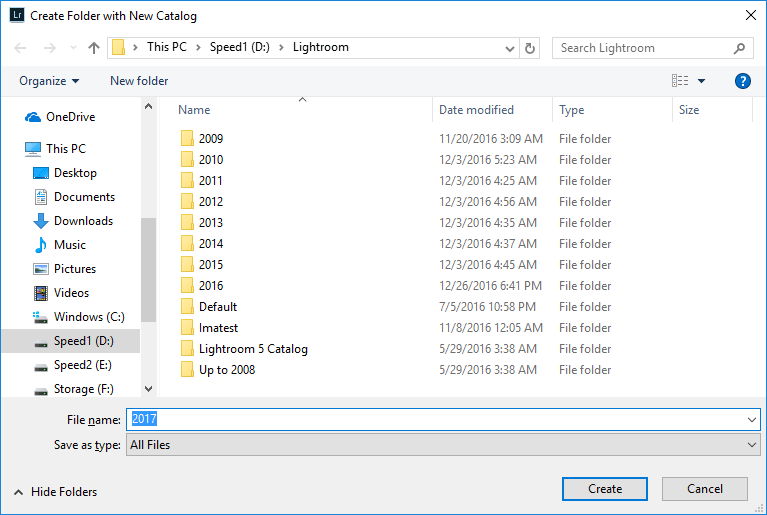
Keep in mind that you do not have to create a folder for the year – Lightroom will do that automatically. All you have to do is type the new year in the “File name” field, just like above. After you click “Create”, Lightroom might ask if you need to back up your catalog. Since you have already done that in the previous step, you don’t need to worry about backing up your catalog again, so you can safely click “Skip this time”.
Your brand new Lightroom catalog for the next year should now be open and ready for import. From now on, you will only be importing images into this catalog!
9) Evaluate Your Current and Future Storage Needs
The next steps are to evaluate the total amount of storage you consumed this past year – this will help you understand your future storage needs and growth. For this task, your file system will be the best way to see how much data you have consumed. If you are a Windows user, all you have to do is click your parent folder and select “Properties”, which should bring up a window similar to this one:
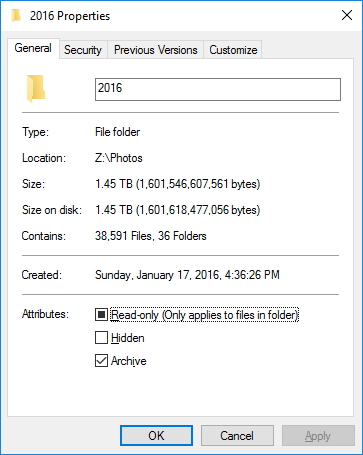
As you can see, I consumed a total of 1.45 TB (Terabytes) of storage in 2016. Lightroom shows a total of 35556 images and I ran the above before saving all the changes to sidecar files in Lightroom, since the process took a long time. It has been a pretty busy year for me, but now that I know that I roughly shot close to 1.5 TB in 2016, I can project that I will need about 1.5-2 TB of space in 2017. This means that I need to re-evaluate my storage needs and make sure that I have enough storage for next year. Looking at my Synology DS1815+ (see my detailed review of the Synology DS1815+), I can see that I still have more than half of the 32 TB volume available and my secondary backup with ioSafe 214 (see my detailed ioSafe 214 review) that mirrors my photos is showing 2 TB of space available as well. I am good to go for another year, but after that, I will need to look into expanding my secondary backup the following year. And my offsite backup routine will need to change as well, as I will need to add another large drive to the mix.
Evaluating storage needs is important, because it will help you plan ahead. I have been a big fan of Synology storage arrays for a while now, but I have recently started to look into QNAP’s storage solutions as well, since they have slightly different technology and allow both NAS and DAS connections at the same time. I will soon be evaluating two QNAP storage arrays for my needs and will be writing reviews, which will hopefully help our readers in choosing the right storage solutions for photography needs.
Hope you found the above article useful. If you perform other useful year-end activities not mentioned above, please share in the comments section below!
The post Photography Workflow – Year-End Activities appeared first on Photography Life.


