
Hyperfocal distance can be a confusing topic, both for beginning and expert photographers. However, if you want to take the sharpest possible images, particularly landscape photographs, it is simply invaluable. In this article, I will explain hyperfocal distance and give several methods to get the sharpest possible photographs with maximum depth of field. This article covers hyperfocal distance charts, as well as other, simpler methods to find your hyperfocal distance.

Understanding Hyperfocal Distance is extremely important when incorporating close objects in the scene, particularly in landscape photography. In the above photograph, the rocks in the foreground, as well as the saguaro trees and the mountains in the background appear acceptably sharp.
(Please note: Although the methods we present in this article are quite easy to understand, hyperfocal distance itself can be a complex topic. If you are a beginner, I highly recommend reading about aperture and depth of field before you delve into this article).
1) What is Hyperfocal Distance?
Hyperfocal distance, at its simplest, is the focusing distance that gives your photos the greatest depth of field. For example, consider a landscape where you want everything – foreground and background – to appear sharp. If you focus on the foreground, the background will appear blurry in the image. And if you focus on the background, the foreground will look out of focus this time! How do you fix this? Simple: you focus at a particular point between the foreground and the background, which makes both the foreground and the background elements of the scene appear reasonably sharp. This focusing point is called the hyperfocal distance.
In the real world, hyperfocal distance is a bit more nuanced. The technical definition is the closest focusing distance that allows objects at infinity to be sharp and in-focus. By “infinity”, I am referring to any distant object – the horizon, for example, or stars at night. By this definition, the hyperfocal distance of your lens will vary with aperture. Why? Think about it like this – if your aperture is wide, such as f/2, you will need to focus quite far away for objects at infinity to appear in focus. However, at a small aperture of f/11 or f/16, distant objects will continue to be sharp even if your lens is focused more closely. So, with smaller apertures, the hyperfocal distance will be closer to your lens.
Your focal length also has a huge impact on hyperfocal distance. As you zoom in, your hyperfocal distance moves farther and farther away. For a 20mm lens, you may need to focus just a few feet from your lens to get the horizon (distant background at infinity) acceptably sharp. On the other hand, for a 200mm lens, your hyperfocal distance may be hundreds of feet away.
It is important to note that, if you focus at the hyperfocal distance, your photo will be sharp from half that point out to infinity. So, if your hyperfocal distance for a given aperture and focal length is ten feet, everything from five feet all the way until the horizon will appear sharp.

Sony RX100 IV + 24-70mm F1.8-2.8 @ 10.15mm, ISO 200, 1/13, f/11
2) When to Use Hyperfocal Distance
Not all photographs require that you focus your lens at its hyperfocal distance. Consider, for example, an overlook of a distant mountain. If you are standing on the top of the overlook and there are no objects in your foreground, it would be silly to focus at the hyperfocal distance, since your nearest object is at infinity. Instead, you should focus on the distant mountains! And your aperture does not really matter either – since the closest object is so far away, you could shoot wide open if you wanted to (probably not a very good idea, since most lenses don’t resolve details very well at wide apertures, particularly towards the edges of the frame. Ideally, you want to stop down the lens aperture to its “sweet spot”, where it optically performs the best). Hyperfocal distance is only useful when objects that are both close and far away from your lens need to be sharp. Since you are actually focusing between these objects, neither is perfectly sharp; they are both simply close enough, or as we photographers often say “acceptably sharp”. So keep this in mind – when you don’t have a nearby object in the scene, you can completely ignore hyperfocal distance concerns.
Likewise, even hyperfocal distance won’t come to the rescue if you have objects that are too close to your lens. For example, it is impossible for a distant object to be sharp at the same time as an object that is only a few inches away from your lens (unless you shoot with specialized equipment, like perspective control / tilt-shift lens, lens attached to bellows, etc). Instead, you have two options: you can use focus stacking (taking several photos at different focusing distances, then blending them together in post-processing), or you can move your camera farther away from the closest object. The latter is often the more preferred option, because focus stacking is not a simple technique and has its own drawbacks and limitations. When a foreground element is too close, changing focus from close focus to infinity can drastically alter framing (since many lenses change field of view when their focusing distance is moved significantly), which can be problematic to deal with in post-processing. Thus, if it doesn’t hurt your composition, the best method is to simply move your camera further away from the nearest foreground element. That way, you can still capture the entire scene in a single photo, without having to deal with diffraction and other problems. In other cases though, when you need both foreground and background objects to be simultaneously sharp, hyperfocal distance is the best method to achieve sharpness across the frame – it ensures that you are getting the maximum possible depth of field from a scene, which translates to an evenly sharp photograph.

When shooting distant landscapes without foreground elements, one does not need to worry about hyperfocal distance, since focusing is set to infinity.
3) Advanced Background Information
The sections above have some slight simplifications, to make it easy for beginners to understand the topic. In this section, we will explore more advanced background information. These aren’t crucial to understand, so feel free to skip this section, but I want to set the record straight in case you were looking for a better understanding of hyperfocal distance.
In reality, the formula that provides a lens’s hyperfocal distance is as follows:

Typically, you don’t need to use such formulae to take photographs; if you are looking for specific numbers, you should use an app or chart that already has been created. However, if you are interested in the optical science behind hyperfocal distance, they can be a valuable way to visualize your settings.
The above formula is why a long focal length (say, 200mm) or a large aperture (say, f/2) both cause your hyperfocal distance to move farther away from the camera. The third variable in this formula, the circle of confusion, is complex enough that it could merit its own article; I will only give a brief outline here. At its most basic, the circle of confusion – measured in millimeters – represents the size that a pinpoint of light can spread out on your camera’s sensor before its blur becomes noticeable. Traditionally, with film photography, the circle of confusion was considered to be 0.03mm for a 35mm film image. This number is based on the assumption that a photograph would be viewed in 8×10 print size at a viewing distance of about 10 inches by a person with 20/20 vision.
In practice, especially considering today’s high-resolution cameras, the circle of confusion should be much smaller. Typically, the circle of confusion is not something that you calculate; it is based upon subjective, “sharp enough” tests that depend upon print size. However, since high-resolution cameras can print larger, the 0.03mm value is not particularly accurate today, again, because it is assumed that one would be looking at the same 8×10 size print! This is a subject of debate, but in our opinion, one should not assume that the acceptable circle of confusion should be based on sensor size, but rather based on the resolution of the sensor. Why should we assume that the person shooting with a high resolution sensor is going to print small? Isn’t the whole point of buying a high resolution camera to be able to print larger? One could argue that printing larger would make no difference, because the viewing distance would have to be increased. However, what if one wants to look at all the intricate details of a photo at a much closer distance? Many of us landscape photographers use panoramic photography techniques specifically for this reason – to be able to print larger and with incredible detail! Isn’t it a bit silly to assume that the circle of confusion should be the same for a low-resolution camera like the Nikon D700 (12 MP) and a high-resolution camera like the Canon 5DS R (50 MP)? We know very well that even slight focus errors and miscalculations play a larger role on high resolution sensors, because they appear a lot more noticeable when viewed at 100% and large prints! Assuming that both the high-resolution camera and the lens can resolve more details than a lower resolution camera, and that one would potentially desire their work to be viewed at close proximity, the circle of confusion should vary depending on the resolution of the sensor.
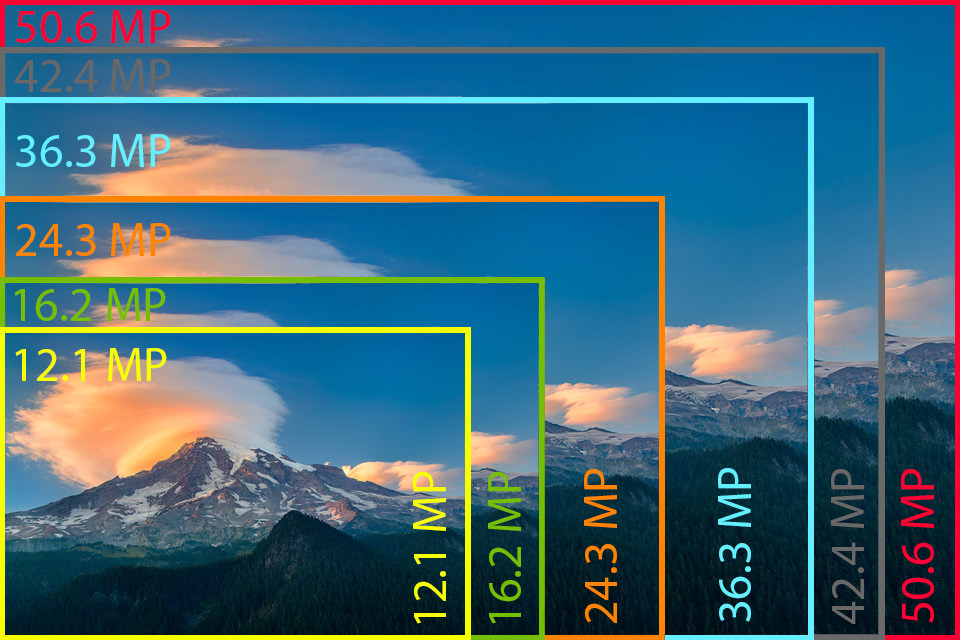
Note drastic differences in resolution and potential print size between a 12 MP sensor and a 50 MP sensor.
Interestingly, nearly all hyperfocal distance calculations and charts use the standard 0.03mm value pointed out above, despite potentially massive differences in resolution!
In summary, the higher resolution, the larger the print size and the closer the viewing distance, the smaller the acceptable circle of confusion should be defined. Please note that other considerations, such as sensor RGB demosaicing have not been added to the discussion to avoid further complication. One could argue that pixel shift technologies seen on some of the latest cameras could potentially negate demosaicing problems.
4) Using a Hyperfocal Distance Chart
The most common method of finding a photo’s hyperfocal distance is to use a chart like the one below:
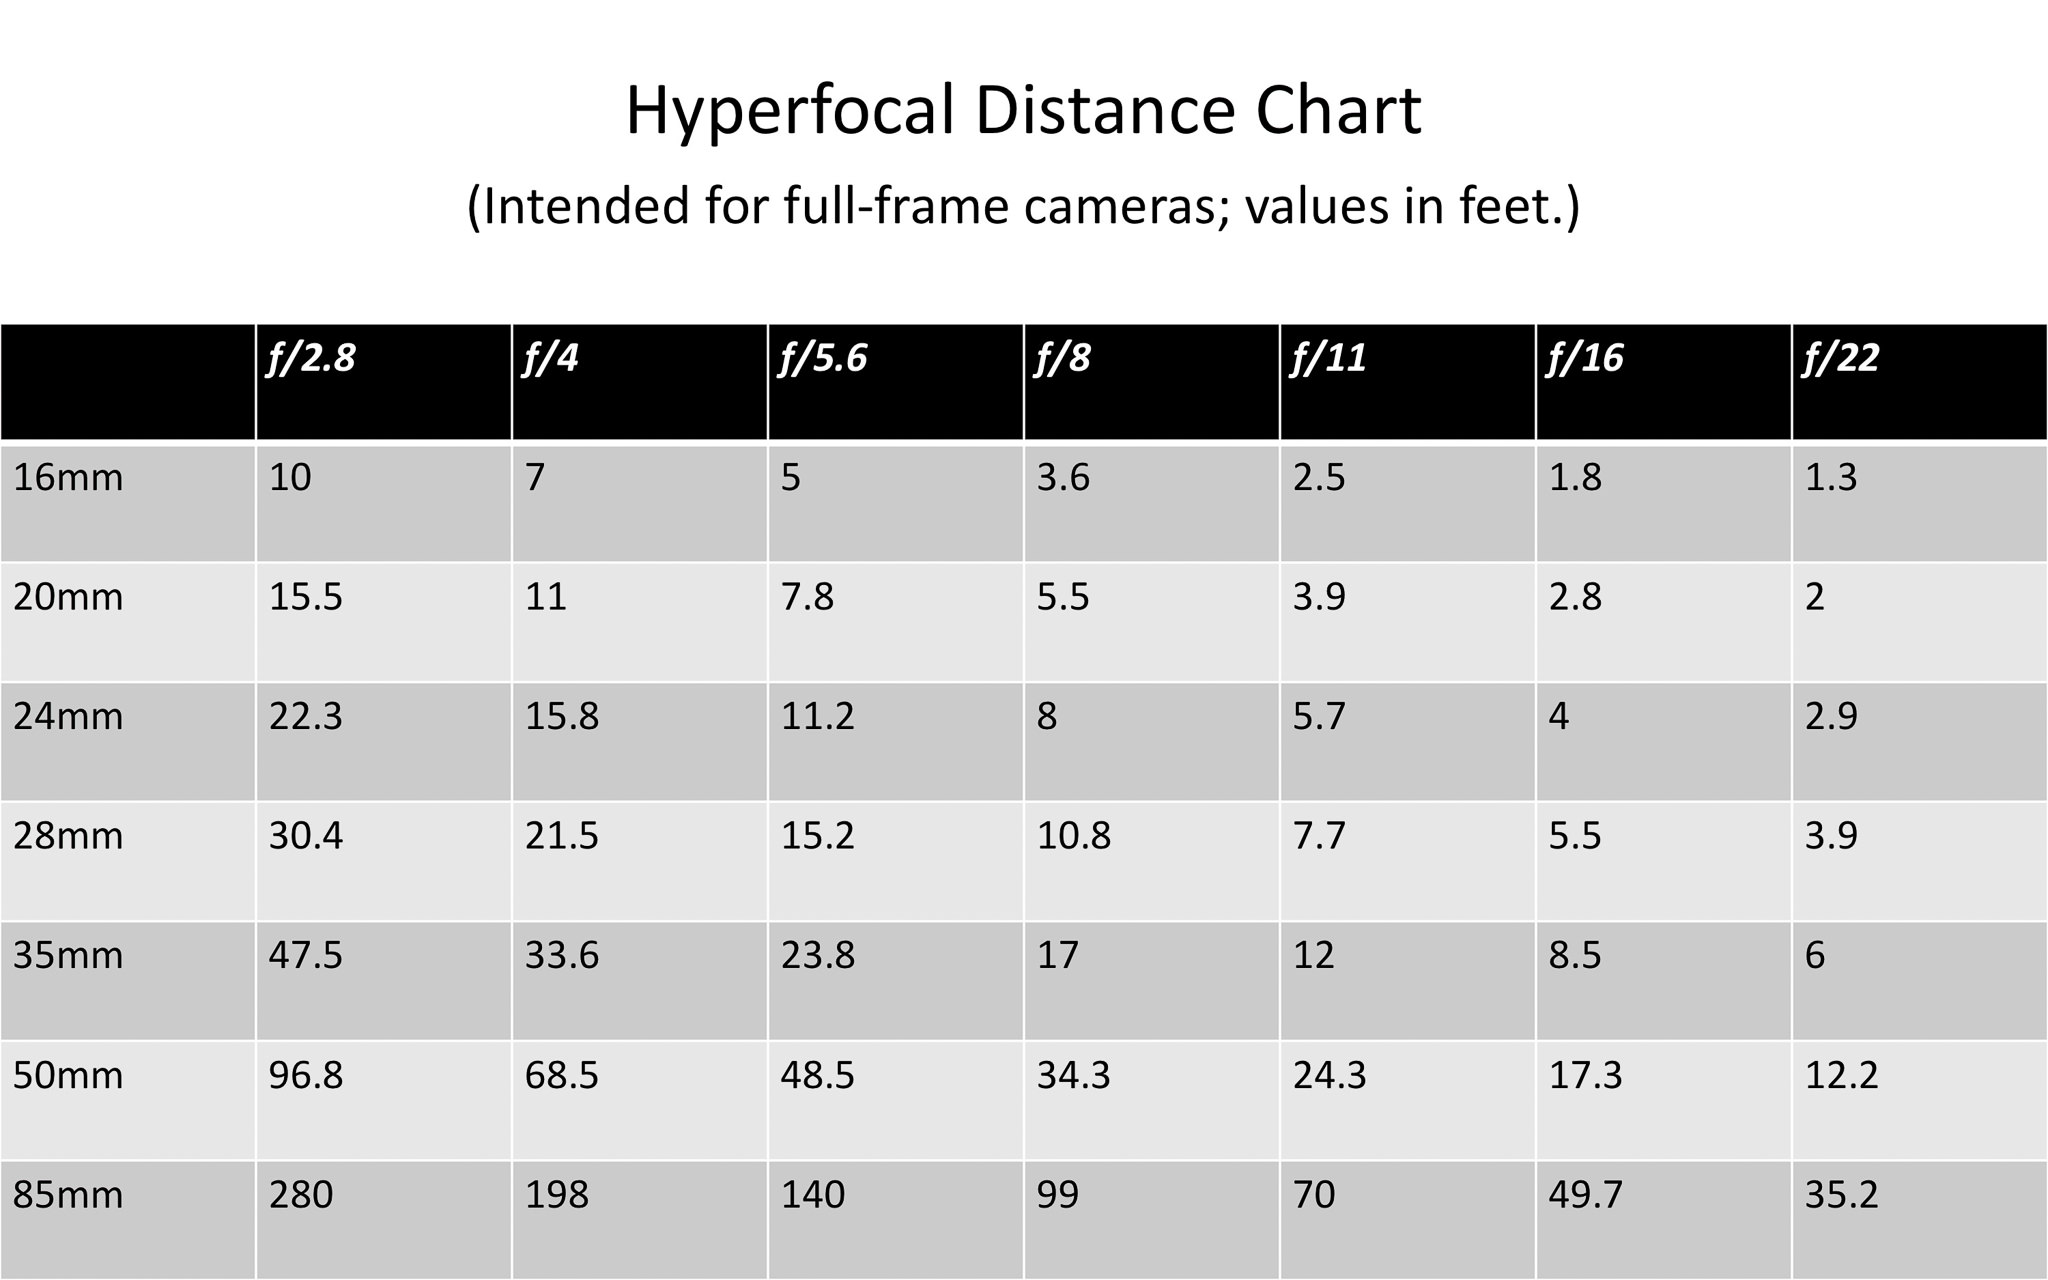
With a chart like this, you control two variables: your focal length and your aperture value. The chart, in turn, tells you the hyperfocal distance. By dividing this distance by two, you know the closest object that will be in focus. If you are interested in creating the most accurate hyperfocal distance chart, you should calculate your own values using the formula given in the previous section; the numbers above were calculated from a 0.03mm circle of confusion, which, as noted, is not always best for modern cameras, larger prints and closer viewing distances.
To use a hyperfocal distance chart, follow the steps below:
- Choose a lens, and be sure to note the focal length that you are using.
- Pick an aperture value.
- Find the hyperfocal distance that corresponds to your chosen focal length and aperture.
- Focus your lens at the hyperfocal distance. This can be done by estimation, or by the focusing scale on your lens (if you have one).
- Now, everything from half that distance until infinity will be sharp.
As you can guess, there are countless smartphone apps that do the same thing – and those are much better than a chart, which takes more time and has fewer exact values. Still, a chart and an app both fulfill the same requirement; they provide the hyperfocal distance for your given camera settings.
Unfortunately, there are a few problems with hyperfocal distance charts. For one, not all of them are completely accurate. Many of these charts were created decades ago, which means they were made with film photography in mind (as discussed in the “Advanced Background Information” section above). Clearly, such calculations are outdated for today’s high-pixel sensors. In particular, these charts are likely to suggest a hyperfocal distance that is a bit too close to your camera, resulting in blurry-looking backgrounds in large prints. The same is true for hyperfocal distance apps.
Honestly, though, the main drawback of hyperfocal distance charts is their impracticality. Do you really want to bring a chart into the field while you are taking pictures? It can take quite a while to find the values and focus in the right spot, particularly given that it isn’t all that accurate in the first place. These charts may be valuable if you shoot film, but the ability to review your digital images renders them generally unnecessary. It’s no wonder that many photographers simply go by trial-and-error, reviewing their photographs after every shot. However, there are better methods than that, which I will cover below.
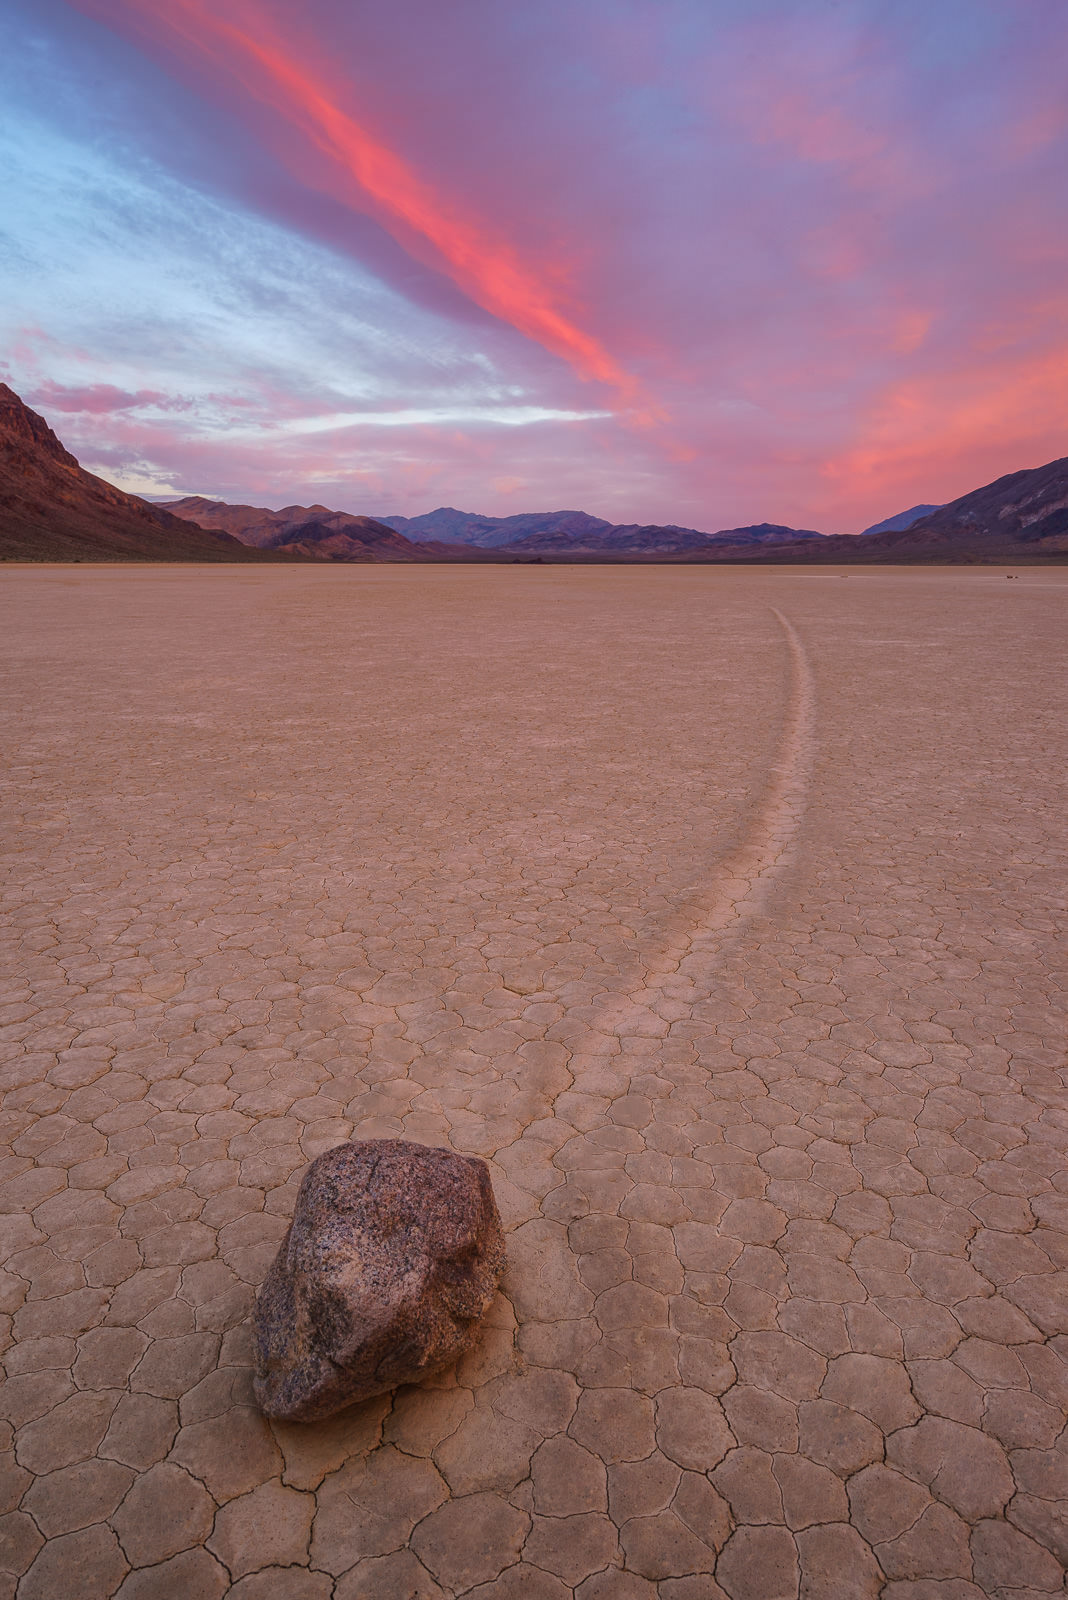
Note that sharpness extends from the nearest rock all the way to the distant mountains in the background
Sony A7R + FE 16-35mm F4 ZA OSS @ 21mm, ISO 100, 1.6 sec, f/16
5) The Double the Distance Method
The simplest method to find your hyperfocal distance, and one which Nasim uses the most and teaches in his workshops, is based upon the properties that I have already discussed. Recall that everything from half your hyperfocal distance until infinity is in focus; so, to find the hyperfocal distance for a given scene, you can simply double the length between your lens and the closest object in your photograph. For example, if I want a flower that is five feet away to be sharp (along with the background), my hyperfocal distance is ten feet.
So, to use this method, follow the steps below:
- Look over the scene that you are photographing. Find the closest object that should appear sharp, and estimate its distance from your camera. If you have a hard time estimating the distance from the camera’s viewpoint, it might be easier to move to the side of the camera while it is mounted on a tripod to more accurately estimate the distance.
- Double this estimation to find your hyperfocal distance.
- Focus your lens at the hyperfocal distance. This can be done by estimation, or by using the focusing scale on your lens (if you have one and trust it).
- Stop down your aperture to increase depth of field. You can estimate the correct aperture (which, for wide angle lenses, will often be around f/8 or f/11), or review the resulting photo to ensure that everything is sharp.
- Now, everything from half that distance (which is where your foreground object is) until infinity will be sharp.
This is an incredibly easy trick to remember, which makes it so useful. Of course, you do need to learn how to estimate distances, but this is fairly easy. If you have a lens with an accurate focusing scale, you can simply use it to measure the distance to your closest object after focusing on it (preferably in live view and zoomed in, for best accuracy). The benefits of this method are clear: it doesn’t require that you carry around a chart, and it can be more accurate than the values presented in a hyperfocal distance chart. Even your abilities to estimate focusing distance will improve over time, which makes this a very useful and above all, a very fast method.

Mesquite Dunes at Sunset
NIKON D5500 + 16-28mm f/2.8 @ 16mm, ISO 100, 1/4, f/11
6) The Live View Infinity Focus Method
Another method to find your hyperfocal distance, and one which can be just as accurate as the method above, is to focus your lens at infinity, or the farthest point of the background in your photograph (ideally using live view while zoomed in, already set at the aperture you plan to use). Take a picture, then review the image on the LCD screen. By magnifying the image to 100% view and starting to move down from the background where you focused to the foreground, you can find the spot that has begun to look blurry. This spot – the closest point that looks acceptably sharp in the photograph – is your hyperfocal distance.
To use this method, follow the steps below:
- Take a photograph, set at the aperture that you plan to use, focused on the farthest background object in your image.
- Review the resulting image at a high magnification (preferably at 100% zoom). Scroll down the photograph until you find the closest point that still looks acceptably sharp (everything past this point to the foreground should look blurry). This point is the hyperfocal distance.
- Focus your lens at this point. Be sure not to change your aperture.
- Now, everything from half that distance until infinity will be sharp.
This method, too, is not completely perfect. The main issue is the term “acceptably sharp”. This means different things to different people. Those with vision problems might have problems looking at a magnified image on the small LCD screen to decide what’s sharp and what’s not, and viewing images on the camera’s LCD might not be ideal during daytime conditions either. It also becomes a problem when your JPEG preview is over-sharpened. Even if you shoot RAW, which you should, the JPEG settings in your camera (“Picture Control” menu on Nikon or “Picture Styles” menu on Canon) do affect the appearance of photographs on your LCD screen. This is true no matter your camera. The problem is that your JPEG preview’s “Sharpening” setting may be far too high. Essentially, this can trick you into thinking that one area is sharper than it truly is. In this particular case, a high sharpening value might suggest that an object is sharp, even when it is out of focus; this correspondingly affects the accuracy of your hyperfocal distance value. My recommendation is not to increase the sharpening value too high, which will make the LCD screen far more accurate to use for assessing sharpness in images.
Finally, it is worth noting that this method can take some time to implement perfectly. The “Doubling the Distance” method is far quicker, which gives you more time to take pictures if you are in a hurry. However, if accuracy is your goal, this method is hard to beat – assuming that you have sharpening reduced in the JPEG preview.
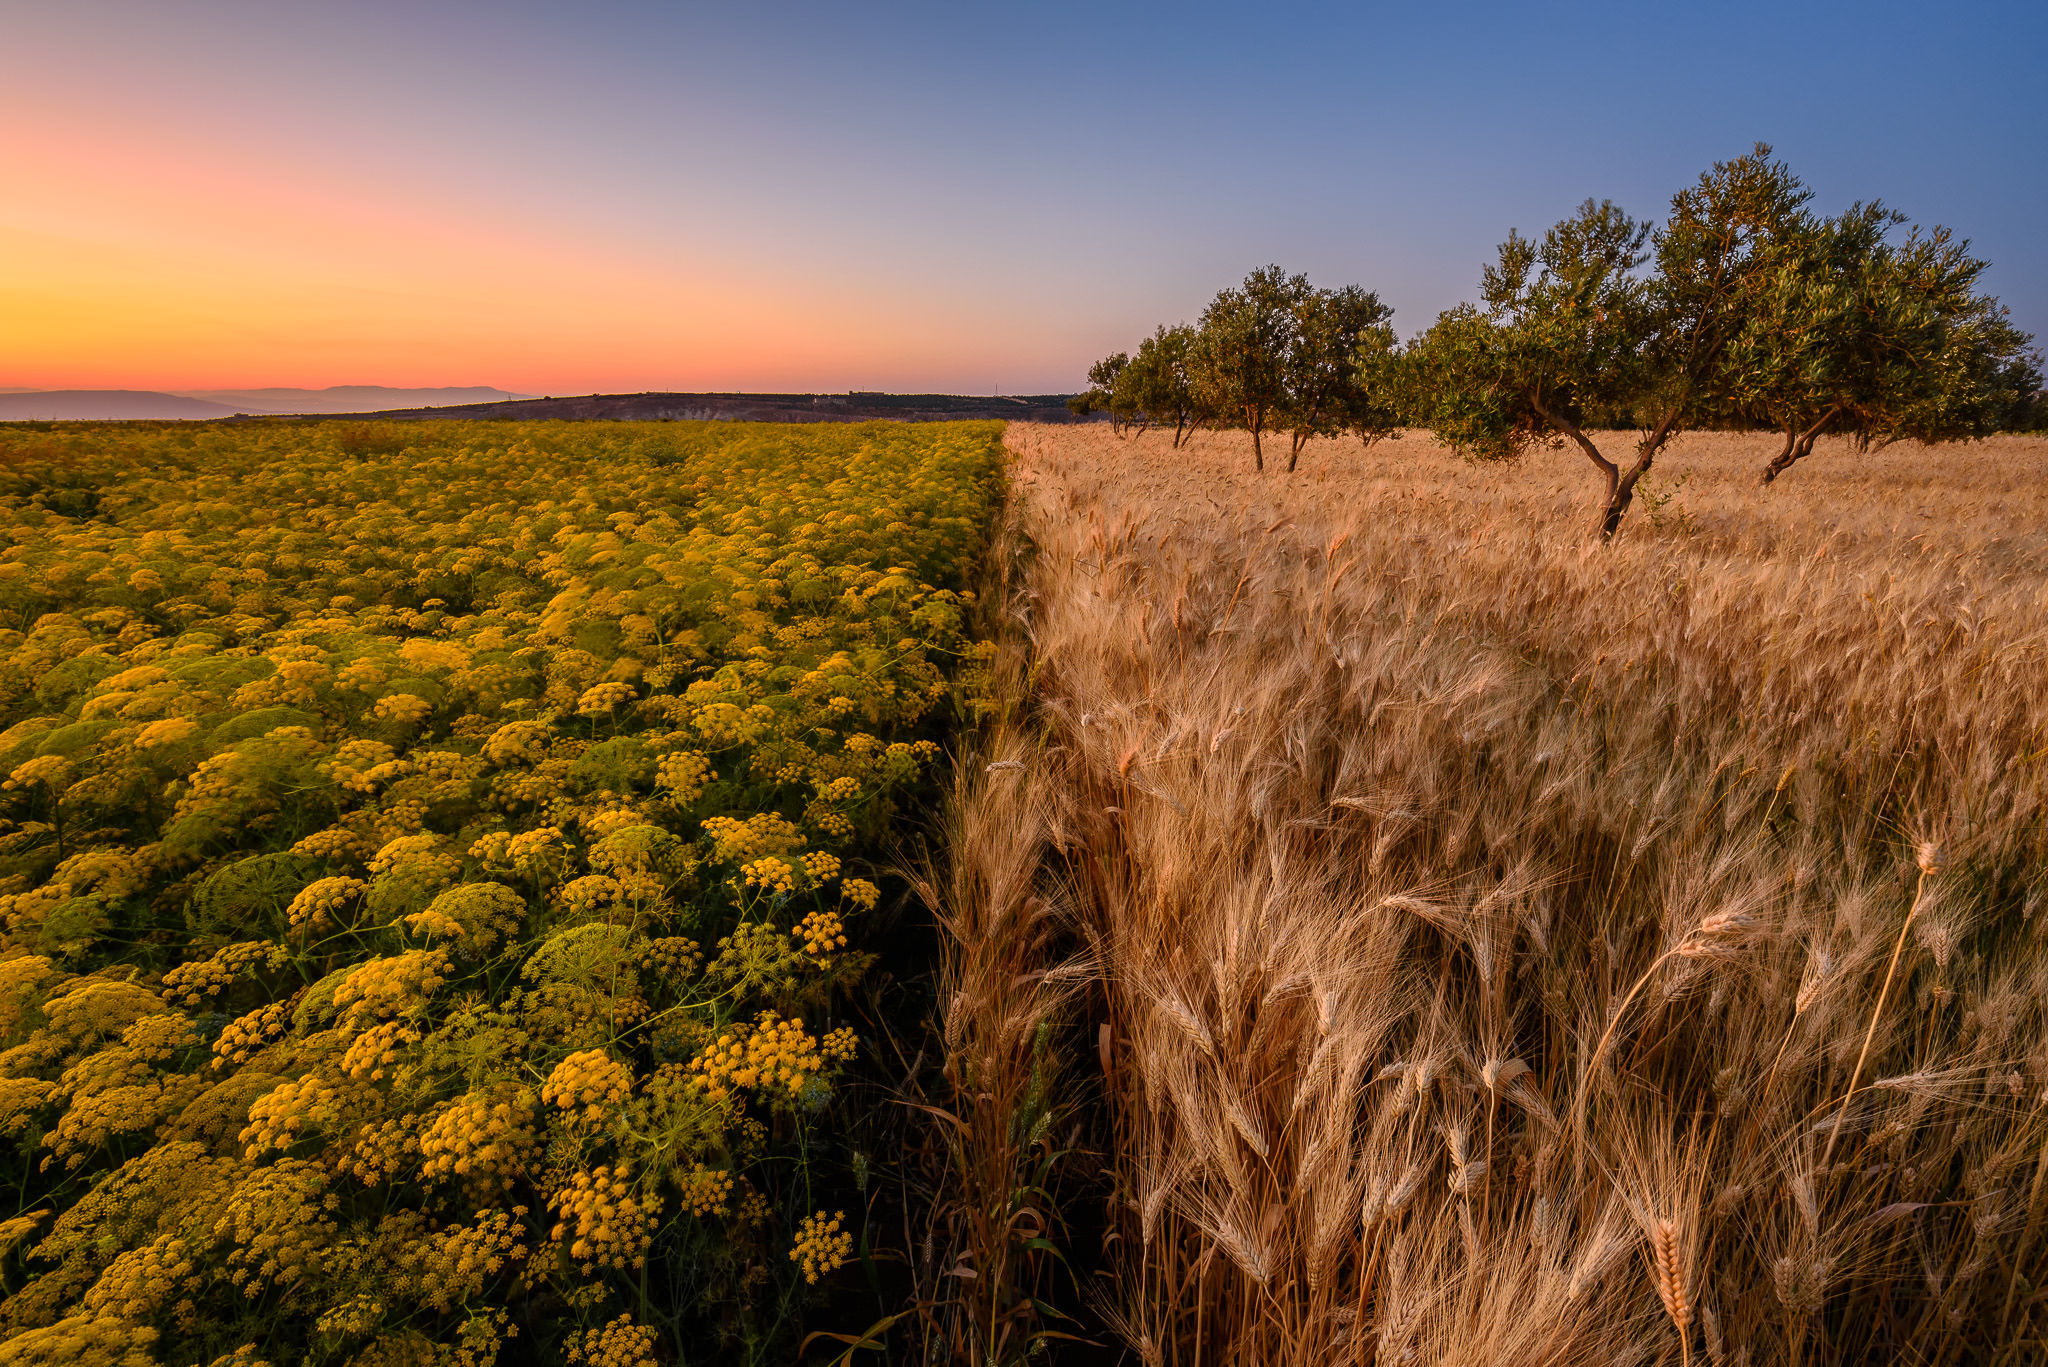
Ajloun Field Sunset
NIKON D750 + 15-30mm f/2.8 @ 15mm, ISO 200, 5 sec, f/16
7) The Blur Focus Method
My personal technique to find hyperfocal distance is fairly simple, although it comes with its own list of caveats. For this method, I enter live view mode at the widest aperture that my lens offers. I then focus the lens so that both the foreground and the background are equally blurry – that focus distance is basically the hyperfocal distance.
To use this technique, follow the steps below:
- Flip your lens to manual focus.
- Switch to the widest aperture on your lens (typically somewhere from f/1.8 to f/4).
- Turn on live view.
- Focus your lens so that the closest object and the farthest object in your scene are equally blurry.
- Don’t touch the focus ring anymore (already set to your hyperfocal distance) and set the desired lens aperture. Now, everything from half the hyperfocal distance until infinity will be sharp.
Say, for example, that you are trying to photograph a nearby rock in front of a distant mountain. All you need to do is switch to your lens’s widest aperture in live view, then turn the focusing ring until the rock and the mountain are blurred the same amount. Neither of them will be sharp – you simply are finding the spot that makes the size of the circle of confusion, or the blur you see, about the same. Take a look at the photo below:

NIKON D800E + 20mm f/1.8 @ 20mm, ISO 100, 1/125, f/1.8
The photograph above was taken at f/1.8 with a 20mm lens. That’s why neither the foreground nor the background is actually in focus. However, both of them are equally unsharp; neither is more blurry than the other. That’s a good thing! This means that I found the hyperfocal distance of the landscape. After taking this photo for illustrative purposes, I switched to an aperture of f/16 for the photo below:

NIKON D800E + 20mm f/1.8 @ 20mm, ISO 100, 1/3, f/16.0
This photo looks much better, but let’s see a crop of the foreground and the background to be sure:
This photo is exactly what I want. Even though the landscape includes a wide range of distances – the foreground rock was about an arm’s length from my lens – everything is acceptably sharp in the final photograph. Please note that, here, I used an aperture of f/16. Although this does add some blur due to diffraction, the focusing distance is so large that this barely gets the foreground and background to an acceptable level of sharpness. Ideally, I would have done a focus stack at f/5.6 or f/8 for maximum sharpness.
Of course, the “blur focus” method is not perfect. It relies on estimating sharpness based solely on a three-inch LCD screen, and not all lenses have a wide enough aperture to show any clear blur in the first place. The biggest issue with the blur focus method, though, occurs if your lens exhibits noticeable focus shift. If this is the case, the focusing distance of your lens will change as it is stopped down. I am lucky enough that my Nikon 20mm f/1.8G does not show significant focus shift, which is why the image above is sharp, but the same may not be true for your equipment. Lenses with visible focus shift do not work with this method – your foreground and background may be equally-blurred at f/2, for example, but stopping down to f/8 may shift the focus so that the foreground is noticeably more blurry than the foreground. That would be a huge problem!
Does your lens exhibit focus shift? That is something that you can test for yourself, or perhaps read in lens reviews. If you are in doubt, do not use the blur focus method; the “Doubling the Distance” and the “Live View Infinity Focus” methods are also extremely accurate, and they do not vary for lenses with focus shift.
It also is worth noting that some cameras (primarily entry-level DSLRs) do not allow you to change your camera’s aperture manually in live view. If this is the case for you, the Blur Focus method unfortunately will not work.

Wadi Rum Colors
Sony A7R + FE 24-240mm F3.5-6.3 OSS @ 24mm, ISO 160, 1/60, f/8.0
8) Split-Screen Focusing
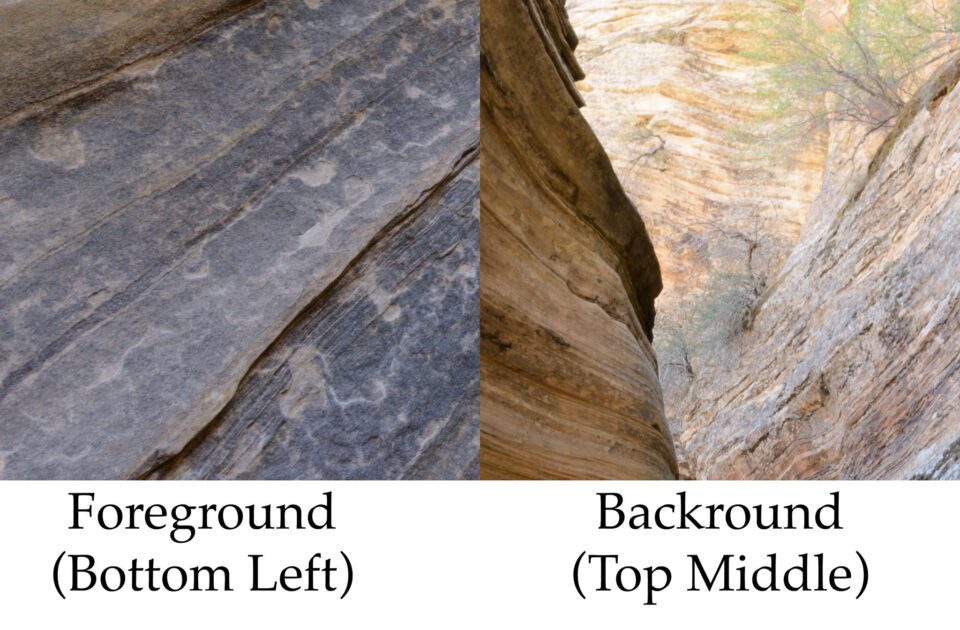
Some new cameras like the Nikon D810 include a helpful Split-Screen Display Zoom. With this feature enabled, you can magnify two different parts of your camera’s live-view screen simultaneously. Essentially, Split-Screen focusing lets you simultaneously see the sharpness of your background and foreground; this lets you manually focus until both are equally sharp.
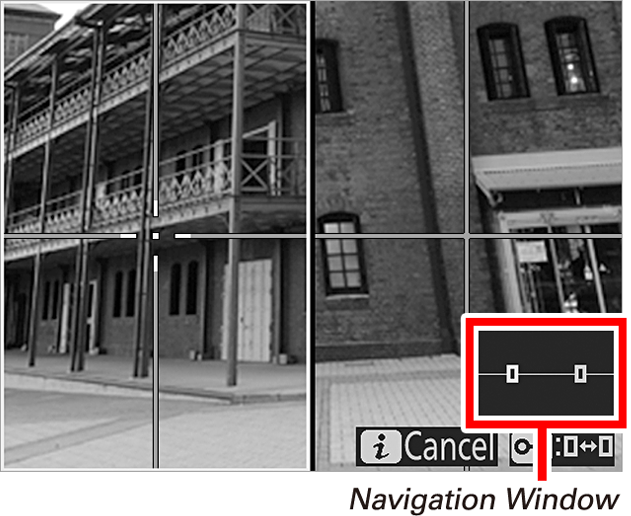
Unfortunately, there’s a catch. This feature only splits the screen into left and right halves, which is not particularly useful for horizontal landscape photographs. However, if you are taking a vertical image, it is very useful (and if you shoot with a perspective control / tilt-shift lens, the split screen is invaluable!). The left-hand screen becomes the foreground at the bottom, while the right-hand screen becomes the background at the top. It would be wonderful if Nikon enhanced this functionality further, by allowing the two split areas to be positioned both vertically and horizontally. This would be the best and the most preferred way to find the hyperfocal distance in images.
If you don’t have a camera with this feature, you unfortunately are out of luck. However, any of the other methods listed above can be just as successful; they simply take more time.
9) Level of Precision
In all honesty, none of the above techniques are perfect. They all require that you estimate distances or enter your camera’s live view, and none of them help you decide which aperture values to use for the sharpest photograph. In truth, chasing perfect sharpness can be a fruitless game. For almost every image you take, “close enough” is likely to be more than enough. If perfect accuracy is crucial, your should review your photos for exact sharpness at 100% zoom. This is especially true in the most extreme situations, like a landscape that runs from a couple feet in front of your lens into the distance. In this case, anything less than perfect precision will result in blur in a large print.
However, for day-to-day photographs, the techniques in this article will give a hyperfocal distance that is plenty accurate. Most importantly, these techniques do not rely on outside focusing charts or apps; they are easy to do in-camera, and they are fairly quick with practice.

Sunrise Reflection at Badwater
PENTAX 645Z + smc PENTAX-FA645 45-85mm F4.5 @ 60mm, ISO 100, 1/1, f/16
10) Conclusion
Hyperfocal distance is essentially as complicated as you want it to be. If you care about circle of confusion and pixel-level precision, that works for you; other photographers will be content to focus roughly between the foreground and background, and everyone will walk away happily. However, there are a few methods of finding the hyperfocal distance that can help any landscape photographer, and some of them are quite easy to use. To summarize each method:
Hyperfocal Distance Charts: Generally obsolete and not very practical, unless you use a film camera. Their numbers are based on small prints and might not be particularly accurate for today’s high-resolution camera world.
Doubling the Distance Method: The quickest way to estimate your hyperfocal distance, but it does rely on your ability to estimate distances. With practice, this may be the best method of finding your hyperfocal distance.
Live View Infinity Focus Method: This is a pretty accurate way to find your hyperfocal distance for a given aperture, but it takes some time to run through all the steps. You need to review every image to find the last spot of “acceptable” sharpness, which is somewhat subjective (and dependent upon the sharpness setting of your JPEG preview, even if you shoot in RAW).
Blur Focus Method: This method is pretty quick and generally accurate, but it requires that your lens does not have significant focus shift problems. Plus, it only works on cameras that let you change aperture in live view.
Split-Screen Focusing: This method is the most accurate, but it only works for vertical photos with the newest cameras like the Nikon D810. If you can use Split-Screen Focusing, you don’t need to worry about hyperfocal distance at all; simply change around your focus and aperture settings until the foreground and background are as sharp as possible.
I hope that this article provides a solid concept of hyperfocal distance. If you have any questions, please feel free to ask in the comments section below.
The post Hyperfocal Distance Explained appeared first on Photography Life.


