
Camera shake can be a real hassle and pain when shooing off a tripod. Sometimes camera shake can be completely eliminated with a couple of simple steps and other times, it can be quite painful and sometimes even impossible to deal with. How does one reduce camera shake? Are remote shutter releases helpful in reducing camera shake? Is it possible to eliminate it completely? Since I see this issue so often in the field, I decided to write a detailed article that deals specifically with the challenges of dealing with camera shake when shooting from a tripod.
1) Is Remote Shutter Release Helpful in Reducing Camera Shake?
Having been teaching workshops for a number of years (check out the Colorado Fall Workshop page for more info), I notice a pattern in the way that remote shutter releases are typically used. Many photographers start out with flimsy tripods, tripod heads and quick release plates that severely destabilize their setup, resulting in a lot of blurry images when photographing in low-light conditions. As a result, many think that buying a remote shutter release will somehow alleviate the problem and yield sharper images. In reality, remote shutter releases in such cases only end up making the problem worse. First, they do nothing to address the initial problem with stabilization. Second, they sometimes end up consuming precious time in the field to set up and get going (if you have tried to screw in a remote shutter release cable on a high-end DSLR in below freezing temperatures, you know exactly what I mean). Third, if it is a cabled shutter release, it is yet another device dangling off your camera, which can create more stabilization problems in windy conditions. Fourth, those pins on the camera do tend to bend and break off overtime, resulting in expensive repairs and lost time in the field. And lastly, remote shutter releases are prone to break and get lost when traveling. For these and other reasons, I have personally been minizing my use of the remote shutter release – I only pull it out when I absolutely need it.
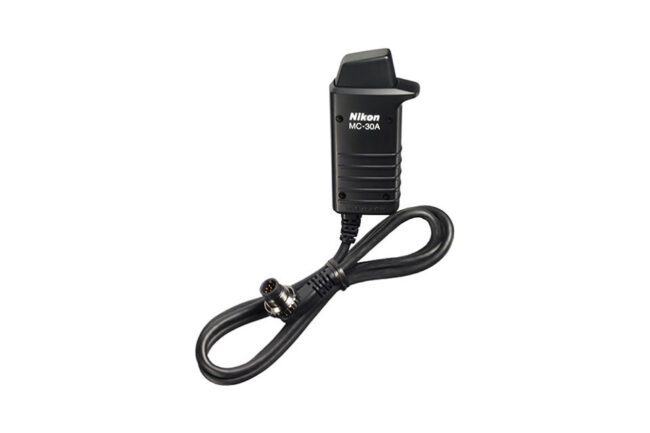
The good news is, if you are shooting with the current generation DSLR or a mirrorless camera, you most probably don’t need a dedicated remote shutter release anymore just to keep your camera steady. While I used to always carry a remote shutter release with me in my bag, I now typically take it with me if I need to shoot exposures longer than 30 seconds. And even that limitation is getting lifted on many modern cameras today, thanks to additional bulb modes that allow shooting past the traditional 30 second exposure threshold. So what are the new ways of stabilizing camera that work really well, sometimes even better than what a remote shutter release can offer? Let’s take a look. But first, let’s talk about stabilization issues and how you can address them with a steady tripod setup. If you already have a great tripod system, skip the next section below.
2) Use a Steady Tripod
Before you even consider using a remote shutter release for stabilization purposes, you should first evaluate your tripod and camera setup. I see this issue all the time with photographers – they cheap out on a tripod setup initially and end up going through 2-3 tripods before realizing that they need to invest in a solid tripod system.
Here is a typical tripod purchase scenario. First, photographer discovers what a tripod is and suddenly they realize that they want one. They go out and get the cheapest aluminum tripod from Walmart or Best Buy and take their first long exposure shots. Then they realize that their images look cool, but they are blurry. After doing some research, they discover that the source of the trouble is the very device they bought, so they start looking at alternatives. By then, the tripod is already out of the return period, so the tripod ends up in the “backup” pile of the closet. As they look at buying a new tripod, they realize that they can spend as little as $ 50 for another crap tripod and as much as $ 1000 on a fancy tripod. The idea of spending more money on a tripod than what they spent on their camera sounds mind boggling, so they spend $ 200 on a supposedly much better tripod. After they shoot a few frames, they are happy that the new tripod is so much better than the old flimsy one, which now gathers dust in the storage. Another six months go by and they realize that the new tripod isn’t as steady as they thought it would be, especially with heavier gear mounted on it. The head does not seem to be keeping the intended framing, tripod legs seem to be falling apart, and the tripod seems to be too heavy for travel needs. They are now again at a point of purchasing another tripod. This time, they won’t make the same mistake! Now they will be buying a solid carbon fiber tripod and they will be investing in a pretty good ballhead. This time, they are putting in $ 500 towards purchasing the tripod of their dreams. And despite all efforts, they end up purchasing a Gitzo or an RRS tripod with accessories anyway, spending the thousand dollars they never thought they would spend in the first place. Sounds familiar? It sure does for me, since that’s exactly what I went through when starting out. Now add all the numbers up and all the time that is wasted in the field getting those blurry shots in those expensive, once-in-a-lifetime trips and you will realize why a solid tripod is worth the investment.
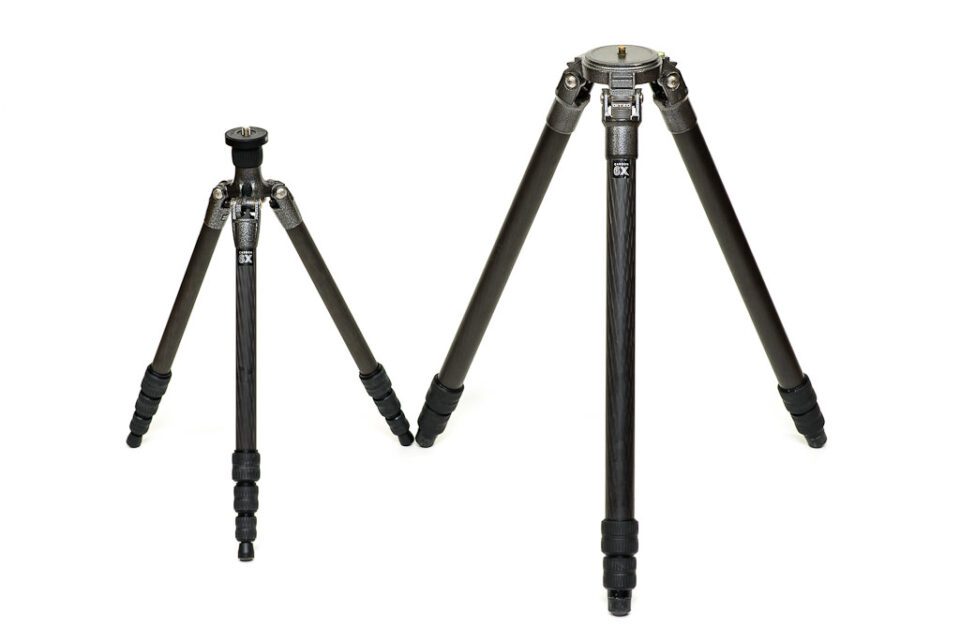
Don’t make the same mistake – buy a solid tripod once and for all. I have been using my Gitzo Systematic for ten years and it has never failed me. When I clean it up, it looks as good as new – I know it will serve me for many more years to come. I have put everything on it, including the exotic Nikon 800mm f/5.6E VR (dubbed “Baby Jesus” by John Sherman. “At this price, it’d better perform miracles!”) and it has handled it like a champ. I have literally abused it, by taking it into deserts, oceans and below freezing temperatures. The same goes for my Gitzo Traveler, which I have taken with me every time I travel on an airplane. When you invest in a solid tripod system, you do not have to go back and keep buying more – it will pay for itself quickly.
If you are shopping for a solid tripod today, check out my article on how to buy a tripod. If you are serious about your photography, buy a tool you can always rely on, not put blame on.
3) Other Sources of Camera Shake
Once you have a solid tripod system in place, your next task should be to evaluate other potential sources of camera shake. Where else does camera shake come from? Let’s take a look:
- Camera Strap
- Your Hands
- Image Stabilization
- DSLR Mirror Slap
- Shutter Shock
- Long Focal Length
- Surrounding Environment (Wind, Water, Sand, etc)
While some of these are very easy to deal with (remove dangling camera strap, turn off image stabilization when mounting your camera on a tripod, etc), others can be problematic, especially when shooting at very long focal lengths. Let’s take a look at some real working methods to reduce camera shake.
3.1) Camera Strap
While camera straps can be really nice to have when hand-holding your camera, they become a hassle once you mount your camera on a tripod, especially when shooting in windy conditions. When wind starts to blow hard, your camera strap might start to hit your camera or your tripod feet, causing your setup to destabilize, resulting in blurry images. For this reason, it is best to either use camera straps that can be easily removed through a quick-release mechanism (without leaving dangling ears), use one hand grips that do not react to wind, or not use camera straps at all. Some sling camera straps can have tripod mounts on them, allowing for quick tripod mounting and removal of the strap and those could be quite handy to use as well.
3.2) Your Hands
Your hands and fingers can play a huge part in destabilizing your camera, so it is best to never engage them to release the camera shutter in the first place. If you find yourself taking pictures by pressing the shutter release on your camera, where the camera fires as soon as you press the button, you are doing it wrong. If you find yourself holding your camera while a picture is being taken off a tripod, you are doing it wrong. The same goes for holding your tripod – keep your hands and fingers away from the setup right before and during the process of taking pictures.
There is only one case where it is acceptable to use your fingers to release the camera, and that’s when you use a self-timer – more on that further down below.
3.3) Image Stabilization
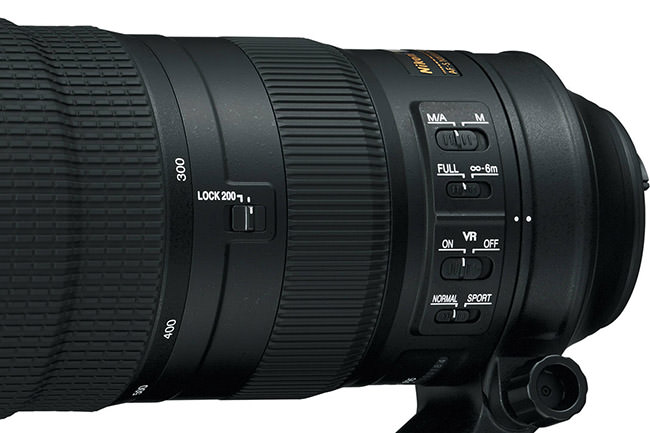
While some cameras have ways to detect tripod use, it is best to always disengage image stabilization when you shoot off a tripod. When your setup and the platform you are standing on is stable, image stabilization can be quite harmful to your images. So if you have an image stabilization switch on your lens, make sure to move it to “Off” position when shooting. You will usually have a switch on the side of the lens for that, as shown in the image below (note the VR On/Off Switch):
If you have a camera with in-body image stabilization (IBIS), make sure to turn it off from the camera menu. Image stabilization can be named different things depending on brand. On Nikon lenses it is called “Vibration Reduction”. On others it might be called “Vibration Compensation”, “Optical Image Stabilization” or “SteadyShot”, For example, if you shoot with a Sony mirorrless camera that has IBIS, you will have an option for “SteadyShot” in the camera menu – make sure to set it to “Off” before shooting.
There are rare conditions in which you might need to keep image stabilization turned on. For example, image stabilization on some of the Nikon super telephoto lenses is designed to be used on a tripod. Other times, image stabilization on a tripod can be helpful when shooting from a non-stable platform, such as a boat. Refer to your camera and lens manuals to see in which situations image stabilization should and should not be engaged.
3.4) DSLR Mirror Slap
If you use a DSLR camera, the mirror slap can be a source of camera shake when shooting in low-light situations. Gladly, many modern DSLRs have ways to prevent mirror slap from causing camera shake. One of such methods is to use the Mirror Up mode. In this mode, releasing the camera shutter will first raise the mirror, then the second release will start the exposure. While the Mirror Up mode can work great to eliminate mirror slap, it pretty much requires the use of a remote shutter release. Sadly, most Mirror Up implementations do not work with a self-timer, which makes this mode only practical to use with a remote shutter release.
Another method, which I personally prefer and use probably 90% of the time, is Exposure Delay Mode. With the Exposure Delay Mode turned on, the camera will raise the mirror, wait for a specified amount of time, and only then take a picture, which can effectively reduce and potentially even eliminate mirror slap. This mode is not available on every camera, but if it is available on yours, you can use it in combination with a self-timer, which can work out really well (more on that below) in situations where you do not have a remote shutter release with you, or do not have the time to set it up.
3.5) Shutter Shock
It turns out that another big source of camera shake can actually be the shutter mechanism, which some people refer to as “shutter shock”. While most DSLRs have ways to deal with Mirror Slap, few cameras actually provide a way to deal with the shutter shock. Shutter shock is a real problem and not just in DSLR cameras – it can actually be a pain to deal with even on mirrorless cameras! The problem with shutter shock, is that the shutter moves right before the exposure starts, so it can be more of a cause for blurry images than the mirror mechanism.
Shutter shock can be quite devastating to images, especially at certain shutter speeds. Here is what happened to the original Sony A7R when it was used at shutter speeds like 1/10th of a second:
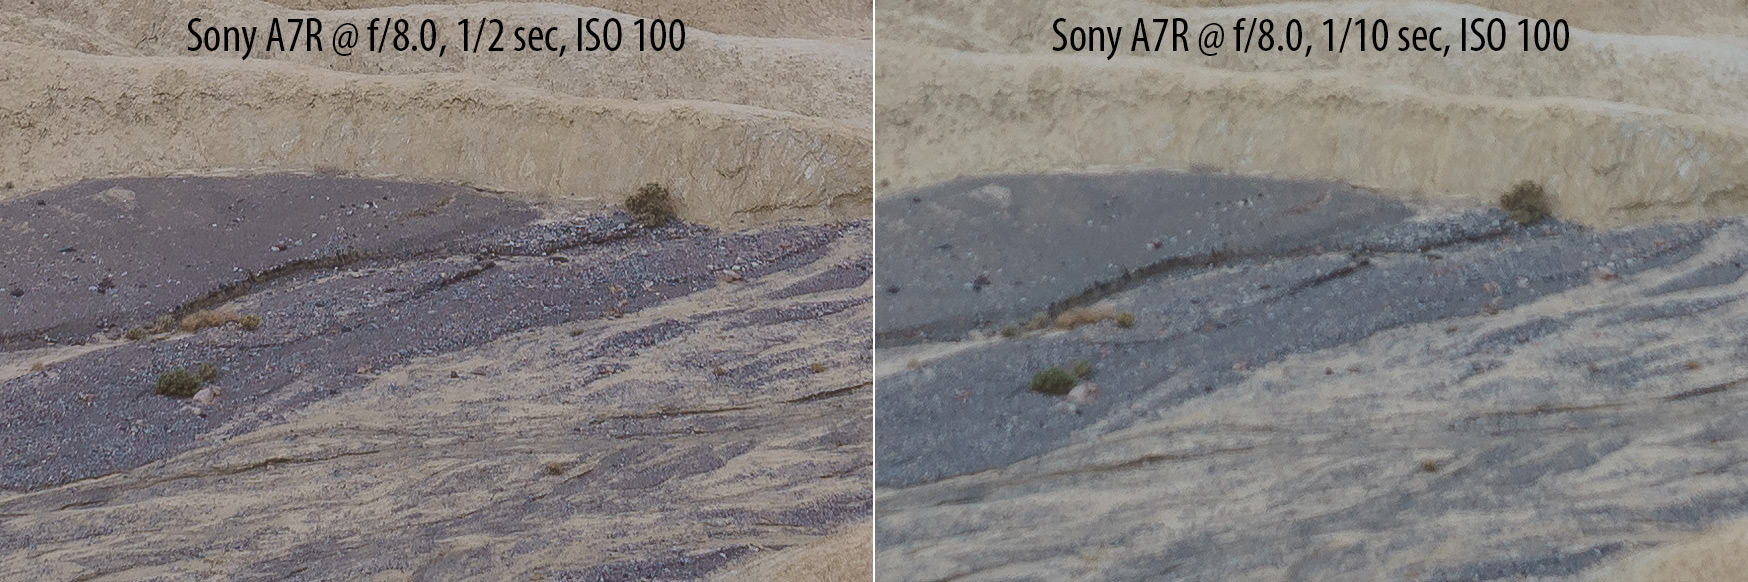
And all this blur on the right side of the image came from the shutter mechanism!
The best way to deal with vibrations from the shutter mechanism is to use a feature called “Electronic Front Curtain Shutter”, “Electronic First Curtain” or “Live View Silent Mode”. Sadly, most entry-level and mid-level cameras on the market today do not have such mode available, which is disappointing. And in the case of the Sony A7R example provided above, the camera did not have an EFCS feature, which turned out to be a big problem (thankfully, Sony addressed the issue on the A7R II, as detailed in my Sony A7R II review)
So if you go through your camera menu and your camera manual, and you cannot find such an option, you are basically out of luck and your only choice will be to either use a “Mirror Up” mode described above, or a combination of Exposure Delay + Self Timer, which is discussed further down in the article.
If you do have the Electronic Front Curtain Shutter (EFCS) mode available in your camera, then with a combination of camera features, you can completely eliminate any camera-induced vibrations. Basically, when EFCS is engaged, the camera does not trigger the shutter mechanism at the start of the exposure – the shutter is already open and the camera only engages the shutter at the very end of exposure. This means that the camera must be in a particular mode for EFCS to actually work. In a DSLR camera, EFCS can work either with Mirror Up mode (first release raises both the mirror and the shutter mechanisms and the second release starts the exposure) or in Live View mode. If you shoot with a mirrorless camera, just make sure that EFCS is turned on and you should be set – you should not hear any noise when your shutter goes off, only one sound after the picture is taken. Below are some examples of proper use of EFCS on a few cameras.
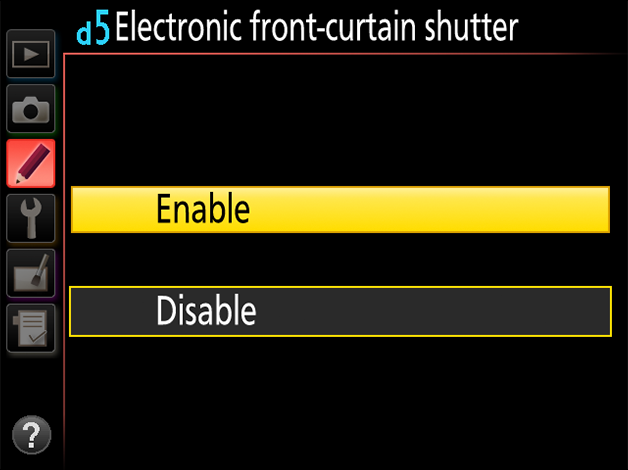
3.5.1) Nikon D500/D810/D5 (with EFCS)
If you shoot with a Nikon D500, D810 or D5 DSLRs, you have two options to engage EFCS, as detailed in my Nikon D810 review. You can use a remote shutter release in combination with the Mirror Up mode. If you do this, the camera will raise the mirror and the shutter mechanisms the first time you release the shutter and will start the exposure only after you release the shutter for the second time. If you give enough of a pause in between, you will completely eliminate camera shake. Don’t forget to enable EFCS first:
Custom Setting Menu->a5 Electronic front-curtain shutter->On (it is off by default):
Another method is to engage Live View. Since you should always do your best to achieve critical sharpness by engaging live view and zooming in to your subject, why not fire your camera using Live View? The only trick here, is that you must use the Mirror Up mode for this to work, which, I know, is quite stupid! This is where Nikon royally screwed up and does not want to fix with a firmware update! If you do not shoot in Mirror Up mode, the camera will engage its shutter mechanism before an image is taken in live view, making EFCS completely useless.
Since the Mirror Up mode assumes the use of a remote shutter release for proper operation, what do you do if you do not have a remote shutter release, or do not want to bother with setting up one? Well, there is a solution – just use Exposure Delay Mode in combination with the Mirror Up mode. Here is how you set it up:
- Enable EFCS first (see above)
- Set camera release mode to Mirror Up (Mup on the top dial)
- Custom Setting Menu->Shooting/Display->d4 Exposure Delay Mode->3s
From now on, if you use the camera in regular mode, the first time you release the shutter will raise both the mirror and the shutter mechanisms and the second time you release the shutter, the camera will wait for 3 seconds before the exposure starts, which should eliminate all camera vibrations. Just make sure that your camera is steady – if your camera wobbles for more than 3 seconds on a tripod, this won’t do much to help. See section #2 on using a proper tripod setup if that’s the case.
If you decide to use Live View to take images, don’t be surprised that the first time you release the shutter nothing will happen for a while – that’s what is supposed to happen, since both the mirror and the shutter are already raised! The second time you release the shutter, however, is when the camera will wait for 3 seconds, after which it will silently start the exposure. Then once the exposure ends, the shutter mechanism will come down to end the exposure, then come back up again to come back to live view mode. Again, if you do not engage the Mirror Up mode, EFCS will not work in live view.
Sadly, Mirror Up mode does not work in combination with Self Timer, so your only option for taking pictures without a shutter release device is to engage Exposure Delay Mode with these DSLRs.
Always remember: Exposure Delay Mode is for the Mirror, whereas EFCS is for the shutter mechanism. The only exception is when shooting in Live View mode – that’s when the Exposure Delay Mode essentially becomes a Self Timer, albeit limited to 3 seconds.
All this sounds pretty involved to get EFCS working right? Sadly, that’s the way Nikon designed these latest DSLRs and it looks like we will have to wait for future cameras to get this issue addressed, which sucks. However, shutter shock is not always your enemy – sometimes just the combination of the Exposure Delay Mode with a Self Timer are enough to eliminate camera shake, especially when using short focal length lenses (wide-angle to standard).
3.5.2) Nikon D5xx, D5xxx, D7xxx, D6xx, D7xx, D8xx and Dx Series Cameras (No EFCS)
If your Nikon DSLR is fairly recent and you do not have EFCS, you most likely have the regular Exposure Delay Mode available to use. If that’s the case, by using the combination of a Self-Timer with the Exposure Delay Mode, you can effectively reduce camera shake caused by the mirror mechanism or your hands, without using a remote shutter release. Here is how to set this one up:
- Set camera release mode to Self-Timer (set top dial to Timer)
- Set Self-Timer to a shorter period, between 2 to 5 seconds. Custom Setting Menu->Timers/AE lock->Self-timer->Self-timer delay->2s/5s
- Custom Setting Menu->Shooting/display->Exposure Delay Mode->On (or select 3 seconds, if available)
Once you do this, here is what’s going to happen when you release the camera shutter:
- The camera will engage the self-timer and wait either 2 or 5 seconds, which should eliminate shake from your hands
- You will hear the first noise afterwards, which is when Exposure Delay Mode raises the camera mirror
- The camera will wait for a second or however long you set the Exposure Delay Mode to be, which should reduce camera shake from the mirror
- After this the shutter curtain is raised and the exposure starts
- Shutter curtain comes back down after the image is captured
Keep in mind that this will mess up your shooting when going hand-held! Make sure to come back to normal shooting mode (disengage self-timer) and turn off Exposure Delay Mode from the camera menu after you take your camera off the tripod!
If you have a camera like the Nikon D750 that has U1 and U2 shooting modes, you can program the above into one of the modes and simply switch back and forth, which will save you a lot of time!
3.5.3) Canon Rebel, 40D/50D/60D/70D/80D, 6D, 7D Mark I/II, 5D Mark II/III/IV (EFCS)
If you shoot with a modern Canon DSLR, you most likely will have an option under the Camera icon under “Lv func.” called “Silent LV shoot.”, which is basically EFCS. Make sure that it is enabled and set to Mode 1, as explained below:
- Menu->Lv func.->Live View shoot.->Enable
- Menu->Lv func.->Silent LV shoot.->Mode 1
- Shoot in Live View mode
Remember, in order for EFCS to work on Canon DSLRs, you must shoot from Live View mode. The great news for Canon shooters, is that you can use a combination of a self-timer along with the EFCS, which can be used to completely eliminate camera shake. Here is how you can achieve that:
- Set the above-mentioned EFCS / Silent LV shooting options
- Press the “Q” button to switch to quick menu
- Go to Drive Mode and select “Self-timer: 2sec/remote”
Once you do that, when you release the shutter in Live View mode, the camera will wait for 2 seconds, then start the exposure with the mirror and shutter already raised. Once the exposure ends, the shutter will come down to end the exposure and come back up to get back into Live View mode.
It is actually pretty shocking to find that Canon has been pushing EFCS to its DSLRs for a while now, while Nikon DSLR shooters only have it on a select few cameras (Nikon, hint, hint!).
3.5.4) Sony A6xxx, A7/A7 II, A7R II, A7S /A7S II
If you shoot with the latest generation Sony mirrorless cameras, they all come with EFCS. All you have to do is make sure that EFCS is enabled from the camera menu:
- Menu->Setup Icon->e-Front Curtain Shut.->On
From here, you don’t need a remote shutter release – simply put the camera to Self Timer drive mode (set it up to 2s first) and shoot away! The camera will always shoot with EFCS going forward, whether you look through the viewfinder, or use the LCD.
Other mirrorless cameras might have EFCS as well – I would recommend to check the camera manual to see if such a mode is available.
3.6) Long Focal Length
If you have ever shot at a very long focal length, especially when coupling super telephoto lenses with teleconverters, you might have noticed that your camera will shake like crazy and continue to do so for a while after you touch it. This is especially noticeable when shooting from an unstable tripod setup. The reason why longer focal lengths are challenging, is because vibration is much more pronounced at longer focal lengths than shorter ones, since you are magnifying such a tiny portion of the frame. It is best to explain the reason using the below illustration:
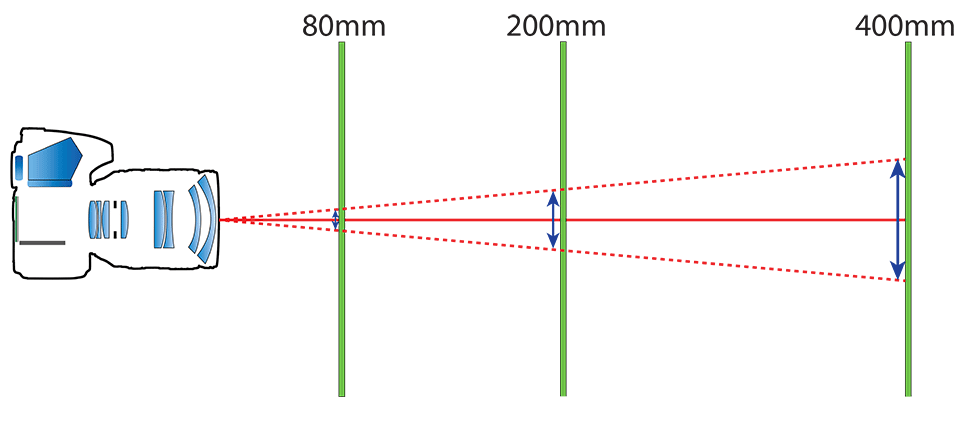
Here you can see how the potential for the shake is increased with the increase in focal length. The red-dotted lines that represent the potential limit of how much the camera can shake when hand-held have a much shorter span at 80mm than at 400mm. That’s because camera shake is magnified with increase in focal length.
As you can see, at shorter focal lengths the camera does not have much challenges with slight vibrations, but once very long focal lengths are involved (200mm and beyond), camera shake gets much more pronounced. If you ever want to evaluate your tripod setup, mount a super telephoto lens and try zooming into live view at 100% at 200mm+ focal lengths. Then see how crazy the vibrations get after you touch the camera! Even with the top of the line tripod + ballhead setup, I had a rough time getting the 800mm f/5.6 lens to stabilize when I had a 2x teleconverter on it! I had to use Mirror Up and wait for 5+ seconds to get an image that was somewhat less blurry than others when shooting the full moon. After taking a single shot, I had to reframe my image, since the moon by then was already pretty much out of the frame. Here is the resulting shot:
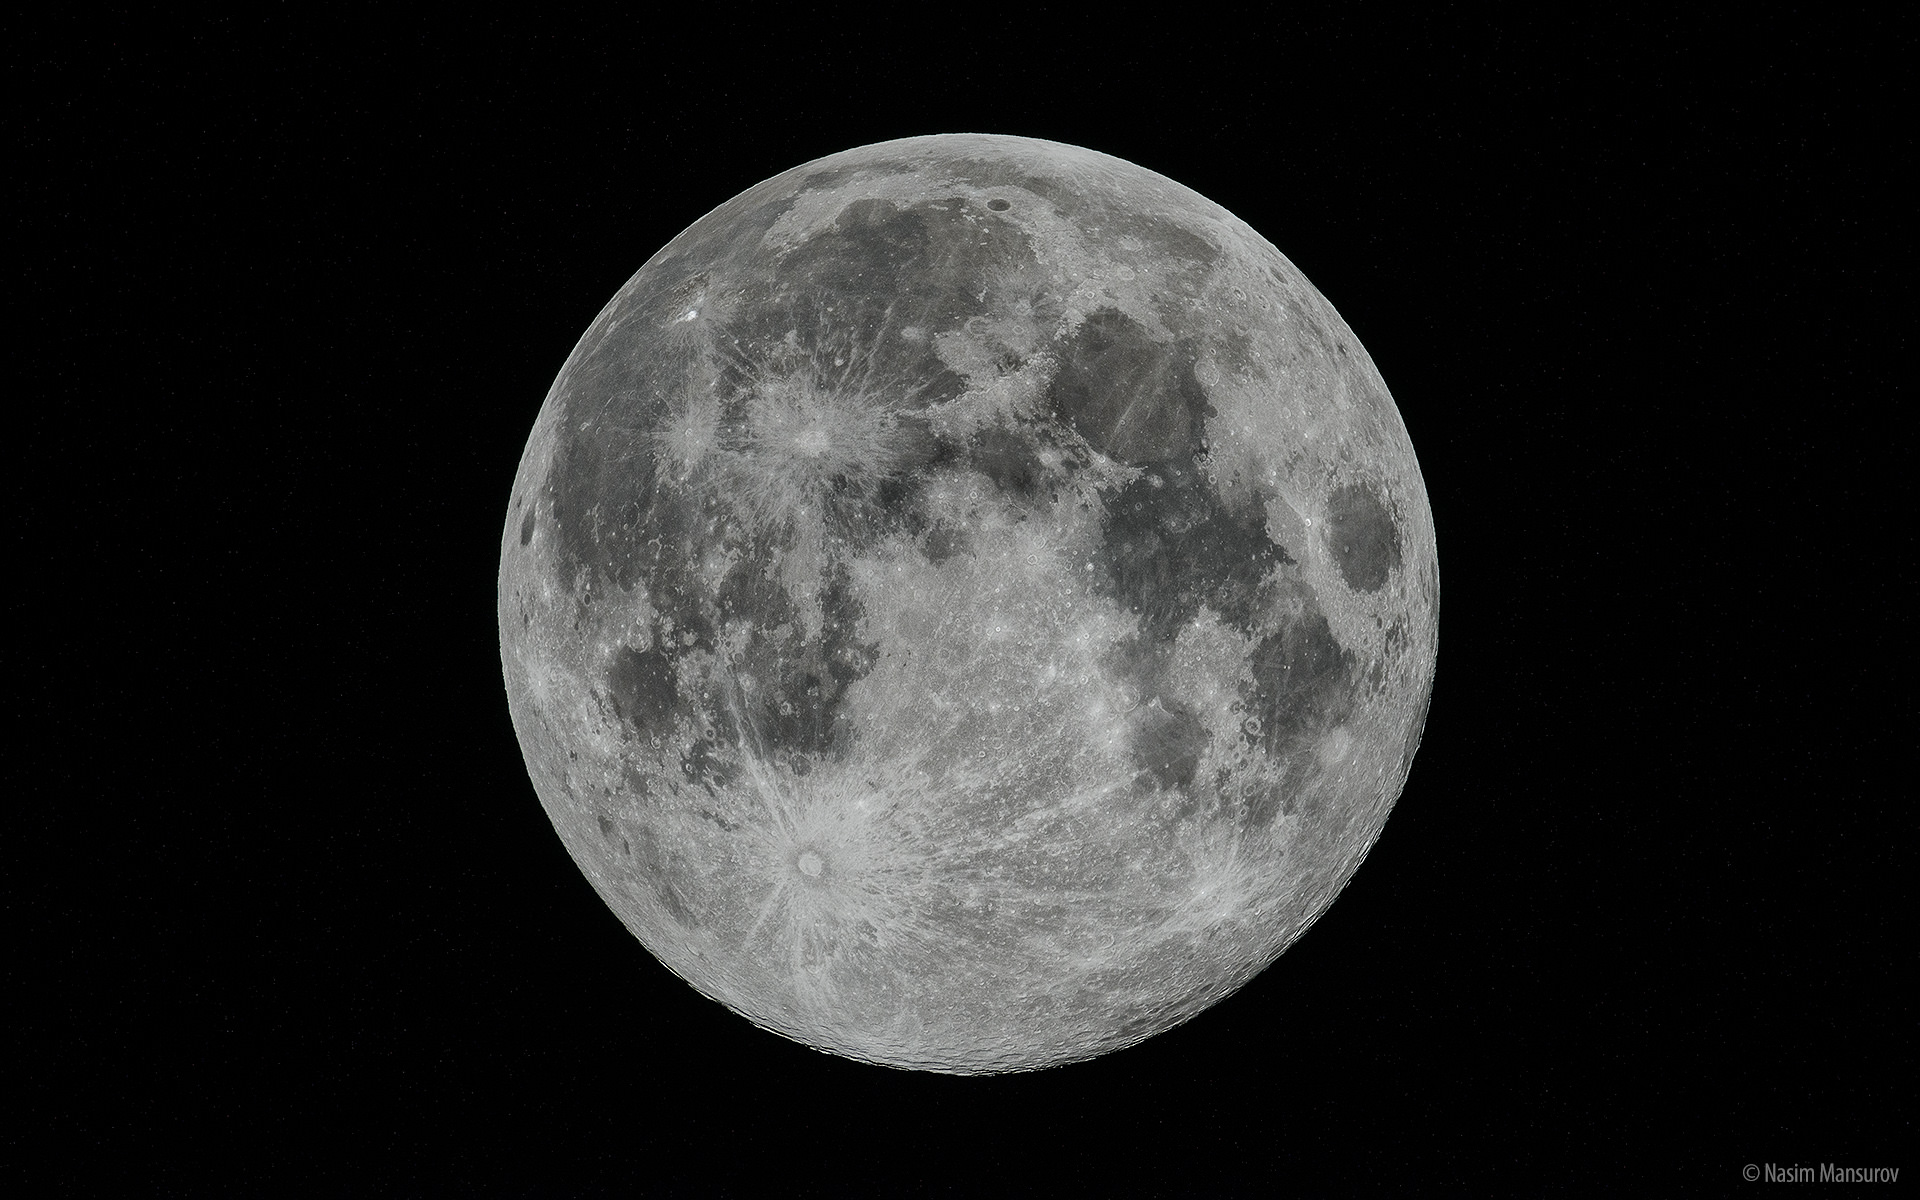
NIKON D800E + 800mm f/5.6 @ 1600mm, ISO 800, 1/800, f/13.0
While it turned out to be fairly sharp, I wish I had the D810 with the EFCS with me at the time, since the EFCS mode would have yielded a much sharper image. After I down-sampled the image a bit and sharpened it in Photoshop, the image turned out OK overall, but I knew that I could have gotten even a sharper image if I could disengage the shutter of my D800E before the exposure started. In such situations, EFCS can be truly invaluable. So keep this in mind when using very long focal lengths.
3.7) Surrounding Environment
Once you take care of all tripod, lens and camera-induced stabilization issues, it is also important to check if your environment might be causing camera shake. For example, it is expected that if you shoot in very windy conditions, your camera might shake as a result of strong wind gusts. If you shoot with your tripod dipped into the sea / ocean, the waves might be hitting your tripod legs and causing camera shake.

Notice camera shake due to waves hitting the tripod feet (Copyright Spencer Cox)
NIKON D800E + 20mm f/1.8 @ 20mm, ISO 100, 16/10, f/5.6
If you shoot from a very unstable environment such as sand dunes, your tripod might start slowly sinking, causing blur in long exposures. There might be other factors at play as well, such as an object physically touching your camera setup. Always assess your environment as well and keep both your camera and tripod away from any other objects, making sure that you are set up on a stable, non-moving platform.
4) Summary
As you can see, while reducing camera shake on a tripod might sound like a simple topic, it can get somewhat complex with all the features and advancements we are seeing in camera technology. The good news is, you have plenty of options to stabilize your setup and come back with sharp images. The bad news is, sometimes you might forget simple things and not have a chance to react quick enough to changing environments. Always learn your camera features and write down critical information such as the one presented above, so that you can quickly deploy the right solution to the problem in the field. After you do it over and over again, it will become muscle memory and you will always come back with tack sharp images!
Exposure Delay Mode + Self-Timer to the Rescue
As I have stated above, I rely on the Exposure Delay Mode + Self-Timer probably 90% of the time when shooting landscapes. This mode works very well for eliminating mirror slap and when shooting with the latest Nikon DSLR cameras, I don’t see the effect of the shutter shock as much, since the shutter mechanism is dampened better compared to older models. If your camera does not have the Electronic Front Curtain Shutter, using the Exposure Delay Mode + Self-Timer should still work really well in most cases, often eliminating camera shake.
However, there are some cases where EFCS is needed – if you shoot with super telephoto lenses on a tripod and you want the best sharpness when shooting in low-light situations (say for photographing the moon or distant subjects), EFCS can really help to completely eliminate any camera-induced shake, which includes shake from both the mirror and the shutter mechanisms. I really hope Nikon will continue adding this important feature to all future DSLRs and addresses the current limitations when shooting in Live View mode, as described in the article.
The post How to Reduce Camera Shake on a Tripod appeared first on Photography Life.


