
In Part 1 of Best of 2016, I showed images from my trips to Death Valley NP, Joshua Tree NP and Saguaro NP, then finished up the post with two of my favorite images from Istanbul, Turkey. In this second part, we will be touring through the Rocky Mountain region of the USA, then explore some of the images from my recent trip to New Zealand. As before, I will be spending a considerable amount of time talking about each image, its compostional aspects and what it took to make it work. Please enjoy!
Last summer was a pretty busy time for our team at PL, since we not only released our Workflow and Post-Processing course, but also toured across the Rocky Mountains region of the USA to start filming our Level 3 Landscape Photography video. It was an incredible trip in the company of John Bosley and Spencer Cox and I have to say, it was one of the most memorable trips I have had in a long time, thanks to these amazing individuals. We started our journey in Colorado driving north towards Wyoming’s Grand Teton National Park, where we filmed quite a bit of new material. Obtaining filming permits was a real pain in the neck across all national parks, but Grand Teton was one of the easiest, thanks to a couple of great people in the national park office that made it happen. As John and I were filming Spencer talking, we witnessed a beautiful sunset, with the sun setting right behind the Grand Tetons:
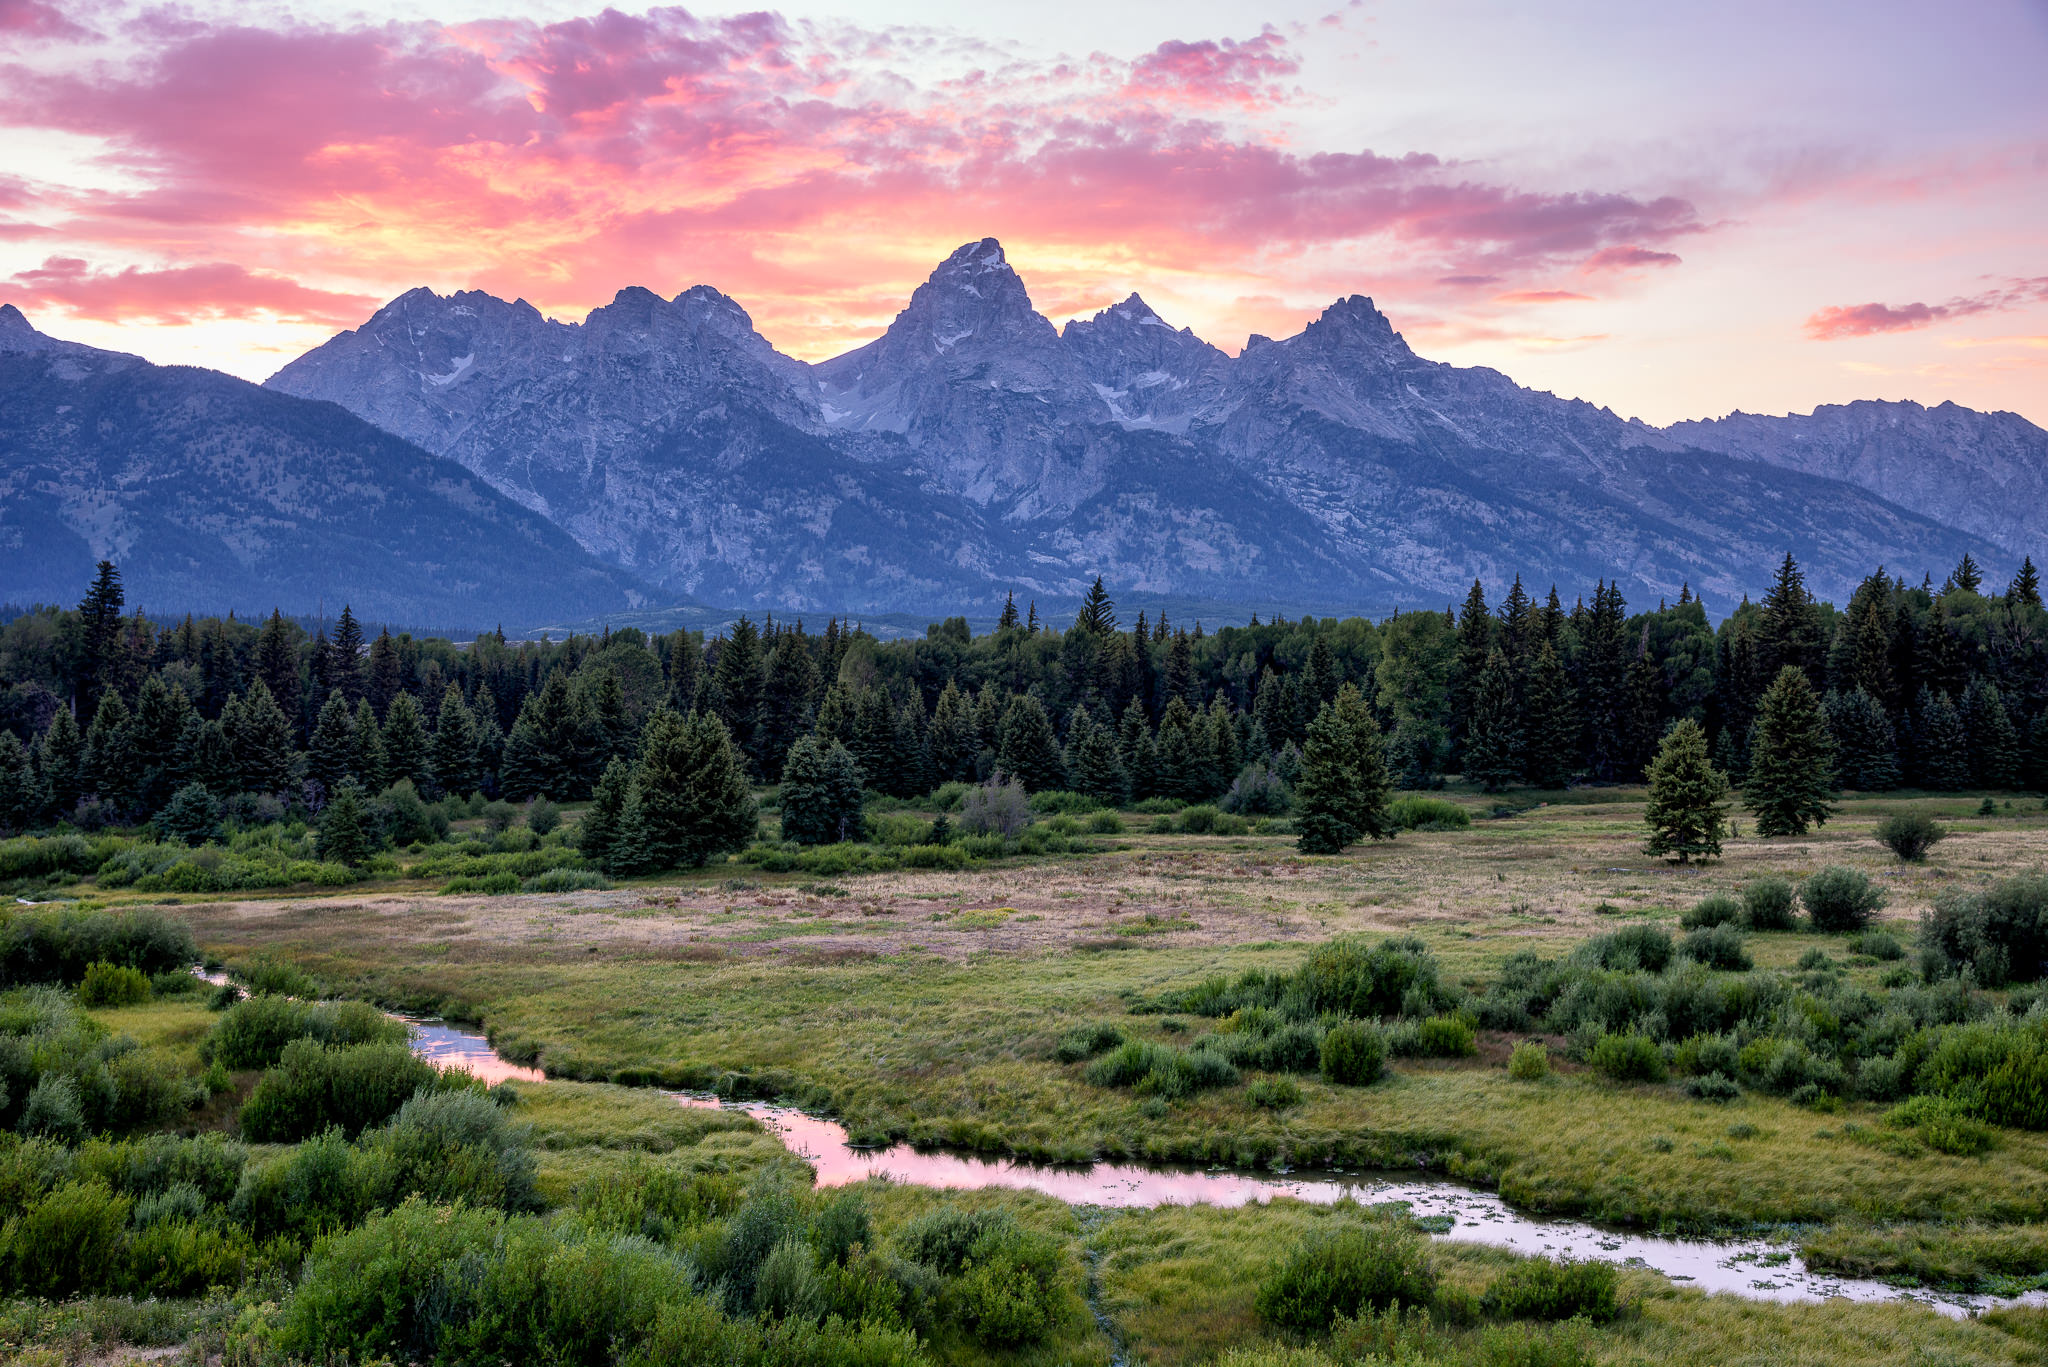
NIKON D810 + 24-120mm f/4 @ 40mm, ISO 200, 4/10, f/8.0
Without a doubt, Grand Teton national park offers a lot in terms of photography potential. You can photograph the Grand Tetons from a number of different overlooks like we have done above, or if you are willing to hike, there are so many great opportunities there as well, offering very unique perspectives that are photographically unexplored. Unfortunately, with the amount of gear the three of us were lugging, it was not easy to move around too much, so we had to stay relatively close to the main roads. Still, I like the way the image turned out – the small stream served nicely as a foreground element reflecting some of the sky, and the layers of trees in the distance served as a separation of the foreground with the distant mountains. There was a bit of haze in the distance that was distracting in the original RAW image, so I had to work it in Lightroom a bit by adding contrast and structure to reduce the effect.
After filming at the park for a few days and getting ready to move up north, we had a chance to meet a couple of PL readers, Beth and Kurt, who happen to work at the Teton County Library. They were extremely helpful in showing us some of the landmarks of the area, including the Patriarch Tree, where we ended up filming one of the case studies at sunrise. Yes, our readers are truly amazing and we always look forward to meeting them when we can!
This time it was yours truly behind the camera, explaining my thought process behind making the below image:
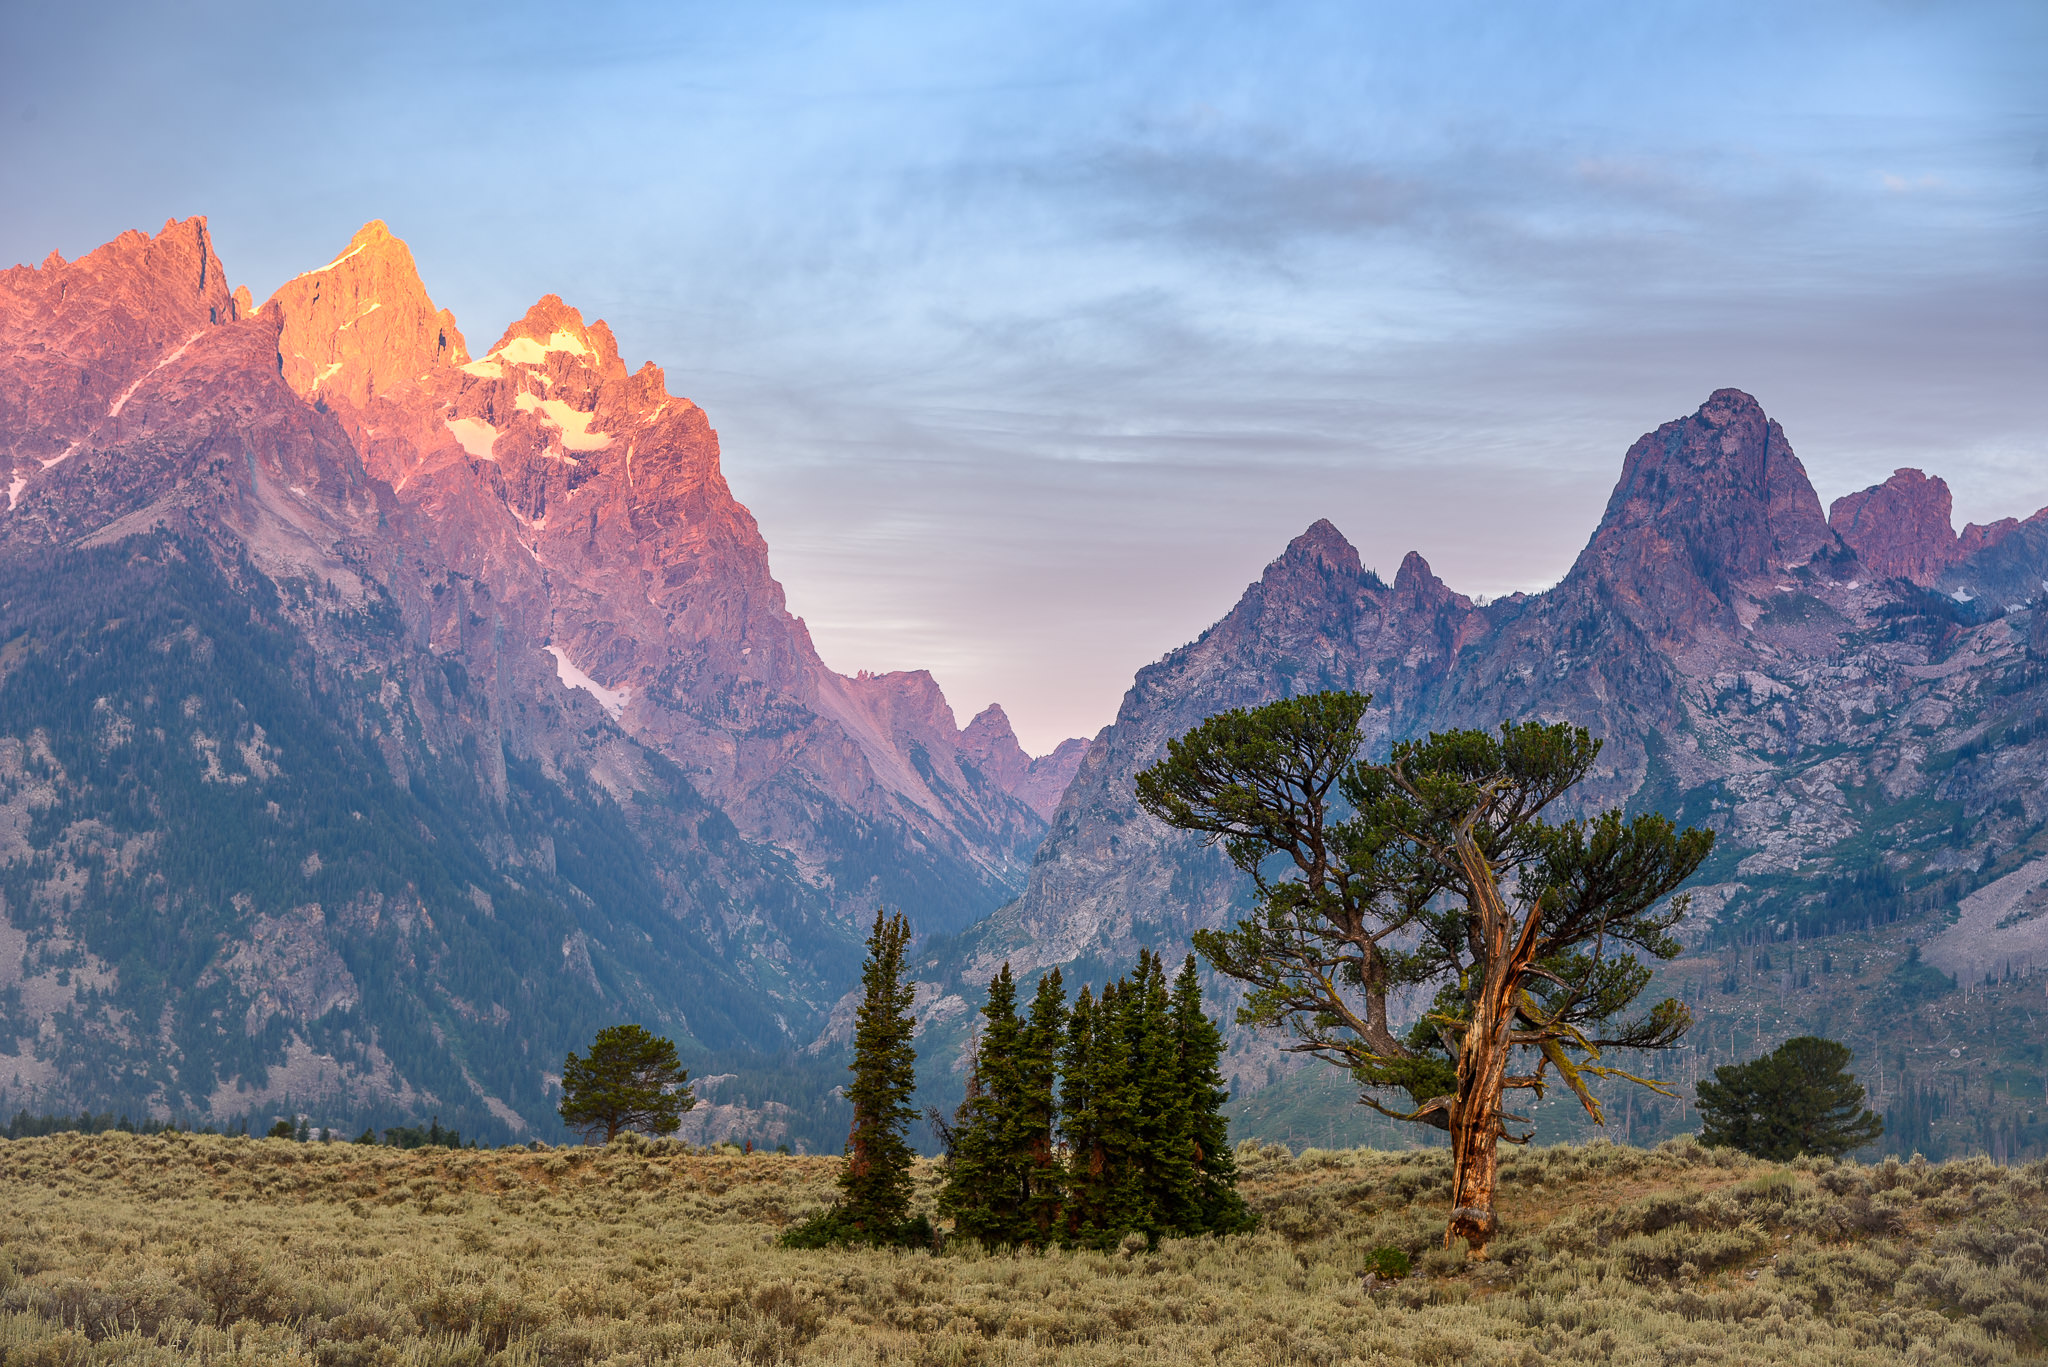
NIKON D810 + 24-120mm f/4 @ 78mm, ISO 64, 6/10, f/8.0
Although we did not get amazing sunrise colors in the sky that morning, once the horizon cleared up a little and the sun rays hit the top of the mountains, we managed to get a nice shot of the Patriarch Tree and its surroundings. For this composition, I used the hill behind the tree as a base level and framed the image so that the light hitting the top of the mountains counter-balances the Patriarch Tree on the bottom right. So in a way, this is a diagonal composition and the weight of both the tree (in terms of size + tones) and the distant mountains works out perfectly for such a shot, whereas the small patch of evergreen trees, along with the “V” divider of the mountains are placed in the center of the frame, adding more to the overall balance.
After successfully shooting both the image and the case study, we decided to move up north and start filming at the Glacier National Park. Since neither John nor Spencer have ever visited the Yellowstone National Park, we decided to stay there for a couple of days and tour the park. Our permit paperwork was still pending with the national park office (obtaining permit for the Glacier National Park was a logistical nightmare!), so we had a couple of days to kill anyway. Plus, it was a good opportunity to do some shooting for ourselves and take the time off the super busy schedule. In short, it was a good excuse to visit and showcase one of my most favorite places on earth that I frequent at least once a year!
We decided to spend one of the sunrises at the Yellowstone Lake. With the sun rising over the distant mountains, Yellowstone Lake always offers great opportunities, especially if you find a good foreground subject. In my case, I ended up using one of the geysers (which is more or less dormant now) as my foreground subject, which I placed on the bottom right of the frame to counter-balance the rising sun. The steam coming out of the geyser helped bring some character into the shot, as the early sun rays painted it with some color, while the quiet and calm morning filled the lake with beautiful, subtle waves:
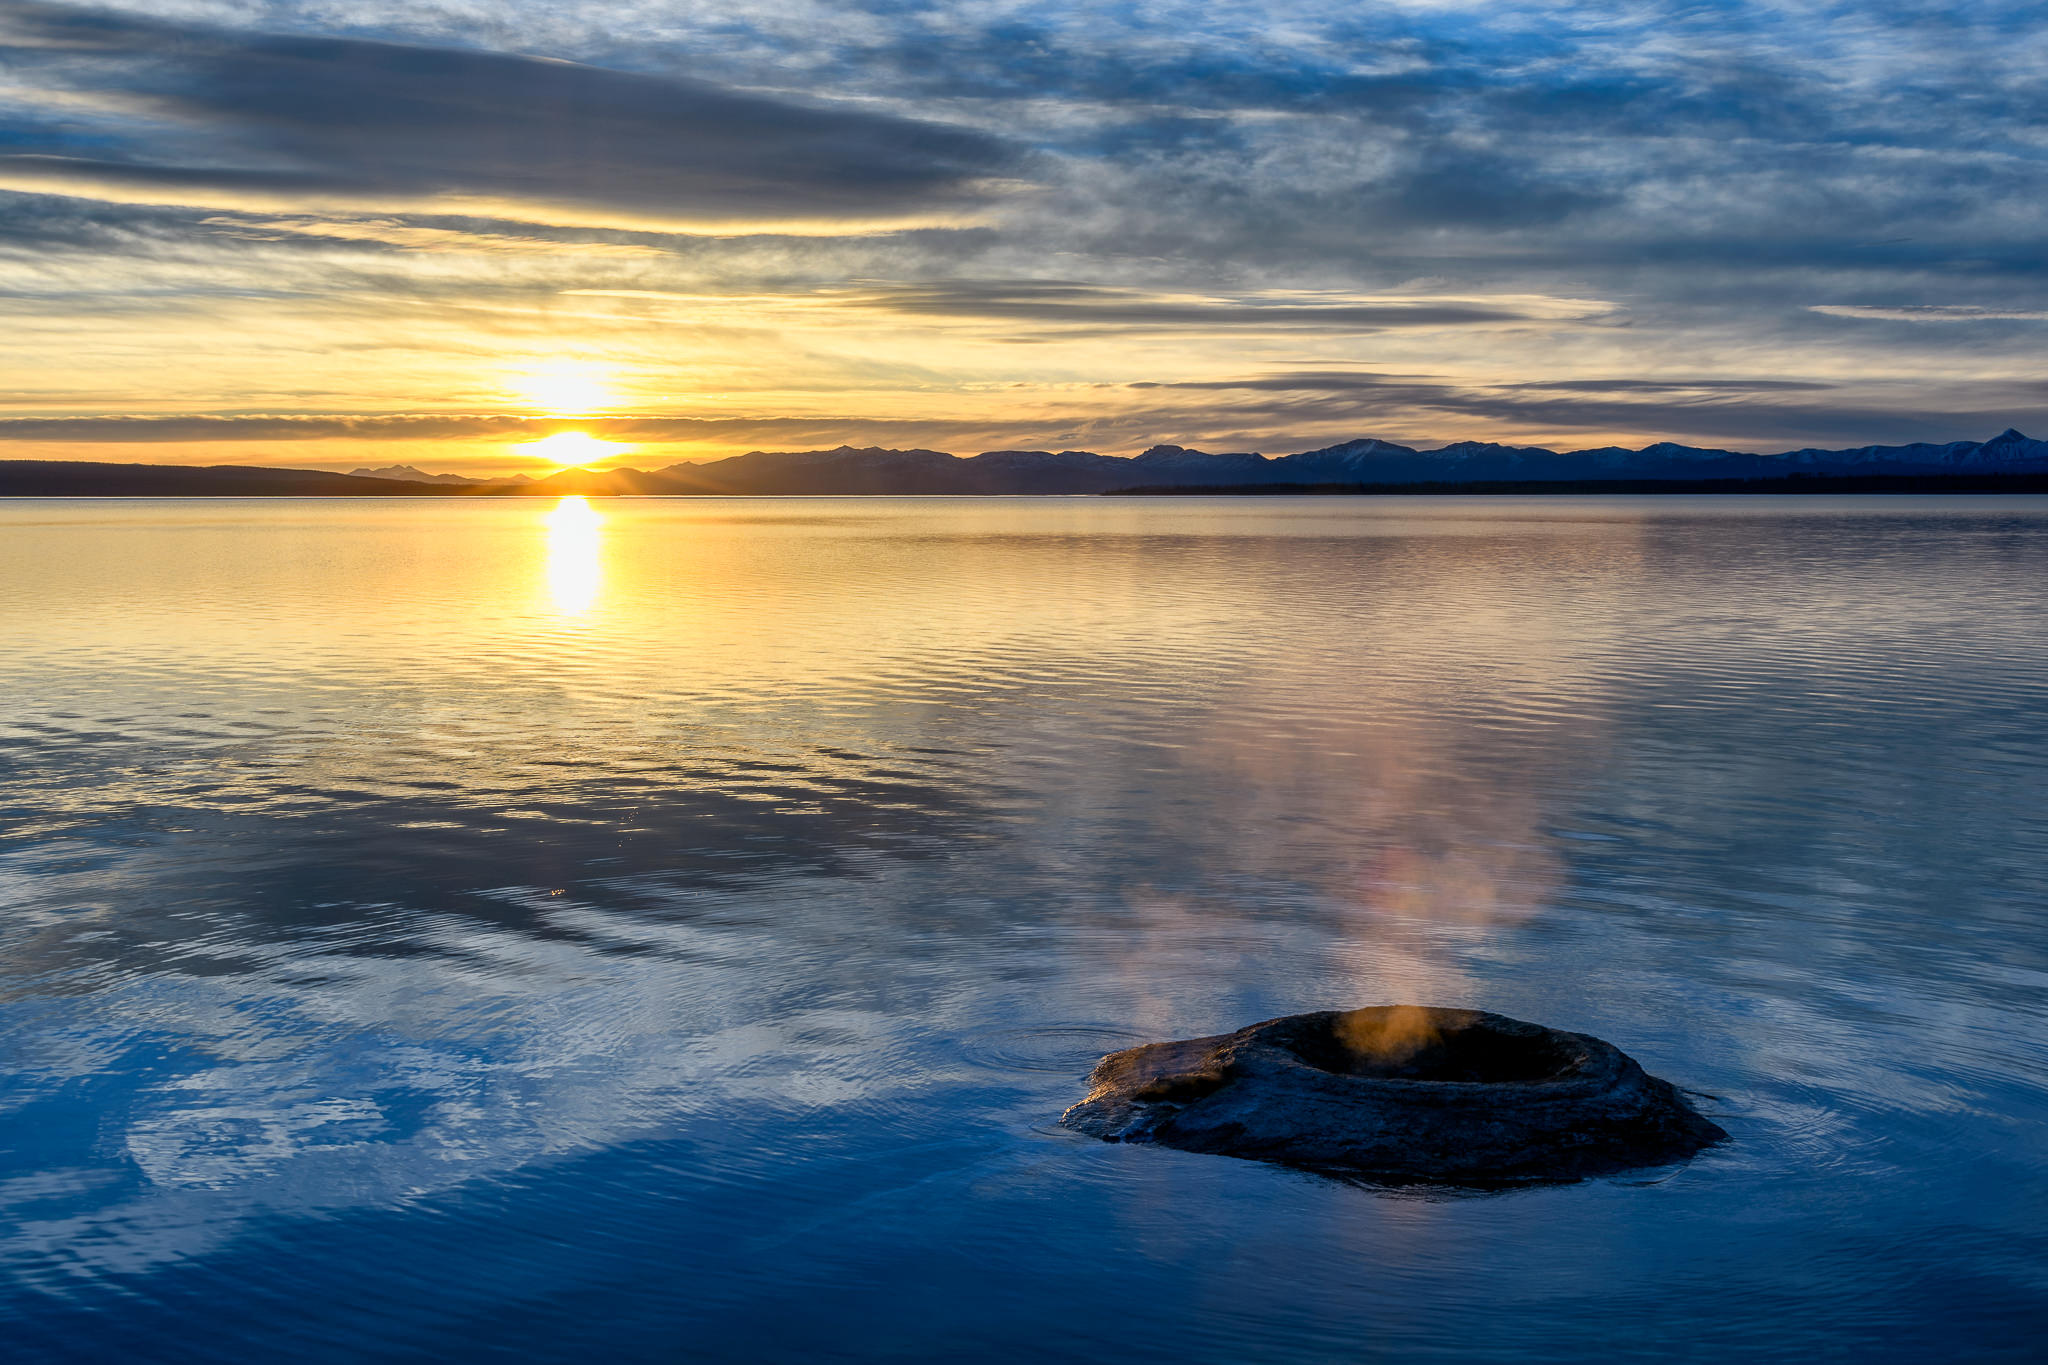
NIKON D500 + 24-70mm f/2.8 @ 29mm, ISO 100, 1/100, f/16.0
I did not spend much time post-processing this one, aside from reducing highlights and boosting some shadows. I also added a little more color to the steam to bring it out a bit by using the adjustment brush in Lightroom. Earlier that morning we definitely had more color in the sky, but considering that it would not have brought out the geyser steam, it would not have worked out for me anyway, which is why I prefer this one instead.
This was my second trip to the area in 2016. Previously, I took my boys to Yellowstone NP, where we explored the park a little more as part of our homeschooling curriculum. That’s where I managed to capture the below shot at sunset, using the Pentax K-1 that I was testing at the time:

PENTAX K-1 + HD PENTAX-D FA 24-70mm F2.8ED SDM WR @ 31mm, ISO 100, 6/10, f/5.6
Speaking of which, the Pentax K-1 was probably one of my most favorite DSLRs that I used in 2016. Its pixel-shift technology by itself is absolutely amazing in terms of bringing out the detail in images, rivaling the output of some medium format cameras. Despite some of its shortcomings, I was blown away by what the K-1 had to offer, especially once you factor in the price of the camera! If Pentax pushes more great lenses for the K-1, it will surely make the system a lot more attractive to use, especially for landscape photographers. It surely has a lot of potential and Pentax engineers have done a tremendous job with the K-1. If only Adobe and Pentax found a way to work together in making pixel-shift files look good! Sadly, once you start working with such images, your only route is to use the SilkyPix RAW converter software provided by Pentax. I have tried to work with some Pentax high-res files in Lightroom, but I could not get far without adding a bunch of unwanted artifacts to my images when there was any movement involved, which is disappointing.
Coming back to our group trip, one of the highlights of visiting the Yellowstone NP was witnessing a beautiful geyser eruption on a very gloomy day:
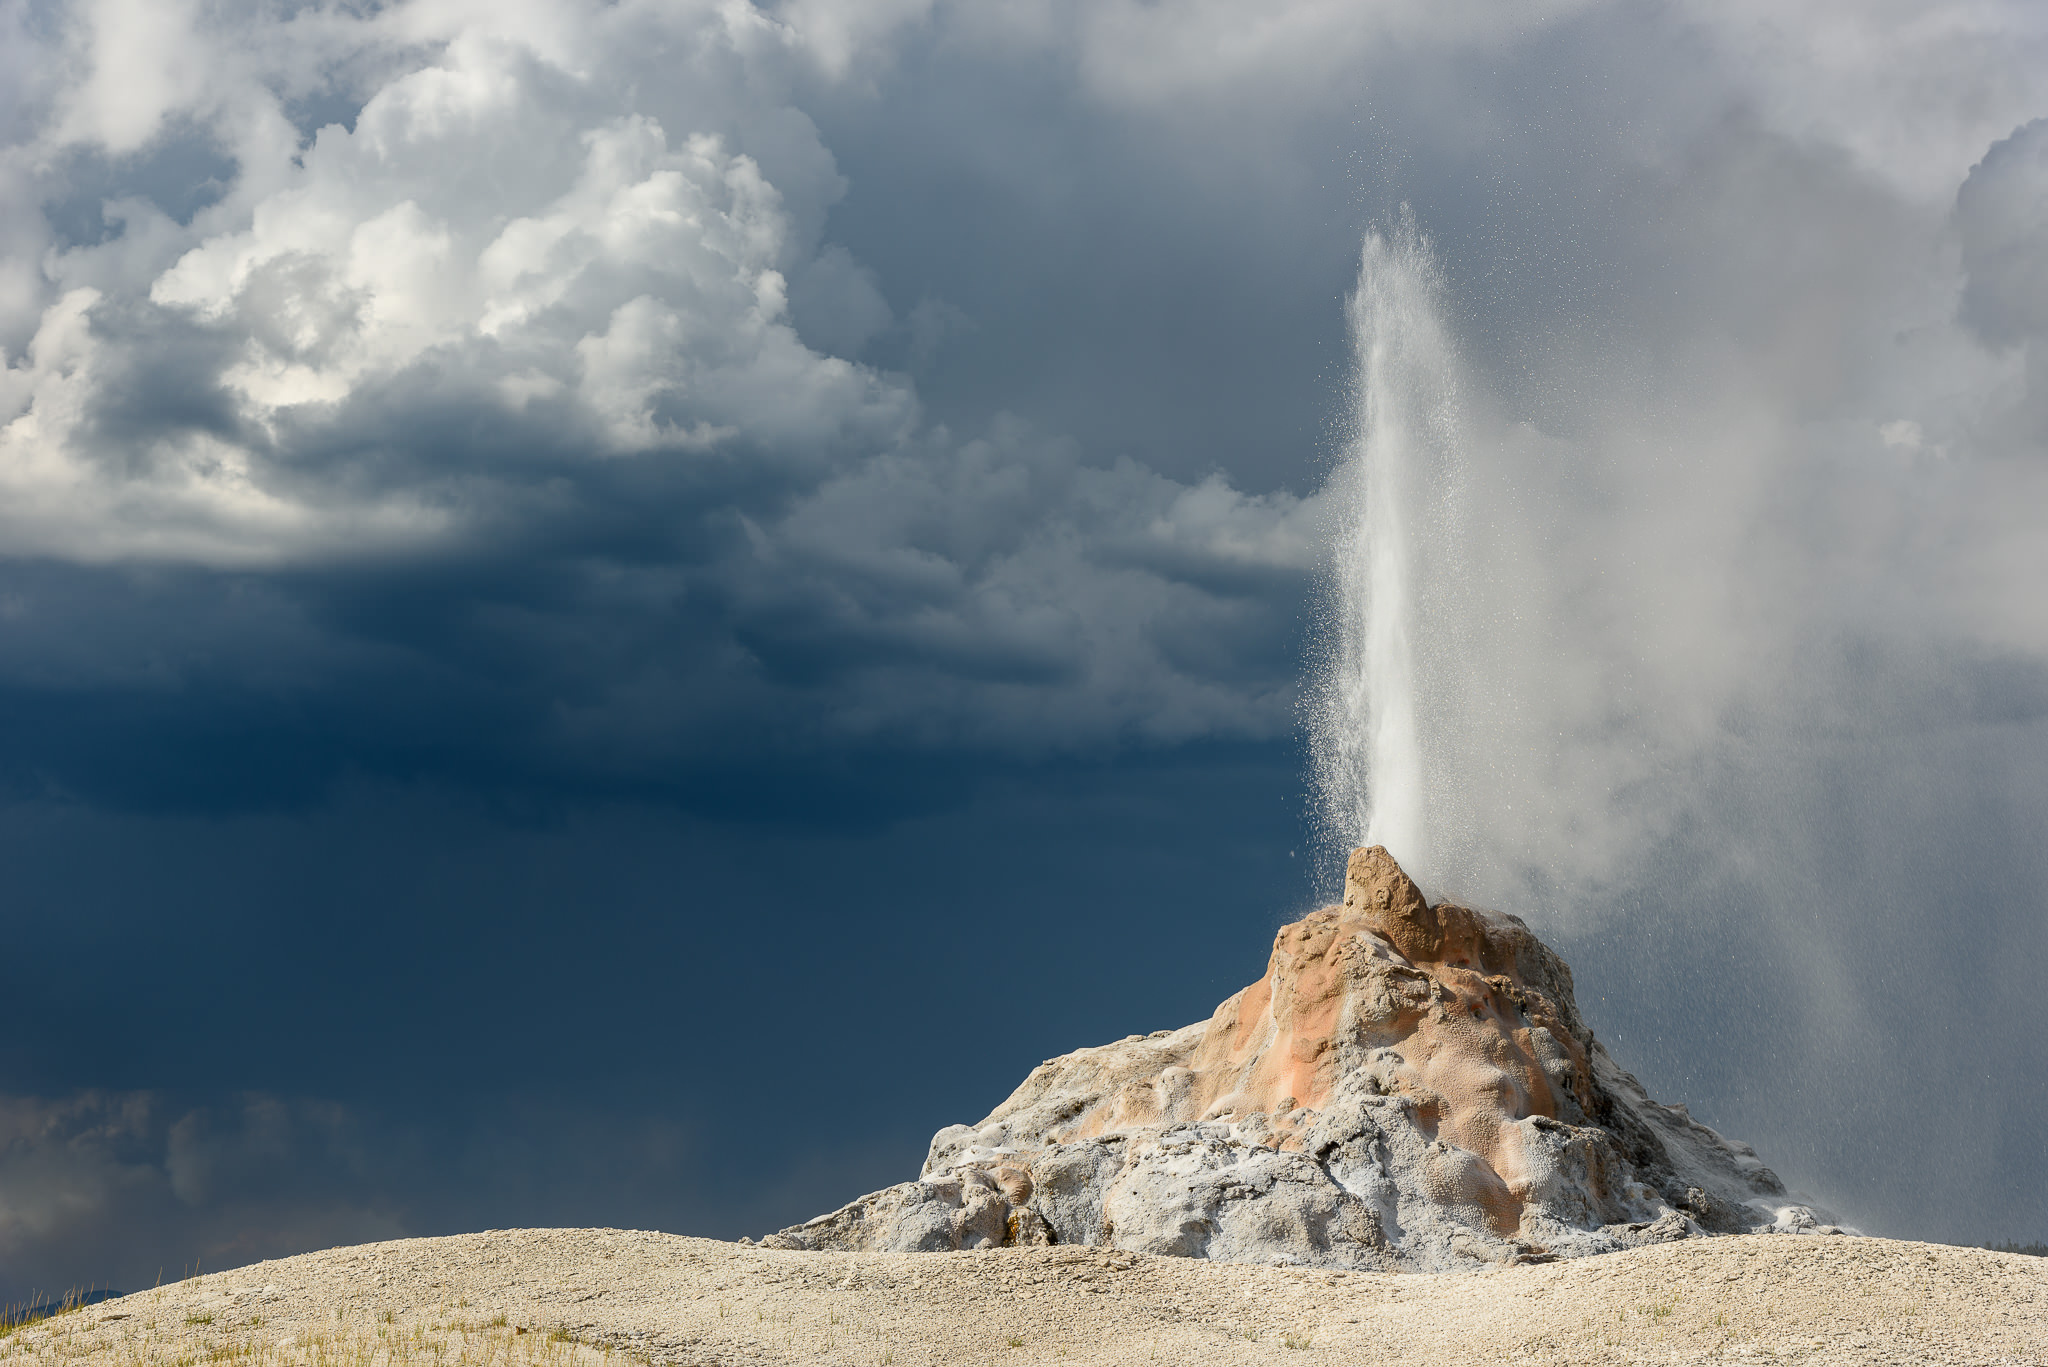
NIKON D810 + 24-120mm f/4 @ 62mm, ISO 64, 1/160, f/8.0
Here, I placed the erupting geyser to the right of the frame, while keeping the bright part of the clouds on the top left, forming another diagonal composition. The lack of cloud formations above the geyser helped with the composition a little and the illuminated tones of the landscape, along with the dark tones of the clouds really brought out the contrast in this shot, making it one of my favorite shots from Yellowstone in 2016. All three of us were hoping to witness a lightning storm in the distance, but sadly, we did not get to see it. Imagine how cool this shot would have looked with a lightning bolt to the left of the geyser! Oh well, perhaps next time we will be luckier!
Did I already say that obtaining a filming permit at the Glacier National Park was a nightmare? Dang, it was brutal. Not only was it tough to get a permit, but the park was also very strict about the particular locations we could film in. After waiting forever and paying the outrageous fees (filming permits and fees for each park turned out to be different), we ended up filming most of the content outside the park near the KOA campground we were staying at. On the very last day at the park though, we did film a little bit of content past the Hidden Lake overlook, with the Bearhat Mountain forming the bulk of the composition:
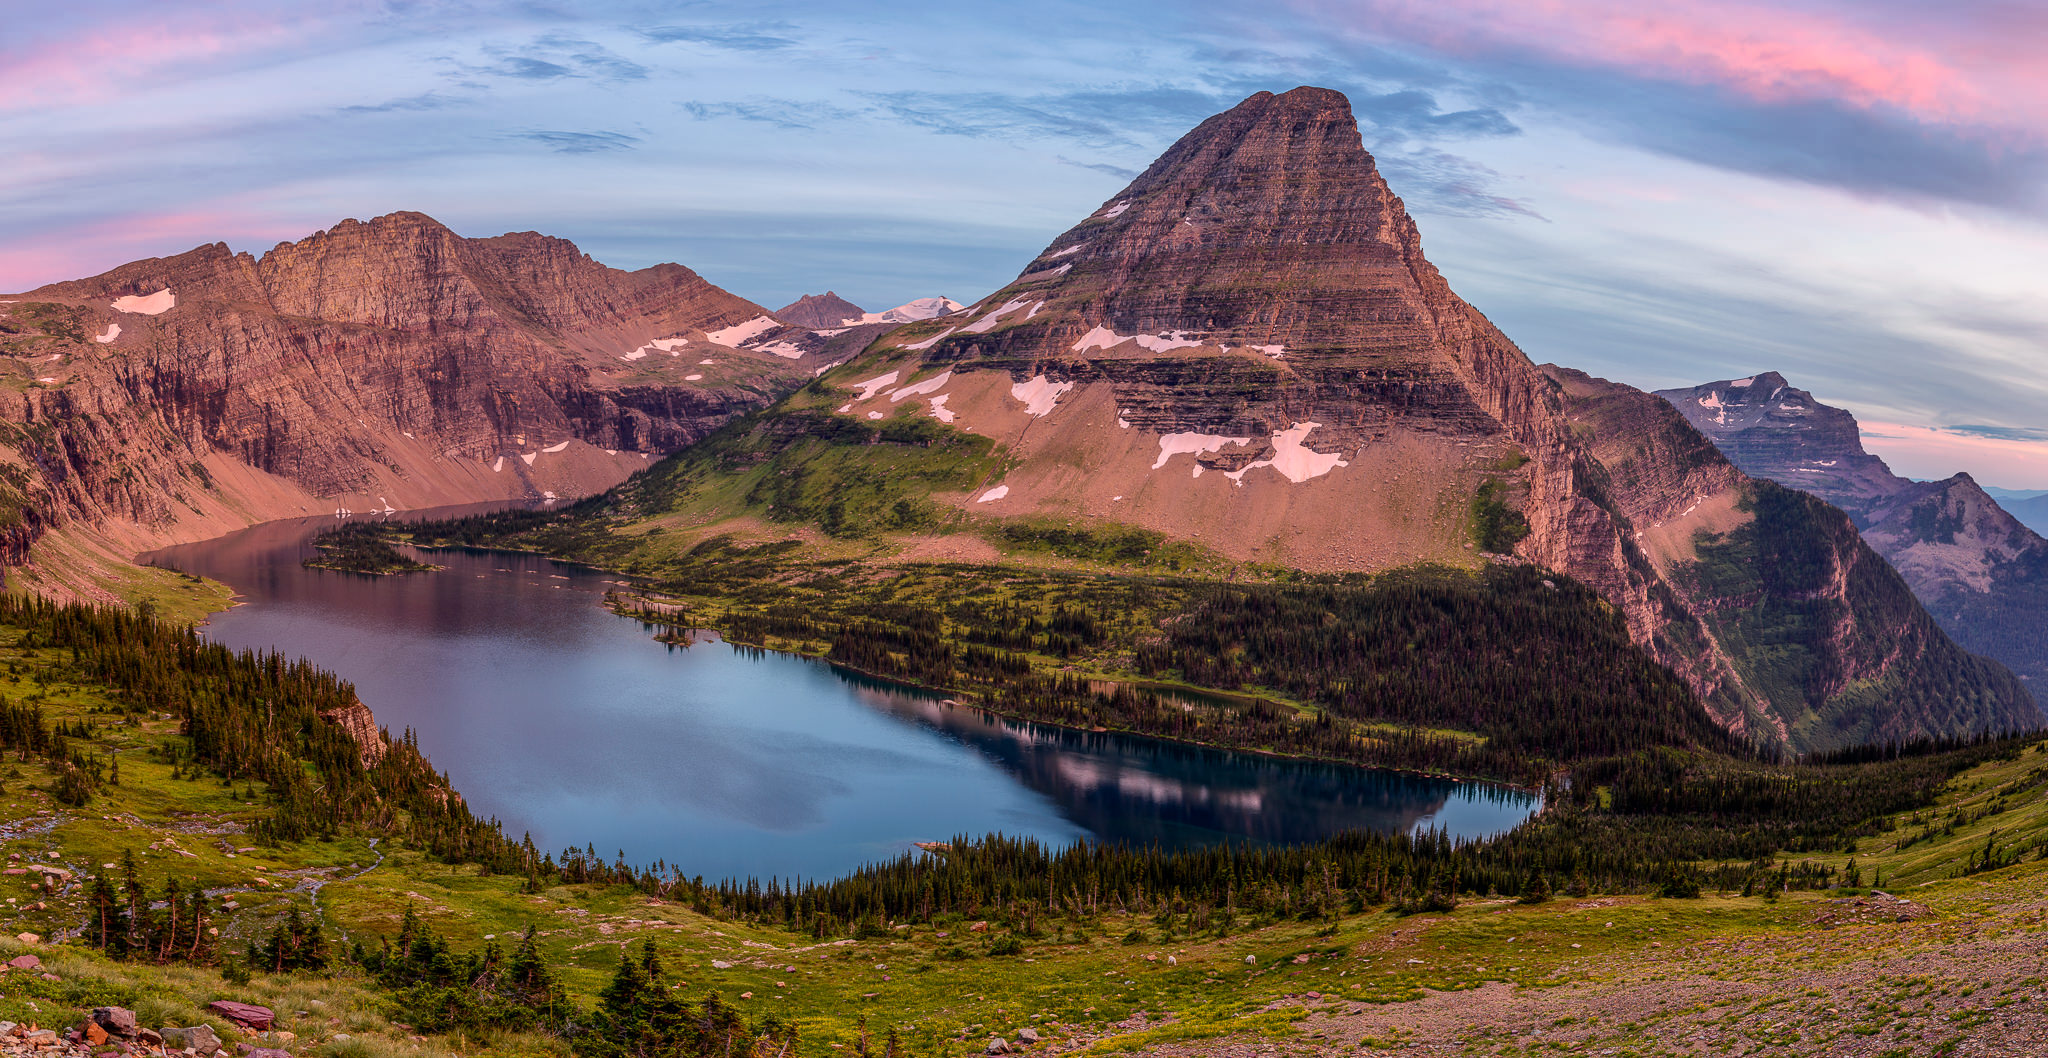
NIKON D810 + 24-120mm f/4 @ 40mm, ISO 64, 1/1, f/11.0
During this time, we briefly recorded another case study on photographing panoramic images. The sunset happened very quickly and we did our best to shoot the video as quickly as possible, so that I had enough time to capture the actual panorama. Sadly, the clouds formed up too high in the sky and I was not able to capture them all for this panorama. Still, I love the way colors reflected off the clouds into the landscape, bringing the beautiful, subtle tones into shot.
Although it appears that the panorama has a lot of distortion in it, notice that I captured each shot at 40mm. When I reviewed each individual shot from the capture, it was the way that the clouds formed up that made it look like they wrapped around the mountain. In reality, there is no distortion from the lens or as a result of the stitch that I performed in Lightroom. Although the original stitch was much wider, I ended up cropping the left side quite a bit in order to concentrate on the two most important features – the Hidden Lake and the Bearhat Mountain. Here, the two are complementing each other nicely. I wish there was another viewpoint where I could get a full reflection of the mountain in the lake, but we could not find any. And although there were some beautiful wildflowers that we could have used as a foreground, we did not want to damage any of the sensitive areas off the main trail.
After the last sunset at the park, we headed out to the west, straight to Mt Rainier National Park. Although we filmed some more content there, we did not have a chance to shoot much color, since it was a pretty dry, cloudless time of the year. That’s why I did not end up with anything worth showcasing from the trip to Mt Rainier. Given that we were already on our third week of the trip, we were already getting ready to wrap things up. John departed from Seattle the following day, while Spencer and I stayed for a few more days to explore one last destination – Olympic National Park.
While Olympic National Park was absolutely stunning in every way, we were again greeted by very sunny days. Weirdly enough, early mornings and late evenings were very cloudy / foggy at the coastline, preventing us from being able to capture anything at the shore, while during the days it was super dry, which is obviously not ideal for capturing a rain forest. Still, Spencer and I had to find out ways to find interesting areas to capture and film in, so we ended up finding some streams and waterfalls to photograph:

NIKON D810 + 24-120mm f/4 @ 24mm, ISO 40, 15/1, f/11.0
In this particular shot, I slowed down the shutter speed of my D810 to 15 seconds to blur out the water and bring it out more, since there was not much water in the stream to begin with. The dead tree log, along with the curved feature of the landscape allowed me to use the two as a window into the waterfall. At some point of time near sunset, the sun rays reached the dead log through the trees, painting it with some color and bringing its features out. It was Spencer’s idea to include the log in the frame and I liked his composition, which I shamelessly borrowed for this shot 🙂
That was pretty much the end of our 5,000 mile-long trip. We were all left with some great shots and fond memories while getting a lot of work accomplished, which was a double bonus!
After these long trips, I had quite a bit of work to do – you can imagine what kind of backlog such trips can create, especially when running a busy website. I had a lot of orders to fulfill, lots of packages to send out and many emails to respond to. That’s on top of the renovation and basement finishing that was taking place at my house! Like I said, it was a very busy year for me…
At the end of September, I had my usual Colorado Fall Workshops to attend to. With a total of 2 groups, it was another two weeks of time spent teaching how to photograph landscapes. This time I changed things around and organized two different types of workshops – the first one was more targeted towards beginners, while the second one was much more advanced and covered advanced composition and post-processing. I had a blast as I always do, because the participants were truly amazing! That’s what I love the most about conducting workshops, as I get a chance to meet incredible people from all over the world. Scientists, doctors, engineers, students, teachers and even photography veterans – you name it – I meet people of all calibers! It is truly a rare opportunity to learn from such wonderful people!
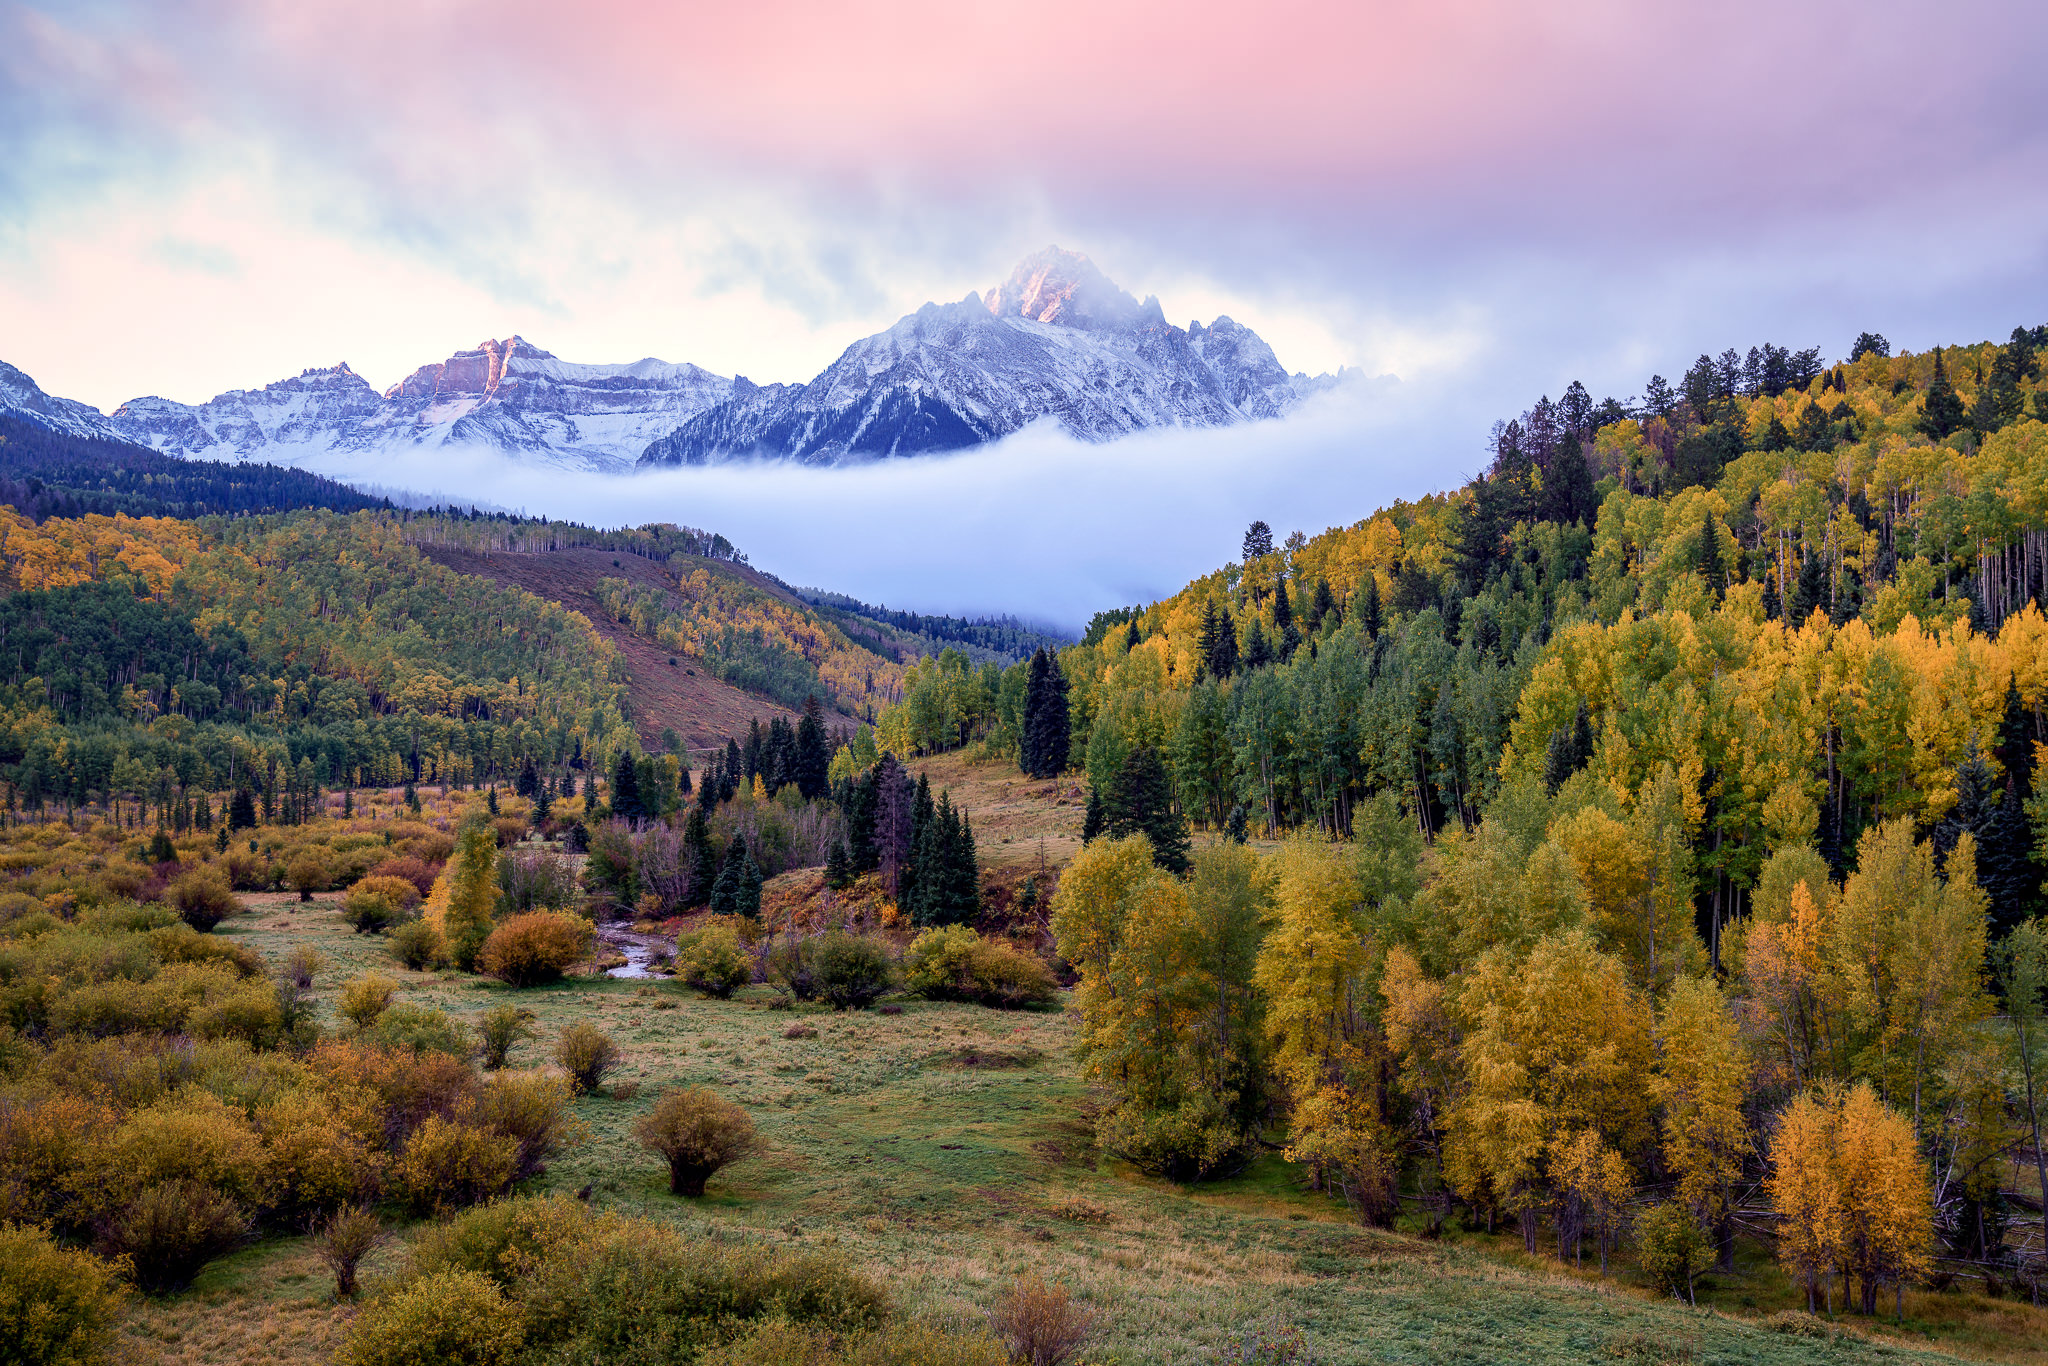
During the workshop, sometimes we get fortunate to photograph stunning Colorado landscapes. Last year, we witnessed a pretty rare phenomenon while photographing at one of my favorite overlooks in San Juan mountains – there was a pretty thick fog that covered Mt Sneffels at sunrise, which at some point opened up and showed us the grand beauty of the mountain, with some beautiful colors in the foreground:
ILCE-7RM2 + FE 24-70mm F2.8 GM @ 40mm, ISO 100, 1/10, f/5.6
The sky also lit up with some pink colors that were reflecting off other nearby clouds, adding to the beauty. In terms of composition, I placed Mt Sneffels in the dead center, right where the hills create the “V” shape, so it is a double triangle – always a great composition to use for sure! The aspen trees to the right are counter-balanced with some bushes to the left of the frame both in terms of features and colors, so the framing works out pretty well overall. Notice that I purposefully included all of the trees on the bottom right side of the frame – as discussed in our Landscape Photography eBook, you do not want to cut into any primary, secondary or tertiary elements in a scene, whenever possible.
Although I really wanted the top of Mt Sneffels to clear up, the moving clouds did not cooperate that morning, constantly closing off the mountain, so this is the only shot that ended up working out. I captured it with the new Sony FE 24-70mm f/2.8 GM lens that I was testing at the time on the Sony A7R II, which turned out to be a pretty solid and sharp lens. Finally, a lens that is vastly better than the 24-70mm f/4 OSS, which I absolutely hated a few years back when shooting with the original A7R. I cannot yet say if it is worth the price Sony is asking for though, since it does have its own issues, but more on that after I put it through my usual lens tests involving Imatest.
The next shot was captured at sunset with the first group, right after the first workshop ended. We stood on top of an overlook by a non-functional mine, looking down at the colors of the stunning landscape. Judging by the Belt of Venus, you can see that the shot was taken right after sunset. Here, the composition is all about the colors and the shapes of the mountains. Again, you can see a few rather pronounced “V” shapes that I used for composition. The blend of evergreen trees, along with the colorful aspens makes the shot look a bit chaotic and at the same time beautiful, while the subtle blue and pink tones of the distant horizon serve as a counter-balance in terms of colors and tones:

Canon EOS 5D Mark IV + EF24-70mm f/4L IS USM @ 70mm, ISO 100, 6/1, f/8.0
As you can see, it was my time to test out the Canon 5D Mark IV, which I only used with a single lens, the EF 24-70mm f/4L IS USM. A wonderful combo for sure and I really loved the camera, especially its quick and snappy AF via live view – much better than what Nikon has to offer! I will soon be working on a review of the 5D Mark IV, which I definitely liked for landscape photography, although I can see why it left so many videographers disappointed. Canon had been strongly pushing out video features in the prior models of the 5D, but the last iteration showed that Canon does not want the camera to compete with its high-end offerings, especially when it comes to 4K video recording. With its 1.74x crop factor for 4K video, along with lack of C-LOG and outdated MJPEG codec, it is not what the videographers were expecting to see for sure, not when other camera manufacturers like Panasonic are pushing phenomenal cameras that can record 4K video without the same concerns. If you don’t care for video and you are a Canon shooter, you would certainly be happy with the upgrade, especially for landscape work. I noticed that Canon certainly improved the dynamic range performance of the 5D Mark IV compared to its predecessor, which is a huge plus. It might not be as good as what you would find on a Sony-made sensor, but it is good enough, which is a definite improvement!
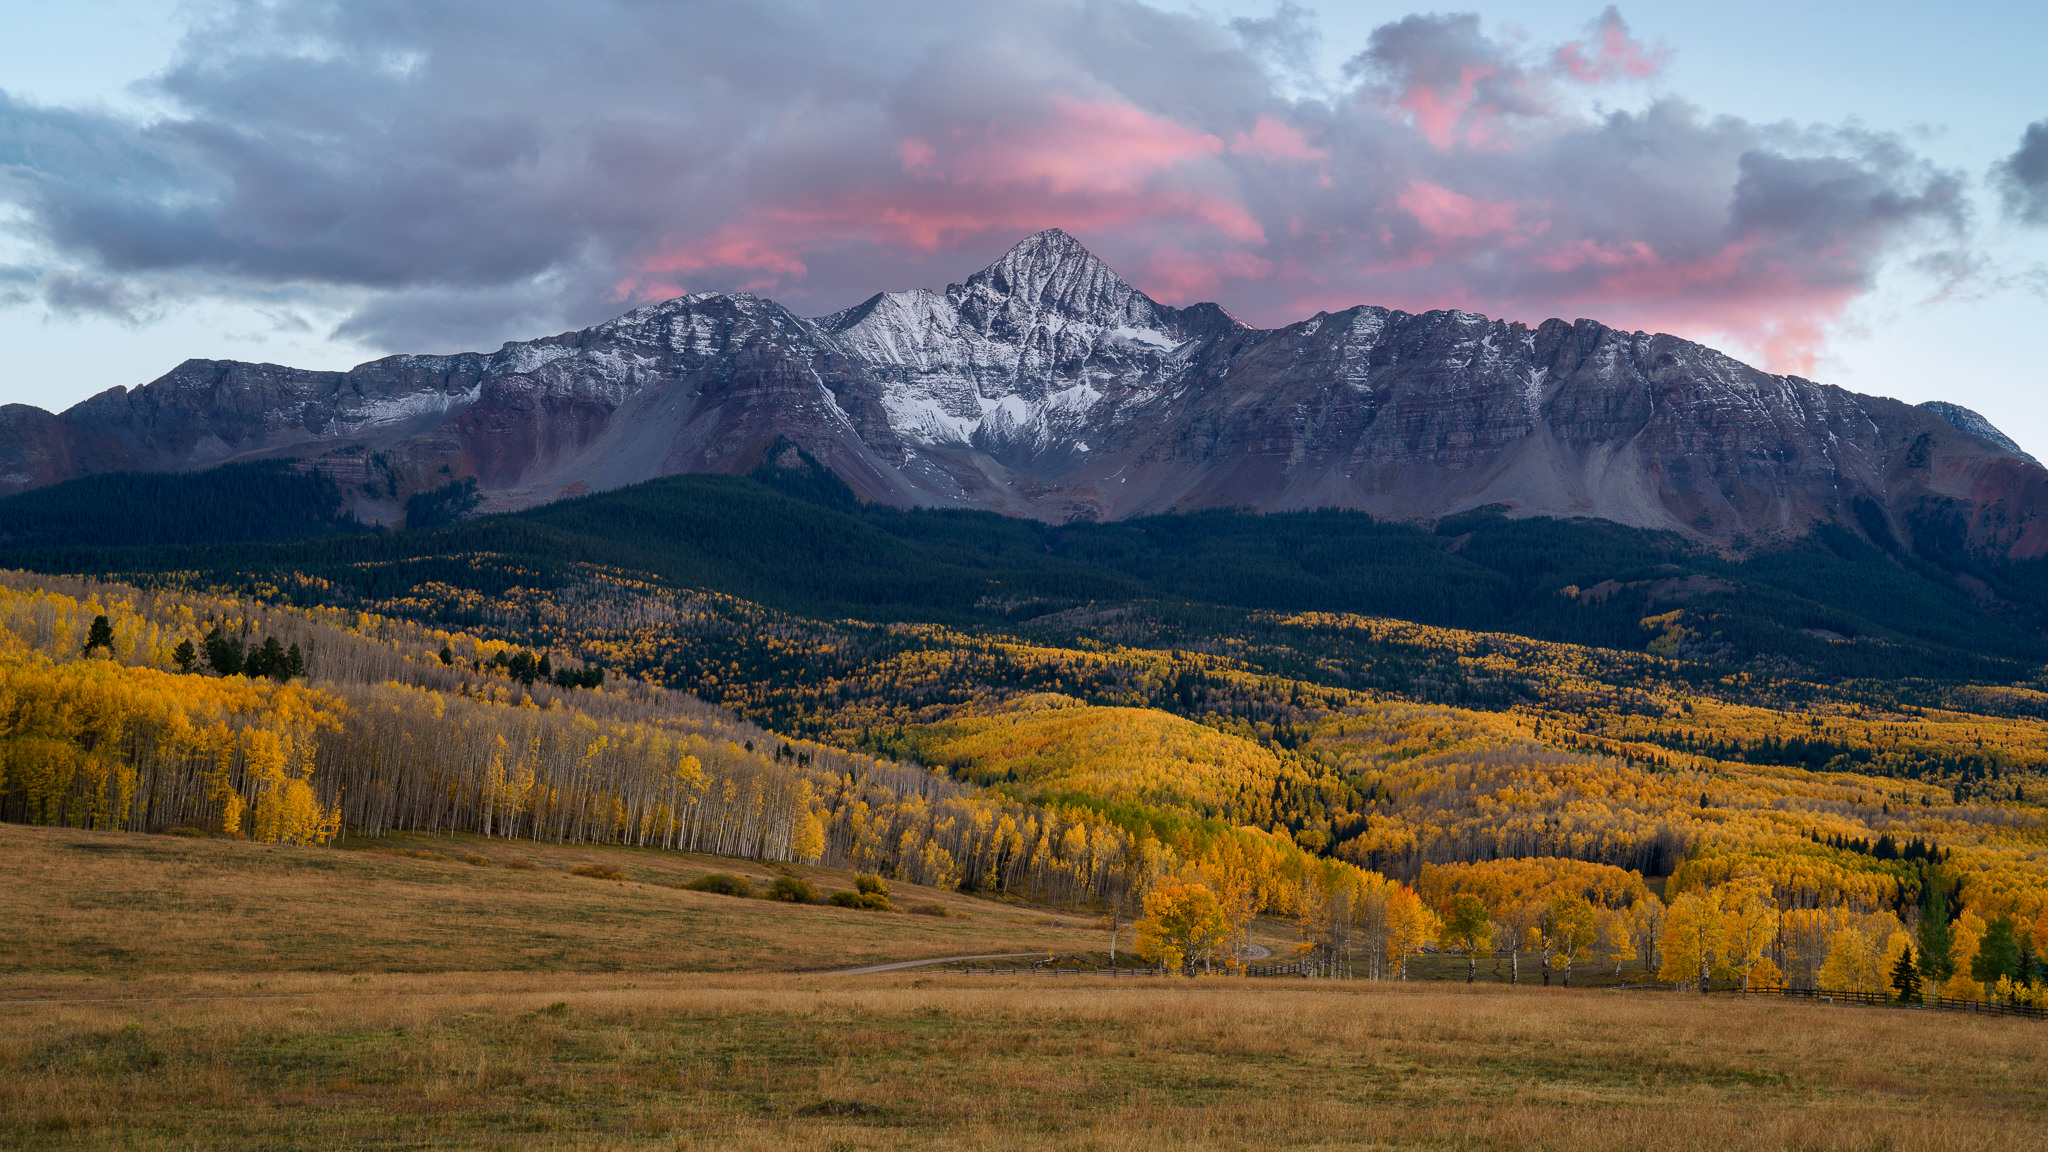
Right before the second workshop started, a few attendees already made it to the campground and were asking about dinner options. As we started driving out from the campground, I asked the participants to grab their cameras at the last minute, as I saw a potential for a good sunset. Although we were nowhere near a good vantage point, I drove as fast as I could when I saw clouds changing colors. It was definitely worth it, since we were able to capture a beautiful sunset that day, with Mt. Sneffels forming the center of the composition:

ILCE-7RM2 + FE 24-70mm F2.8 GM @ 70mm, ISO 100, 1/4, f/5.6
Sadly, the hay stacks were already gone (the local farmers have been picking them up rather early during the past few years), so I could not use those for the foreground. Still, having the green grass in front of the frame, with a layer of trees in the middle, then the snowy mountain peaks in the back, complemented by the pink tones of the clouds in the sky created a beautiful, layered composition that worked out at the end. When it comes to post-processing, there was not much I had to do in Lightroom aside from adjusting the highlights + shadows and some whites + blacks for contrast. To bring out some contrast in the distance and some colors in the sky, I brought the image into Photoshop and used Nik’s Viveza, as explained in detail in our Workflow and Post-Processing course.
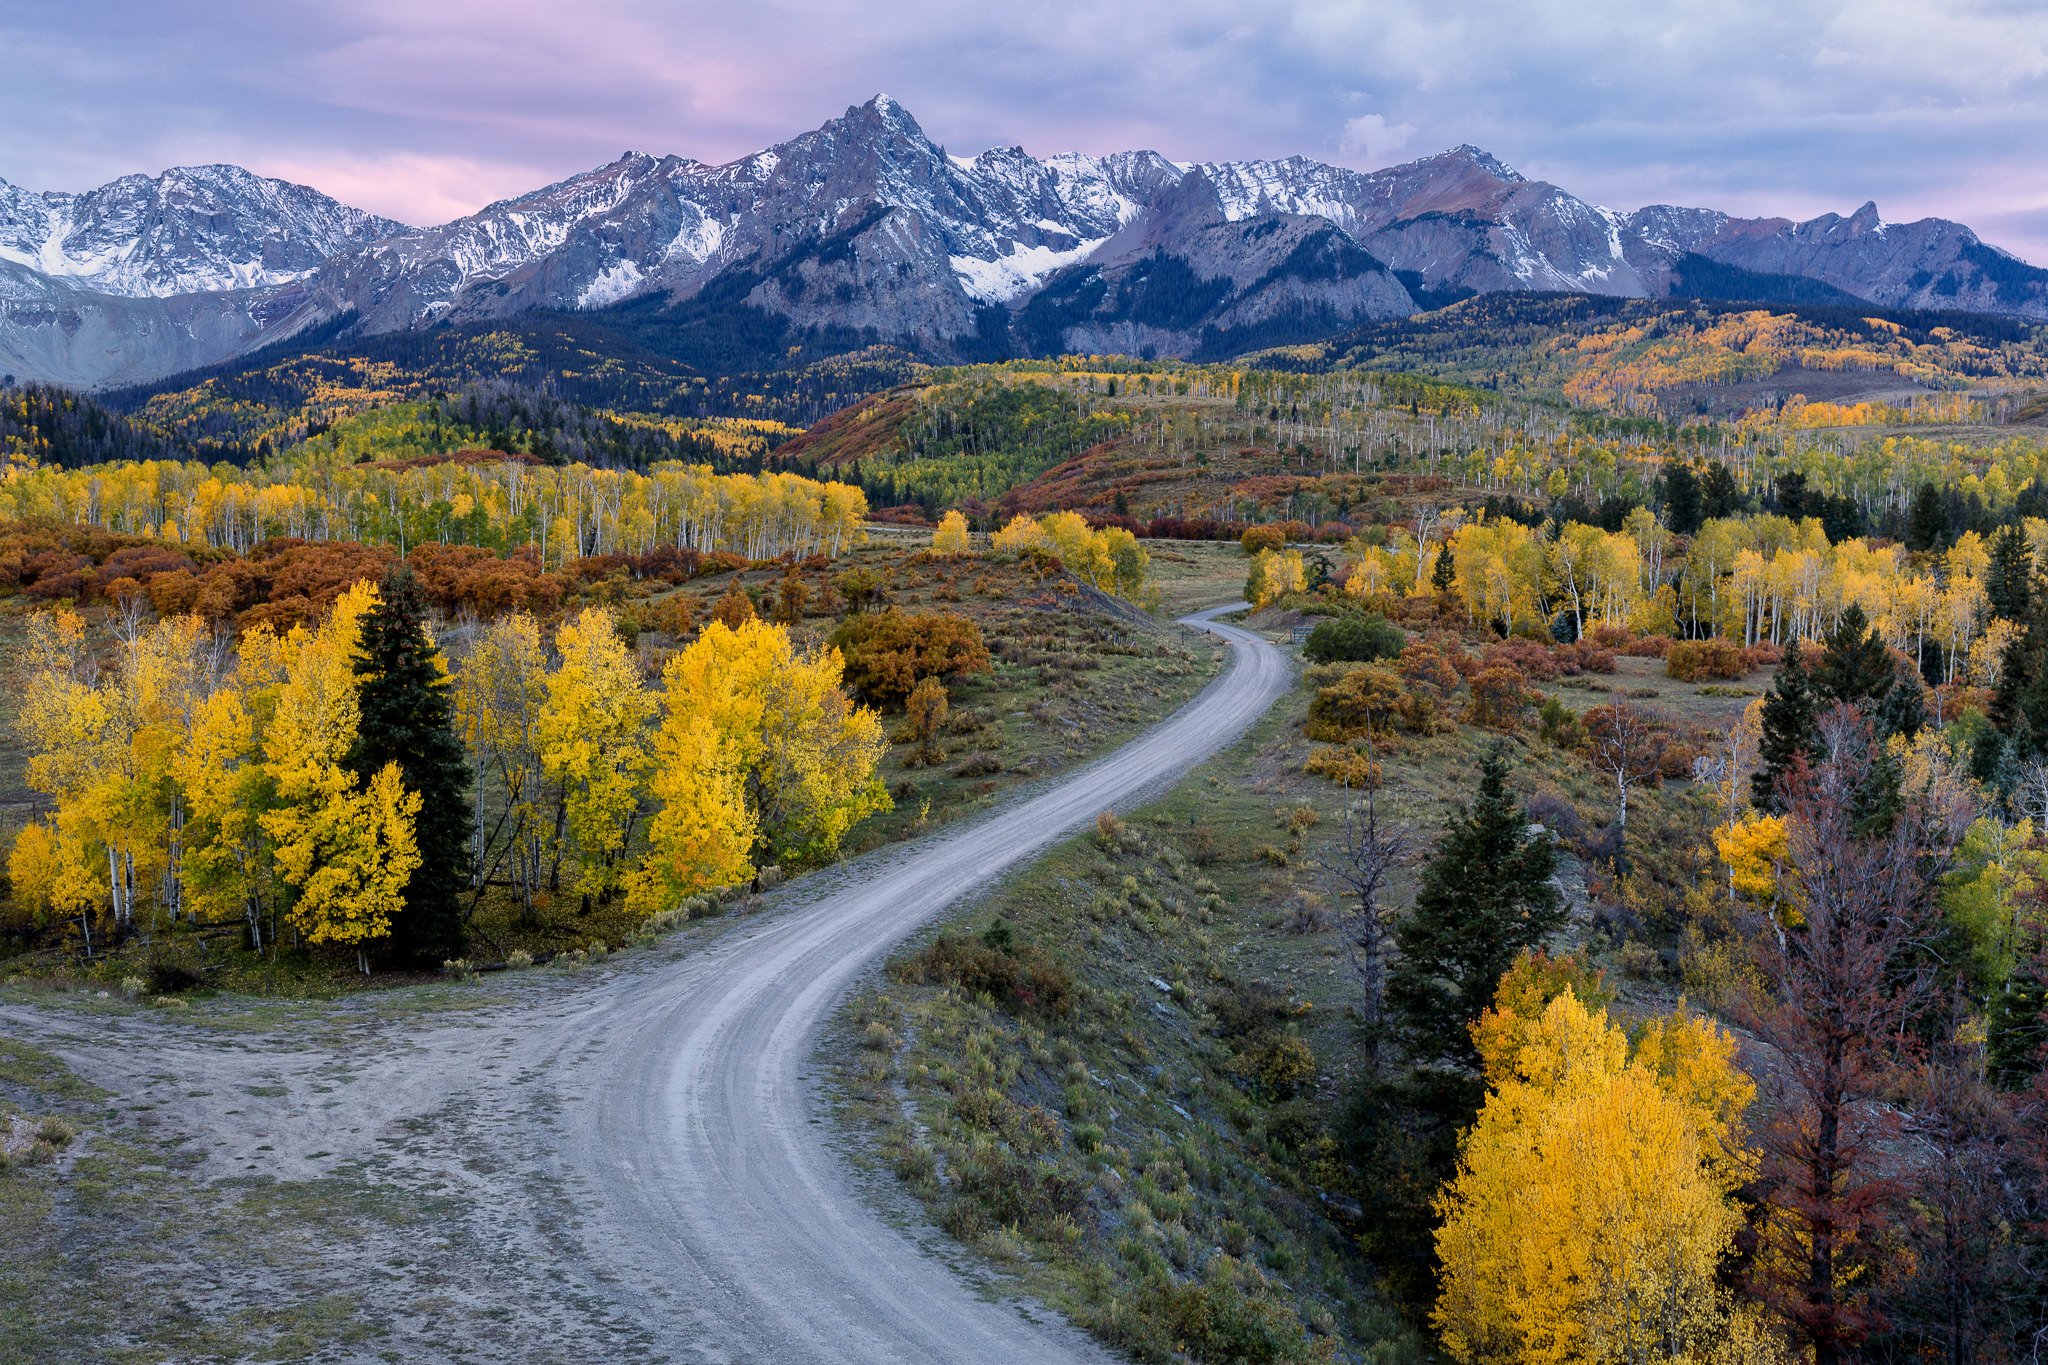
My favorite shot from the workshop was photographing the below overlook at sunrise. Here, I instructed everyone to use the curvy road as the main element of composition to lead the viewer’s eye to the beautiful mountain peaks in the background:
Canon EOS 5D Mark IV + EF24-70mm f/4L IS USM @ 39mm, ISO 200, 1/4, f/8.0
Using curvy roads or features of landscapes like this, especially when they have an “S” shape to them, is always a powerful way to create a beautiful image, since they are strong elements of composition. They also can help in dividing the landscape into two parts, cutting across the frame and creating separation. Although we were all hoping for a more colorful sunrise, once I saw a little bit of color in the sky, I already knew that it would be a good image to work with. In terms of post-processing, just a few key adjustments in Lightroom already brought out the best in the image. As usual, I started out in the Camera Calibration sub-module by changing the color profile to Camera Standard, then gradually moved up to Lens Corrections and Detail sub-modules for some basic tweaks, then once I got to the Basic panel, I dialed -50 for Highlights, +30 for Shadows, +20 for Whites and -30 for Blacks and left all other slides alone. Next, I boosted the colors in the sky a little bit using a gradient filter and used the adjustment brush to slightly brighten out the road. It was already bright as is, but giving it a very subtle boost of exposure allowed me to bring it out a bit more from the rest of the scene. I took the image into Photoshop to clone out a few areas on the bottom left side of the frame, as you can see in the before and after view of the shot:
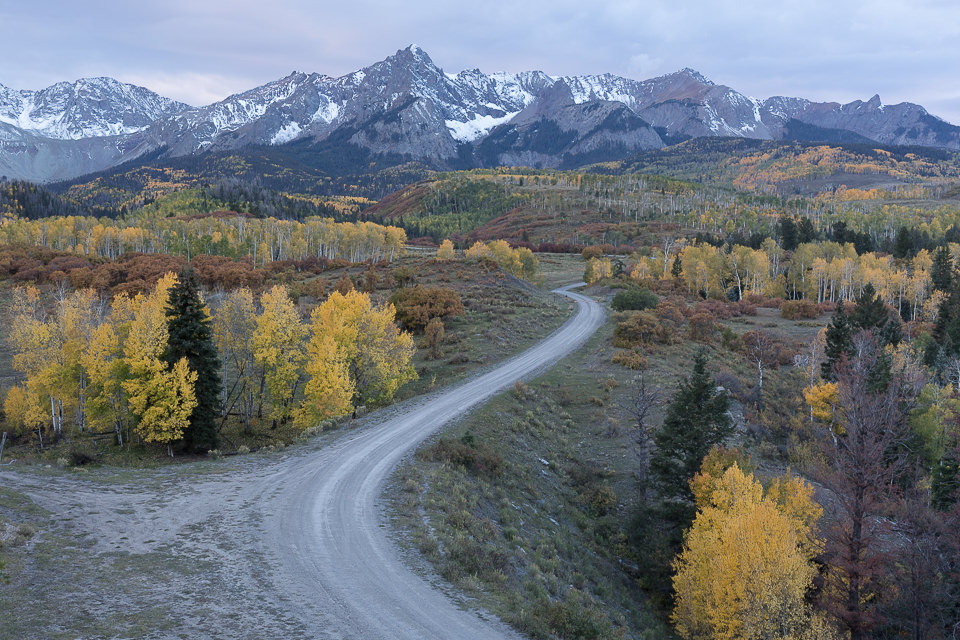

The contrast in the background, along with the clouds were brought up using Nik’s Color Efex and Viveza, as I have detailed in our Workflow and Post-Processing course. Nothing special, but definitely enough to make an impact. Please note that the drastic changes in colors, tones and contrast already took place in Lightroom using the above-mentioned adjustments. I only used Photoshop for very quick changes, which only took a couple of minutes in total. Always keep in mind that you have to start with a solid image to begin with when editing – there is no sense in trying to make something special from a badly composed, badly exposed or badly framed image…
Another shot I added to my 2016 collection is a bit unusual compared to others, as it is more focused on detail than a grand landscape:
NIKON D810 + 105mm f/1.4 @ 105mm, ISO 100, 1/10, f/16.0
Here, I used the new Nikon 105mm f/1.4E lens (next to be reviewed) for capturing a shot with a high level of detail that is composed of a couple of images focused at different distances. I used the focus stacking technique in order to achieve the result I was after, which after putting together in Photoshop, worked out quite well – as you can see, everything from the first tree in the foreground, all the way to the most distant tree in the background is in perfect focus. If you look at the exposure details, you will notice that I used a pretty small aperture of f/16 – not ideal in terms of diffraction. Although I could have used a larger aperture for even more details, I would have needed to capture a lot more frames, which is not something I wanted to go through, as it would have dramatically increased both my shooting time and my post-processing time. In addition, we were shooting on a pretty cloudy day and the light conditions were changing very quickly every minute, which is why I ended up shooting at a small aperture with no more than 3 frames in total for the stack.
The last image from the workshop was captured after the workshop was over. A couple of my friends joined me for this particular shot, which we were lucky to capture at sunset, with Wilson Peak serving at the center of the composition:
ILCE-7RM2 + FE 24-70mm F2.8 GM @ 63mm, ISO 100, 8/10, f/11.0
The colors in the clouds were spectacular and we were able to get a stunning image of the landscape, with some late fall colors. Since there was not much to put in the foreground aside from the grass, I had to crop both sides of the frame a little in Lightroom. Aside from the usual adjustments in Lightroom and a little bit of boost of contrast for the distant mountain, there was not much to do in terms of post-processing.
This concludes images from late fall in Colorado. Let’s now jump over to the much more recent images from New Zealand, which I was fortunate to visit a few weeks back in December.
This time, there were three of us – Spencer, my friend Tunc and myself, set to explore New Zealand for the first time. After rather quick planning calls (we made a decision to travel to New Zealand literally two weeks before the trip), we decided to focus on the north island only for a few days, before shifting over to the south island in pursuit of photographing landscapes. We started out in the north-eastern side of the north island, where we had a chance to drive around the coastline and find places to photograph.
The idea for the New Zealand trip was to visit, explore and practice our photography skills on an unknown (to us) landscape. Before the trip, both Spencer and I agreed on letting our creative vision drive us to places. We purposefully skipped the process of looking at other people’s images, photo spots, etc., because we wanted to come back with images that we executed on our own. Although I have never been to New Zealand, I have previously seen many images from there, from the well-known and popular spots such as the Wanaka Tree, Church of the Good Shepherd, Lake Matheson, etc, so I was not looking forward to coming back with the same shots. Instead, we purposefully skipped those popular spots and decided to photograph the areas we loved as we drove by them.
That’s pretty much what happened in the north island – on our first day, we were driving on the road and saw a beach with interesting rock formations. There was a triangular rock sticking out of the ground, with a bunch of birds sitting on it. We stopped at the next pull-over, walked back and decided to stay there for sunset. With low tide, the water pulled away from the rock formations, allowing us to use the beautiful foreground as part of the composition. That’s where I captured one of my most favorite shots from the trip:
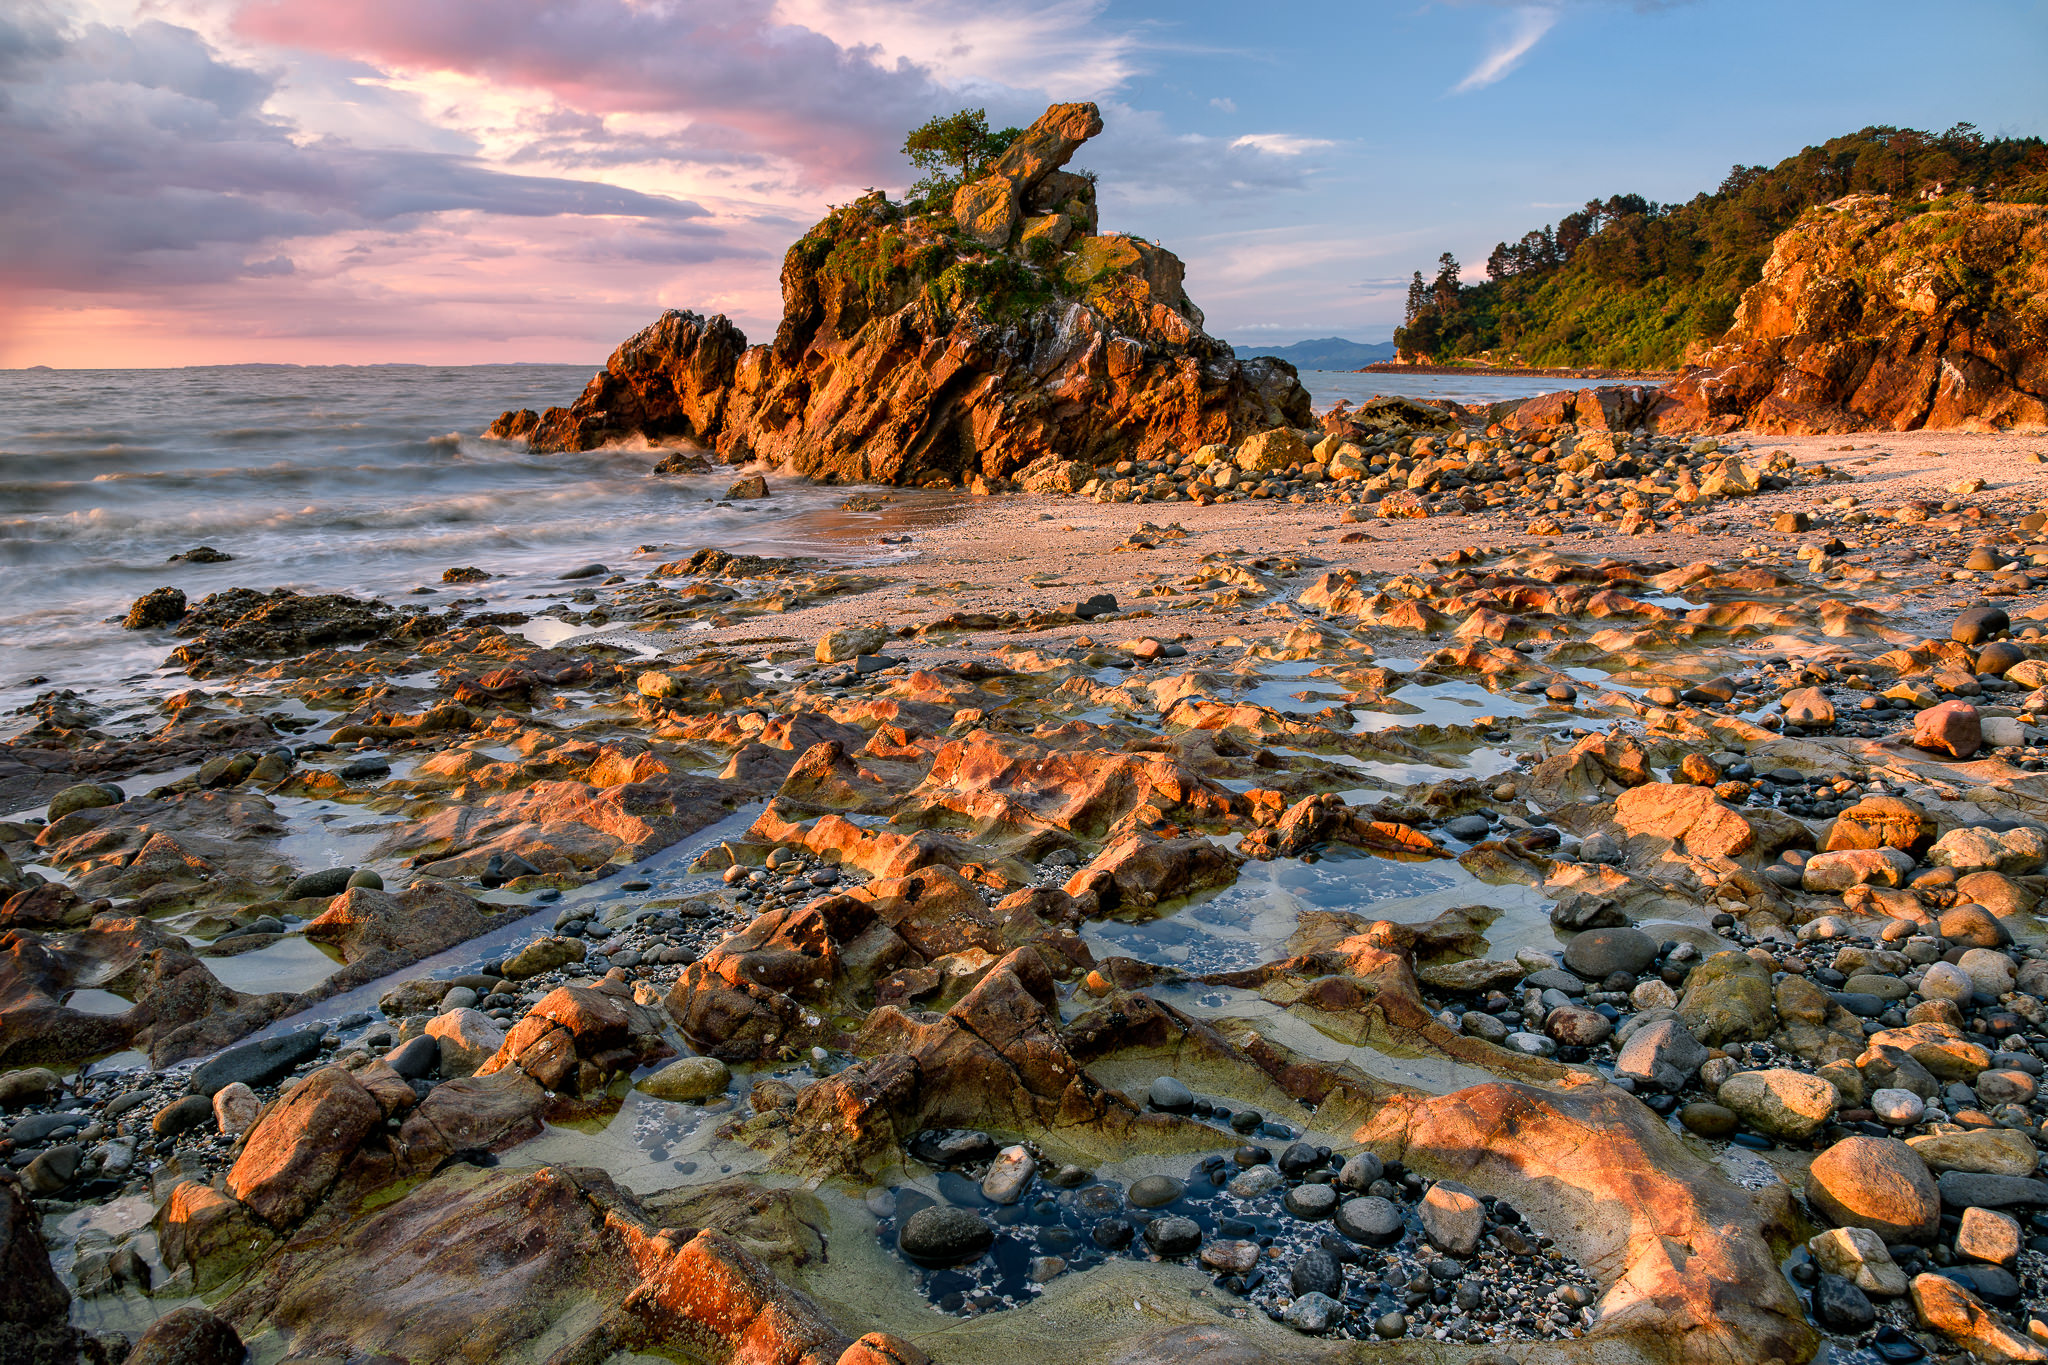
NIKON D810 + 24-120mm f/4 @ 24mm, ISO 64, 1/1, f/11.0
As the sun was setting, the last light rays coming from the horizon really painted out the foreground. I walked around for a few minutes until I found one area that presented a good opportunity, where the rocks and the light falling on them formed a triangular shape. That’s where I stopped and set up two tripods side by side – one with the Nikon D810 + Nikon 24-120mm f/4G VR lens and the other with the Fuji X-T2 and the 10-24mm f/4 OIS lens. I started taking pictures and as we neared the sunset time, the colors started to appear in the sky, with the last rays of light beautifully shaping out the foreground. It was a beautiful sunset that lasted for a quite a while, something we don’t normally get to experience in most of the US. With New Zealand being so far south of the globe, both sunrises and sunset can definitely last a while, especially in the summer, which starts in December.
The above image was taken at a full second exposure. The light was so soft that aside from my polarizing filter, I did not have to worry about using any other filters. Although the image might appear like an HDR image, it is not! All I did was dial -50 for Highlights and +50 for Shadows in Lightroom and everything popped right back to where I wanted. In fact, even not touching the Shadow slider at all still showed a lot of detail in the shadow areas, due to the softness of light at sunset! Truly stunning!
The next shot was captured from a helicopter using the Fuji X-T2, with the XF 35mm f/2 R WR mounted on it. Given the price, size and weight of the lens, I have to say, it surely should be on a “must-have” list of Fuji lenses if you own the Fuji X system. In fact, this is exactly the combination I used when we were in the super rainy Milford Sound area. Spencer, Tunc and I hiked under non-stop rain and the Fuji X-T2, along with the 35mm f/2 WR was on my neck the entire time! At one point of time, when I put my hands into my pockets, they were full of water – that’s how much it was raining that day. Spencer’s Nikon D800E ended up dying in such conditions, until it was fully dried and brought back to life from dead, while the Fuji X-T2 kept on shooting! I had Spencer and Tunc capture a shot of the soaked X-T2 with the lens, so as soon as they send me the image, I will update this post with it. In short, the weather-sealed X-T2 with the 35mm f/2 WR proved to be a workhorse combo, although later on I also subjected my non-water resistant 10-24mm f/4 OIS to similar conditions and it also did quite well to my surprise. Anyway, coming back to the below shot, I managed to capture it off a helicopter, while Spencer was busy taking pictures with two Nikon DSLRs, with the window of the helicopter taken off. It was definitely below freezing in the cabin as we were shooting in such extreme conditions. I have not gone through all of the images from the helicopter ride yet, but this one in particular is one of my favorites:
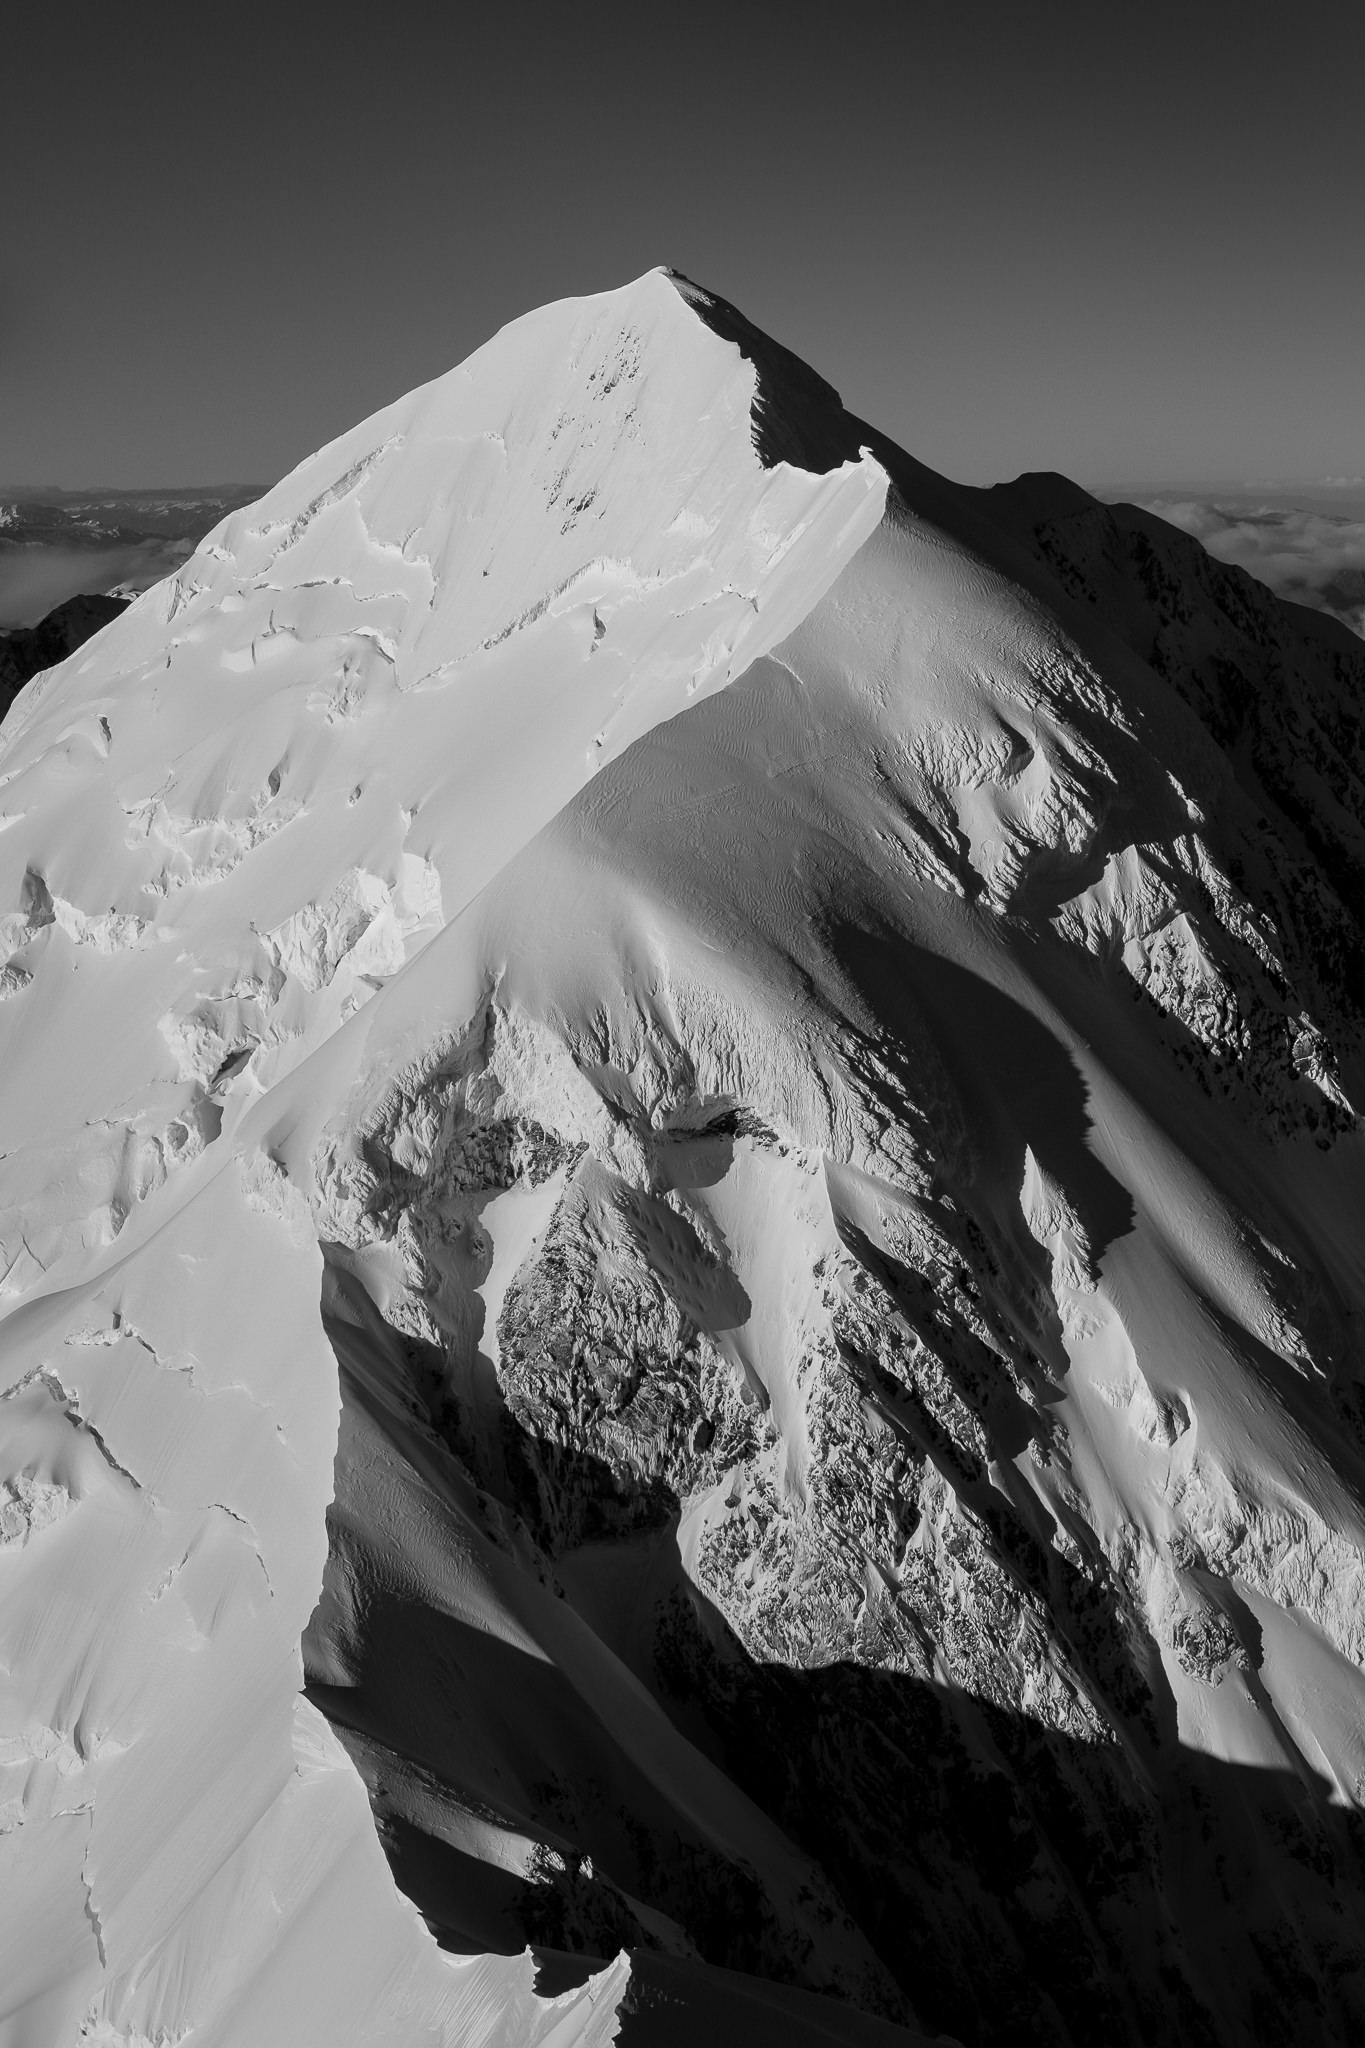
X-T2 + XF35mmF2 R WR @ 35mm, ISO 250, 1/3800, f/5.6
I switched the camera to vertical orientation and took a shot of one of the mountains from its opposite side as we were flying over it. While I like the color version of the shot, converting it to black and white really brought out the tones and shades of the mountain, showing the beautiful “S” curve that makes up the composition. Converting to black and white in Lightroom was easy – once I changed it to Black and White, all I did was grab the sky and darken it a little and that was it.
The next image was also captured from a helicopter and this time we were flying over the Tasman glacier. I asked Spencer to move his body a little, so that I could stick the X-T2 with the 35mm f/2 WR out a little and capture the glacier without any window reflections:

X-T2 + XF35mmF2 R WR @ 35mm, ISO 200, 1/1000, f/5.6
Here, the Tasman glacier worked out great as part of the composition, dividing the two sides of the mountains in the frame diagonally. The layered mountains, along with the puffy low clouds in the distance brought out the background, while the blue sky over the clouds added a layer of color. Definitely one of my favorites from the helicopter ride that day!
After we started heading back to the airport, I noticed that the beautiful streams with glacial water from the Tasman lake were forming crazy textures, so I captured the below shot from my window, diagonally cutting the river through the frame:
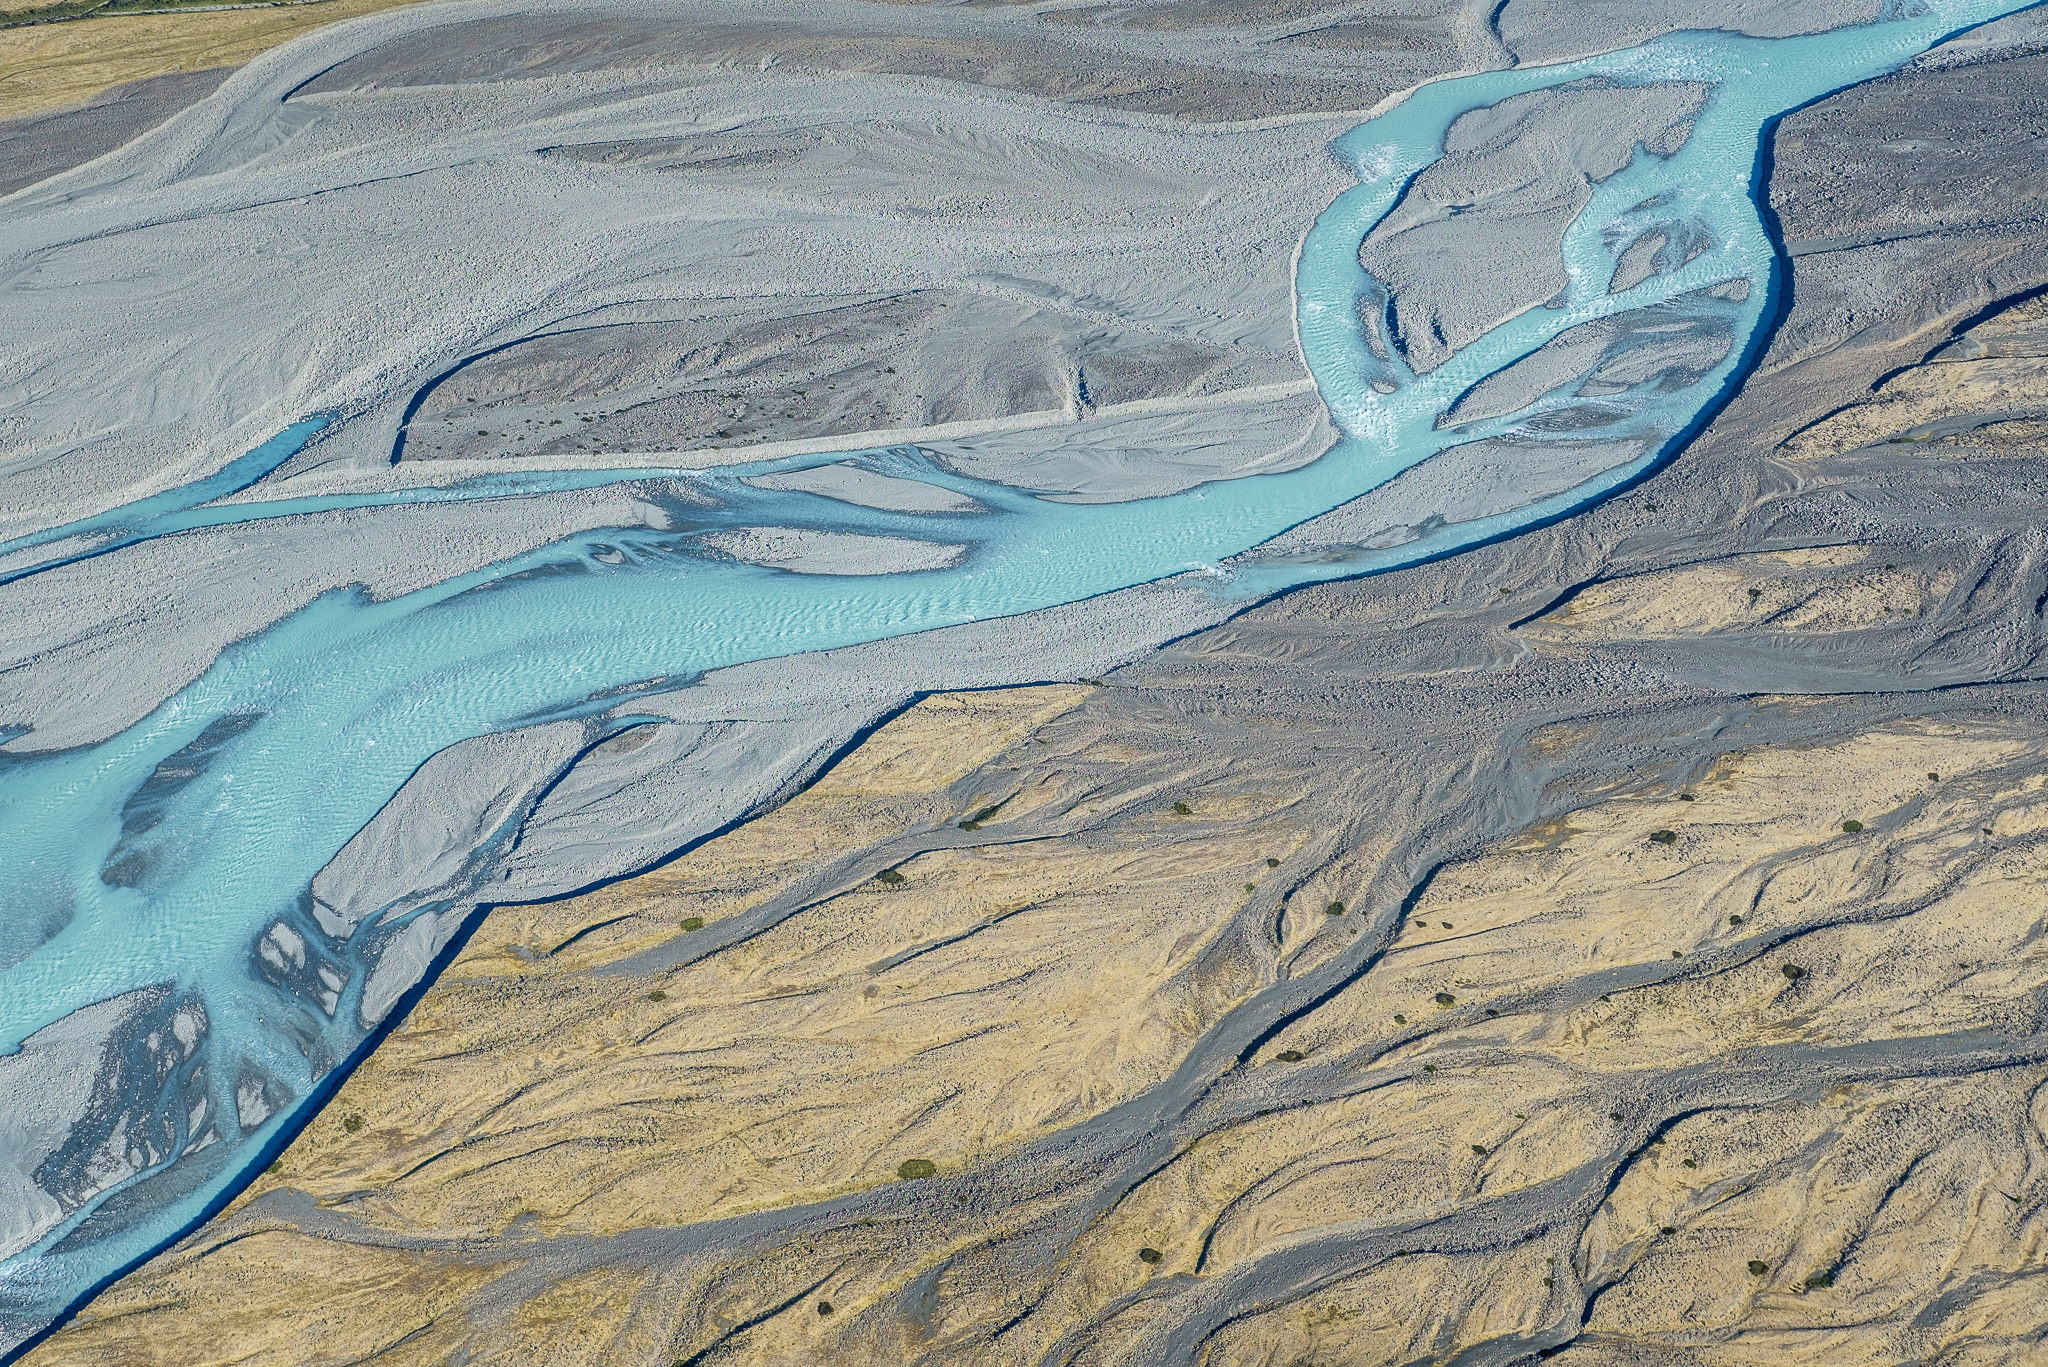
X-T2 + XF35mmF2 R WR @ 35mm, ISO 200, 1/350, f/6.4
What I love about this shot, is how the glacial river is separating two different tones of colors – the top left side is painted with white and gray colors, while the bottom right side of the frame has some yellow grass and dark streams that no longer have any water in them. Another diagonal composition that works!
As we were flying between and over the tall mountain peaks, we were able to capture some beautiful details of the mountains:
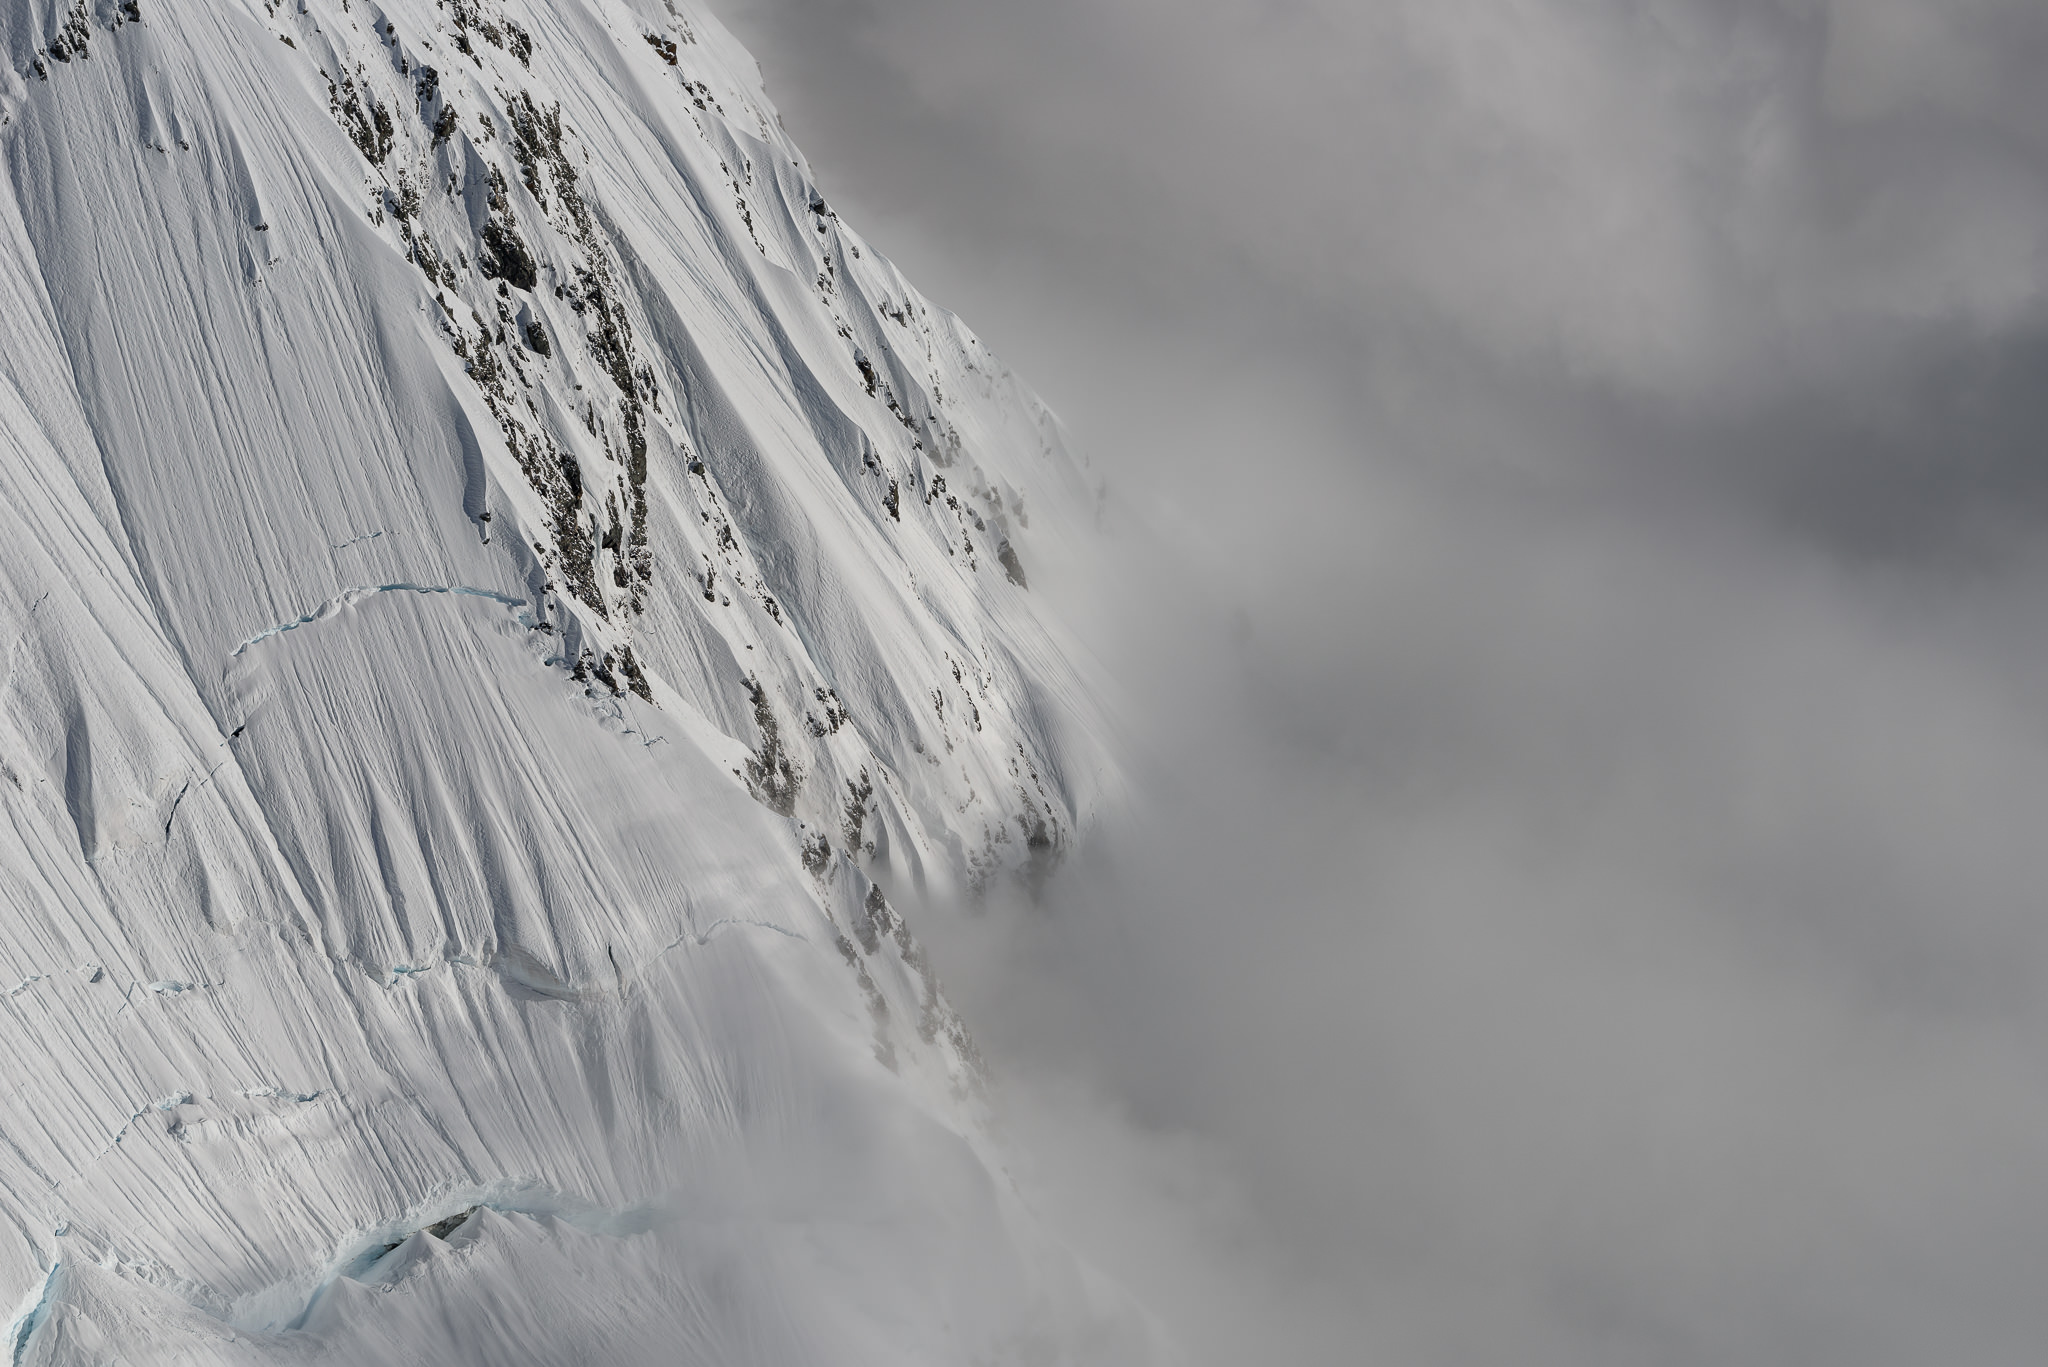
NIKON D810 + 70-200mm f/2.8 @ 120mm, ISO 100, 1/500, f/9.0
I love the way the view of the mountain glacier and its features is cut off by a cloud to its right, creating a nice separation of the two. I pretty much did not touch this one in terms of post-processing, as the amount of contrast and colors in the scene is enough to make it a nice shot.
While staying on top of one of the mountains might not be for everyone, Spencer, Tunc and I decided to stay for a night in one of the huts right on the base of Mt. Cook. Quite a bit of equipment had to be prepared in advance and I don’t know what we would do if we did not have basic climbing equipment like crampons. If you ever decide to do something similar, make sure that you are fully prepared not only in terms of clothing for the extreme, but also in terms of climbing gear, especially if you plan to move around the hut. In fact, we were discouraged from going to certain huts due to poor conditions – in some cases, the helicopter cannot land close to a hut, so you have to hike your way in on top of ice or snow. And if you fall, you are basically done, as you would most likely fall and die. On the day of our stay at the hut, the flying conditions were far from being ideal and we were told, that if a storm rolled in, we might be trapped at the hut for a few days – definitely not something we were prepared for! Gladly, it all worked out, but we were all pretty nervous after waiting for an hour for the helicopter the following morning. The bad thing is, if you are up there during bad weather, you are pretty much on your own. Even rescue helicopters won’t fly in bad weather, since it is too risky.
But doing something like this can surely be rewarding. We managed to climb to the top of one of the nearby peaks, which was more of a hill than a peak. Not a technical climb by any means, but still, a bit steep and nerve-wrecking in some areas when looking down! In some places, we had to be tied to each other, in case one of us managed to fall. And you’d better not lose your axe if you slide down, as that’s the only way you can stop yourself from sliding further down.
At the top, we had a chance to capture a stunning sunset and that’s where I captured this shot, which is definitely my most favorite shot from the trip:
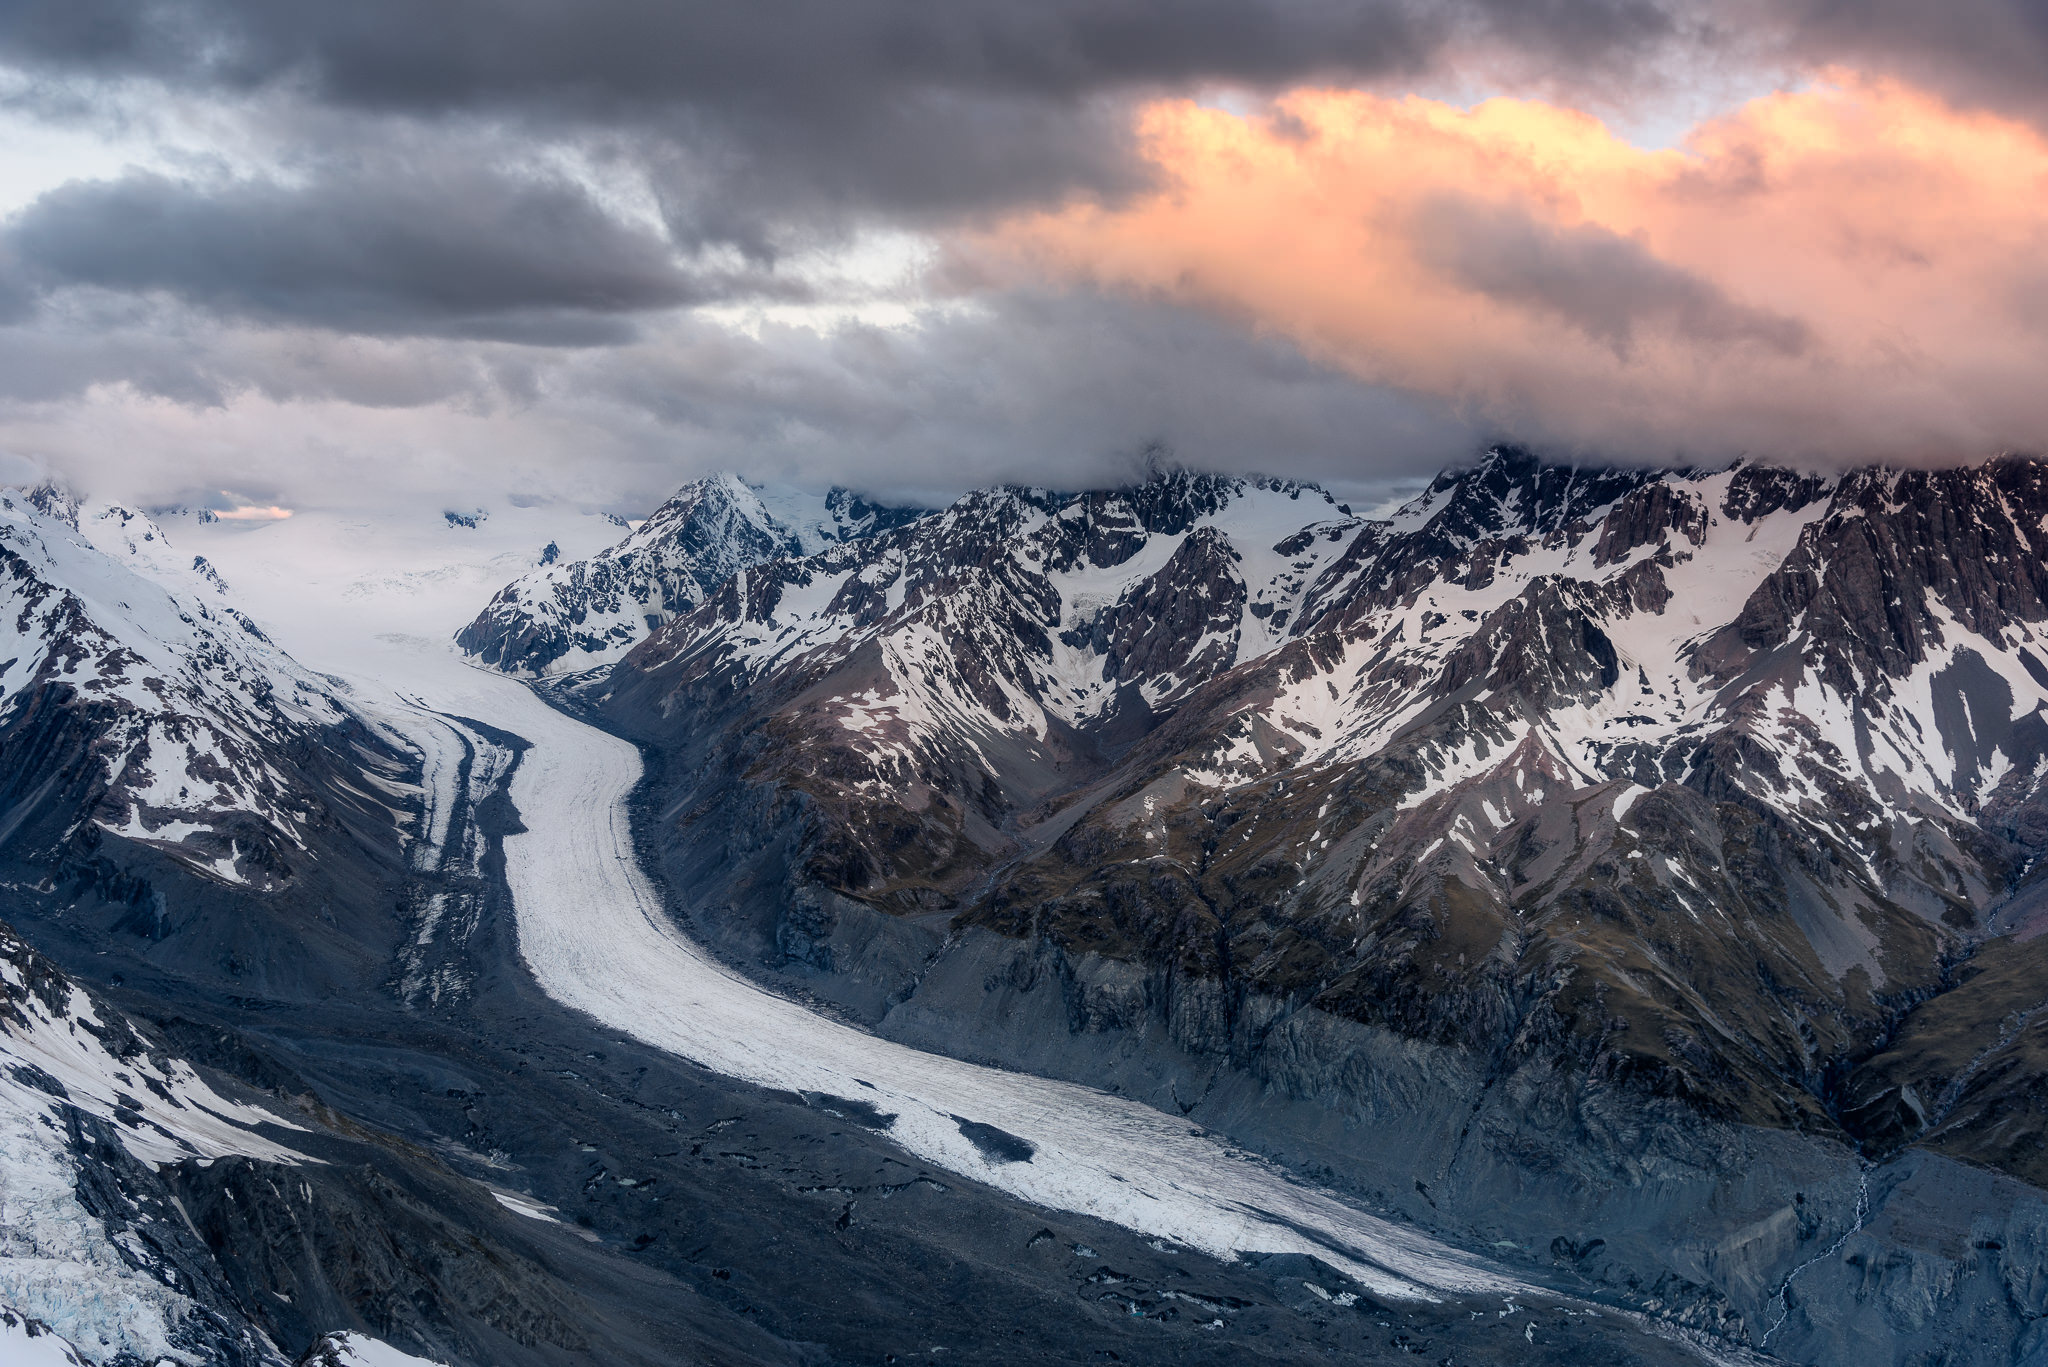
NIKON D810 + 24-120mm f/4 @ 32mm, ISO 64, 1/4, f/8.0
The Tasman glacier is obviously the highlight of this composition. Its grand beauty and its shape is what attracted me the most. Here, you can see that I mostly concentrated on the areas of the glacier that have snow (yes, those dark, dirty areas are all part of it and the glacier is huge!), using the curvy line for the composition. The sunset colors on the top right side of the frame worked out great to counter-balance the glacier, forming a criss-cross composition. For post-processing, I increased the contrast of the overall scene, brought up the shadows a little and dropped the highlights, along with other typical adjustments. Next, I brought the image into Photoshop and performed a bit of dodging and burning to bring out the glacier from its surroundings.
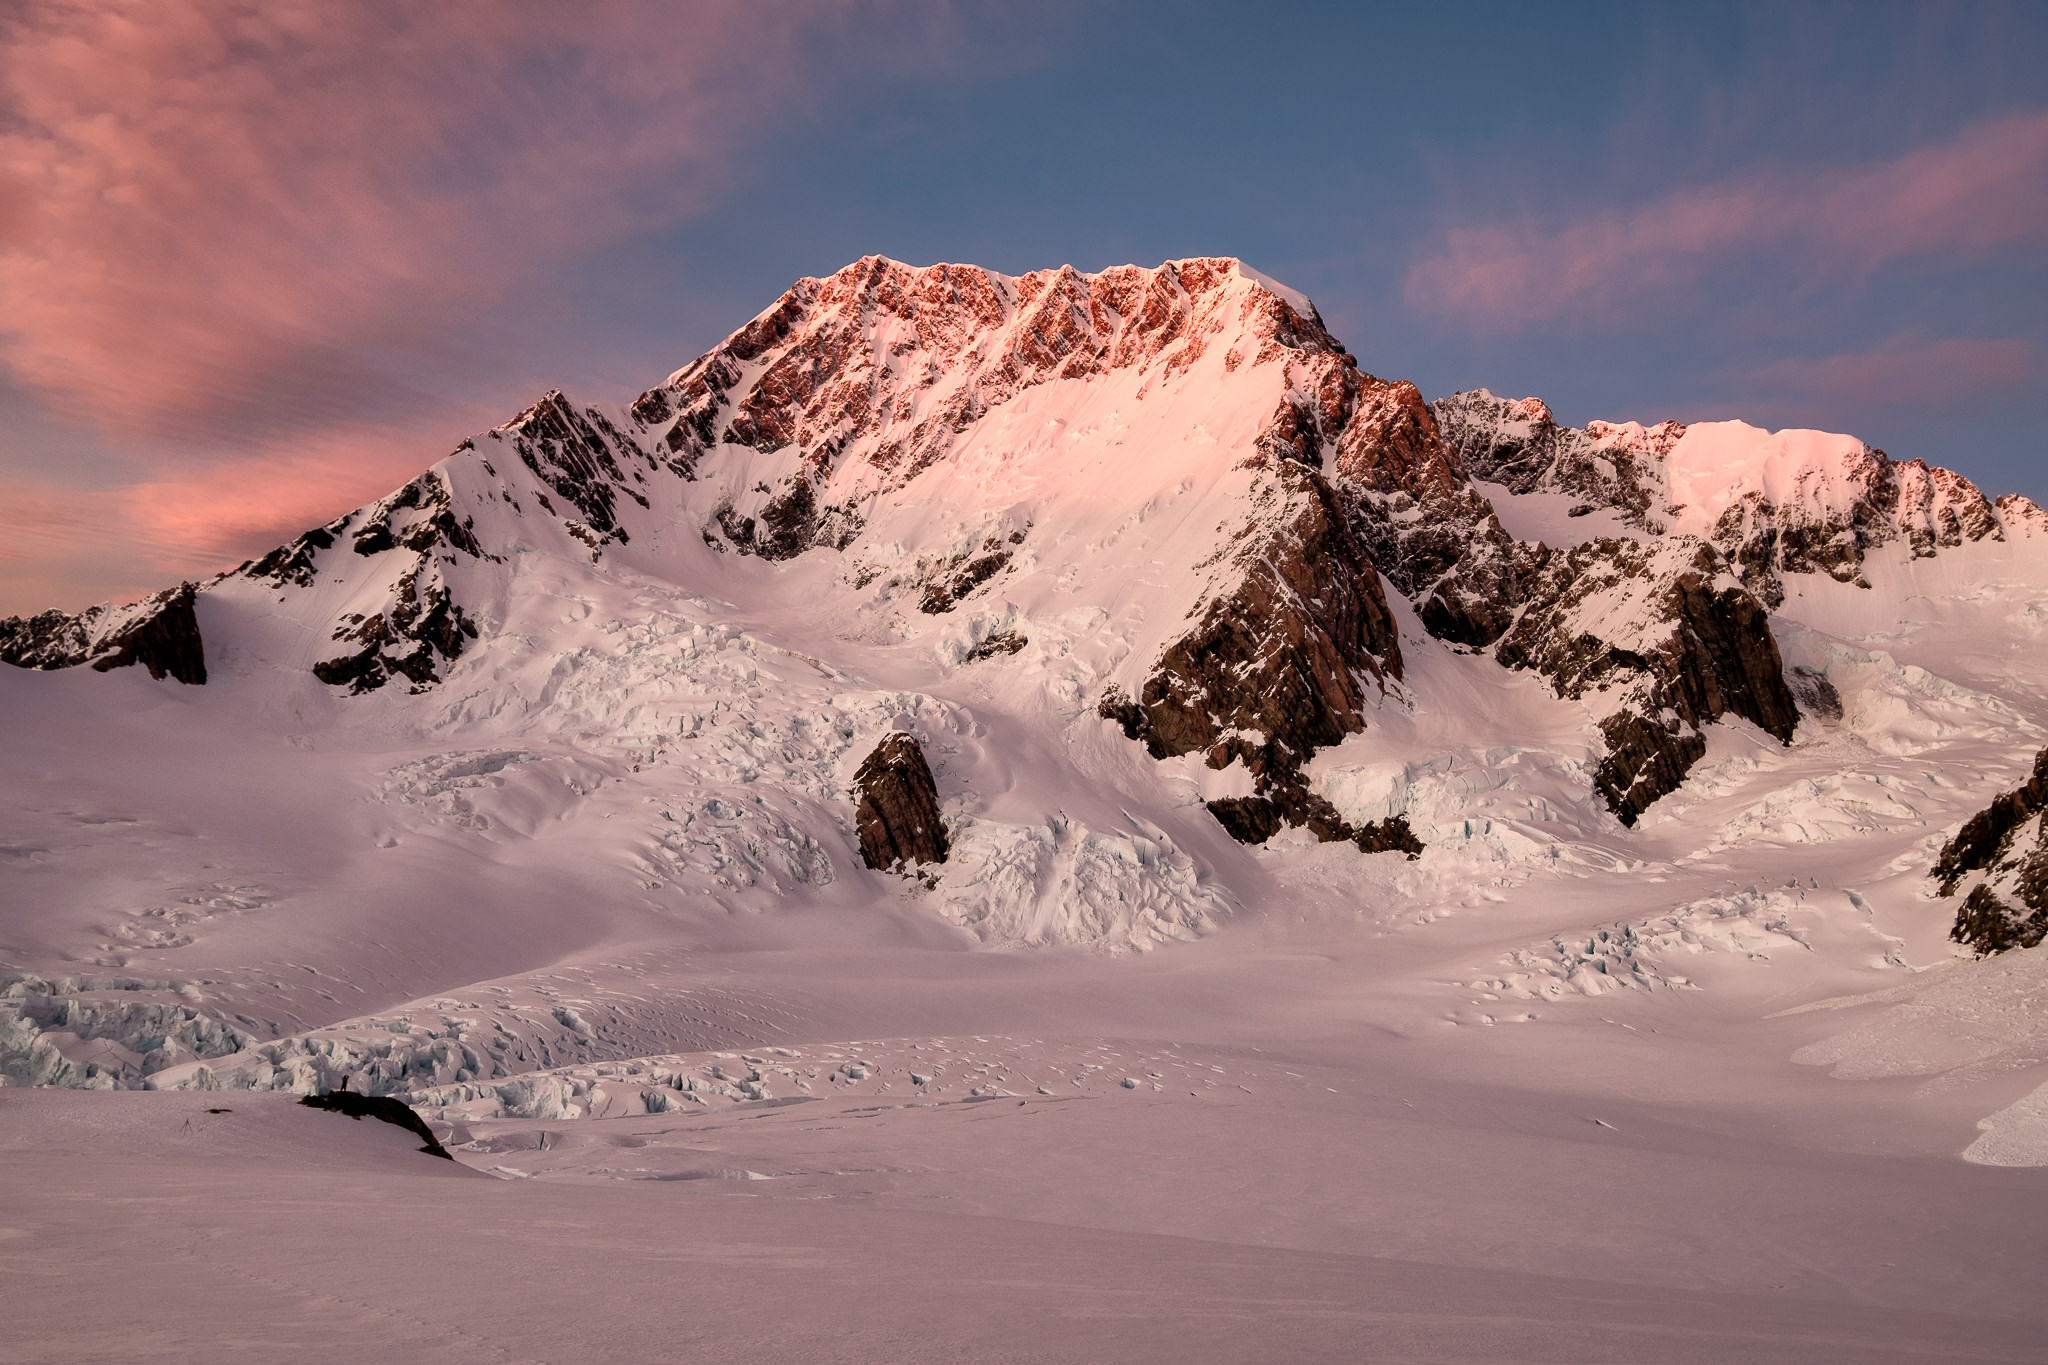
Another favorite, which I captured after landing, is the image of two climbers heading back to the hut after their ascend to one of the nearby peaks. I waited for the climbers to pop into one area that had some light, which worked out as planned:

NIKON D810 + 70-200mm f/2.8 @ 200mm, ISO 64, 1/800, f/5.6
For sunrise the next morning, I mostly concentrated on photographing Mt. Cook. Although I have a few panoramas that worked out quite well, the shot below is my favorite:
X-T2 + XF10-24mmF4 R OIS @ 18.2mm, ISO 200, 1/10, f/8.0
I wish I was at a higher vantage point to capture Mt. Cook, since I could have placed something in the foreground to make the shot more interesting. Still, the beautiful sunrise colors hitting the peak and the surrounding clouds worked out beautifully here and the glaciers that are surrounding the mountain really brought out the crisp details that I was after. It was an amazing experience standing there and photographing the sunrise! Again, I used the trusty Fuji X-T2 with my 10-24mm f/4 OIS to capture this shot, although I do have a similar shot that I captured with my Nikon D810 + 24-120mm f/4G VR as well.
While at New Zealand, we were fortunate to witness the stunning display of wildflowers in the south island. I was particularly in awe of the beautiful lupines, which were all over the place. As we drove along the main roads, we would often stop and take pictures whenever we encountered large fields of wildflowers. Here is one of my favorite shots from some place off the road:
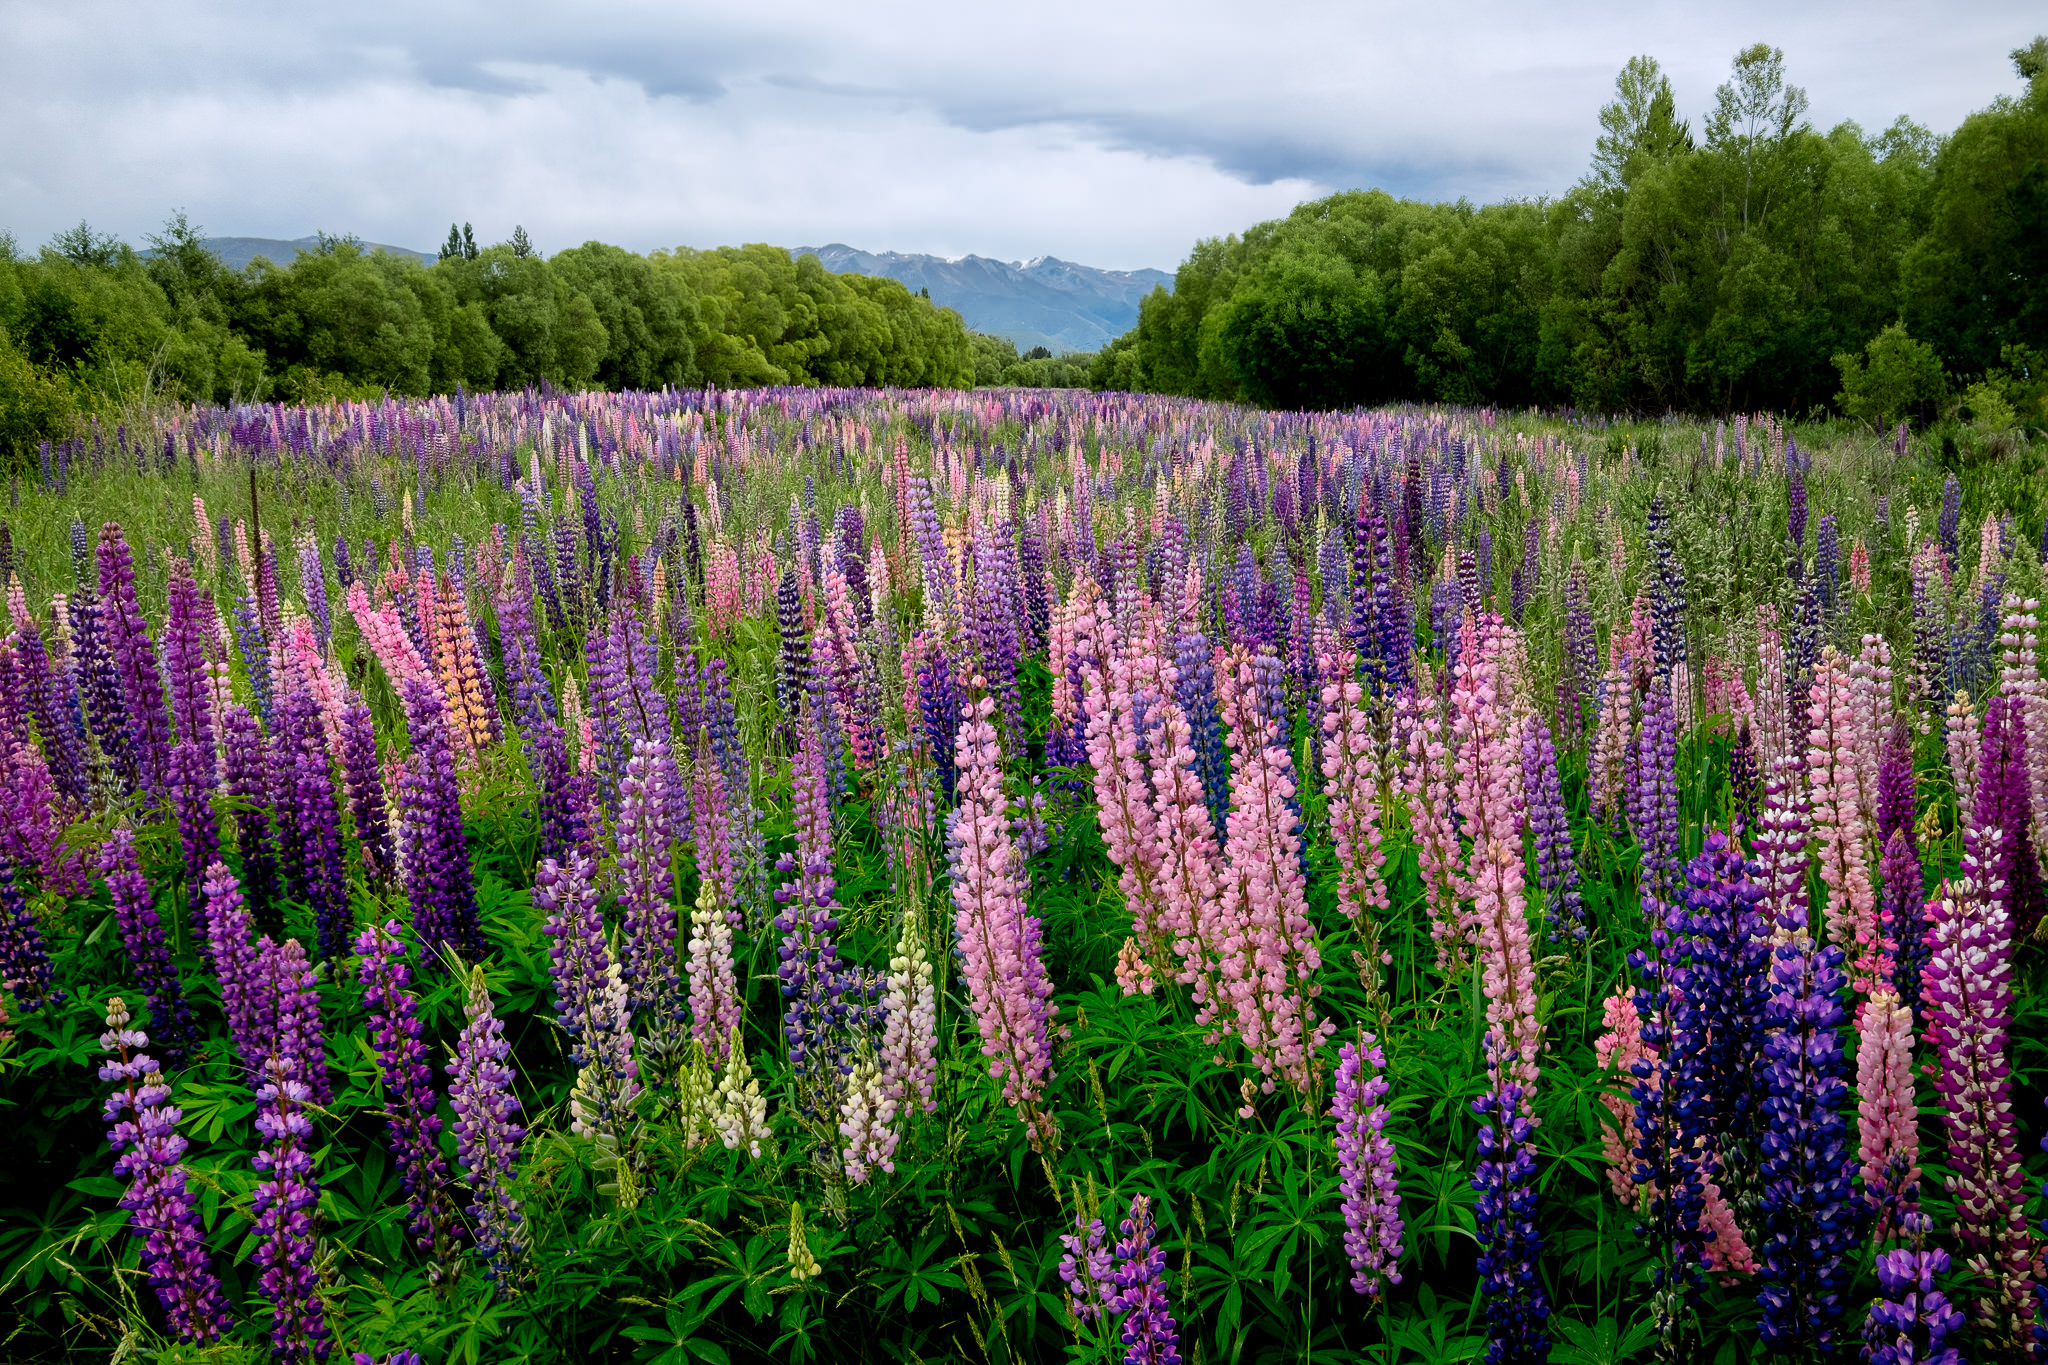
X-T2 + XF10-24mmF4 R OIS @ 18.2mm, ISO 200, 1/50, f/11.0
As you can see, it was unbelievably beautiful! For this particular composition, I used the lupines in the foreground as the primary subject, while placing patches of trees in the middle in “V” shape in the center, leading the eye from the bottom of the frame towards the distant mountains in the background. Again, the Fuji X-T2 with the 10-24mm f/4 OIS were used to capture the shot.
While in New Zealand, we were also fortunate to witness a few rainbows. Although most of the encounters happened while driving and we did not have stunning rainbows that lasted a long time, as soon as we saw one, we would try to find a place to shoot the rainbow from, so that we had something in the frame to complement it. In this particular case, we stopped close to a field that was full of lupines, so all three of us ran in different directions to capture the lupines with the rainbow in the frame. Here is what I ended up with:
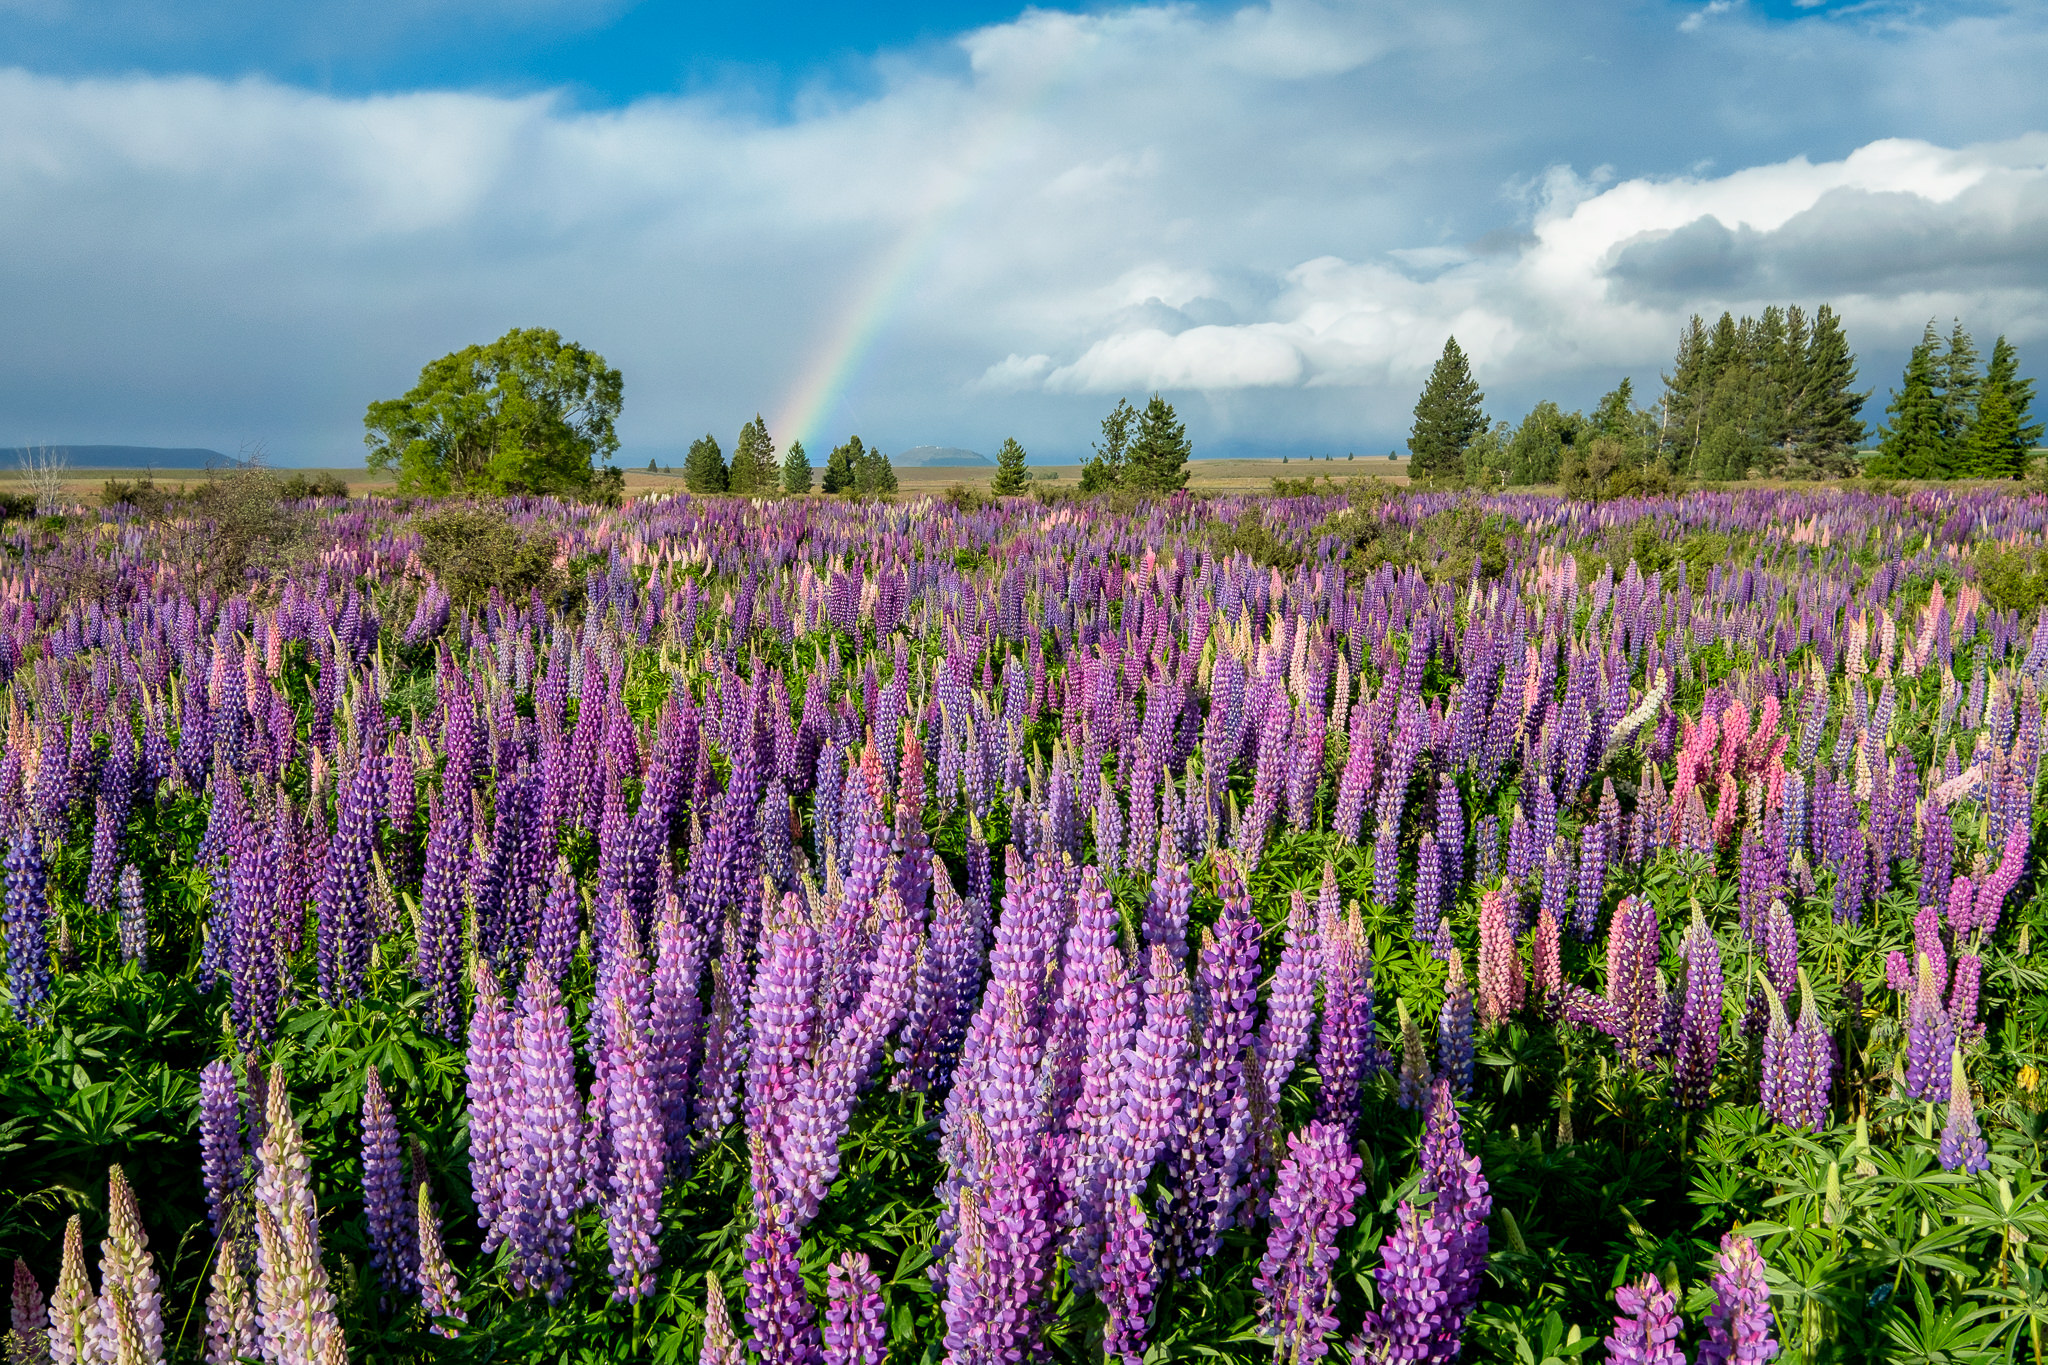
X-T2 + XF10-24mmF4 R OIS @ 24mm, ISO 800, 1/340, f/11.0
I wish the rainbow was full, but I had to work with what I had! And it did not last long – the rainbow was gone after a couple of minutes. I placed the large batch of lupines right in front of me, trying to work the rainbow into the shot. I did not want to cut into the trees to the left of the frame, so I ended up putting the rainbow a bit to the left of the center. While not ideal, and some trees are cutting into the rainbow, I still picked this one as one of my favorites from the trip.
The next shot I want to show you is from the hike to Hooker Lake. I captured this one close to sunset time, as Spencer, Tunc and I were on our way to the lake, with a bunch of equipment, including a drone. It was a pretty long hike and Spencer volunteered to carry the drone to the lake, while I carried it on our way back. As you hike to the lake, you will be going on a few suspension bridges. As I was about to step on one, I captured the following image:

X-T2 + XF10-24mmF4 R OIS @ 24mm, ISO 200, 1/20, f/11.0
What I like about this image, is that the bridge and its sections serve as a perfect way to lead the viewer’s eye into the stunning landscape in the background, while all other parts of the image, whether it is the beautiful snowy mountain peaks, or the colorful glaciers, or the greenery on the bottom of the frame are nicely complementing the framing. Some color in the sky would have been phenomenal, but perhaps I can plan that for next time, as I really wanted to capture the Hooker Lake at sunset instead.
Speaking of which, that’s exactly what we did that evening. While one of my cameras was set up for a timelapse, I grabbed the Fuji X-T2 with the 10-24mm f/4 OIS to capture the hooker lake from a completely different perspective. I had to hike and explore the area quite a bit and sadly, I did not have much time. There weren’t many clouds in the sky either at the time of sunset, so the images with Mt. Cook getting some last minute rays of sun did not turn out as well as I hoped they would. Right after the sun set, I found the composition I was after:
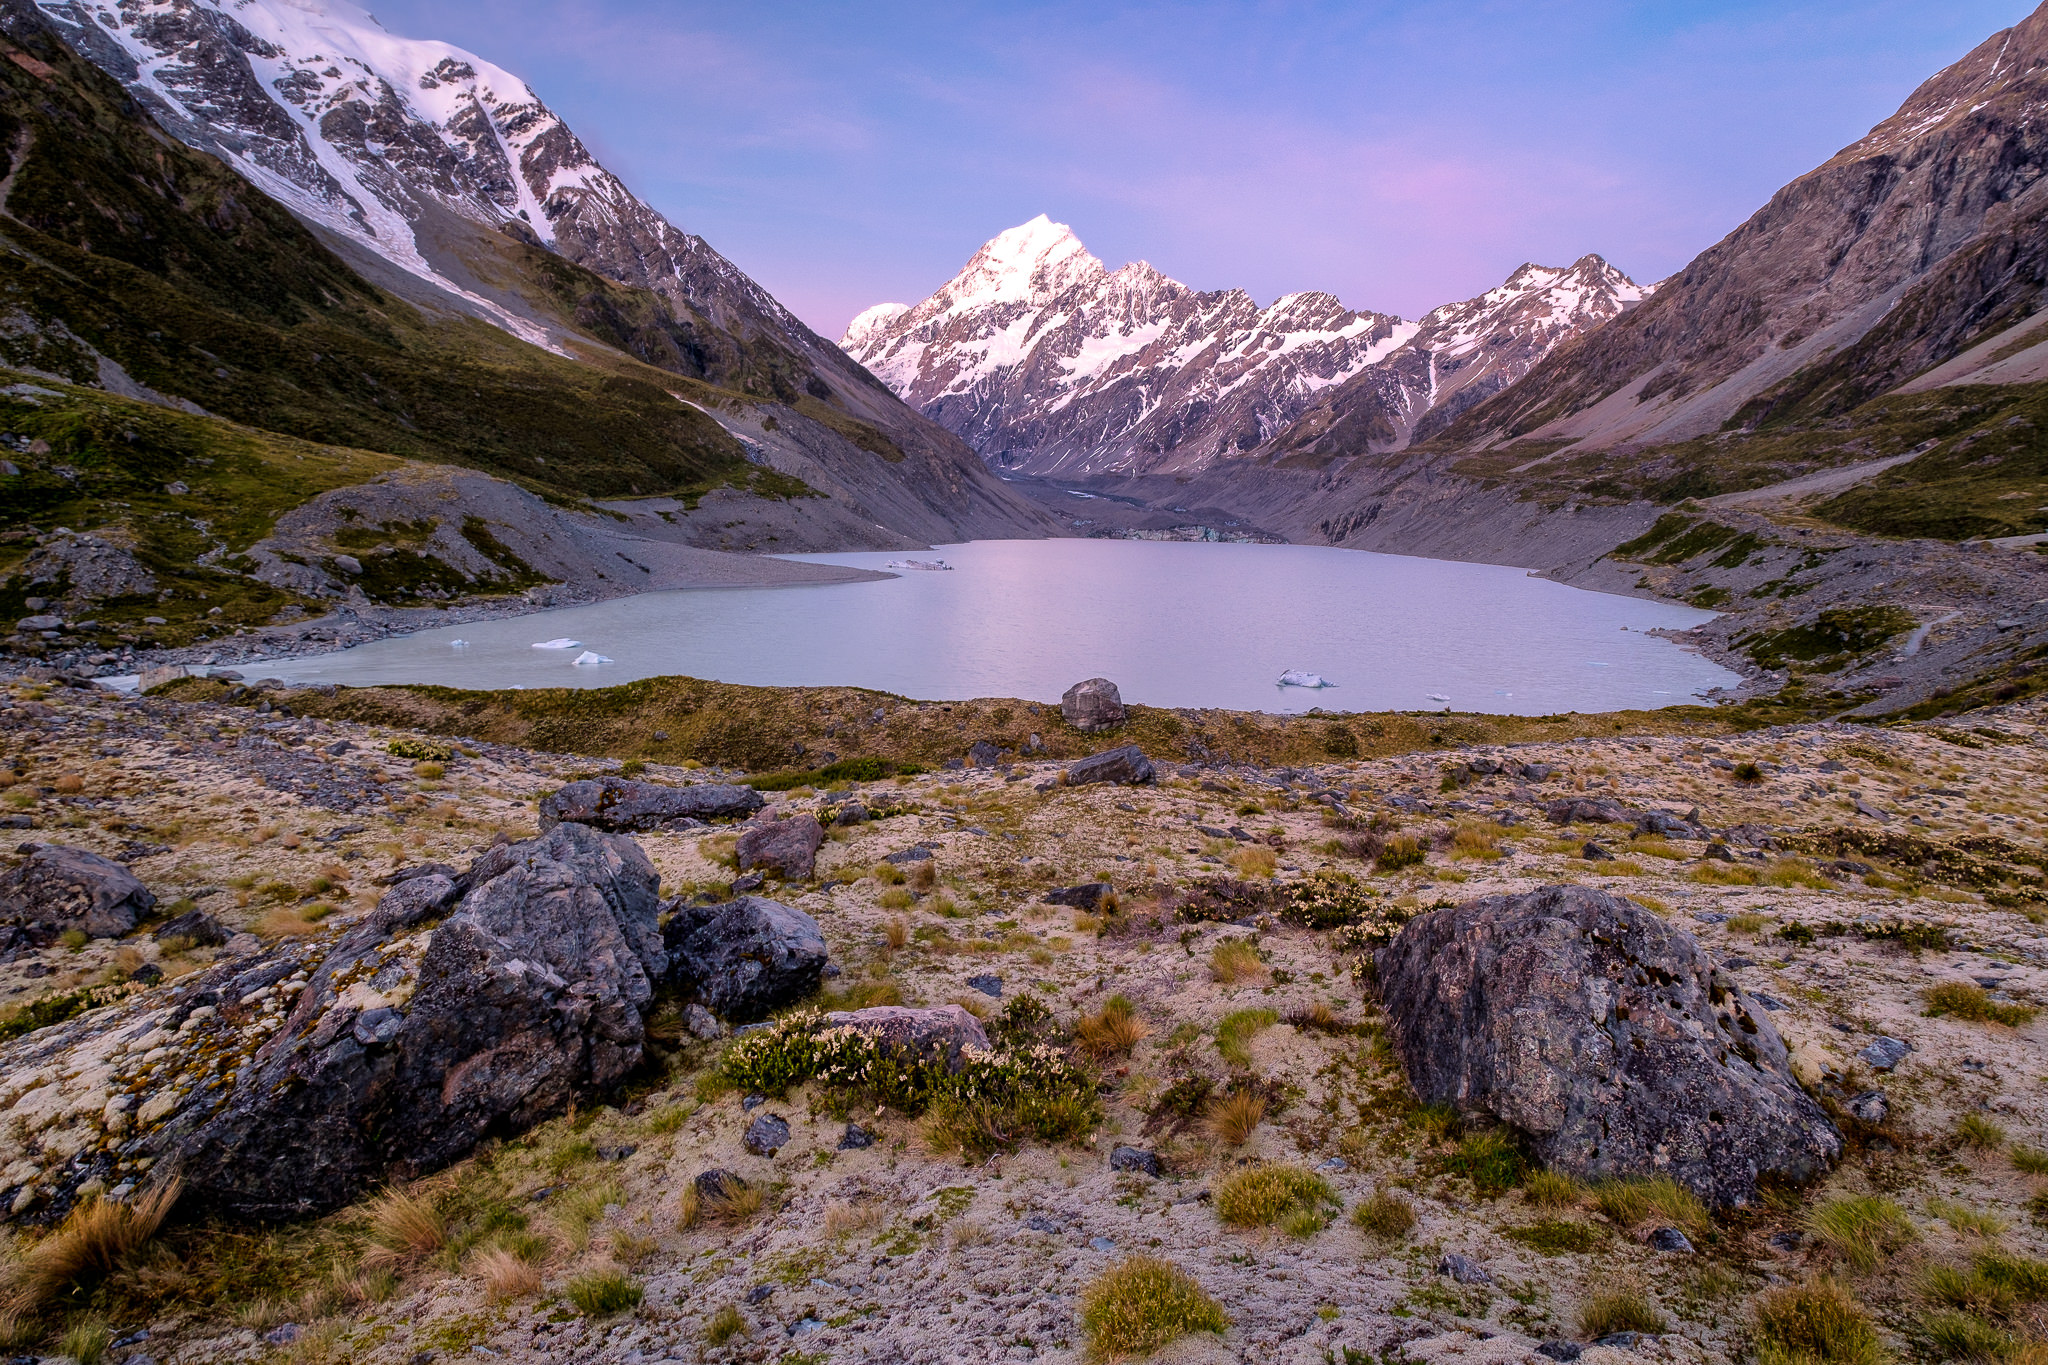
X-T2 + XF10-24mmF4 R OIS @ 11.5mm, ISO 200, 13/10, f/8.0
Here, I came across two rocks that were shaped to draw the viewer’s eyes towards the lake, the glacier and the distant mountain range. With this framing, I was able to fit the entire landscape and managed to add a few interesting foreground objects to the scene. The timing after sunset worked out too, since nearby clouds helped reflect some of those sunset colors to the clouds that were in the scene. The idea of this shot is to help guide the attention from the bottom of the frame towards the secondary subject, the Hooker Lake, and eventually towards Mt. Cook, which sits close to the center of the frame – that is my primary subject.
Although I had a bunch more images from New Zealand, I decided to showcase photographs from one particular area of New Zealand, where we spent the last couple of days. As we were driving south in the beginning of our journey in south island, we spotted an area known as “Castle Hill”. Although we ended up driving through it, we really wanted to get back there, as we saw a lot of opportunities for unique shots. And that’s exactly what we did at the end of the our trip!
How could a place with a bunch of scattered rock formations inspire us the most in New Zealand compared to grand landscapes? Well, we saw a lot of opportunities to create unique images. And I am very glad that we did, because I ended up with some of my most favorite images from 2016 there. Places like the Castle Hill allow one to really put the brain into work in terms of composition, since there is nothing prepared for you and everything seems random – you really have to find your own composition and work with the light to make an interesting photograph. As soon as we started hiking in the area (be very careful when hiking in rain, since you could slip and fall, especially off the top of rock formations), I told Spencer that I was in love! What a stunning place to photograph! As soon as sunset approached, I was running around like crazy, flexing out my composition muscles:
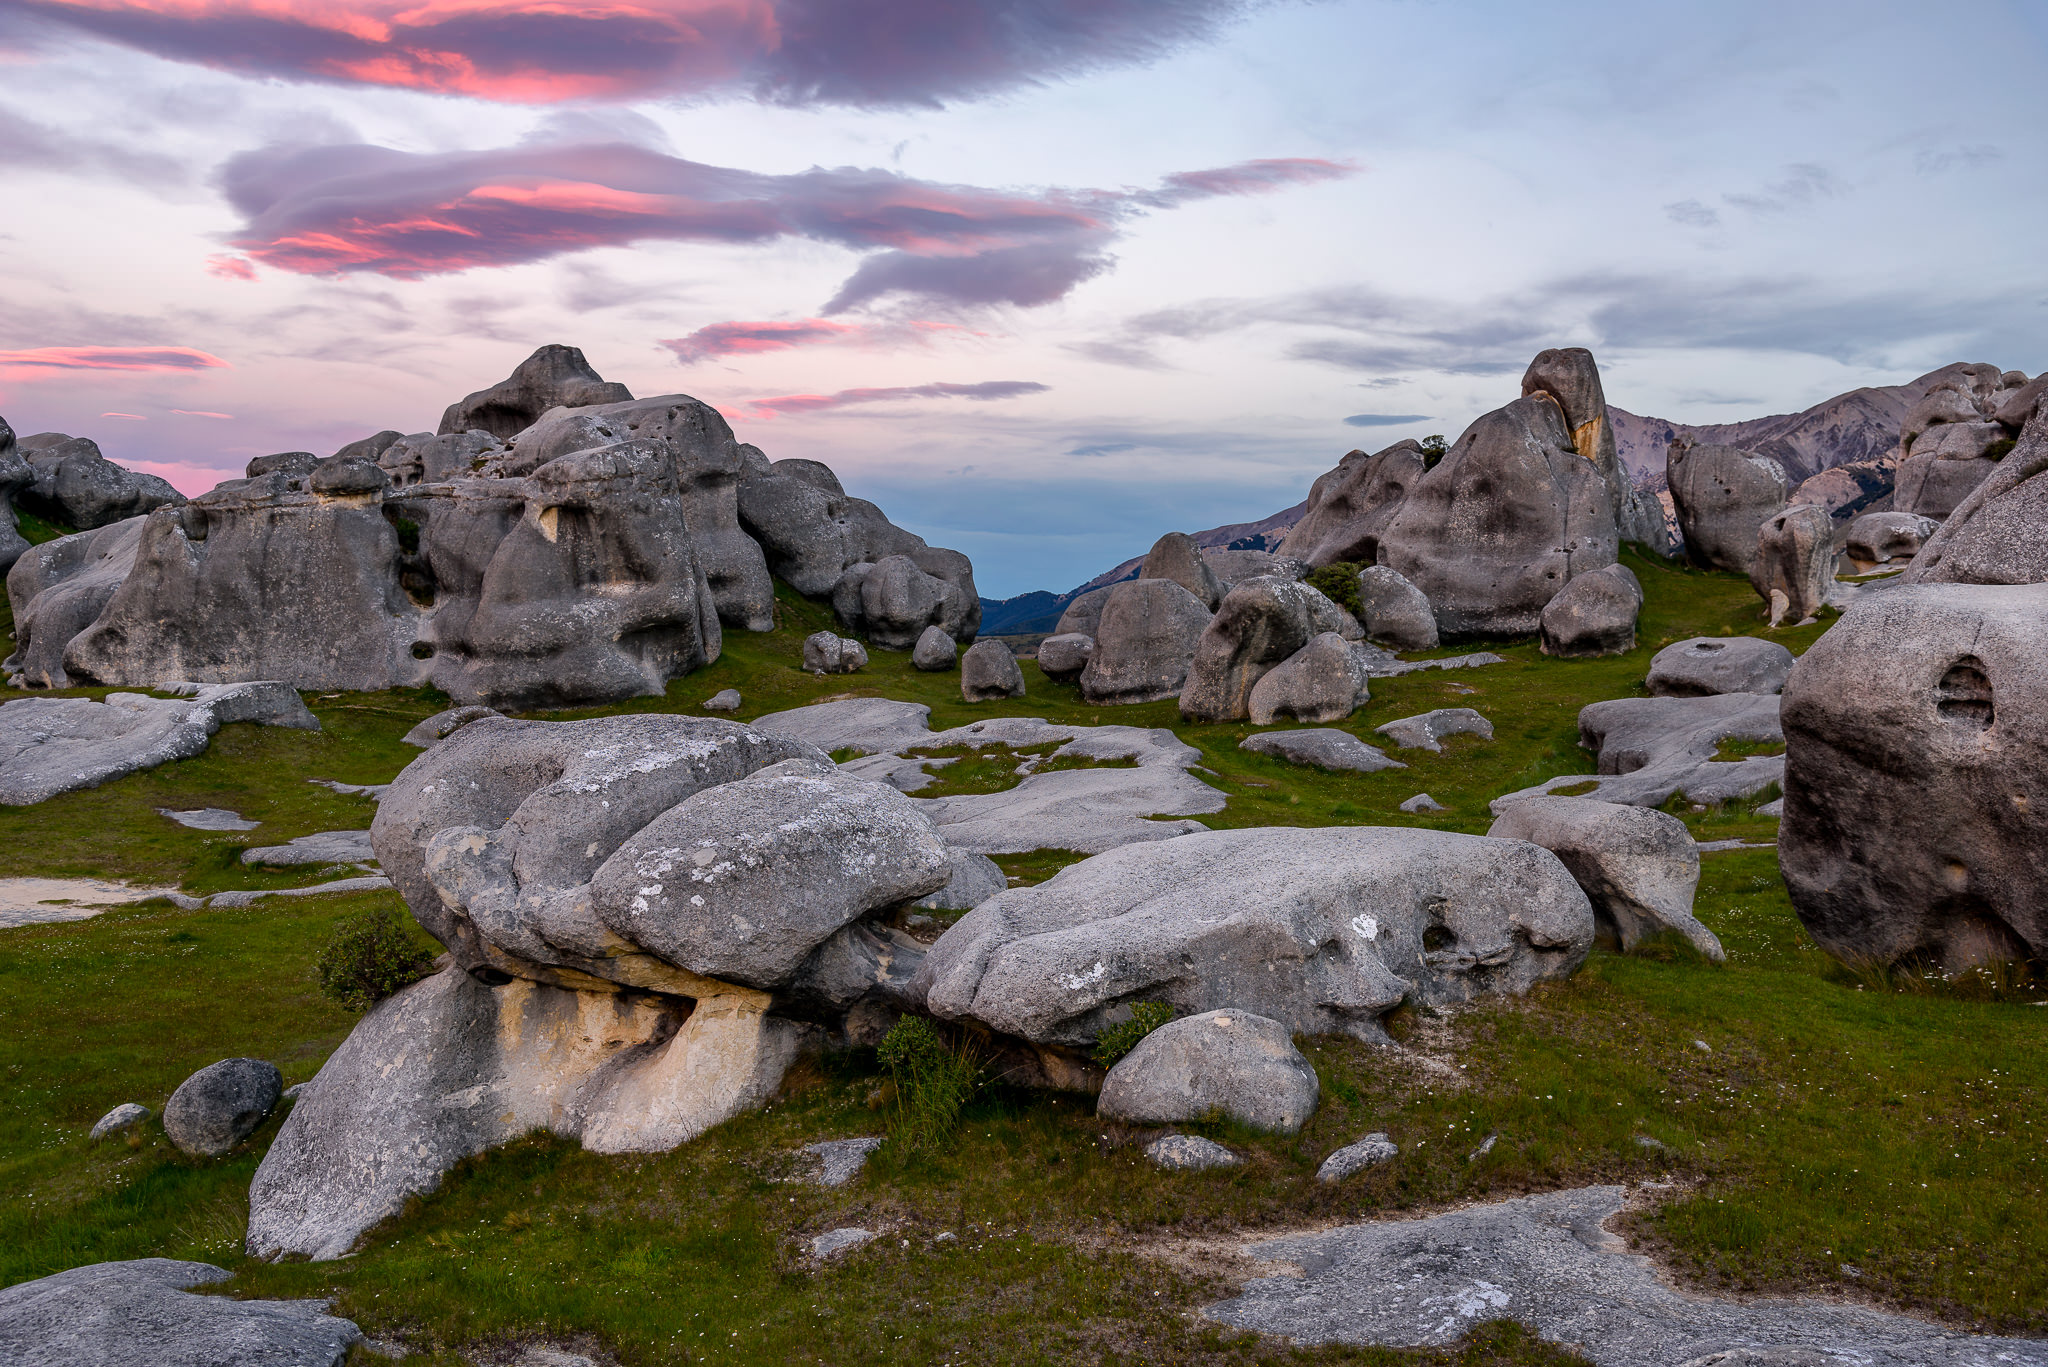
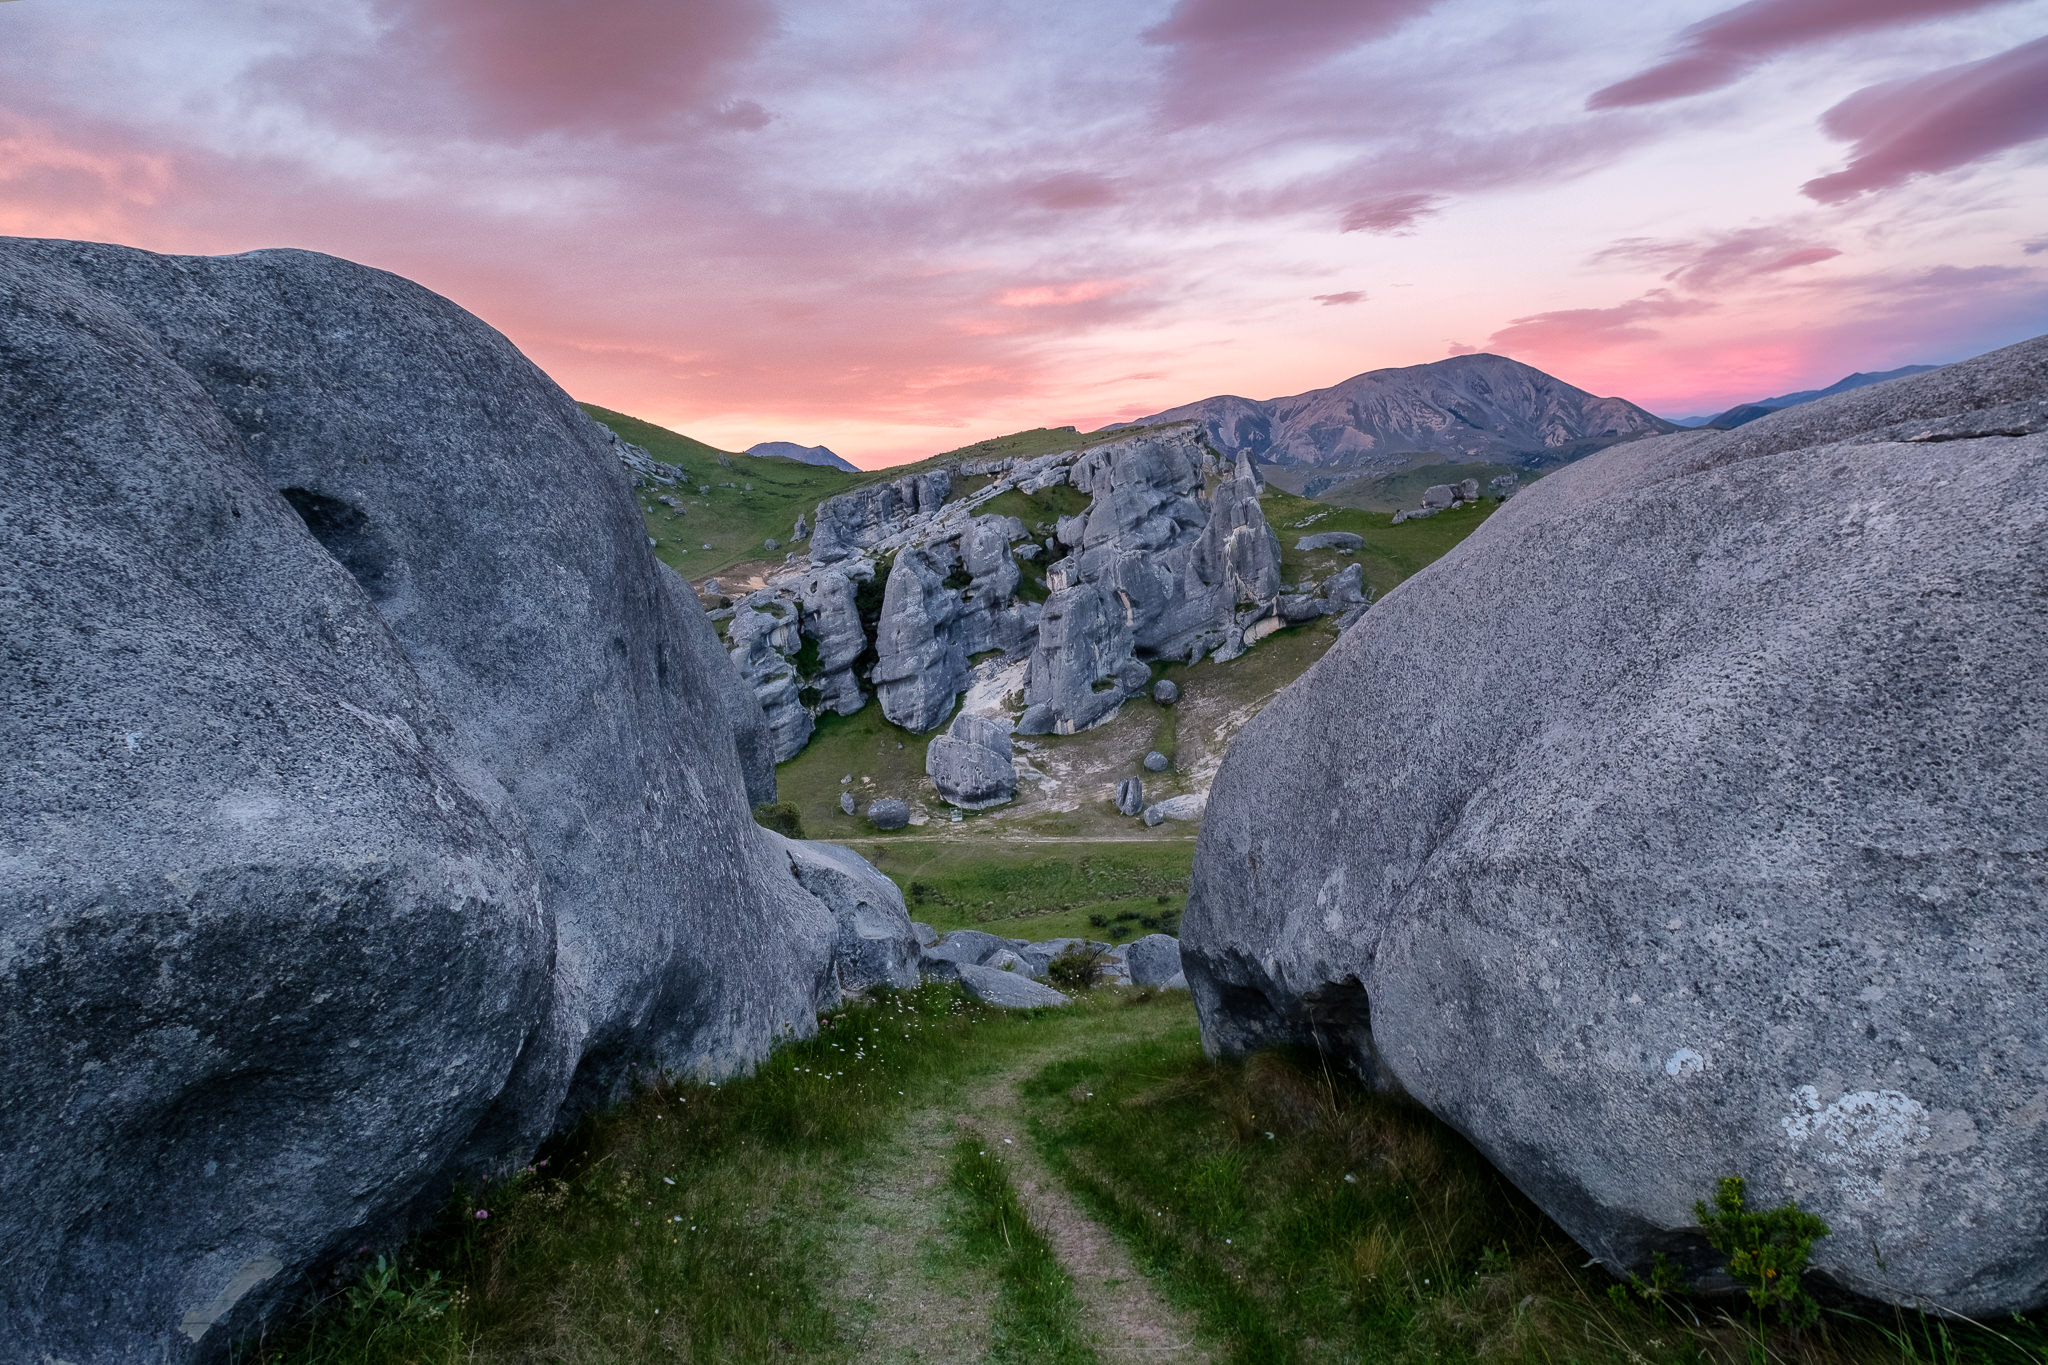
NIKON D810 + 24-120mm f/4 @ 34mm, ISO 64, 1/1, f/8.0
How about a double “V” composition with lots of shapes and triangles? Check! How about narrow paths creating windows and leading lines towards distant structures:
X-T2 + XF10-24mmF4 R OIS @ 11.5mm, ISO 400, 1/18, f/8.0
Check! How about insanely beautiful skies with definition, with unique foreground opportunities and separation:
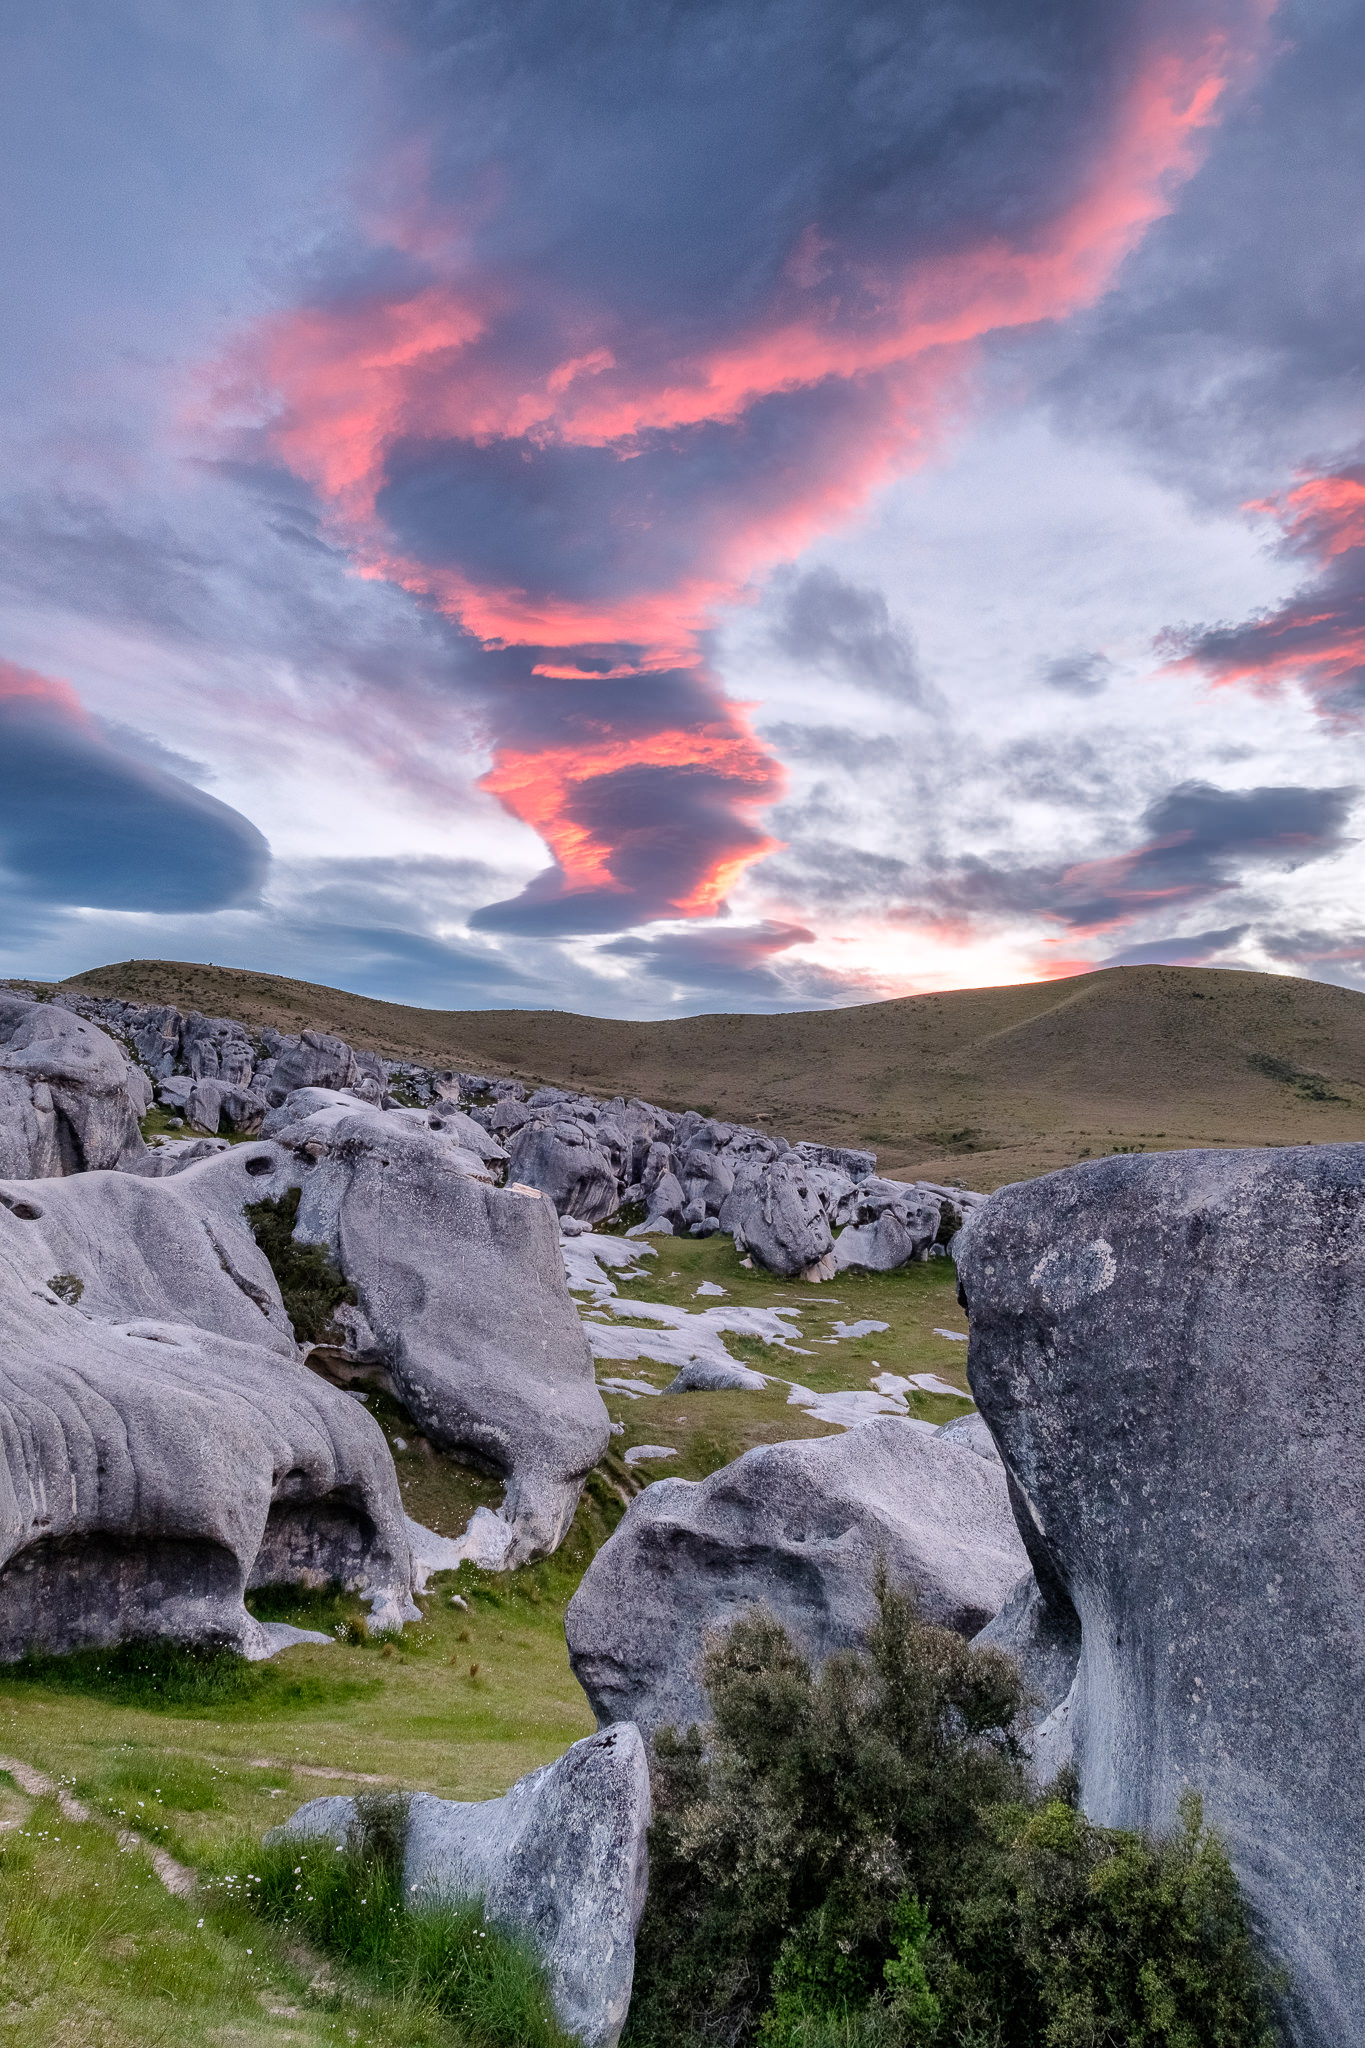
X-T2 + XF10-24mmF4 R OIS @ 15.1mm, ISO 800, 1/60, f/8.0
That’s another check! Wow, what a place to be and shoot. We spent two sunsets and one sunrise at this location, because it was all worth it. At sunrise and sunset times, I literally ran with my tripod and the Fuji X-T2 + 10-24mm f/4 OIS. My Nikon D810 + 24-120mm f/4G VR was busy shooting pre-composed timelapses, while the X-T2 was mounted on a secondary tripod and that’s what I shot with pretty much the whole time I was there. I don’t know how many calories I burned there, but I came back with a lot of sweat each time. The sunrises and sunsets lasted for 15-20 minutes at a time, which is when I moved around the most, seeking for unique opportunities each time. This is the place that gave me the flexibility I am always after – I like moving around to have different compositions and framing, instead of camping out in a single place.
Here is another favorite shot of mine that I captured at sunrise:
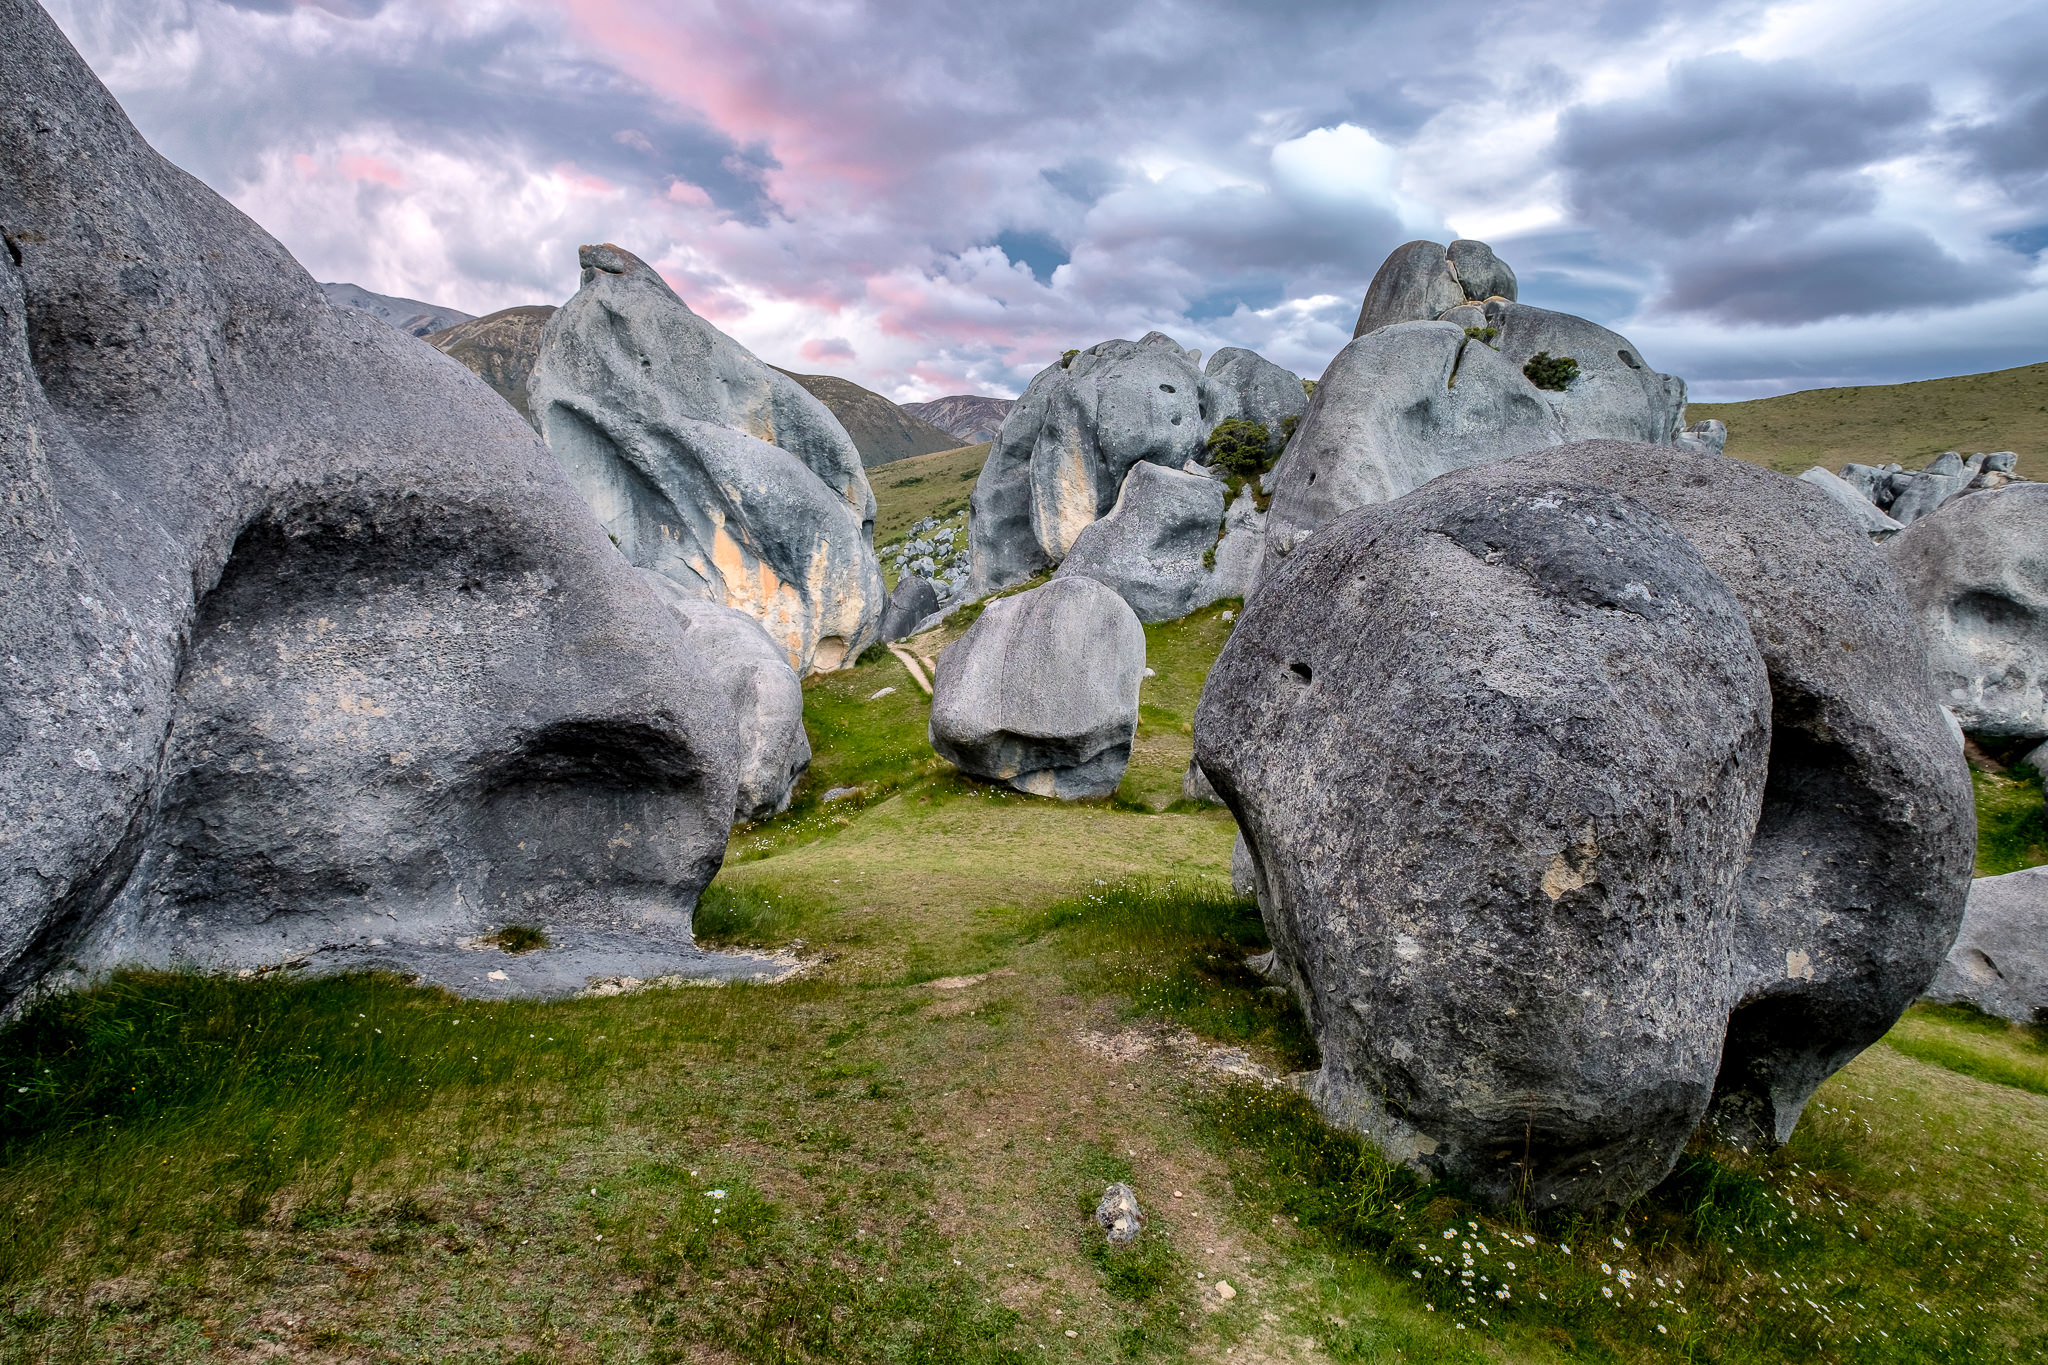
X-T2 + XF10-24mmF4 R OIS @ 11mm, ISO 200, 1/9, f/8.0
Subtle tones and beautiful formations that lead the eye towards the distant rocks. Here, I composed the shot to lead the viewer towards the smaller rock that is sitting in the middle of the frame. The sunset colors and tones nicely complement the darker tones seen in the rock formation towards the bottom right side of the screen. And that rock formation looks like someone’s head turned sideways, which is pretty cool! Notice that there is also a trail in the middle of the screen that leads towards the rock in the center.
The last composition is something that Spencer found the previous day, which I shamelessly stole from him as I was running around at sunset:
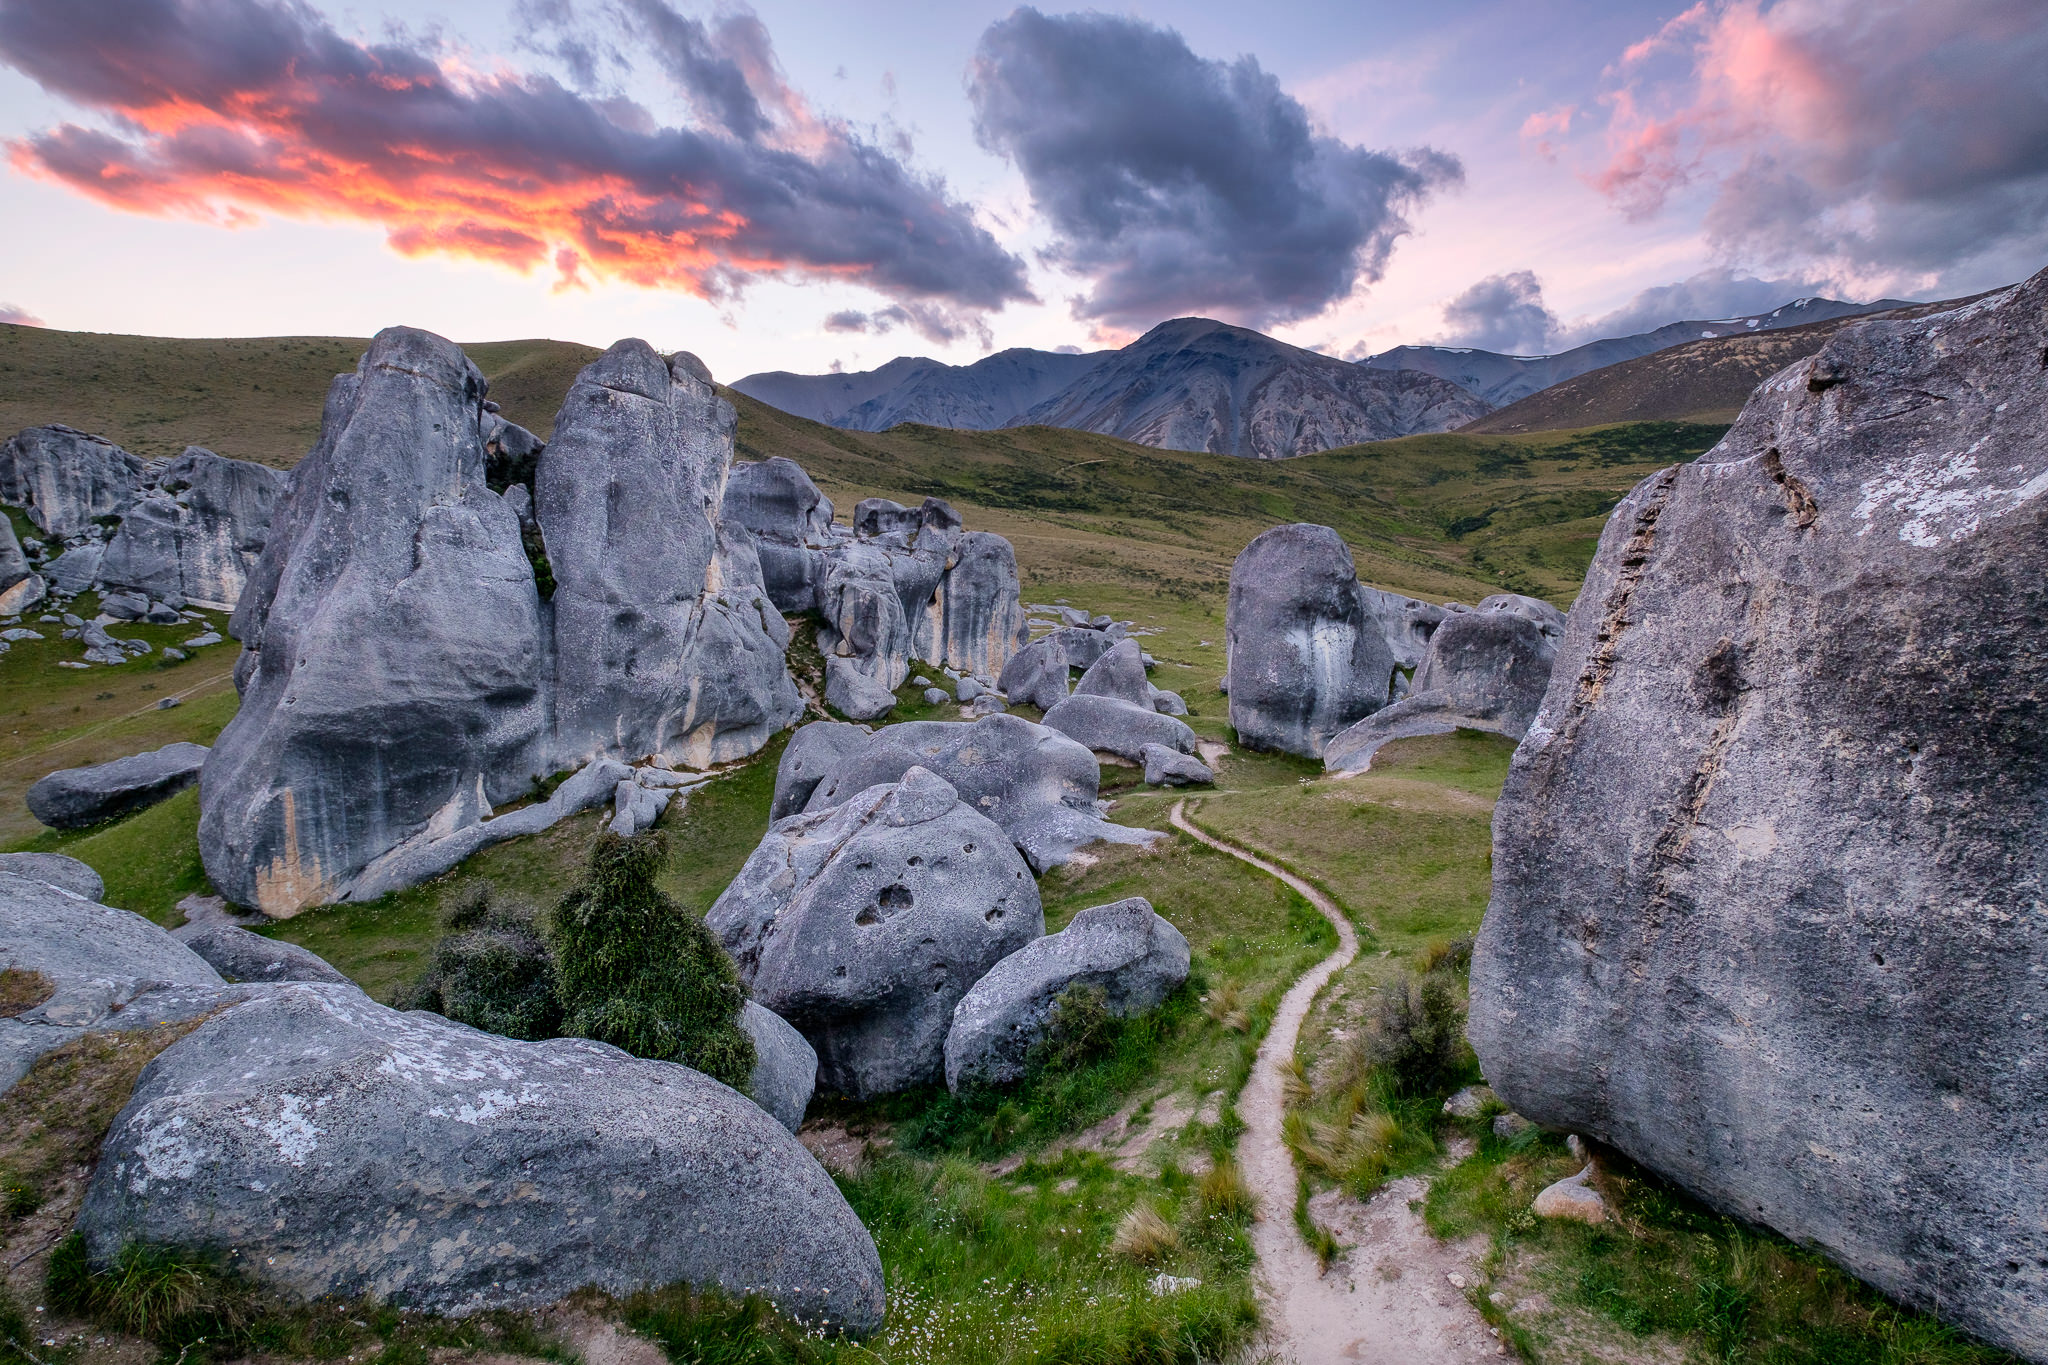
X-T2 + XF10-24mmF4 R OIS @ 10.5mm, ISO 200, 1/10, f/7.1
Here, the trail is creating a separation between the dramatic rocks, while at the same time serving as a nice curve to lead the viewer’s eye towards the rocks and the mountains in the distance. Thanks to everything that took place in this shot, including the beautifully-lit cloud formations, it is a perfectly balanced shot in every way. Notice that I carefully framed the shot to include the colorful parts of the cloud fully, including the center cloud that is overhanging the dark mountain peak. The lighter tones of the cloud on the right, along with the blue sky complement the more colorful clouds on the left of the frame and go together with the rock formation on the right side of the frame, which I was forced to cut off. Also notice that the rock formation on the bottom left side of the image is fully included – it is an important tertiary subject that I wanted to keep while framing this shot.
Now a quick summary regarding the Fuji X-T2: it is a phenomenal camera. Without a doubt, the best camera Fuji has made since it started the X-series cameras. It has a perfect balance of features, amazing ergonomics (the joystick alone makes it worth upgrading from the Fuji X-T1), quick and accurate autofocus system and weather sealing that worked out better than what Spencer and I experienced on the Nikon D810. Out of all the cameras we had during this trip, we had two Nikon cameras that died, Spencer’s Nikon D800E and Tunc’s D810 (fully died at freezing temperatures – the shutter mechanism froze and got stuck), which is something none of us expected to happen. While the D800E eventually came back to life (after getting dried for a few hours), I did not expect a Fuji mirrorless camera to outlive high-end Nikon DSLRs in such extreme conditions – and it saw more rain than any other camera. The Fuji X-T2 proved to be a camera I can fully trust and that’s important for landscape and travel photography. It was small, it was light, it was versatile! And the battery life of the X-T2 was not a problem either – although I had two batteries with me, I rarely ended up using more than one per day, which is great. Since we could not recharge every day, I ended up turning off image preview and I minimized my LCD use, which surely helped in preserving the battery life. Overall, I am in love with the X-T2. I have already made the decision to sell my X-T1 in order to move up. It is totally worth it. And looks like Fuji already has its first promotion in place – the X-T2 + Battery Grip bundle is currently discounted by $ 230. And I believe it is the first time I see the camera in stock at B&H!
I hope you have enjoyed my favorite images from 2016. If you have any feedback or questions, please let me know in the comments section below!
The post Best of 2016 – Part Two appeared first on Photography Life.


