
Sharpening remains a particularly confusing topic among photographers, especially given the tremendous number of post-processing options available. Some post-processing software has so many options that it is hard to know where to start; others do not let you use optimal methods in the first place. If you are trying to use the best sharpening settings – including the lowest possible levels of noise and other artifacts – the ideal method is three-step sharpening.
Note: No matter the scene you photograph, you shouldn’t do any sharpening until you have made all your edits already! In other words, sharpening should be your final adjustment before making a print. (With Lightroom, and some other non-destructive post-processing software, this does not apply. Unlike many programs, the order of your Lightroom adjustments has no effect whatsoever on the final image. As an example, cropping and then adding a vignette in Lightroom produces the same effect as adding a vignette and then cropping.)
Also, before I cover three-step sharpening, remember that it is impossible to restore detail that your equipment did not capture in the first place. Sharpening is nothing more than increasing the local contrast of details you already captured. Still, it is an important part of post-production, particularly if you are making prints.

NIKON D800E + 24mm f/1.4 @ 24mm, ISO 100, 1/3, f/16.0
1) Step One: Deconvolution Sharpening
The first, fundamental type of sharpening is called deconvolution or capture sharpening. This, essentially, is how you undo the inherent softness of a photograph – softness caused by factors that are impossible to counteract in the field, such as the low-pass (anti-aliasing) filter in many cameras. Even if your camera doesn’t have a low-pass filter, like my D800e, deconvolution sharpening is still necessary.
Essentially, you can think of deconvolution sharpening as a faint grain applied across the entire image. This adjustment is not strong at all; it simply lays the groundwork for more extensive sharpening later.
To use deconvolution sharpening in practice, the most important point is to maintain restraint. This type of sharpening applies equally across every part of a photograph, including areas without any detail. If your settings are too aggressive, you may end up adding noise, grain, and other artifacts to low-detail areas of your photo.
In Practice
So, which deconvolution settings are ideal? That varies from photo to photo, as well the specific software you use. With Lightroom, deconvolution sharpening is very easy to apply. Set the radius as small as possible (0.5 pixels), the detail as high as possible (100) and the masking as low as possible (0). Then, adjust the sharpness value so that the amount of grain in low-detail areas is tolerable. For my D800e, this is typically between 20 and 40, depending upon the image. Photos that are filled completely with details (as in, no clouds or out-of-focus areas) will let you increase the sharpening value more than images with low-detail regions.
If you use Photoshop, I recommend doing the same adjustments in Camera Raw. However, if you prefer working within the main Photoshop workspace, you can do similar adjustments via the smart sharpen tool (among many, many others).
Pay attention to the areas without detail more than the areas with detail for deconvolution sharpening. Don’t be hesitant to increase the “sharpening” slider, but be careful not to add any unwanted grain or noise.
Also, if you are working in a program like Lightroom or Camera Raw, it is fine to do some noise reduction in this stage. For most programs, though, it is best to do noise reduction before you do any sharpening at all. (As mentioned in the introduction to this article, the order that you apply Lightroom adjustments doesn’t matter.)
Lastly, I recommend sharpening at 100% magnification, which maps a single pixel of your image to a single pixel of your display. If you must zoom in further to see your changes clearly, 200% and 400% also are acceptable; however, don’t zoom in to any unusual value, whatever software you use (i.e., a value of 90% or 234% is far from ideal). This also holds true for the next step, local sharpening.

NIKON D800E + 105mm f/2.8 @ 105mm, ISO 100, 6/10, f/16.0
Your deconvolution settings should not add appreciable grain or noise to the low-detail areas of these waves.
2) Step Two: Local Sharpening
The most important sharpening step is local or creative sharpening. Here, you are sharpening only areas that already have high levels of detail. The point of local sharpening is to increase the clarity of important areas, yet avoid adding unwanted noise and grain to low-detail regions.
Say, for example, that you are photographing a portrait. After you apply a light deconvolution sharpening across the entire image, you are ready to target more specific details. You might want to sharpen a model’s eyes, for example, without also sharpening the background. That’s local sharpening.
In Practice
There are countless ways to put local sharpening into practice. I could write a full article on each of Photoshop’s sharpening tools, including ones that aren’t obvious at first, and it still wouldn’t be comprehensive. For now, I’ll only list a couple for simplicity’s sake.
First, if necessary, you could just stay in Lightroom for all your local adjustments. Although there aren’t nearly as many options – in fact, the local sharpening tool only has a single slider – there are other benefits to doing all your edits in Lightroom. For one, Lightroom is non-destructive, meaning that you can re-adjust all your old edits at any time. Also, RAW files in Lightroom are smaller than TIFFs exported from Photoshop.
If you do choose to work in Photoshop, be sure to use layers and masking. I will write a tutorial on masking soon, but the basic premise is that masks let you apply an adjustment – like sharpening – to specific parts of a photo rather than the entire image.
When I use Photoshop, one of my preferred tools is Smart Sharpen. To do local sharpening in Photoshop, my workflow may look like this:
- Open the photo in Photoshop.
- Duplicate the layer.
- Apply Smart Sharpen to the top layer at the strongest setting that I might need.
- Add a white mask to the top layer.
- Decrease the amount of sharpening in low-detail regions by painting gray or black onto the mask.
- Flatten the layers and save the image.
Other programs with layers would be similar. If you don’t have Photoshop, consider using Nik’s free Sharpener Pro 3. (All of the Nik Suite is free.)
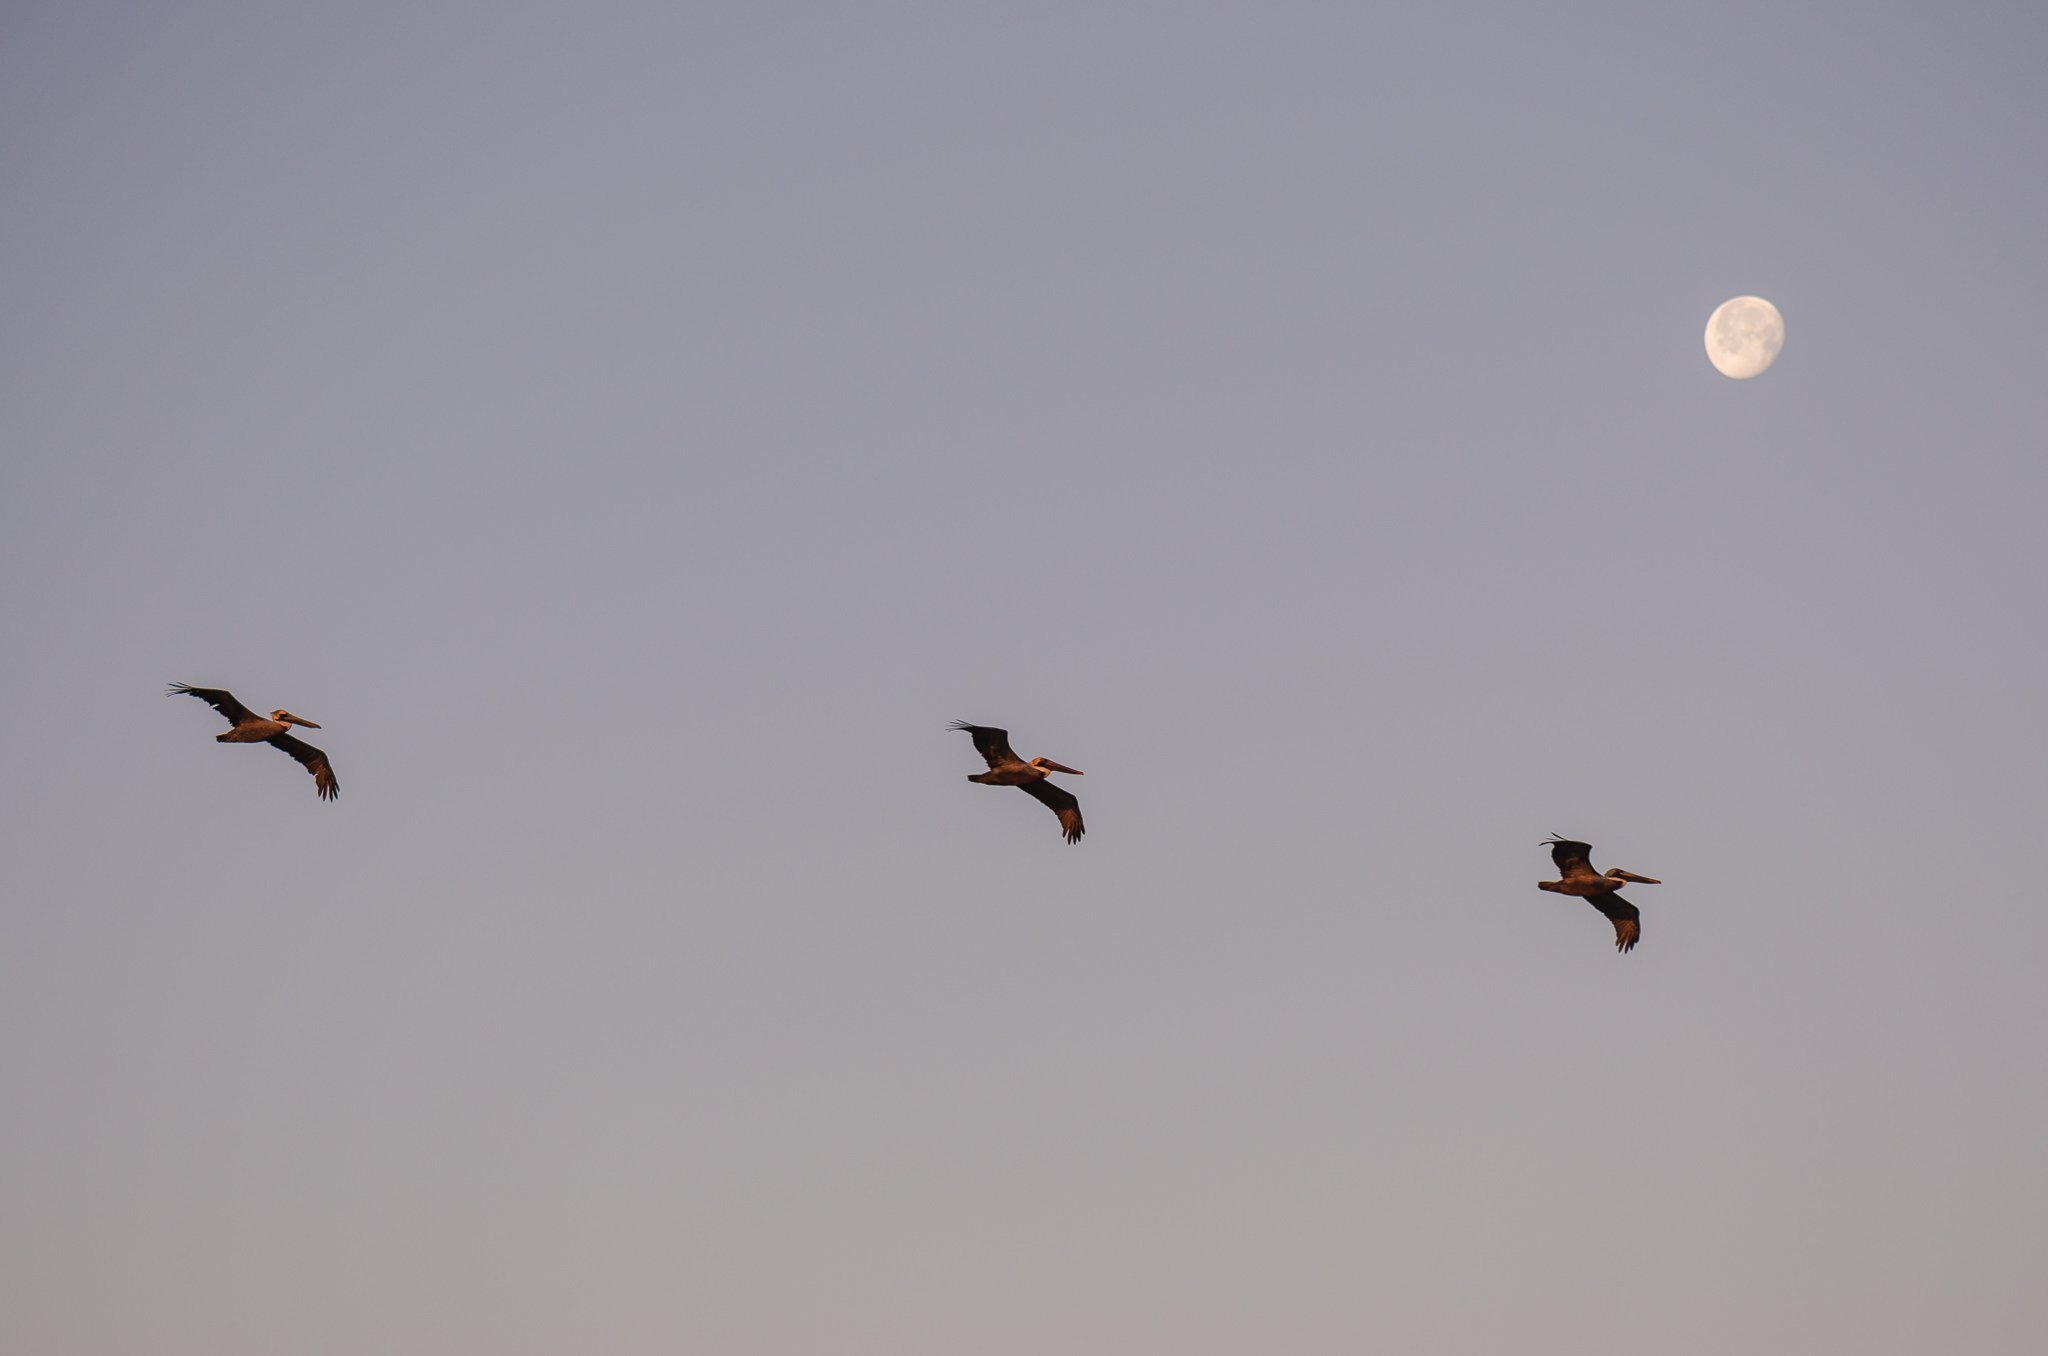
NIKON D7000 + 105mm f/2.8 @ 105mm, ISO 100, 1/320, f/3.5
In this photo, I only applied local sharpening to the three pelicans and the moon. I masked out the sky completely.
3) Step Three: Output Sharpening
The final adjustment is output sharpening, which depends upon the specific material that you are using for a print. Output sharpening is simply the additional sharpening that you apply to counteract high levels of texture in a print.
Consider a canvas, aluminum, or matte print, for example. If you don’t add any additional sharpening, your photograph will be blurry simply because of the material you use! This isn’t as much of a problem with low-texture papers – say, glossy or metallic.
Even photographs intended for the web need some output sharpening. Every time that you downscale an image, your software needs to interpolate pixels and bin them together. In the process, you may lose detail; the best way to counteract this is to add a bit of extra sharpening
In Practice
Usually, output sharpening is very easy to apply, since it is built into many programs already. Take a look at this screenshot from Lightroom, for example:
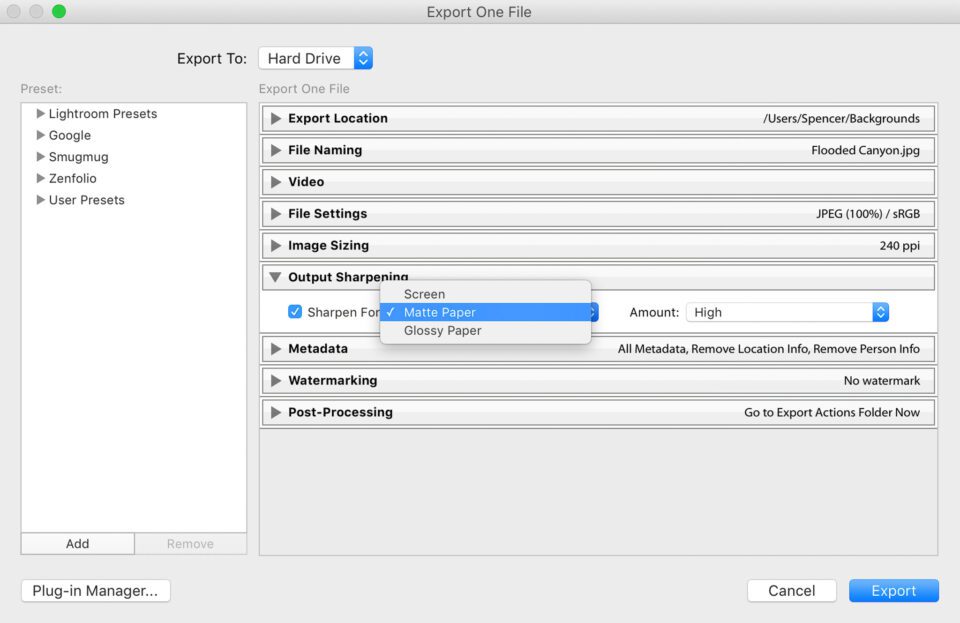
As you can see, Lightroom has built-in algorithms for output sharpening, which means you don’t need to do any of this manually! Simply export your photo from Lightroom, choosing the proper strength for whatever material you are using.
This may take some trial and error, and it does depend upon your print size as well as the material. Personally, for example, I prefer the “low” sharpening for large prints on glossy paper, but I use “standard” sharpening for web when I export to Photography Life. When in doubt, go for lower sharpening – it is easier to ruin a photo if your edits are too aggressive.
Also, if you are creating a print that is particularly important, you may not want to let Lightroom’s automatic software take over. Instead, consider adjusting the sharpness manually, either in Lightroom or Photoshop. I don’t do this for most images, but it may be necessary for certain, specialty prints (such as very small prints on canvas, which require stronger sharpening adjustments than any of Lightroom’s normal export presets allow).
Lastly, if you don’t want to use Lightroom, the free Nik Sharpener Pro 3 has an output sharpening tool that allows for more precise adjustments. I have never been unhappy with Lightroom’s export sharpening, but certainly some photographers will want more control.
4) When Does This Matter?
The three-step sharpening method is the ideal way to sharpen a photograph, no matter your subject. However, it is more important – as you may expect – if there are large areas without detail in a photograph.
Typically, the one-step sharpening method that many people use in Lightroom (or perhaps two-step if they also do output sharpening) is simply to adjust the sliders until the photo looks as good as possible. However, if parts of the photo are more detailed than others, you can’t expect great results from applying the same amount of adjustment to the entire image.
The masking tool in Lightroom and other software aims to fix this, and it does a decent job. However, it inevitably isn’t perfect. If your masking is too strong, details in the photo will look “crunchy” and uneven. If your masking is too weak, low-detail areas of your photo will grow too grainy and noisy.
Three-step sharpening is useful for landscape photographers, although not to the same degree. If I have clouds in a photo, there still isn’t a better way to avoid adding unwanted noise and artifacts. However, if I’m photographing a scene completely filled with detail (like the image below), I may be able to get away with just two-step sharpening: aggressive deconvolution sharpening, then output sharpening. It all depends upon the image.
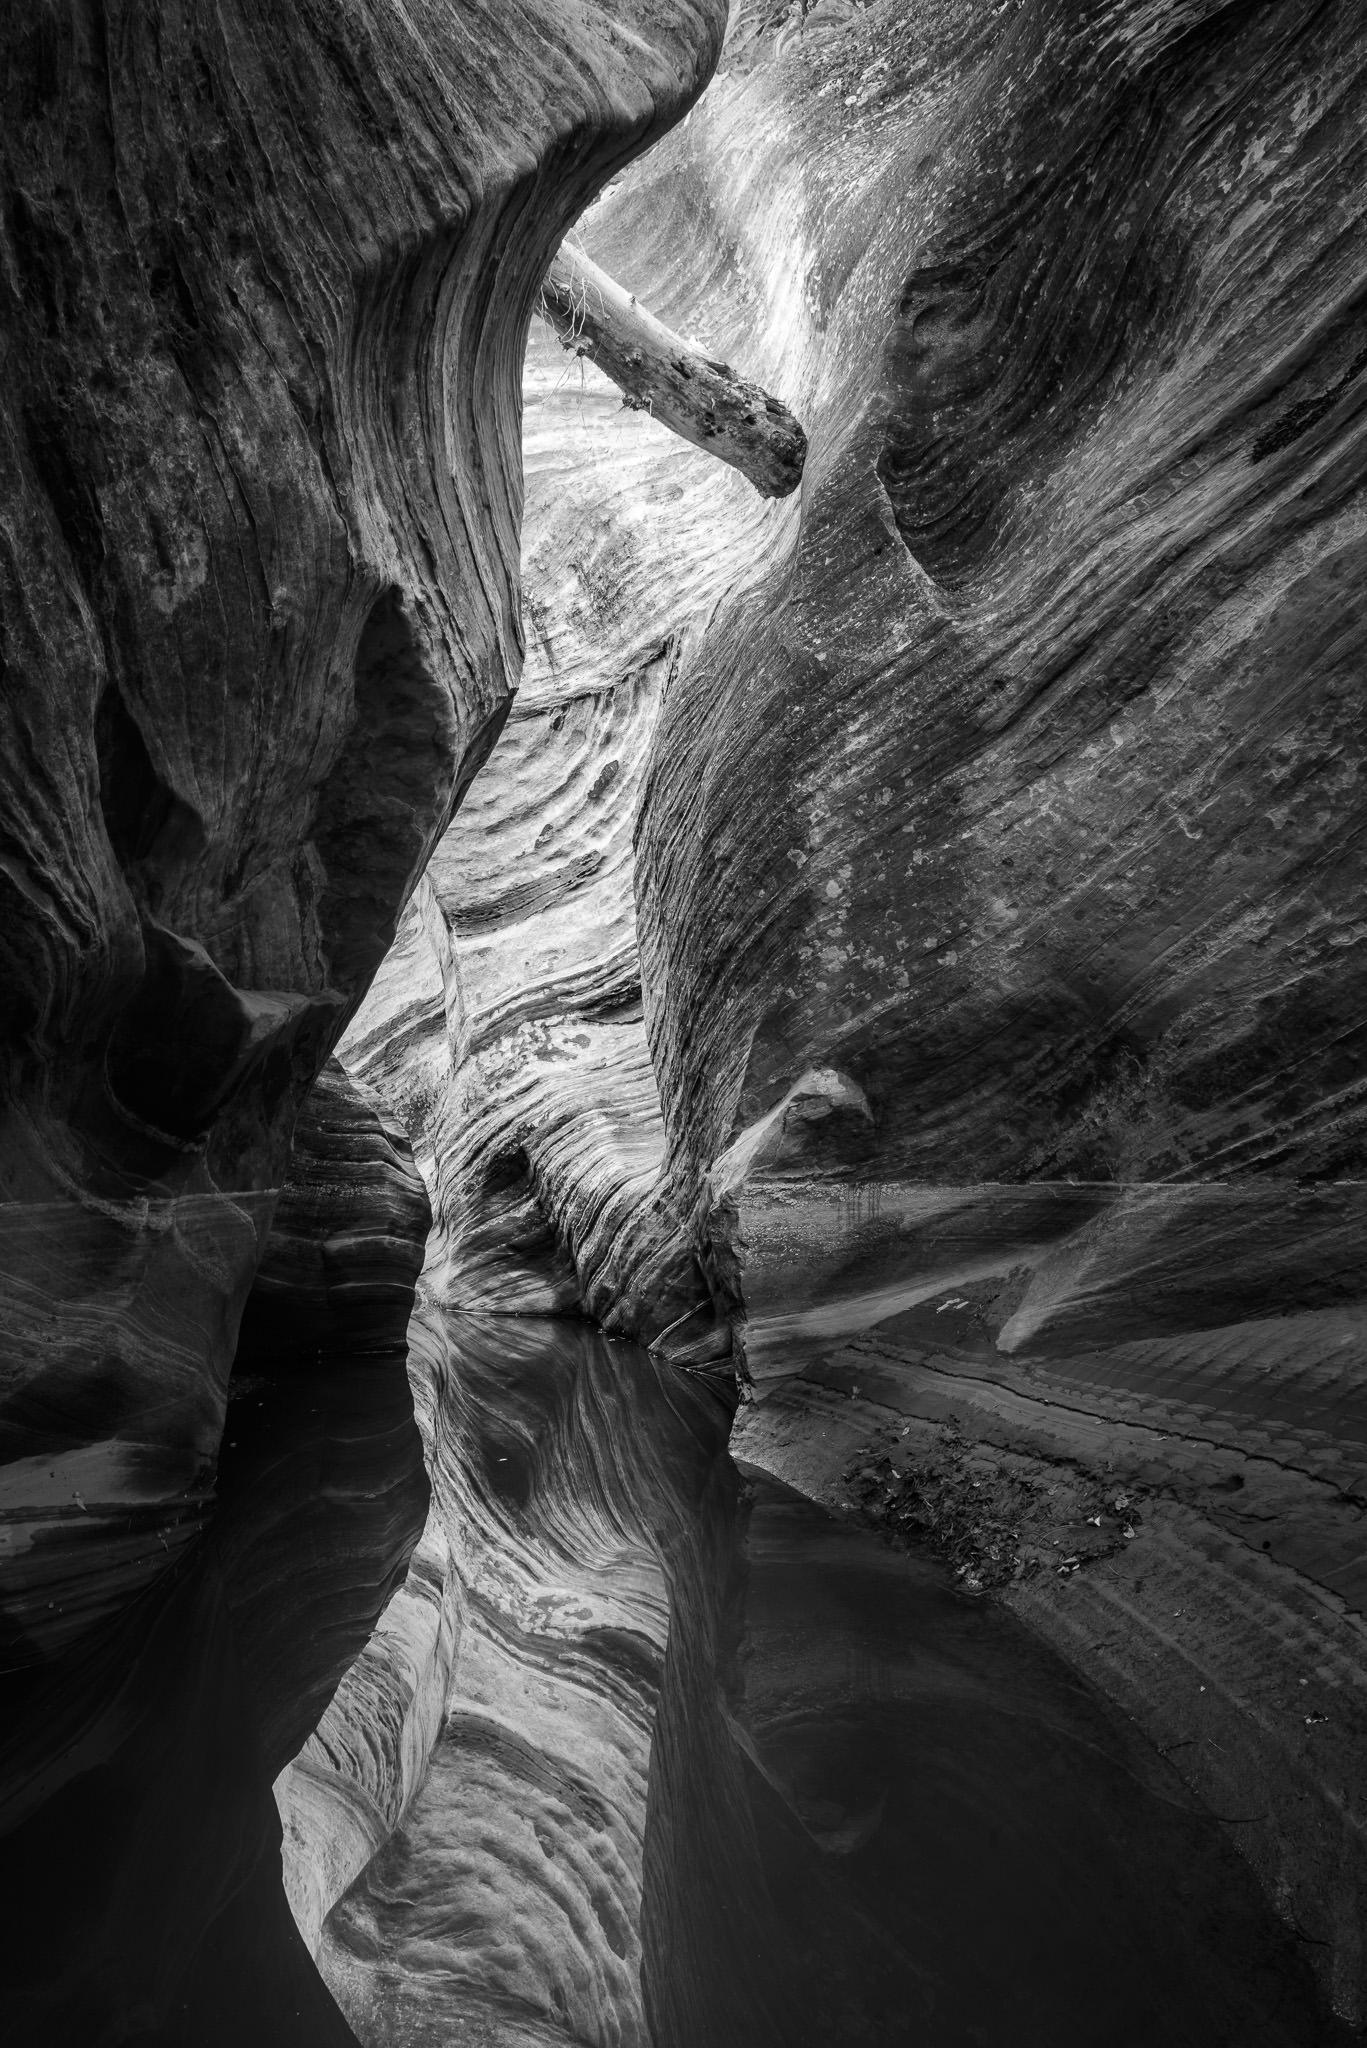
NIKON D800E + 20mm f/1.8 @ 20mm, ISO 100, 8/10, f/16.0
Sharpening techniques can be a confusing topic, since there are so many different tools at your disposal. Hopefully, this article covers three-step sharpening in a way that is easy to implement in your own photos, regardless of your specific software.
Will you need to use these techniques for your own photography? It all depends upon your specific situation. If you tend to display photos online more than in person, the techniques in this article are unlikely to make a huge difference. However, if you want the sharpest possible images for a print show or exhibition, three-step sharpening is ideal.
The post Advanced Post-Processing Tips: Three-Step Sharpening appeared first on Photography Life.


