Fourteen Avoidable Challenges in Professional Photography

by Skip Cohen

I’ve written for every Shutter Magazine since it started. For the most part, each article has been a building block for some aspect of your business. Well, for the September issue, I went a little off track and had some fun with my very first rant in a published magazine.

It was so much fun to write and hits on many challenges you can easily avoid, I decided to share a little of it in today’s post and then give you the link to the rest of the article:


Headshots that Uncle Harry Could Capture: This is right at the top of the list. You’re a professional photographer or at the very least aspiring to be. Your goal is to get people to hire you because of your skill set.  Remember that old expression: “You never get a second chance to make a first impression.”

In regards to your headshot, get rid of that poorly lit portrait. Throw away selfies that a teenager would use. Trade in horrible portraiture for a well lit and posed professional looking headshot.
 
Even better, get a shot of you working. Put a camera in your hand. Have an associate photograph you from the side and slightly behind you, as you’re working a subject. That will capture an image with you, your camera and done right, your subject in in the background, slightly out of focus.
 
You’re not going to impress anybody with a bad headshot, let alone support your claim to be the artist they should hire.
 
Doesn’t Anybody Proof-read Anymore? I get that you’re an artist. You didn’t go to school to be a writer, but that doesn’t mean you have to sound like a moron. Seriously, I’ve received email blasts from photographers and couldn’t understand what they were talking about.
 
So, you’ve got a few options. If you really can write, but are just too rushed, take the time to read what you’ve written out loud. Then read it to somebody else. There’s very little I ever write that my wife, Sheila doesn’t take a look at for me.
 
Here are two other options: Check out Grammarly.com. I love it. It won’t catch everything you’re trying to say, but proof-reading out loud together with Grammarly will help you dramatically. The other option, especially for those of you who truly hate to write, but you’re trying to maintain a blog, for example, is to hire somebody to write for you. Wander into the local high school and find yourself an “A”  English student.


Read more…There are twelve more challenges with this month’s article and they’re just a click away. 

The article starts on page 12, making me really proud to have the lead spot this month. What’s great about all fourteen of the challenges is they’re all fixable. Some might take longer than others, but each one can help you build a stronger skill set, brand or business.

Check out this month’s Shutter Magazine online  and then consider subscribing to the hard copy. It’s become the  best looking magazine in professional photography and every month is loaded with helpful content. If my link above doesn’t work, click the link below – you may have to subscribe to the FREE online version to read the rest of the article.

SkipCohenUniversity – SCU Blog

Posted in Photograpy How To | Tagged , , , , | Leave a comment

Fourteen Avoidable Challenges in Professional Photography

by Skip Cohen

I’ve written for every Shutter Magazine since it started. For the most part, each article has been a building block for some aspect of your business. Well, for the September issue, I went a little off track and had some fun with my very first rant in a published magazine.

It was so much fun to write and hits on many challenges you can easily avoid, I decided to share a little of it in today’s post and then give you the link to the rest of the article:

Headshots that Uncle Harry Could Capture: This is right at the top of the list. You’re a professional photographer or at the very least aspiring to be. Your goal is to get people to hire you because of your skill set.  Remember that old expression: “You never get a second chance to make a first impression.”

In regards to your headshot, get rid of that poorly lit portrait. Throw away selfies that a teenager would use. Trade in horrible portraiture for a well lit and posed professional looking headshot.
 
Even better, get a shot of you working. Put a camera in your hand. Have an associate photograph you from the side and slightly behind you, as you’re working a subject. That will capture an image with you, your camera and done right, your subject in in the background, slightly out of focus.
 
You’re not going to impress anybody with a bad headshot, let alone support your claim to be the artist they should hire.
 
Doesn’t Anybody Proof-read Anymore? I get that you’re an artist. You didn’t go to school to be a writer, but that doesn’t mean you have to sound like a moron. Seriously, I’ve received email blasts from photographers and couldn’t understand what they were talking about.
 
So, you’ve got a few options. If you really can write, but are just too rushed, take the time to read what you’ve written out loud. Then read it to somebody else. There’s very little I ever write that my wife, Sheila doesn’t take a look at for me.
 
Here are two other options: Check out Grammarly.com. I love it. It won’t catch everything you’re trying to say, but proof-reading out loud together with Grammarly will help you dramatically. The other option, especially for those of you who truly hate to write, but you’re trying to maintain a blog, for example, is to hire somebody to write for you. Wander into the local high school and find yourself an “A”  English student.

There are twelve more points, just a click away, and if they describe an aspect of your style, business or skill set, nothing is cast in concrete – they’re easily fixed.  

​I’m very proud to have the lead-off spot in this month’s issue starting on page 12.  If the link above doesn’t get you to the September issue, remember to take thirty seconds and subscribe to the online edition. Then check out the print edition – Shutter Magazine has become the leader in outstanding print quality, design and content. You won’t be disappointed when it’s in your mailbox each month!

SkipCohenUniversity – SCU Blog

Posted in Photograpy How To | Tagged , , , , | Leave a comment

DIY: Reliable and Cheap Universal White Balance Reference Device

DIY projects are always popular, so we’ve decided to throw another one into the mix. This particular little idea comes from a problem that many photographers have – where do you get a good, small, white/gray surface to use for white balancing your RAW shots in conversion?

The obvious answer here is “just get a grey card!” But…

  1. Problem number one – a good gray card comes with a price tag from around $ 20 up to potentially as much as $ 100. Not to mention that for some shots (like it is in a studio with multiple lights/reflectors) you may need several references for white balance placed in the scene.
  2. Problem number two – gray cards require delicate handling (no bending, no fingerprints, no dirt, no scratches, some can’t withstand moisture, etc.). What if you dropped your gray card into dirt in the middle of nowhere?
  3. Problem number three is that you have to actually set up a grey card, and that might be a hard thing to do – uneven surfaces, wind, anything that makes it difficult to put the grey card down or stand it up will make it difficult to use.

We’re proposing an alternative that will save you time and money, as well as make you feel good for not buying into some inefficient, overpriced product of limited usability.

So, welcome to LibRaw’s Wacky Cheap 5-Dollar DIY White Balance Reference Project.

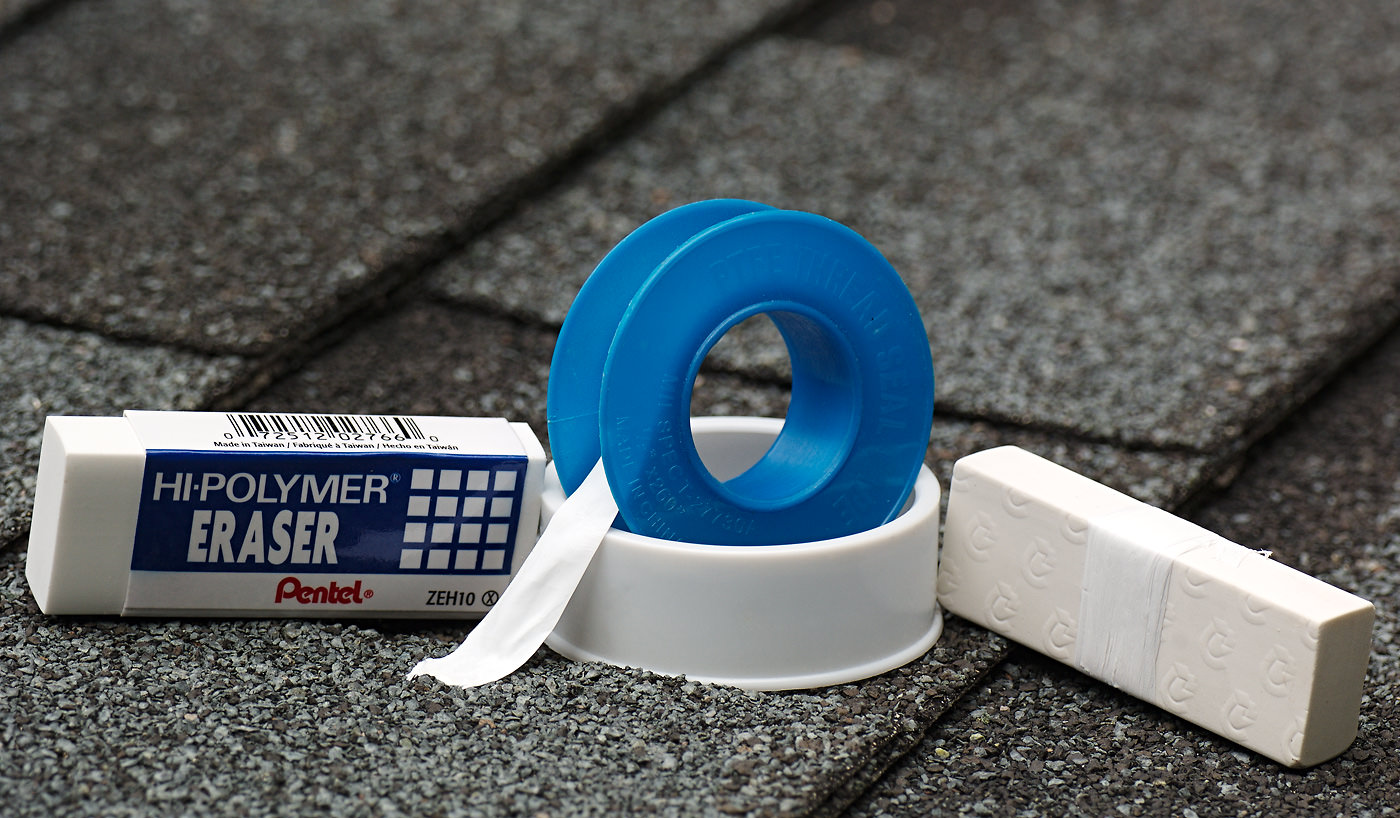
Step 1. Go to whatever store you have nearby that sells office supplies. Get a white/light gray rectangular eraser.
Got it? Good. You’re ready for the next step.

Step 2. Go to any hardware/home improvement store and get a roll of Polytetrafluoroethylene (known most commonly as Teflon/PTFE) white matte thread seal tape. This stuff is indispensable when it comes to plumbing, you can find it everywhere in the world.

Step 3. Tightly wrap the PTFE around the eraser several times – 4-5 times ought to do it, it won’t let through any light after that.
That’s it. Your cheap, portable, easily-replaceable universal white balance reference device is done.

WhiteBalance Reference DIY PTFE Tape plus Eraser

Figure 1. Ingredients and ready-to-use White Balance Reference

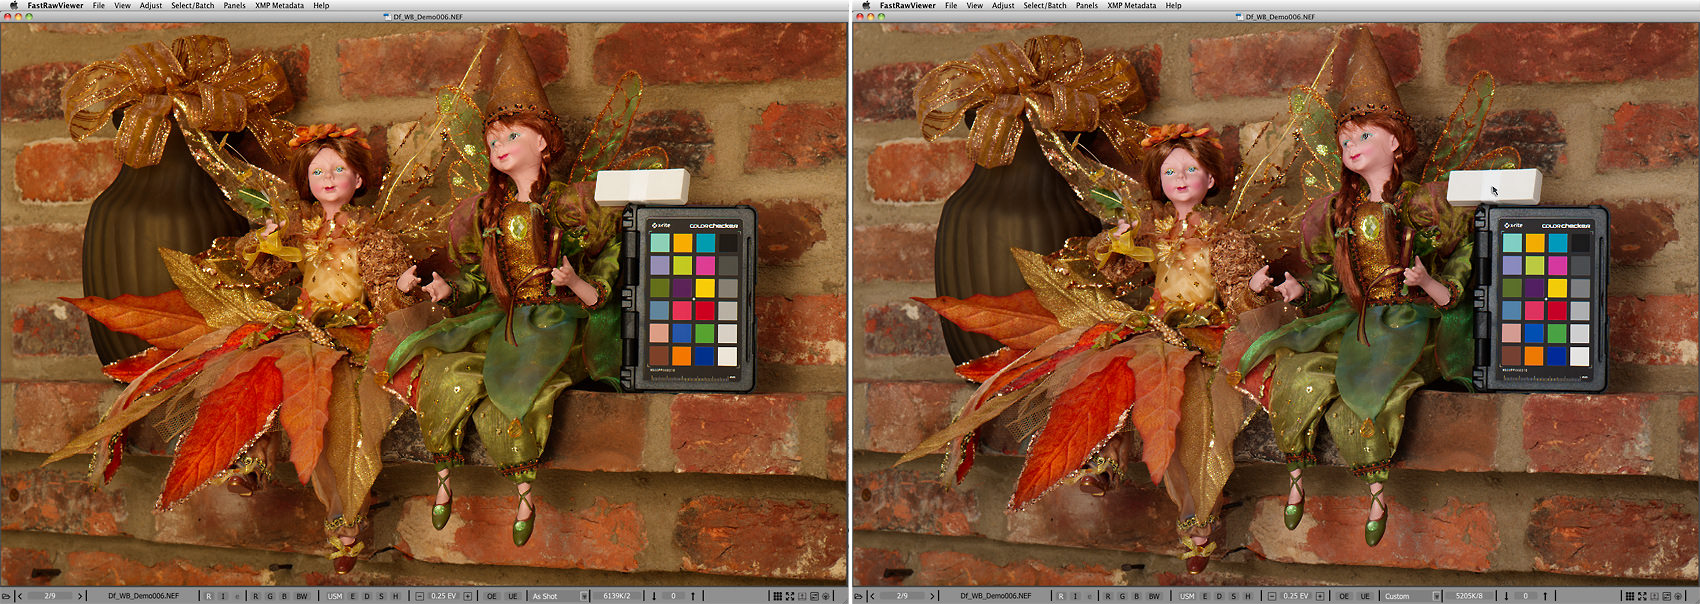
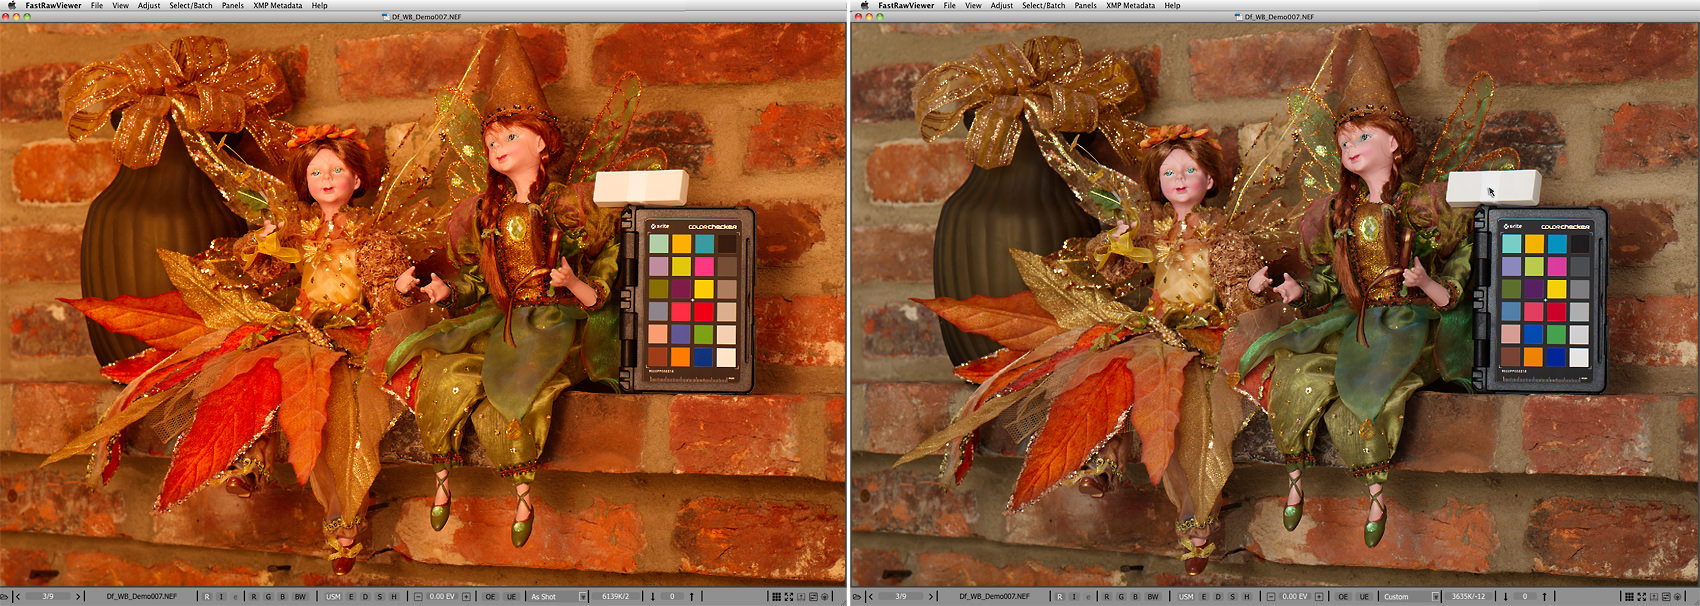
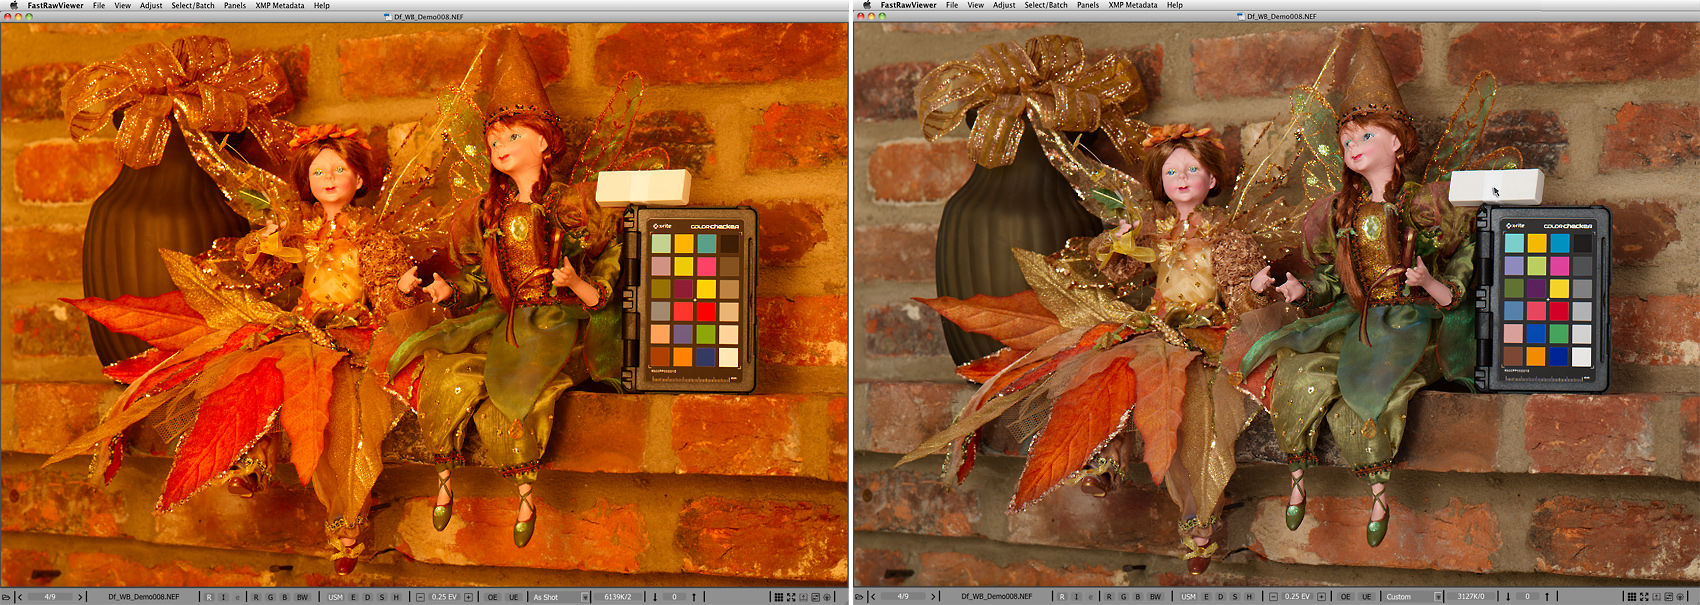
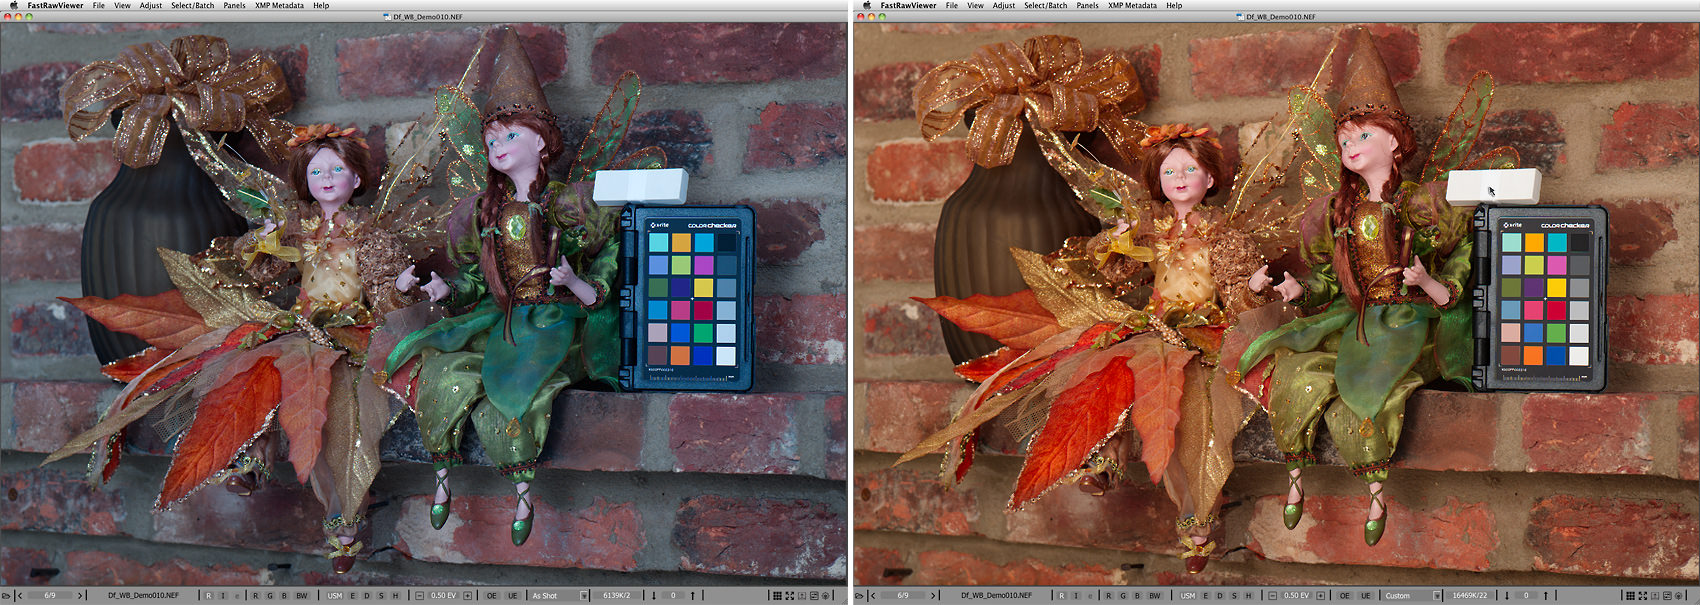
For a demonstration of its use and effectiveness we’ve chosen a scene that will become (after a re-arrangement) a postcard for a friend – autumnal colors, fairy dolls, and our favorite brick wall. Consider 5 shots of the same scene taken under 5 very different color temperatures, ranging from warm incandescent, to very cool high in the mountains. The left part of each picture is the RAW, opened in FastRawViewer with the white balance set to “As Shot.” The right part is the same RAW, with a custom white balance established by clicking on our improvised white balance reference. The mouse cursor shows where exactly the white balance was taken from.

Pict2-FastRawViewer_White-balance-Demo_06_asShot_and_Custom

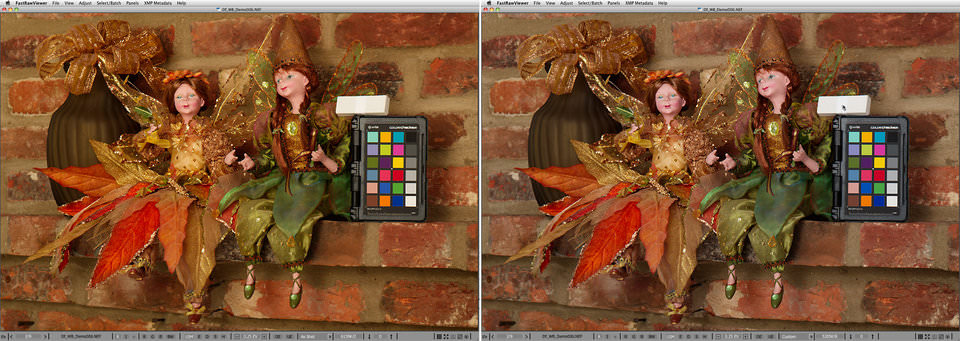
Figure 2. Df_WB_Demo006.NEF. Color Temperature / Tint – 5205K / 8

Pict3-FastRawViewer_White-balance_Demo_07_asShot_and_Custom

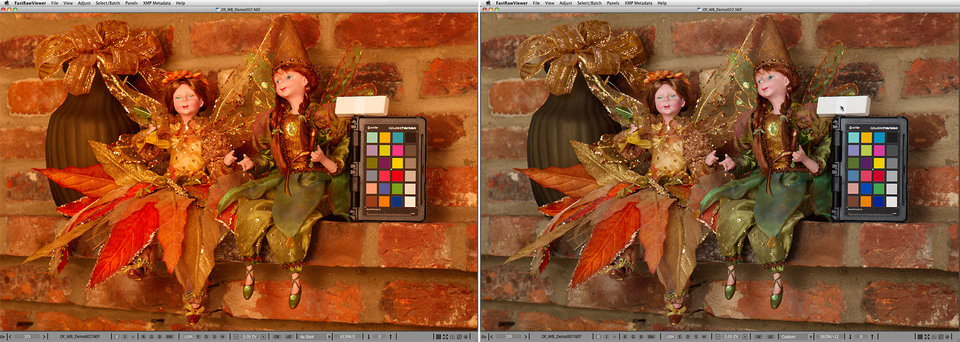
Figure 3. Df_WB_Demo007.NEF Color Temperature / Tint – 3635K / -12

Pict4-FastRawViewer_White-balance_Demo_08_asShot_and_custom

Figure 4. Df_WB_Demo008.NEF. Color Temperature / Tint – 3127K / 0

Pict5-FastRawViewer_White-balance_Demo_09_asShot_and_custom

Figure 5. Df_WB_Demo009.NEF Color Temperature / Tint – 9096K / 14

Pict6-FastRawViewer_White-balance_Demo_10_asShot_and_custom

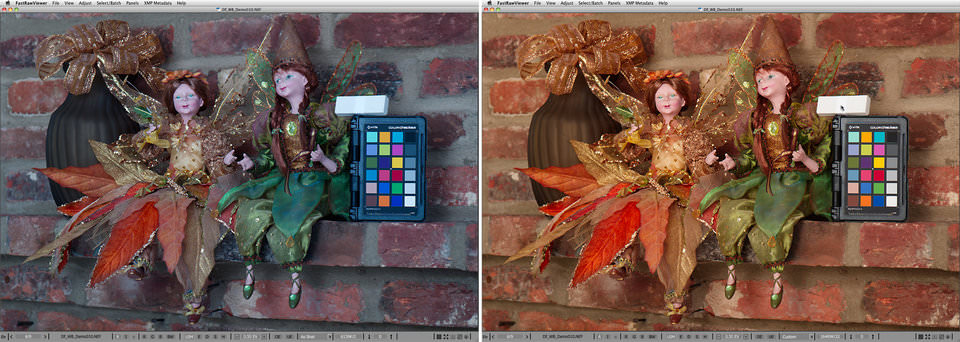
Figure 6. Df_WB_Demo010.NEF Color Temperature /Tint – 16469K / 22

As you can see, the scene contains an X-Rite ColorChecker Passport target. If in doubt, you can install FastRawViewer or use your favorite RAW converter, download the respective RAW files, and check for yourself that the white balance taken from the Passport gray patch is virtually equivalent to what we got from our eraser-Teflon tape setup, as can be seen from the comparing color temperatures, tints, or whatever other white balance readings your software provides.

Incidentally, it’s not by accident that we’re suggesting using this particular material – sintered PTFE has been known to have high spectral purity, low opacity (that’s why 4 layers is enough), and a close-to-1 very diffused reflection factor for many years. However, for obvious reasons, this has not been disseminated as public knowledge.

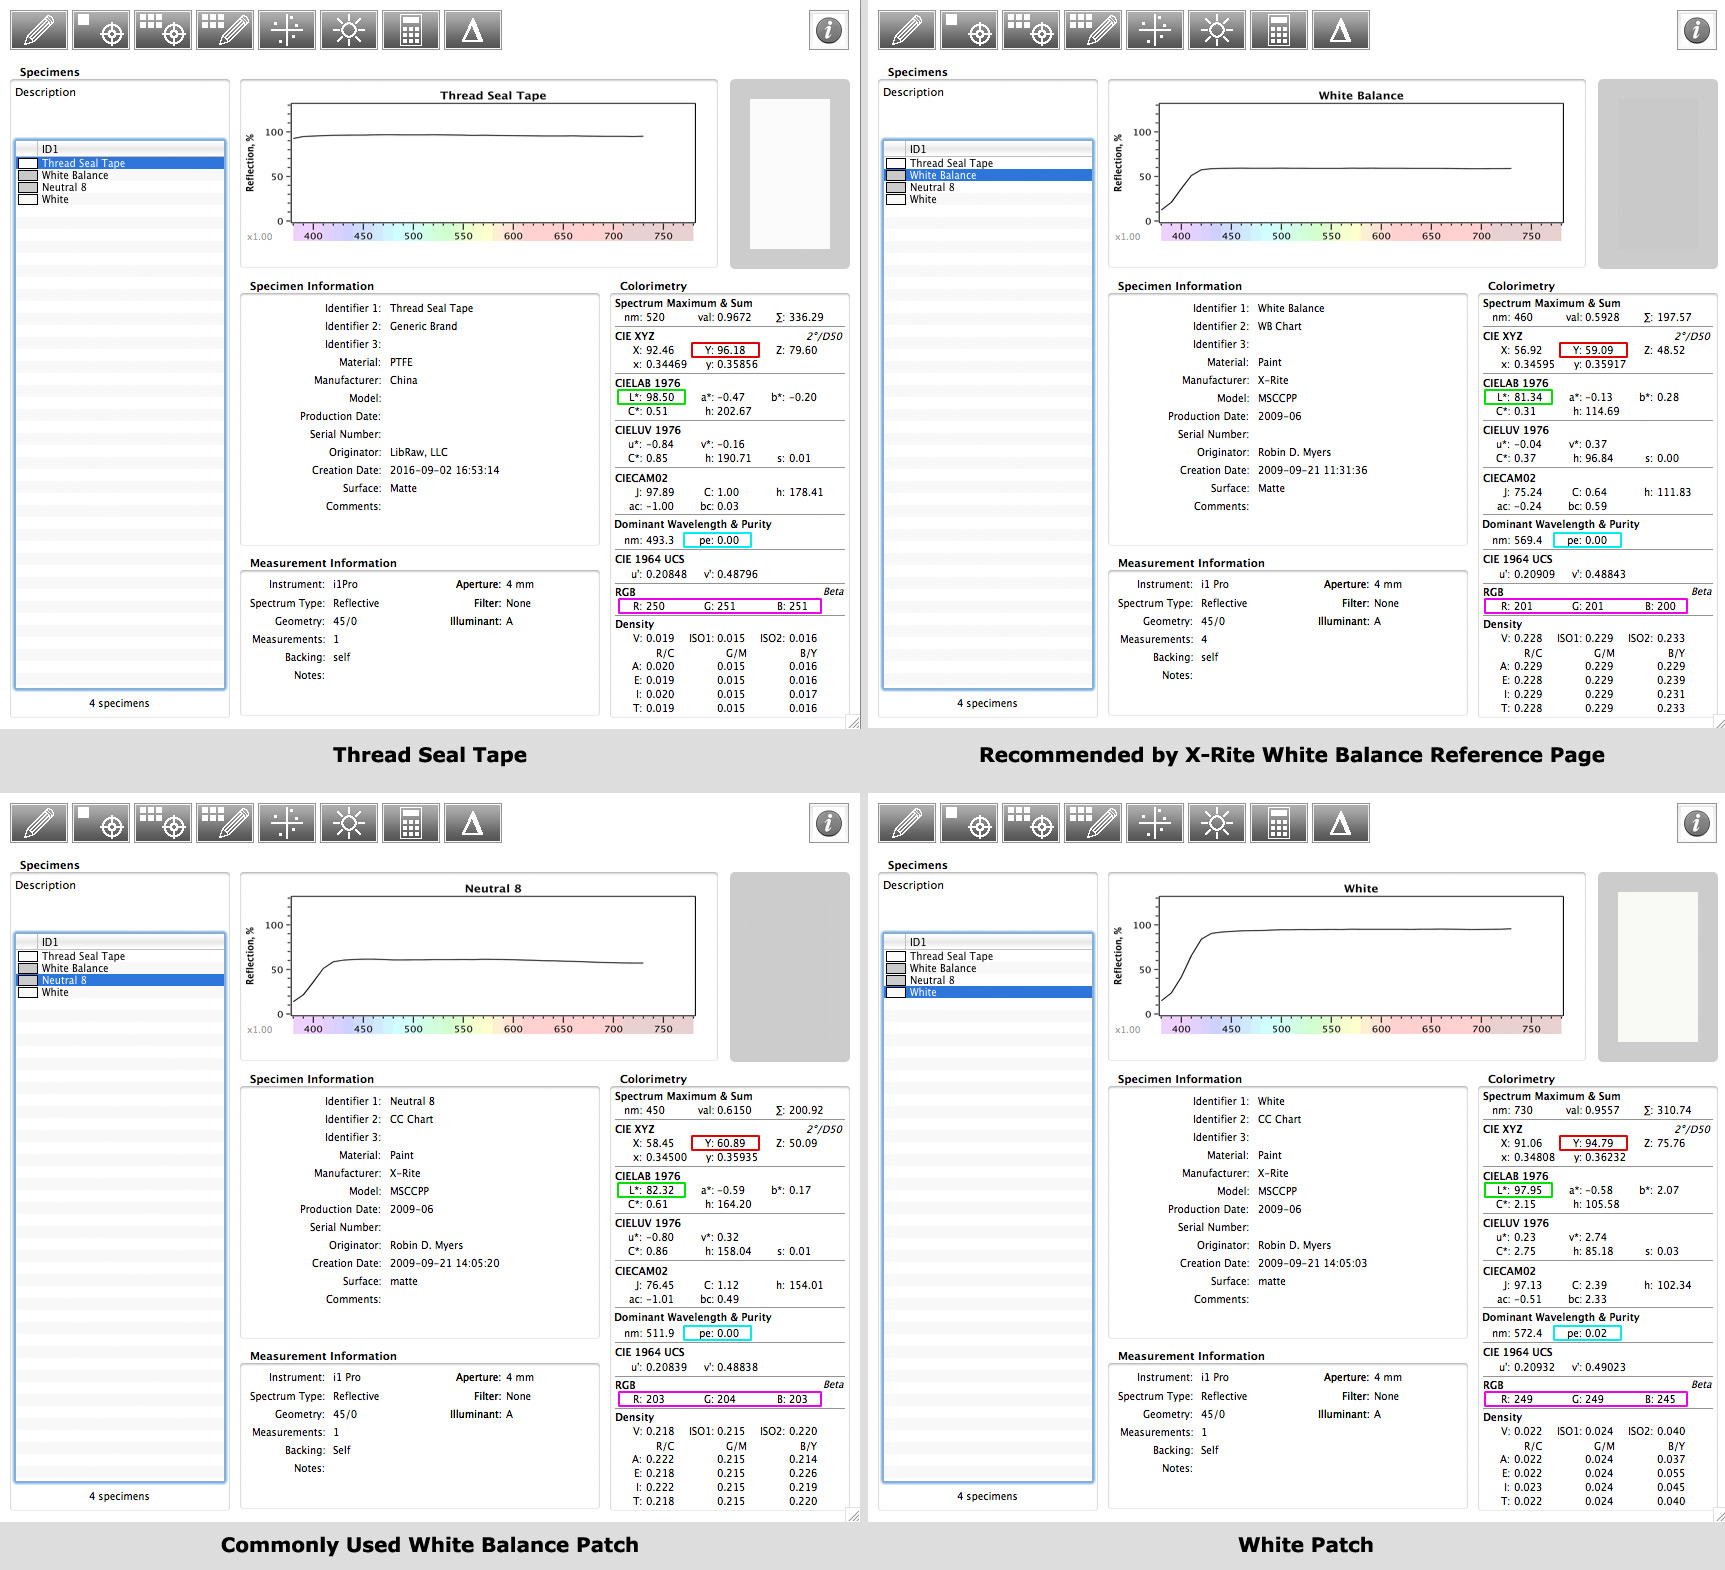
To be pedantic, a little bit of technical information about this. We measured the Teflon tape, after it was already wound around the eraser, with a spectrophotometer. We used Robin D. Myers measurements, made with a same type of the spectrophotometer, for:

  • A white balance reference page as recommended by X-Rite
  • A commonly-used gray patch
  • A white patch

The picture below shows the results of said measurements as processed by SpectraShop.

Pict7-Results-fromSpectroShop

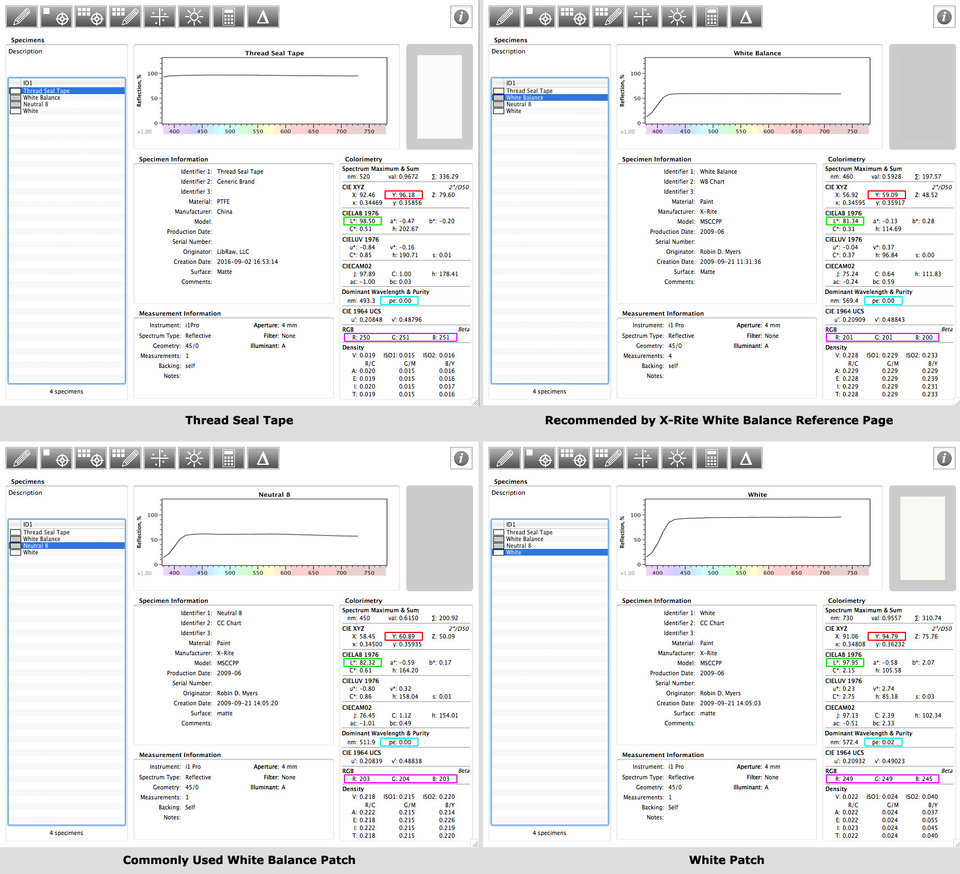
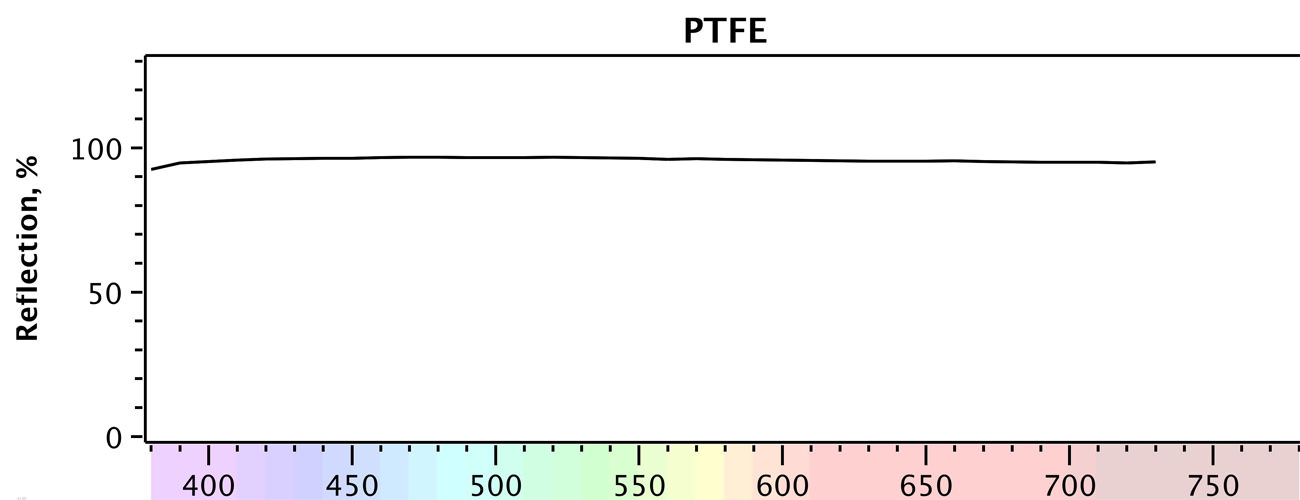
Figure 7. White Balance references spectral measurements processes by SpectroShop

The most telling features are:

  • The spectral graph at the top, which needs to be as flat as possible, that makes for a good neutral reference for white balance;
  • Y, the reflectivity of the material (the red rectangular mark), the maximum possible being 100; for 18% gray, Y=18;
  • L* (the green rectangular mark); for 18% gray, L*=50;
  • pe, spectral purity (the cyan rectangular mark), pe=0 is “ideal”;
  • RGB values (the purple rectangular mark), demonstrating the neutrality in familiar units.

As you can see, our Teflon tape has a reflectivity factor of Y=96.18%, that is the highest of all materials checked, L* = 98.5, a spectral purity equal to 0, and RGB values almost identical to one another (250, 251, 251). As you can see on the graph below, the spectral response of our DIY target is extremely flat.

Pict8-SealTape_PTFE_graph_only

Figure 8. White Teflon tape spectral response

Aside from its cheapness and ease of use, Teflon tape has two more very important qualities:

  1. In most cases, the only things that are going to be brighter than the Teflon tape are a specular highlight or a light source, because the Teflon tape has a close-to-maximum achievable diffuse reflection. This helps when establishing exposure and maximum brightness in RAW conversion.
  2. The higher the values in the digital capture are, the lower the noise is. That’s why having a target with a higher diffuse reflection factor as a white balance reference ensures that the readings used by the click-on-neutral method are less contaminated by noise, less skewed, and generally more accurate.

Links to the RAW files:
Df_WB_Demo006.NEF
Df_WB_Demo007.NEF
Df_WB_Demo008.NEF
Df_WB_Demo009.NEF
Df_WB_Demo010.NEF

The post DIY: Reliable and Cheap Universal White Balance Reference Device appeared first on Photography Life.

Photography Life

Posted in Photograpy How To | Tagged , , , , , , | Leave a comment

Model Posing In Billowing Light Colored Canvas Traditional 1 5/8″ Natural Espresso Wood Grain 24×29 Photo On Canvas

Model Posing In Billowing Light Colored Canvas Traditional 1 5/8″ Natural Espresso Wood Grain 24×29 Photo On Canvas


Model posing in billowing light colored” is an art print by Gjon Mili from The Life Picture Collection. Get photo prints of “Model posing in billowing light colored” in a variety of frames, styles, and materials. Photographer Bio Emigrating to the United States from Albania in 1923, Gjon Mili is regarded as the first photographer to use electronic flash and stroboscopic light to create photographs outside of a scientific context. A true pioneer of the artform, Mili?s photographs of dancers, athletes, and pictures or performances have shaped our understanding of how movement too rapid or too complex for the eye to discern is captured in the still image. Mili?s career as a photographer for Life Magazine spanned four decades and saw the publication of thousands of his photographs, taking him around the world; from collaborations with Pablo Picasso, to the incarceration of Adolph Eichmann, to original photos from Broadway plays. The Life Picture Collection From one of the most iconic magazines ever to hit the shelves comes The Life Collection? an archive of some of the most recognizable imagery of the 20th Century. Documenting events in politics, culture, celebrity, the arts and the American experience, these compelling and provocative photographs include the works of some of the greatest photographers capturing some of the greatest moments in history.

Price: $
Sold by Photos.com by Getty Images

Posted in How To Photograph | Tagged , , , , , , , , , , , , | Leave a comment

The do’s and don’ts of using a wide angle lens

I love using a wide lens!

When I’m out with my camera, more often than not, I’ve got my 30mm prime attached because it’s light, sharp, fast and most of all, helps me tell a story. I especially love it when I’m out in the city. But when I’m in the bush, I love to go even wider! Whether it’s capturing an expansive mountain view or a thick forest floor, I always reach for the widest lens in my kit to tell the story.

Let’s talk about some do’s and don’ts that help me to get the most out of shooting wide.

Do: keep the photo simple

Sometimes when using a wide angle lens, it’s tempting to fit as much as you can into the image. However, one of the most effective ways to utilise a wide angle lens is to leave content out. A bit of the good old “less is more” principal.

Wide angle lenses are perfect for open spaces with a single tree or a seascape with an expansive sky. One of my favourite things to shoot is when my kids are out exploring. I love nothing more then standing back and observing as they discover.

photo of girl waling in grass by Jayne Cho

black and white photo of kids climbing stairs outside by Jayne Cho

Don’t: forget about the subject matter

Whether you’re shooting a minimalistic landscape or a busy street scene, there still needs to be a point to the image – it could be as simple as an interesting texture or repeated colour, or you might want to convey the busyness of a market place. I like to think about what I’m trying to communicate before clicking the shutter, especially in the busy scenes.

Korean street photo by Jayne Cho

Korea street photography by Jayne Cho

This image was begging to be taken – such a typical scene outside a traditional Korean market. Old friends sitting on bits of cardboard, talking, laughing, sharing stories – one of them even had a shirt with “Korea” on the back! I couldn’t have set the scene more perfectly myself, and the 30mm lens was wide enough to capture the foreground and importantly, the entrance to the markets in the background.

street photography with a wide angle lens by Jayne Cho

I particularly like this image because my husband and daughter are walking together, securely and calmly in what was a crazy, hectic scene. They’re prominent enough to be the obvious subject matter, but it’s still clear that the surroundings are chaotic.

Do: utilise compositional elements

With so much of a scene able to be included in an image, it’s sometimes easy to lose focus on what is important. One of my favourite compositional techniques is leading lines. They can lead the viewer’s eye right to the subject matter, and create more dramatic images.

photo of boy walking on rocks by the water by Jayne Cho

In this image, the stretch of sand in the foreground is pointing straight to my son in the background. And the jagged texture of the rocks adds an extra element of drama.

Another simple technique that can really add punch to your wide images is to incorporate framing.

pic of boy in a hat holding candy by Jayne Cho

Shot again with my 30mm prime, I deliberately positioned my son in front of this street-food tent which served two purposes. Firstly, it helped to convey the location and secondly, it provided a nice framing opportunity as he proudly showed off the packet of candy he’d just bought.

Other ways to incorporate framing is to capture subjects within door frames or windows, or among trees as I was able to do here.

Other ways to incorporate framing is to capture subjects within door frames or windows, or among trees as I was able to do here.

photo of boy climbing rocks by the water by Jayne Cho

In this image, my son is framed within the rock face – clearly allowing him to be the main subject matter, but at the same time, incorporating the surrounding environment.

Don’t: worry about lens distortion

Technically, a wide angle lens is any lens that has a wider field of view than what the human eye sees. This means that objects closer to the camera appear larger than ones farther away, even if they are the same size in reality. It can also cause horizons to suddenly bend in the middle, lines of buildings to converge and roads disappear into the distance quickly.

All of these aspects can be used to your advantage, and with a few tweaks in Lightroom, any bendy horizons can soon be straightened out.

backlit-picture-of-kids-playing-in-the-trees-by-jayne-cho

picture of kid walking down the street by Jayne Cho

Do: use a wide angle for photographing people

A wide angle lens can be used very successfully for shooting people. They’re especially helpful when shooting groups because you can get the whole story!

Don’t: use a wide angle for portraits

Actually, this is not 100% true for me, but it’s worth keeping in mind that the wide angle lens can be unflattering, when people suddenly have very big noses if shot from a close distance. Sometimes this can be fun though!

black and white portrait of young boy by Jayne Cho

So there you have it – some of my do’s and don’ts of using a wide angle lens.

Wide angle lenses are powerful! I love them because they have the ability to bring your viewer into the middle of the most chaotic scene, allowing them to almost hear and smell the surroundings. And on the other hand, they can find rest and calm in the simplest of landscapes.

But most of all, a wide angle lens allows me to have the career I’ve always wanted, to be a documentary journalist – of my own life!

pic of girl climbing a tree by Jayne Cho

Whether it’s capturing an expansive mountain view or a thick forest floor, I always reach for the widest lens in my kit to tell the story. Let's talk about some do’s and don’ts that help me to get the most out of shooting wide.

The post The do’s and don’ts of using a wide angle lens appeared first on Clickin Moms.


Clickin Moms

Posted in Photograpy How To | Tagged , , , , , | Leave a comment