Fuji X100F Review

Fujifilm X100F

This is an in-depth review of the Fujifilm X100F camera, which was released by Fuji on January 19, 2017. The X100-series cameras have been very popular since they were introduced to the market and the X100F is the fourth iteration of the product. Sporting a 24.3 MP X-Trans CMOS III sensor, a fast X-Processor Pro image processor, an improved 91-point AF system and an updated button layout with joystick autofocus control for easier AF point selection, the X100F is the most refined camera of the series. I had a chance to test out the X100F earlier this year for a few months when traveling to Morocco and Uzbekistan, so I decided to write this review based on my field experience.

Photography Life

Posted in Photograpy How To | Tagged , , | Leave a comment

Picking the best: 5 Pros show us their culling routines

Do you ever struggle with choosing the best of the best in your photo sessions? Have you ever wondered how other photographers decide one frame is better than another? Are you overwhelmed by trying to edit a hundred images when you should just be choosing a few?

We have TOTALLY been there!

That’s why we have gathered five of our favorite Click Pros to give us a behind-the-scenes peek at their culling processes. They are sharing what makes one image stronger than another and how they navigate the sometimes overwhelming task of choosing the best. Their advice and insight has us so inspired and we know it’s going to make you a more efficient photographer, too!

Kate Luber

Kate Luber is a Clickin Moms Mentor and has been a member of Clickin Moms since 2012. A central Oklahoma portrait and lifestyle photographer, her primary passion is capturing her two young daughters’ childhood in magical ways. From the everyday moments to styled portraits, Kate infuses fun and humor with a dash of drama into her images. By day, you’ll find Kate working full-time in the banking industry and surviving on Diet Coke, sushi, and chocolate.

Everyone has a different definition of a “keeper” image. I am a notoriously ruthless culler, and only the best of the best make it through to the editing process.

I start narrowing the images by looking at the technicals. If an image isn’t sharp, I won’t even consider it. It’s always a bit disappointing when the best expression is on an image that is soft, but if it’s soft, it’s just not good enough.

After the focus check, I look for elements that cannot be corrected in editing. Distracting items in the background can always be removed, but if a foot is slightly chopped off, you can’t add it back on. So I always scan images for any unfortunate limb chops that can’t be corrected by cropping in more.

Next, I begin looking at the poses and expressions. Nobody needs five images of the same, or even similar, smile or pose. I choose the best one and move on. Then I will pull up all of the similar images in “Survey View” in Lightroom and compare them at a larger size and force myself to narrow it to no more than two images of a certain setup.

This can be a challenge when the images are of your own children, and you think they’re all adorable. I don’t delete the images that aren’t selected; they live on my hard drives forever. I simply choose to edit and share only the best.

Once the gallery is narrowed to technically solid, varied images, I start looking at the nuances that grab your attention. Is there a sparkle in the eye in one image that just keeps standing out to you? A moment? A story? As you look through your images, there will always be images that just pull you in, and those are the images that have that something special.

Sometimes I spot that something special before I’ve made it through my initial, technical cull process. Through every stage of the culling process, I keep my eyes open for the hidden potential in an image. Is the composition or light just a bit off but could be magical with a little polish from editing?

Some images may seem a bit ordinary, but I can envision where I would take it with editing and make it magical. I’m always looking at the bones of the image, the technique and the moment, emotion, or mood, and seeing how I can dress it up.

Rebecca Hunnicutt Farren

Rebecca Hunnicutt Farren is a children and family photographer who recently relocated to the Pacific Northwest in Portland, Oregon (previously of Taichung, Taiwan). She loves capturing photos of her daughters that highlight the world around them, even more so if they include lines, shape, and color.

This was a short session with my daughter shot in Taichung, Taiwan where we lived until recently. It was a rainy day but not too heavy, and we were headed out to the art museum. I love our big rainbow umbrella and will take full advantage of any opportunity to photograph my girls in the city with it. I initially was going for more of a documentary image and captured her walking between the scooters.

As we approached the front door I noticed some shallow puddles and attempted to capture a cool rainbow reflection, but there was not enough sunlight or water to create the reflection I had in mind.

Then, I was completely inspired by the large textured neutral gray wall and the contrast with my daughters striped pink dress and fun rainbow umbrella.

I’ll fully admit that I’m a chronic over-shooter. I make up for it by only editing one or two images from a quick session. This little shoot with my 5 year old at the wall lasted 4 minutes and I shot 75 frames!

On my first culling pass I flagged 45 shots. I do this first cull by quickly going through the images and flagging anything that catches my eye. Then I went through those 45 flagged images and added a red tag to the images that I liked best. From this particular shoot I was looking for facial expression, light on her face, placement within the frame, movement, and body language.

I do love my daughters cute smile in image #1, but I found that images #3, 5, and 6 had a bit more potential story. I was asking her to walk from camera left to camera right and was envisioning a photo with her on the left rule of thirds line with room to walk forward comfortably. I also wanted to see some active movement in her dress and body language, with some light shining on her face as well.

From this smaller set of 7 images I considered editing numbers 3, 5, and/or 6 but decided on doing a complete edit of number 6 as it more fully matched my initial vision.

SOOC image

In Adobe Lightroom I added contrast, decreased highlights, lifted shadows, warmed up the image, and straightened the two visible lines. I also did a bit of dodging on her face and removed a color cast from the umbrella. I also dodged the dress and added a radial filter to the image help her pop on the darker background.

Lightroom edit

While editing in LR I felt that I wasn’t quite happy with the placement of my subject within the frame. Then I took the image over to Photoshop and utilized content aware to remove the two circle lights on the walking surface, and then decided to remove the horizontal gold line at the top of the image as well. I initially liked it but didn’t feel that it was impacting the image as I had hoped.

After the those edits, I wanted to extend the canvas to place the subject more on the ROT line. I shot this with my 35mm but wanted a bit of a wider look.

Final Photoshop edit

Sarah Keene

Clickin Moms member Sarah Keene is captivated by light and the unique aspects of ordinary moments. Taking great delight in art and beauty, she seeks to show a sense of joy and delight in all her subjects.

While I never believed that JK Rowling wrote the Harry Potter series in one sitting, or that eloquent twists of phrase were created instantaneously by the modern poet, I definitely held to a notion that I should be able to achieve my final photographic vision in a minimal number of frames.

When so many renowned artists have drafts before a completed work, why would the same idea be not even more significant for a humble photographer like me?

Once I started thinking of shutter clicks as drafts of a final vision, I was freed up to create just that—drafts! These drafts were now images that I was completely free to discard but that were essential to creating my final work. This mindset helped me to continue to click the shutter and refine those drafts to match the vision I had in my head. It led me to creating images that I love.

This is my youngest daughter. She is spunky and delightful. She is earnest and hard-working and creative. As the youngest, she is always striving to keep up with her big sister, to be able to do the same things.

She presented with an opportunity to capture her delight in a self-styled pig tail. As she proudly showed me her work, I grabbed the camera. She gave me a few seconds of her time; this is how I worked, refined my vision and created an image I treasure.

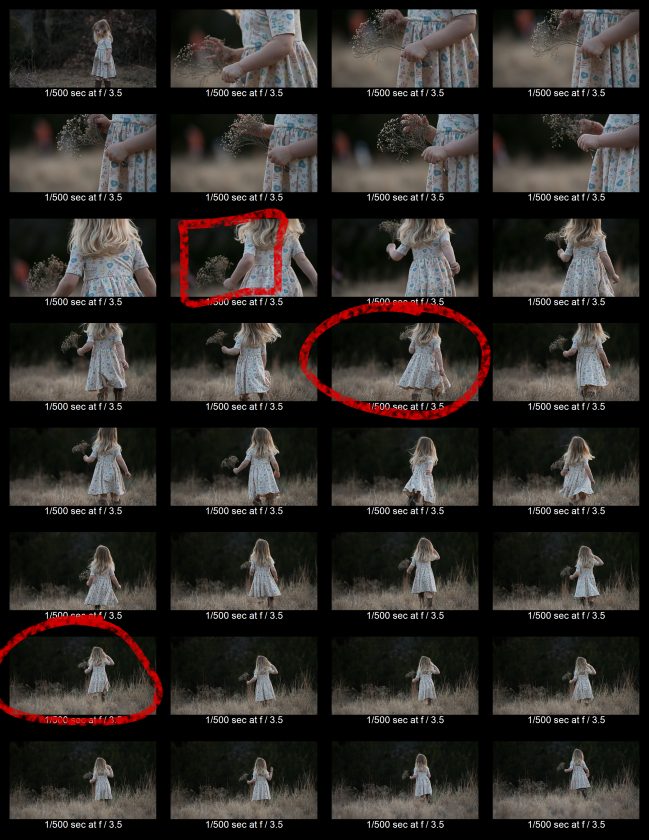
For this particular set, arriving at my final image was very much the same as my creative process in developing the idea. Obvious deletions were simple—blinks, missed focus, poor expressions and posture. Additional rejections were made as natural light can change even in such a short space of time.

In my contact sheet, I captured some delightful, smiling images at the beginning of the series. However, those did not show the depth of her character. Several are still kept because I liked the expression or posture but those were not the vision I chased.

I have plenty of smiley pictures of this girl. The goal of this image was to highlight her determination. I wanted a portrait of a serious hard-working girl who is still little. I shot through the moment, through the sweet expressions, through some silliness, until she was comfortable enough to show her deeper self.

SOOC image

This image communicates in this one frame how much I adore her. In her later life, I want her to look back at this picture and see herself through my eyes. I want her to know how much I was proud of her efforts. She should see how much I loved that ridiculous pig tail. I want her to know that when I saw her I didn’t focus on the outward details.

With those eyes I looked through into her soul. I saw her as an amazing person whose mother I am proud to be. I didn’t stop at ‘cute’ but pushed through to get my final vision of LOVE.

Final image

Editing simply put the final polish on this image. Skin tones are of paramount importance here, so I worked with the color to get that just right, adjusting Temperature and Tint in Lightroom along with tweaking the Orange Hue slider.

Second to skin are her eyes! They just draw me right in! I added a bit of clarity and emphasized the color in her iris. I increased the shadows on the sides of her face to give a bit more dimension. Then I lightened the darker spot under her eye and removed trace evidence of that morning’s breakfast from around her mouth. I used a slight S-curve to add a bit of contrast to the entire image, while keeping the whole very light and bright to emphasize the cheerful mood.

Iris Nelson

Originally from Northern Germany, Iris Nelson resides now with her husband and two spoiled dogs in the Metro Phoenix area. Her passion is to chase the light, finding beauty in the concrete jungle in the Metro Phoenix area. She also greatly enjoys photographing food and dreams of photographing chefs in their restaurants highlighting their food in particular.

I have been interested in food photography for a very long time (pretty much since I picked up my first digital camera in 2007). However, the true passion for food photography started about two year ago. I enjoyed seeing other photographers sharing their images. I started to study their images (light, composition, props). After a year of studying other photographers, I wanted to put my own spin on food photography.

I love to photograph in natural light in my little studio. The room has only one window, so I need to be creative how I set up the food to photograph. How do I approach my food photography session, and what images make the cut to be formatted and shared?

As you can see from my contact sheet, only 18 images (out of 94) had potential. From those 18 images, after closer inspection, 6 images I marked to format to possibly share online.

90mm f/2.8

Light and focus are the first things that I look for. Does the star of my images (scones in this case) look appetizing? Will viewers want to eat what I am sharing? How is the composition? Do items overlap/cutting in to the star of the image? Even though these are not people, I still want to make sure that the composition is pleasing to the eye.

50mm f/1.4

As I have mentioned, I shot 94 frames for this scone session. I varied my angles, changed lenses (50mm and 90mm macro), changed exposure/aperture. I kept photographing until I felt I had enough variety for potential hero images from this photo session.

90mm f/2.8

After formatting the 6 selected images, only 4 made the final cut to be shared.

50mm f/1.4

Not all images that I take are hero images. It takes sometimes a lot of trial and error before finding the perfect image(s) I am inclined to share. I encourage you to keep shooting. There will be frustration along the way, but the more you photograph, the more images you have to choose from to share.

Leanne Hymes

Leanne is a hobbyist photographer living in the suburbs of Atlanta with her husband, son and 2 dogs. She is inspired by the beauty in everyday moments and strives to capture her family’s lives in a memorable way. When not shooting, she works as a physical therapist and can also be found running, baking, gardening or reading.

Freelensing has become one of my favorite techniques for capturing images in nature. These photos were taken for the P52 project in which I participate on the Clickin Moms forum. The week’s shooting prompt was “minimalism.” With that theme in mind, I photographed the scene.

My highest priority was finding pictures that were in focus (which is  particular challenge when freelensing). Next I was looking at composition, light, and background.I immediately discarded the last row of images because I didn’t like how the green grass in the background was competing with the fern. I wen t on to eliminate those images where the fern was taking too much of the frame.

After I made those decisions, I was left with 8 of the 30 images I originally shot. In the first two, I was drawn to the hard light and how it was producing a clear shadow. I ultimately decided against them because I found the sharpness of the pine straw on the ground to be distracting. From there is was a matter of fine-tuning the composition

I was drawn to the way the middle of the fern exactly intersected with the corner of the frame in my final image. This small detail is what led me to making my final choice.

Want to be more confident in every step of your photographic process?

With thousands of exclusive educational articles and a community of experienced photographers to answer all of your questions, Clickin Moms is the BEST place to learn and grow in your photography journey.

The post Picking the best: 5 Pros show us their culling routines appeared first on Clickin Moms blog: Helping you take better pictures one day at a time.


Clickin Moms blog: Helping you take better pictures one day at a time

Posted in Photograpy How To | Tagged , , , , , , | Leave a comment

5 steps to make your photography portfolio stronger

I love offering portfolio critique sessions. It is a joy to guide new photographers toward their goals!

With many of my sessions, I have noticed that there are certain bits of advice that I give every time. These lessons are universal for any photographer. Whether you just got your first camera, are on your way to becoming a Click Pro, or are a seasoned professional, you can benefit from these observations now.

Isolate your subject

Isolating your subject doesn’t mean that you have to put him in an empty room in order to photograph him. Rather, it means that you need to make it your goal to let you subject shine. You want the focus of your photograph to be the first thing your audience sees, right?!

These are some of my favorite ways to isolate subjects:

•Using aperture to blur the background

•Keeping the subject far away from background elements

•Placing the subject in an empty space

•Placing the subject in great light

•Ensure a bright subject is on a darker background OR

•Ensure a dark subject is on a brighter background

•Utilize composition (ie: the rule of thirds, leading lines, framing elements)

Place your subject properly within the frame

The easiest way to improve your photos RIGHT NOW, is to avoid cropping at the joints (knees, elbows, wrists, ankles, throat). To have the edges of the frame running through these joints is uncomfortable (the term “limb chop” sounds bad for a reason!). So take a step back and make sure that your composition allows your subject to be comfortably within the frame.

Similarly, don’t have horizontal lines (ie: horizon lines and background elements) running through these joints. This can be a little tricky as we don’t always notice that pole or tree behind our subject when we are happily shooting away. However, I promise that taking a minute to ensure that nothing is “impaling” your subject (yikes!) will yield stronger photographs every time.

In this example, my dark subjects are on a brighter background. They are framed by the horizon line and they are in a clean space. Their limbs are fully within the photograph and the light is beautiful.

Add depth to your image

How does one add depth to a two-dimensional photograph, you ask? By carefully constructing a frame that has elements in the foreground, the middle ground, and the background. Doing so will create a sense of space that will make your photographs so much stronger.

Sometimes a simple portrait calls for only a singular subject with no other elements in the frame. And that is fine! However, when you want to tell a deeper story with your photographs, you need to use every millimeter in your picture!

You want your viewers feel as though they can move through the frame and into the story themselves. Here are some simple ways to add depth:

•Put something in the foreground (but don’t let it distract from your subject…nothing too bright or eye-catching)

•Opt for a point of view where we can see the environment

•Close your aperture to keep desirable elements in focus

•Use light intentionally (backlight allows the sun to be the background element!)

•Place cool colors at the back and warm colors at the front of your image, and vice versa, to see how colors recede and emerge (this is a great trick I learned in Fine Art and Visual Expression with Elle Walker)

In this photo, I shot through the parents. It adds a layer and it also provides a contrast in the tones so the baby can really pop as he is in a bright area.

In this image, I chose to backlight, to back up, and to shoot through some cedar branches. I kept my aperture at f/9 to help me to get a nice sun flare, too!

Balance the frame with light and shadows

Creating a balanced frame means to create a path for the viewer’s eyes to “read” the photograph. Our eyes read from what is bright to what is dark. We search for geometrical forms. Our brain is drawn to the color red. We are automatically attracted first to human forms, faces, and eyes.

If you do not have light on your subject or if the brightest light has fallen elsewhere, it can lead to an imbalanced frame. Should red occur in an area of the frame that is unimportant, it can distract the viewer from your intended subject.

In other words, creating balance means that you have organized the photograph in a way that guides your viewer to your subject first and does not pull them away from that intended focal point.

In this image, I was drawn to the quiet light falling on my son’s face and hands. I was happy that I happened to have my camera in my hand! The light was at just the right place and allows the viewer to read the frame just the way I intended.

The post-processing in this image was very important. I needed to keep the curtain as dark as possible, in order to make the starburst the “star” of this image alongside my son. The relationship between light and shadows balances the frame and draws the viewer to the starburst area.

Here is an example of how red can grab our attention, even when it’s out of focus. In this frame, the bike was part of the story of a bike ride that didn’t end well. But for someone who doesn’t know the back story, it might be distracting.

Work to get accurate white balance

Color in photographs can be such a difficult thing to see at first. Our brains are wired to autocorrect when there is a color cast that we know is wrong.

However, achieving correct white balance can make all the difference in the effectiveness of a photograph. I urge you to learn how to edit skin by the numbers. Using these mathematical baselines will help you retrain your eyes and will eventually make seeing and editing correct white balance second nature.

There will always be trends in post processing, but if the white balance is weird, that’s all I can see! Feel free to explore new techniques but don’t allow yourself to be the victim of passing fads. Having solid white balance is crucial to creating timeless work.

Avoid in-between moments and distracting elements

When looking at your work, don’t put “mommy goggles” on. This is not to say that you shouldn’t take a few of those super close-up shots of that adorable toddler (because that is what I did and while they isn’t likely appealing to anyone else, I know those shots are just screaming LOOK HOW AMAZINGLY BEAUTIFUL MY SON IS!). Instead, I want you to take those shots and then be intentional in taking shots that tell the story of your subjects.

Don’t forget you are taking pictures for your kids so they will be able to remember and relive their childhood. So, look at your favorite images. Do they tell the story of a moment? Or do they capture a moment that is more in-between?

Be intentional. Know why you are shooting. Choose your settings to support the story. Click. Look at the back of your camera. Move. Repeat.

Here the light really helps to tell the story. It sets the time of the day so we can understand she was not supposed to be sleeping at 4pm. She fell asleep on her iPad after drinking her bottle of milk. We discovered the next day that she had pneumonia. All the elements in this frame complete the story.

Look again at your best images. Is there a person or a thing that doesn’t belong in your story? If you meant to feature your gorgeous daughter bursting with laughter, you don’t need to put Dad mowing the grass in your frame! Simplify your frame. Get closer and choose an angle to avoid distracting elements.

In this image, the only way I could make this silhouette was by getting low in the grass and shooting through the scene to have his limbs separated and his body not merging into the tree or the electricity wires!

So now for some homework! Put together a portfolio of your 25 best images. Are you following these bits of advice? If not, how could this advice improve those images? Go out and try again to improve upon what you love! As your mentor today, I want you to improve and I want you to feel empowered by these tools to do just that.

Want to learn how to take better photographs?

With thousands of exclusive educational articles and a community of experienced photographers to answer all of your questions, Clickin Moms is the BEST place to learn and grow in your photography journey.

The post 5 steps to make your photography portfolio stronger appeared first on Clickin Moms blog: Helping you take better pictures one day at a time.


Clickin Moms blog: Helping you take better pictures one day at a time

Posted in Photograpy How To | Tagged , , , | Leave a comment

7 Methods to Create Realistic HDR Images

Luminosity Mask Technique

Mention the phrase “HDR photography,” and you will definitely get some cringes. HDR is one technique that you either love or hate. Fortunately for me, I have been using this technique to create many of my images ever since I picked up a DSLR, and it is a tool I definitely have grown to appreciate. Personally, I love taking photos during sunset and sunrise, which means most of the scenes I encounter are of extreme contrast and therefore high dynamic range. Depending upon the shot, it can be nearly impossible to create a tonally balanced image without doing HDR photography of some kind, although there are many different methods of blending exposures with different results, some more natural than others.

Photography Life

Posted in Photograpy How To | Tagged , , , | Leave a comment

Photographing Bhutan

16. David-Lazar-Bhutan-Tigers Nest-Prayer Flags

Fine art travel photographer David Lazar first became fascinated with Bhutan after winning a photography contest in 2010, and then enjoying the fruits of his first prize – a free trip to the mysterious, “Land of the Thunder Dragon”. When he had the chance to return earlier this year, he could not have been happier! This is quite befitting in a country where the government actually has programs for the mental and spiritual wellbeing of its citizens, and measures what it terms, Gross National Happiness.

Photography Life

Posted in Photograpy How To | Tagged , | Leave a comment