8 Tips for photographing a large group with success

Photographing a group can be scary. Really scary. I remember when I was a new photographer, the thought of photographing a large group completely terrified me. I dreaded getting the inquiry for a family reunion, extended family, or even a request from my mother-in-law.

However, after years of practice and a lot of mistakes, I have learned to photograph a large group with confidence. By developing a reliable workflow, I have replaced the nerves and fear of large groups with confidence.

Even better, this workflow can work for any photographer at any level. Here are eight of my best tips to help you nail your next group photo.

Large Group Photo Session family tickling little boy and laughing by Shelly Niehaus Photography Prosper, TX.-6

1. Have one main contact or decision maker for the group

Whether you’re photographing your own large family, a group from work, or an extended family session, you will need one main contact to make decisions for the group. This is the person who will finalize all of the details. They are your source for important information including time, location, types of images desired, wardrobe, styling, and must-have shots.

I usually ask the person contacting me who would be the best point person for the group. If it is a client session, I recommend that the person be the one paying for the session. This ensures that they are in the loop of all decisions, their expectations are communicated directly to me, and there are no surprises.

Large Group Photo Session family looking at camera and smiling by Shelly Niehaus Photography Prosper, TX.-8

2. Have all of the details planned in well in advance of picture day

When you are coordinating a large group of people, it can take some extra time to get all of the details planned. Often, it takes more time than you would think

That’s why you should have all of the details set and ready to go a good while before the session. Let everyone have enough time to have the time and day on their calendar without having to move other obligations. For clothing, give everyone ample time to shop and order items as necessary. Have your shot list set well before the session giving everyone ample time to add their input on the photos they want.

Large Group Photo Session family standing among trees by Shelly Niehaus Photography Prosper, TX.-4

3. Keep it simple

With all of the moving parts of a large group photo, simple might not even seem possible. But the truth is that there are things that you can control and in those cases, simplicity is always the answer.

Resist the urge to shoot in multiple locations. Have everyone dress in two to three neutral colors that will coordinate easily. Choose gear that is versatile so that you aren’t perpetually switching lenses.

While it is easy to want to flex all of our creative muscles at a photo shoot, when working with a large group it is often best to work simply so that the challenges of wrangling all the people don’t overwhelm you.

Large Group Photo Session family laughing in front of bridge by Shelly Niehaus Photography Prosper, TX.-15

4. Choose a location that is family friendly and works for all members of the group

It is very important to consider the ages of all of the family members, both young and old, when you are choosing a location. The wrong location can make the session go south very quickly.

Is there anything to distract young children, such as a play area, heavy foot traffic, or a nearby candy store? Are there any areas, like water hazards or abrupt drop-offs, that would be unsafe for children who aren’t as steady on their feet? Is everything accessible for older or disabled family members?

Keeping everyone comfortable throughout the session and having the location accommodate everyone will make for happier photos and a smoother workflow.

Large Group Photo Session family watching small boy run away by Shelly Niehaus Photography Prosper, TX.-13

5. Create a schedule of arrival times based on the ages of the children

I cannot recommend staggering arrival times enough. Start with the oldest family members arriving first and then work down the line until the family with the youngest members arrive last.

If photographing a large extended family, I would have the grandparents arrive first, followed by the adult children with no kids, families with teens, and families with school age children. Finally the last to arrive would be the families with young toddlers and babies. This allows for the youngest children to have the shortest window and really maximize their attention span.

Usually, I stagger the arrival times by 10 minutes. This gives me an opportunity to get to know each family and have time to take individual photos of the family and children.

One week before the session, I discuss the arrival schedule with the group coordinator and go over details. Finally, I send an additional reminder the day before the photo session to confirm all of the designated arrival times.

Large Group Photo Session family playing and laughing candid photo by Shelly Niehaus Photography Prosper, TX.-3

6. Do the large group or family photo as soon as everyone has arrived

After everyone has arrived and you’ve done the individual shots, this is the perfect time for the group shot. Given the staggered times, this usually is about 45 minutes into the session. By now the adults are comfortable and have been hanging out and chatting and the youngest family members are still fresh.

Before starting to line everyone up, make sure your camera settings are perfect. Your number one priority in a group shot is that everyone will be in focus.

I usually photograph large group with my 24-70 2.8 lens around f/3.5 – f/5/6 and make sure that I am far enough back to safely ensure that everyone is in focus. In addition, make sure you don’t have any distractions in the background such as trees sticking out of someone’s head. After fixing so many mistakes in post I have learned to stop and take a moment to double check the composition. It is much easier to get it right in camera.

Finally, make sure that the lighting is ideal for a large group. I usually prefer flat light for the posed group shot to make sure that everyone is lit evenly. This ensures that everyone’s smiling faces are perfectly visible which makes for happy clients.

Large Group Photo Session family kissing and making funny faces by Shelly Niehaus Photography Prosper, TX.-12

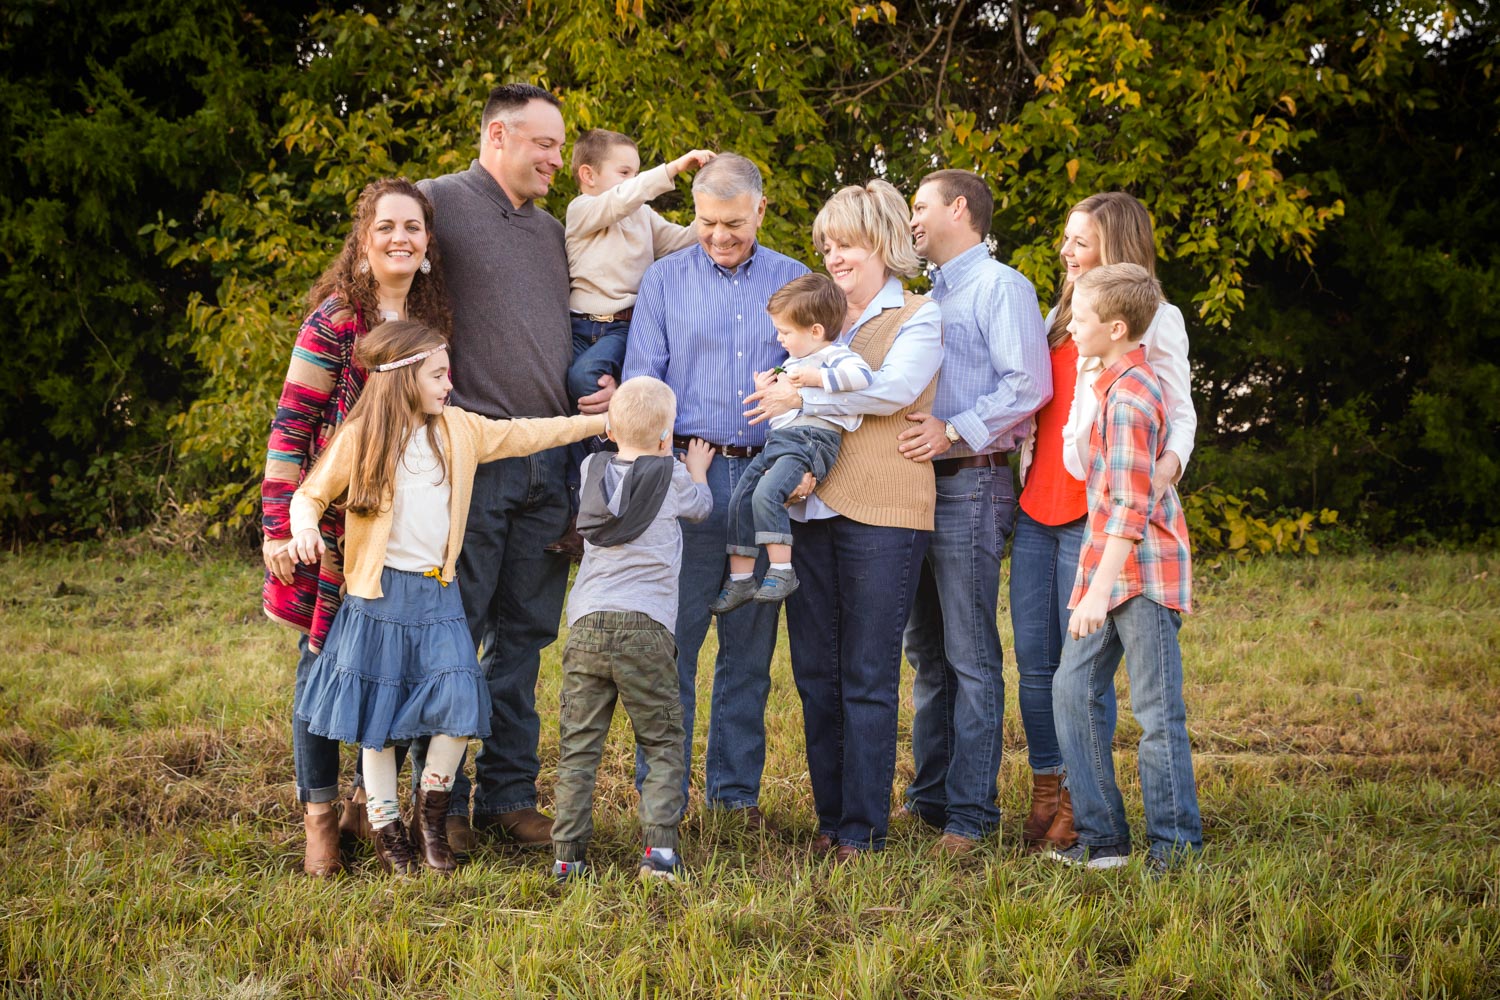
7.  Take control of the posing

Once you have your camera settings dialed-in, now is the time to begin posing the family. Start by placing the oldest or most prominent members in the middle of the group. These are your anchors for the group photo.

Next, go in and add the other members and families around the anchor points as needed.  I start with the adults and add the kids in last.

Check for symmetry in both height and color. A clump of one color in the midst of varied colors or a group of small children with tall adults all around can look strange.

This is the perfect time for an assistant to be a second pair of eyes and check for details. While an assistant isn’t necessary, it can be very helpful to have a detail-oriented person to be there for this part of the shoot.  His/her job is to make sure everything is in check because as a photographer, you already have so many things going through your head. It can be easy to miss an untucked shirt, an out of place accessory, or crazy hair.

If you don’t have an assistant, ask one of the adults who will be on the end to stand behind you and do a quick check.

While I’m getting set up, I always instruct the group to just hang out and chat for a while. The group welcomes the break from being camera-ready!  If you are extra sneaky, this is a great opportunity for fun candids of the group interacting with each other as you take your “test shots.”

Large Group Photo Session family sitting in field by trees with sunshine by Shelly Niehaus Photography Prosper, TX.-1

Finally when it’s go time, I instruct all of the older family members to look and me smile no matter what. I tell them this is the only time during the session I’m going to ask them to do this, but it’s important for them to be looking at me and smiling while I interact with the kids. I assure them that I have the kids under control

The next few minutes are always a bit comical as I do anything I can to get the kids attention. Some of my favorites include jumping up and down, singing, dancing, telling stories, or talking animatedly to them about all the fun games we are about to play “after this photo is taken.” All the while I am snapping away.

This is a great time to be an over shooter. So many things can happen in large groups and having a bunch of photos available for head swaps and variety can be incredibly helpful.
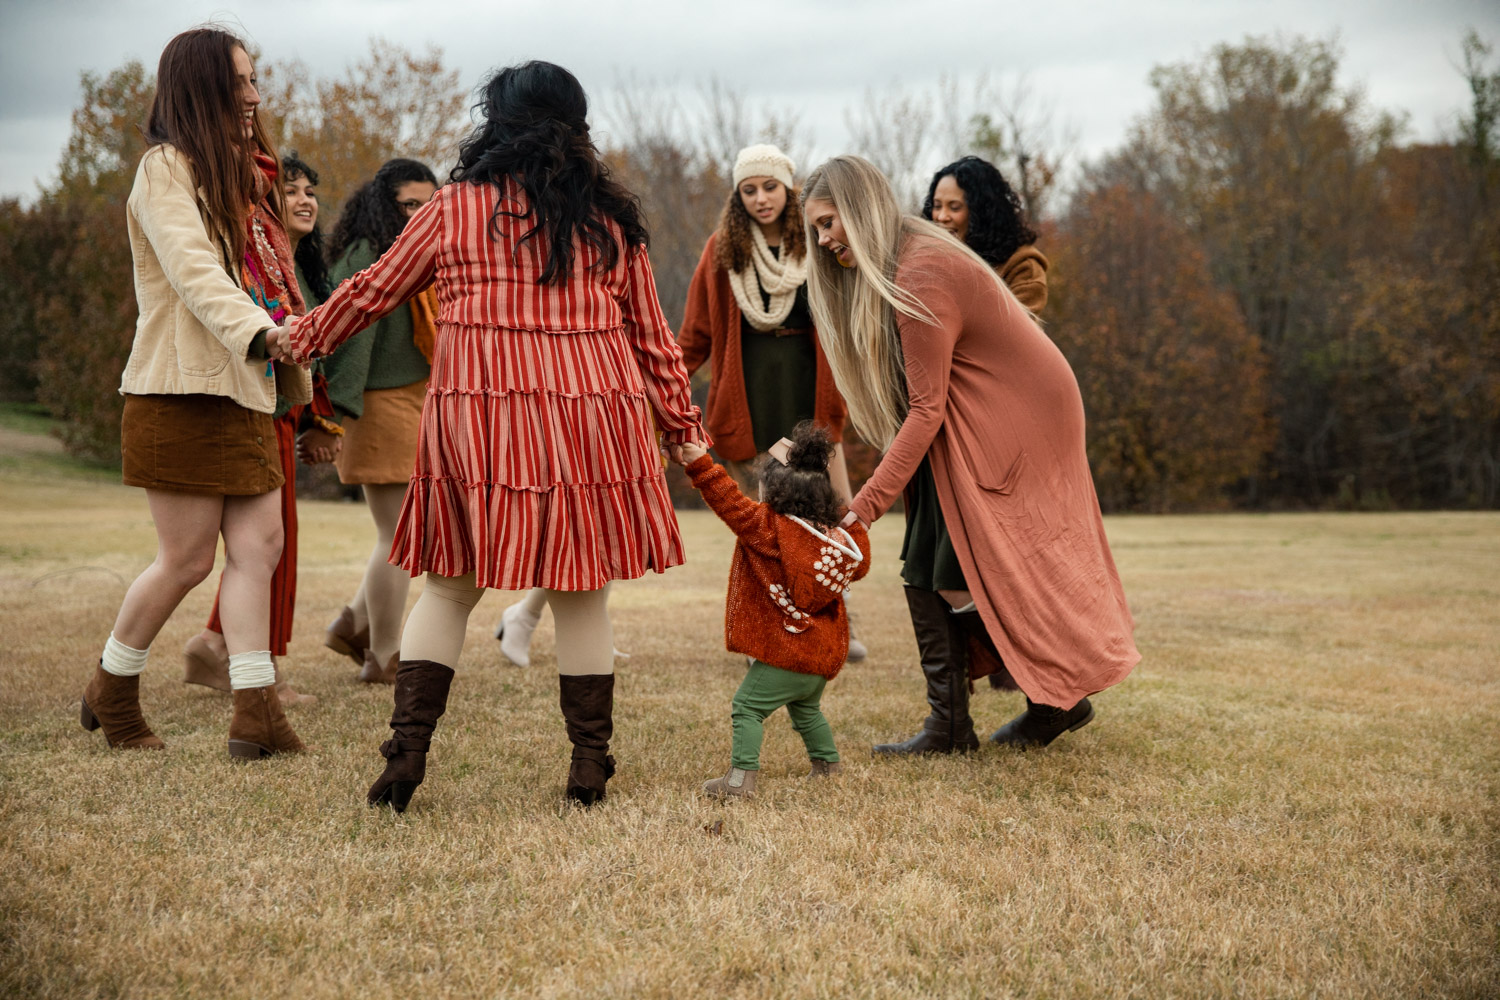
Large Group Photo Session family playing ring around the rosy by Shelly Niehaus Photography Prosper, TX.-10

8. Bring the fun!

As important as it is to get the shots on your list, it is also just as important to make this a fun, memorable experience for your subjects. Your demeanor will drive the tone of the session and can make all the difference in getting the shots you want.

There are endless ideas for sweet, interactive photo setups. I love putting grandparents on blankets or chairs and having them read to the little kids. Play games with the kids. Taces, ring around the rosy, tickle fights and duck-duck-goose are all sure to please.

Even the teens and adults like to get in on the action! Adults do really well with conversational questions such as, “What was your favorite vacation?” or “What is your favorite memory as a family?”

These simple prompts get them engaged with each other and really allow me to capture some great candid images. I let the last half of the session play out on its own and aim for a mixture of posed and candid images to complete the family gallery.

Large Group Photo Session grandparents reading to kids on chairs by Shelly Niehaus Photography Prosper, TX.-2

At this point in my journey, photographing large groups and extended families is one of my favorite things. These photos will mean so much to current and future generations. I have learned to embrace the moving pieces and challenges that these sessions bring. Instead, I focus on the importance of these photos to these families.

So feel confident when tackling your next group photo. Arrive prepared and you can approach these sessions with confidence rather than fear.

These tips will give you a framework to handle all of the details that need to be taken into consideration. Make them your own so that you can achieve your unique vision in the final photos. You’ve got this and I can’t wait to hear about your large group sessions in the comments below!

19Feb-CM_blog_lower_CTA_retina

The post 8 Tips for photographing a large group with success appeared first on Clickin Moms blog: Helping you take better pictures one day at a time.


Clickin Moms blog: Helping you take better pictures one day at a time

Posted in Photograpy How To | Tagged , , , , | Leave a comment

iPhone X Camera Review

iPhone X

My iPhone is always with me. That’s what makes it so versatile compared to the big cameras I shoot with. I use it at home and I have taken it with me all over the world.

Photography Life

Posted in Photograpy How To | Tagged , , | Leave a comment

33 Photos of real life that will make you see beauty in the everyday

Have you ever wondered how your favorite photographers stay inspired?

Do you wish that you could have access to their unending ideas and creativity?

Well guess what? We know the secret: COMMUNITY!

Over at Clickin Moms, we are always thinking of new contests, games, and exercises to strengthen our photographic skills while having fun and making friends. One of our favorite traditions is the monthly forum contest. We announce a theme and the Clickin Moms members share all of the ways that they were inspired to capture it.

In July, the Clickin Moms community worked to create images for the theme of “Real Life.” These photographs capture life in a way that highlights the beauty in the mundane, the unique in the everyday, and the wonder of simple moments.

Today we are sharing some of our very favorites for you to enjoy here. We know that you are going to be just as inspired as we are by the amazing artists of the Clickin Moms community. We are thrilled to congratulate Sara Oberlander for her winning shot (above) that has earned her a live Breakout session from Click Photo School!

You can win, too! Enter this month’s forum photo contest with your take on the theme “PLAY” for a chance to be featured here on the Clickin Moms Blog and win a free live Breakout session!

Judith Krasinski

Jess Buttermore

Jen Zaveruha

Jennifer Blake
Jennifer Blake

Leya Speasmaker

Sarah Kleinmann

Laura Beth Davidson

Nicole Sanchez

Sarah Posehn
Sarah Posehn

Wendi Matt

Leah Barad

Leanna Cox

Melissa Hines

Stephine Burtz

Alina Clark

Amanda Patrick

Erin Morrison

Kristin Vucina

Katy Bindels

Jess Harms

Dewi Koomen

Camille Camacho

Jill Koskelin

Katie Turner

Kirsty Larmour

Jennine Coosaia

Laura Pyle

Emma-Jane Burrows

Sara Romo

Bronwyn Blodgett

Tracy Bradbury

Do you want a chance for your work to be featured on the Clickin Moms blog and to be eligible to win a live seat to a Click Photo School Breakout Session? Then join us for this month’s forum photo contest by sharing your best photos for this month’s photo contest theme: PLAY.

Are you not yet a member of Clickin Moms? As a Clickin Moms member you get access to contests like this, thousands of free tutorials, and so much more. Nothing would make us happier than for you to join us!

19Feb-CM_blog_lower_CTA_retina

The post 33 Photos of real life that will make you see beauty in the everyday appeared first on Clickin Moms blog: Helping you take better pictures one day at a time.


Clickin Moms blog: Helping you take better pictures one day at a time

Posted in Photograpy How To | Tagged , , , , | Leave a comment

Recommended Nikon D500 Settings

Nikon D500

The Nikon D500 is an advanced camera designed for action photography. It has a number of buttons and numerous menu options that can be confusing for those who are not familiar with them. In this article, we go over all the controls of the camera and walk through pretty much every menu setting, with our recommendations.
Photography Life

Posted in Photograpy How To | Tagged , , , | Leave a comment

5 Back-to-school photo props that are too cute to skip

Summer has flown by once again. After a few months of carefree days playing in the pool, it’s time to jump back into the routine and gear-up for another year of school.

And of course, you are going to want to have your camera ready!

But how do you tell the story of a new school year in pictures? How do you speak to the events of the back-to-school routine and make these photos stand out from the everyday?

One of my favorite ways to define special occasions, including back-to-school, is to add simple props. These don’t need to break the bank or distract from the kids. Rather, they are simple additions that add context for my audience and allow me to communicate clearly what makes these photos special.

This list includes items that you likely already have around the house and are easy to add to the mix. Try adding them to your back-to-school photos to document the moment and capture the memories.

Backpacks

I remember it like it was yesterday. The day I got my first backpack for my first day of Kindergarten.

It had Rainbow Brite on it and as soon as I brought it home I filled it with my favorite stuffed animals and a bag of cookies (because what else could I possibly need at school?!). I felt like such a big kid as I skipped around the house with it on my back.

And I absolutely love watching my own kids with their carefully selected backpacks each new school year. They speak to their ages, stages, and personalities. Having that new backpack signals the beginning of a new year of learning and adventure. We take a photo of each kid with his/her backpack every year and it’s one of my favorite photo traditions.

PHOTO-WORTHY BACKPACKS WE LOVE:

rainbow brite backpack

This little backpack looks a lot like my backpack from all those years ago and the nostalgia makes me smile! Having the characters that your kids love at this age and stage is a great way to remember what they were into at this age and is sure to make them smile as they head off to school.

reversible sequin backpack

I love this reversible sequin backpack with it’s rainbow of colors and mesmerizing sequins that help keep little hands busy while riding the bus.

herschel backpack

For the older kids, this Herschel Supply Co. backpack is a great option. It’s simple and classic and incredibly durable. This means that it will survive a year of heavy books and being thrown into a locker.

pencils back to school kellie bieser cmblog

Supplies

Notebooks and pencils and glue sticks and erasers might not seem like photo-worthy subjects on the surface. However, school supplies are such a part of a new school year and these items open the door for some creative photo opportunities.

Try taking your camera to the store and photographing your kids choosing their supplies from their list. Or maybe get a shot of your child writing his/her name on the front of a notebook (because there is nothing cuter than little kid writing!). Or you could even create a flat lay or still life scene with all of the supplies! Test your creativity and see how you can be inspired by seemingly mundane objects.

PHOTO-WORTHY SUPPLIES WE LOVE:

Number 2 pencils are a standard on school supply lists everywhere and lend themselves well to all kinds of different photos. Whether it be your little one writing her name on a piece of paper or a macro shot of all those perfectly pointy sharpened ends, you should have these on your back-to-school photo list!

composition notebook

Composition notebooks are another classic school supply for the older kids and a great way to signal the start of school for your resident high schooler. A stack of these on a table with his name on the cover or a bunch of them clutched in her hands as she gets ready for her first day of Freshman year  is a great way to add an extra layer of storytelling to your photographs.

stack of books

Whether it’s Dr. Seuss’s Oh, the Places You’ll Go! or a high school literature classic, photographing the books that your children will encounter in school is a creative way to depict their ages and stages. Stack them high and make them a little stool or have them piled high on the table…you can be creative here!

apple on head back to school photo kellie bieser cmblog

Apples

I am pretty sure no one gives an apple to the teacher anymore, but apples are still seen as a symbol for school. They are produce of the season and are a great way to add a little extra sign of the start of school.

You could set-up an adorable lifestyle portrait of your child at a desk with an apple on it. You could have your child actually take an apple to his/her teacher and document the event. Or you could play with the alphabet and make an “A is for apple” still life.

It’s a simple, inexpensive item that can add just the right touch of back-to-school to make your photos special.

school building little boy in front of school doors kellie bieser

The school building

The school building itself is a great prop to signal the start of the school year! Whether it’s a new building for your child this year or the same one he/she has attended for years, incorporating it into your photos is a great way to highlight the event of back-to-school.

To create an amazing series over the course of your child’s school career, try picking a place (like the front doors of the school) and taking a photo there every year. It is a memorable way to document his/her growth and include the place where so much of that growth happens.

Also try to photograph the entire building and a sign with the name of the school on it. I know that my elementary school is no longer standing and to have a photo to show my own kids would be so special! These contextual photos can add to the back-to-school story and make it that much richer.

back to school sign kellie bieser cmblog

Signs

No one says that you have to be subtle when documenting the first day of school. You can spell out all the details of your child’s first day with a cute sign!

I really love my letterboards because I can use the same one for all five of my kids. But the options for cute back-to-school signs are really endless! You could use a chalkboard, a canvas, or even a piece of paper in a simple frame.

Include the information that is important in marking the occasion: your child’s name, the year, your child’s grade, the teacher’s name, and anything else that you deem important as he/she embarks upon a new year at school.

PHOTO-WORTHY SIGNS WE LOVE:

Felt letter boards are kind of trendy these days and I AM HERE FOR THE TREND! They are nostalgic and sweet and I love that when you are done using them for your back-to-school photo, they can go on the wall with cute sayings for your home.

These little back-to-school chalkboard signs are super cute and I love the idea of a series of images from kindergarten to high school with the same sign. You can give all the details for a first day while also watching your little one grow and change!

kids easel

I love kids’ handwriting and I think it is such a sweet way to show an age and stage (give me all the backwards S’s!). That’s why I love the idea of using a kid’s easy for back-to-school photos. Have your student write her name, age, grade, teacher, the year, and anything else that helps you remember the occasion.

No matter how you choose to document the back-to-school season, the most important thing is that you have your camera out. Whether your child is heading to her first day of preschool or he is going to be a senior in high school, these are days you will want to remember. The details will fade from your memories too fast.

So work with intention in telling the story of back-to-school and include items that make that story richer. I can’t wait to see how you use these items and if you have more great back-to-school prop suggestions, be sure to share them below!

19Feb-CM_blog_lower_CTA_retina

The post 5 Back-to-school photo props that are too cute to skip appeared first on Clickin Moms blog: Helping you take better pictures one day at a time.


Clickin Moms blog: Helping you take better pictures one day at a time

Posted in Photograpy How To | Tagged , , , , | Leave a comment