Last week, for our How Was This Picture Made? series, I had posted a landscape photograph to share and discuss. Thanks to our PL commentators, Gary Bunton, Brian Webster, and Shane, for their participation and sage commentary on the techniques employed and the overall considerations. Well done!
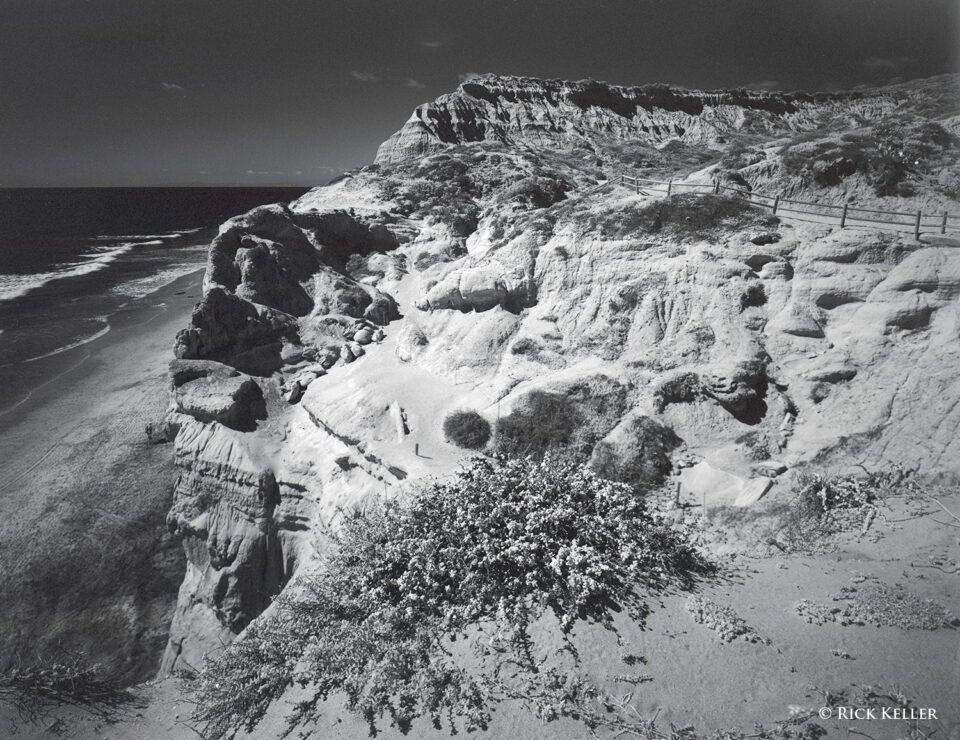
Let’s review the photograph, which I made along one of the many splendid and uplifting hiking trails at Torrey Pines State Natural Reserve in San Diego, CA.
Our PL commentator, Brian Webster, had remarked on the dark appearance of the original image (which was actually “straight out of the camera”). Indeed, I agree that the overall exposure was a tad dark (more on this below), so I decided to make a modest adjustment in Photoshop. The new rendition is shown below.
In terms of the visualization process, after having scouted this scene I desired to create a black and white image that captures the scale, textures, and form of this beautiful sandstone bluff. As I had previously discussed in an article on light, shadows, and visualization, in order for the visual artist to impart shape and depth to a landscape and reveal its textures, ideally the photograph should be made when long shadows are being cast by unidirectional light. Further, I desired to create contrast in such a way that the interplay of light and shadows would draw the viewer’s eyes into the scene.
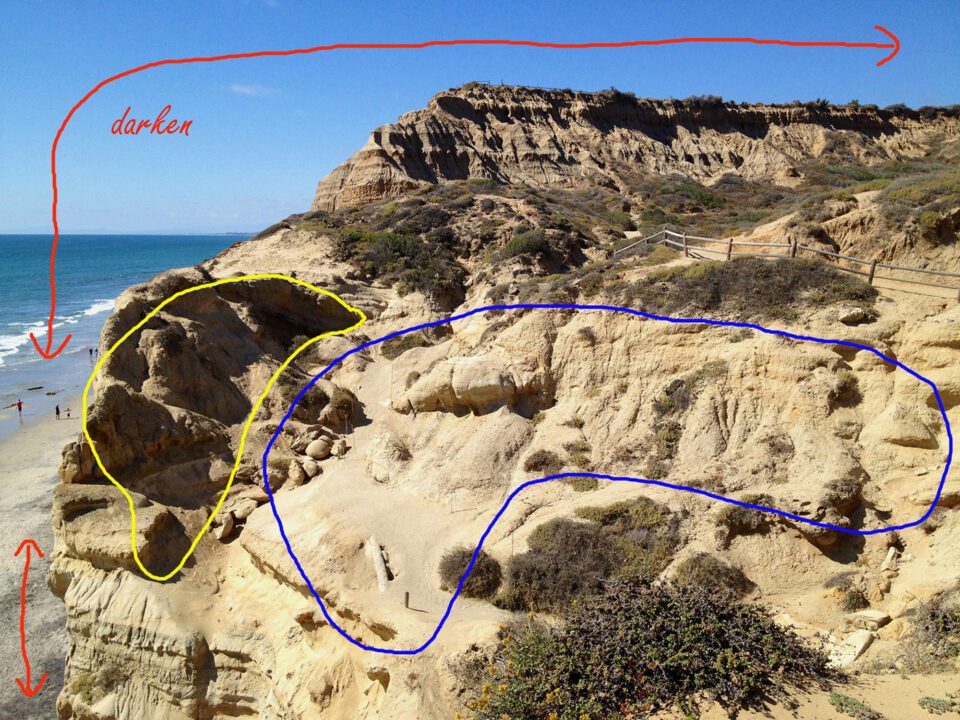
As I studied the subject through my composing card, I realized that the potential to create a high contrast image was enticing. As the iPhone “scout” photo below reveals, I composed the photograph such that there would be a surrounding rim of sky and sea to the left of the bluff.
In order to draw the viewer into the scene and keep the viewer fixated in the center of the photograph, I needed to darken the blue sky and sea. With the juxtaposition of the dark values in the sand in the left lower corner with dark values in the sky and sea, I visualized creating a rim of “vignetting” around the high values in the center of the bluff to create contrast and invite the viewer’s mind into this world. The deep shadows (shown within the yellow cartoon) at the front of the bluff juxtaposed with the high values in the center lent themselves well to creating depth and revealing form. Our PL commentator, Gary Bunton, wisely pointed out that the dark values in the sky as well as the deep shadows in the bluff could have been created with the use of a red 25A filter (more on this below).
Based on my previous experience with infrared film in both 35mm and medium formats, an interesting property of sandstone is that it has the potential to appear as “chalk white” when illuminated by infrared light. With this vision in mind, I chose to pursue an infrared rendition. For film I chose Rollei IR 400, which is (sadly) one of the last bastions of infrared film. The previous gold standards, Kodak HIE and Efke, have long been discontinued.
To create an exposure on infrared film, the photographer must employ filtration to block visible and UV light and allow infrared light to pass through the lens. A key technical point is that the spectral sensitivity of the infrared film must be matched with the spectrum of infrared light that is passed through the filter. For Rollei IR, which has a peak sensitivity of 720 nm with extension up to 820 nm, I used the Hoya R72 infrared filter, which blocks visible light up to 720 nm yet allows passage of light above this threshold (i.e., the infrared spectrum). When you examine this filter, it is not completely opaque, as you can still see slightly through it, meaning that this filter allows some contamination from visible red light. This is not that big of a deal for me, as a mix of a high proportion of IR exposure with a small amount of visible red light exposure might impart a unique look to the image, perhaps distinct from a pure IR or a conventional black and white print.
In terms of the quality of light (more on this on an upcoming article), I typically (but not always) choose the unidirectional light of early sunrise or sunset to create long shadows in the landscape. However, for creating an infrared exposure, these times of the day are not ideal since light at these extremes of the day is not as enriched with infrared light compared to the intense and non-unidirectional light from the mid-day sun. So, I made a compromise: a clear blue sky in the late afternoon where there would still be a good amount of incident infrared light along with some degree of unidrectionality, which again is instrumental to creating long shadows to lend form and depth to the landscape and reveal its textures. Our PL commentators, Gary Bunton and Brian Webster, had astutely pointed out that this photo was made in the late afternoon, based on the directionality of the shadows.
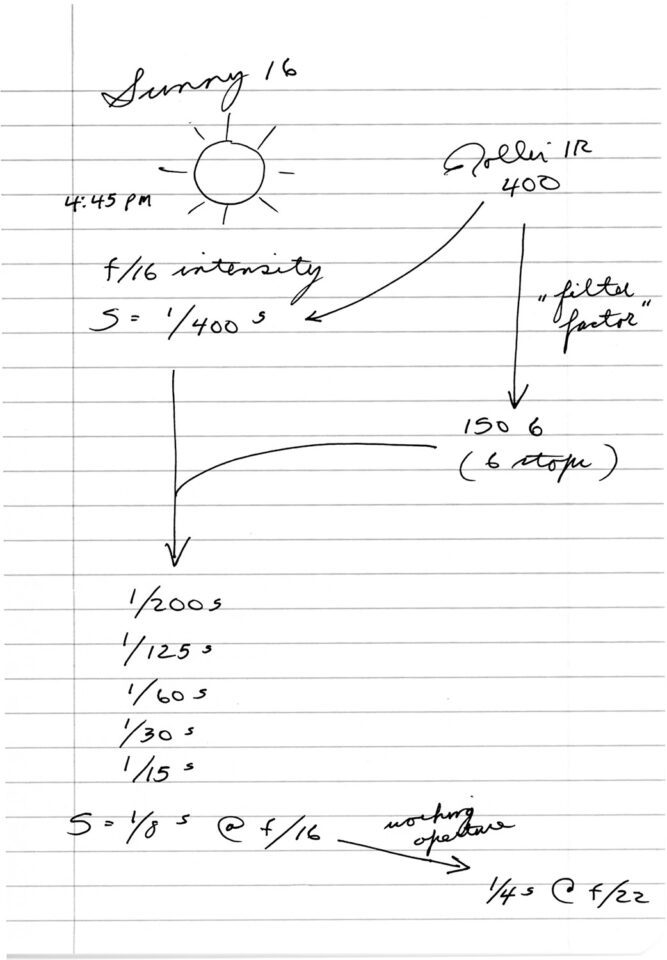
Now, for the trickiest part of the shot: the exposure. Conventional camera light meters and external light meters cannot directly meter infrared light (unless they have been specially modified). In order to obtain a proper exposure on infrared film, the photographer must empirically determine the “working ISO” of the infrared film based on the filter factor of the infrared filter and the prevailing lighting conditions. Rollei IR has a box speed of ISO 400 without the use of an infrared filter. Based on the shared experience of other photographers, the Hoya R72 filter has an estimated filter factor of +5 stops, meaning that the exposure must be increased by five stops (in this case, by prolonging the shutter speed) to obtain a nominal exposure. Many photographers have previously rated the ISO of filtrated Rollei IR 400 to be between ISO 6 to 12. Based on my empiric results with Rollei IR 400 on 120 medium format film where I bracketed exposures between ISO 3 and 25, I previously rated the Hoya R72 filter factor at +6 stops of light and rated the ISO of the film at 6.
Once the filter factor and working ISO have been empirically determined, the next step is to properly adjust the exposure (shutter speed) based on the intensity of the light. This is where the time-honored “Sunny 16 Rule” enters the picture. At the time of day of this particular photo (4:45 pm PST), under clear skies, I would have needed to have used a shutter speed (with the aperture set to f/16) that is equal to the reciprocal of the ISO. For example, under clear skies with bright light (as in this exposure), using a film speed of 100 with the aperture set to f/16, a shutter speed of 1∕100 second (≈1∕125 second) should render a proper exposure. Therefore, given the box ISO speed of 400 and my chosen filter factor of +6 stops of light, the requisite shutter speed for this exposure would be knocked down from 1∕400 second to ⅛ second at an aperture of f/16.
But wait . . . this presumes that the photographer intends to use f/16 as the taking aperture for the photo. The photographer may in fact choose to set a different aperture depending on his/her wishes for depth of field (DOF) control. For example, if the photographer desires more DOF than that afforded by f/16 in this scenario, then the aperture will need to be stopped down, requiring a reciprocal increased duration of the shutter speed to compensate. Alternatively, if the photographer desires less DOF that than afforded by f/16 in this scenario, then the aperture will need to be opened with an accompanying reciprocal shortening of the shutter speed to compensate.
So, which aperture did I choose? This brings us to an equally critical stage of the shot: setting up the camera and lens.
Our PL commentator, Shane, astutely surmised that I used a view camera for this shot. Indeed, I chose to use a 4×5 view camera in order to obtain uniform and simultaneous focus of the foreground and background. To frame the perspective as visualized through my composing card, I used a wide-angle lens, the Nikkor-SW 75mm f/4.5S, which is a razor sharp and contrasty lens and my “go-to” wide-angle lens in large format. This lens provides an angle of view that is similar to that seen with a 21 mm lens in the 35mm format.
Of the plethora of technical reasons that I enjoy using a view camera for landscapes is that the design of the camera is such that the lens projects an “inverted” image circle onto the focusing screen (the ground glass) in the same way that images are projected through the human lens onto the retina (before the image is “flipped” by the visual center of the brain). In my humble opinion, viewing an inverted image on the ground glass empowers the photographer to focus more astutely on composition, perspective, shape, and structure. Plus, the use of the dark cloth to shade the ground glass from ambient light in effect isolates the photographer from the distractions of his immediate environment so that he/she becomes “intimate” with the subject. It is a great experience!
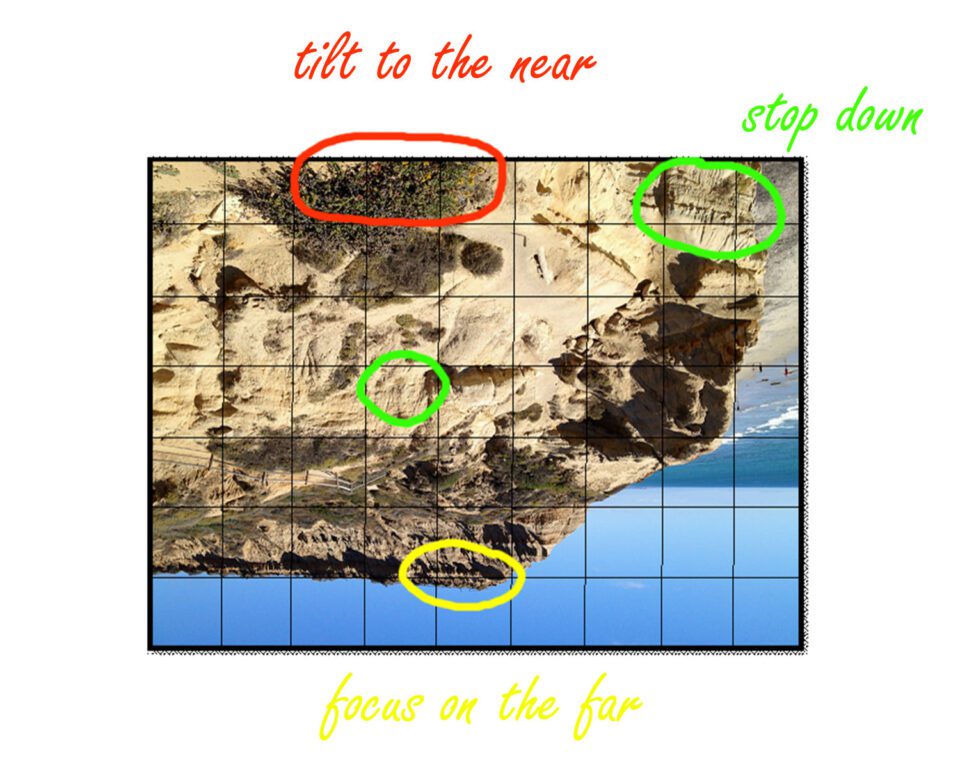
Although a full discussion is beyond the scope of this article, the key principle in focusing the view camera is based on the time-honored Scheimpflug Principle, which dictates that the photographer adjust the orientation of the camera such that the plane of focus, the lens plane, and the film plane intersect at a well-defined plane, which renders the foreground and background in complete focus (even before the lens aperture is manually stopped down). The type of camera movements (tilts and swings of the front and rear standards) that are required to arrive at the Scheimpflug “point” vary with the design of the view camera (i.e., base tilts vs axis tilts). The camera that I used here was a Japanese wooden view camera (Ikeda Anba), which is designed to permit tilts of the lens and film planes that pivot at the base of the camera. Other view cameras are constructed such that the lens and film planes must be tilted about a pivot point that is located at the center axis of the front and rear standards. In a nutshell, for view cameras with base tilts, the Scheimpflug plane is best achieved by “tilting (the lens) to the near and focusing on the far”.
There are many excellent checklists to help learn and master this process, but one of my personal favorites is one devised by Howard Bond that may be viewed here. For this shot, following three successive adjustments of tilting to the near and focusing on the far to render the foreground and background in focus, the next step was to stop the down the lens for DOF control. Although DOF in view camera photography is a tricky and complicated subject, the salient feature is that the laws of optics and the view camera are such that there is a “wedge” of DOF extending from the lens to the far distance. Close to the lens, the DOF is poor, but as the distance from the lens increases, so do the outer limits of the DOF. For this shot, what complicated the DOF is that the immediate foreground was a not a level surface: I had positioned the camera near the ledge of the bluff where the drop-off would place the descending bluff (the “green circle” at the upper right corner of the “ground glass” illustration above) well beyond the near limit of the DOF wedge. Thus, in order to render this portion of the subject in “acceptable sharpness”, the lens aperture must be stopped down appropriately. So, with the competing considerations of DOF and diffraction in mind (fortunately, the latter is not as problematic in large format compared to smaller formats, as large format negatives/slides need not be enlarged as much for a given print size), I chose an aperture of f/22.
Incidentally, one benefit of the mechanical design of large format lenses is that the photographer can manually adjust the lens diaphragm with a continuous and fluid rotation of the aperture lever, which allows the photographer to view instantaneously – in real time – the changes in the DOF on the ground glass; it is almost as if you are viewing a live movie as the diaphragm is being smoothly closed or opened and the scene is slowly coming into sharp focus or out of focus, respectively. This is in stark contrast to the clumsy “clicks” of the aperture ring of manual focus SLR camera lenses, the automated SLR camera lenses where manual diaphragm control has been stripped out, and the fact that DOF can only be “previewed” with a clumsy DOF button in both manual and automated SLRs.
Returning to the shot, with a chosen aperture of f/22, I adjusted the shutter speed from ⅛ second at f/16 to ¼ second to make the exposure. A tripod was mandatory. As you study the final image, the effect of infrared light on lightening some parts of the sandstone is evident and interesting. The rim of dark values in the sky, sea, and the beach is effective in drawing the viewer’s eyes into the center of the image. This darkening effect of the blue hues was made possible by the heavy blockade of blue light from the infrared filter, which is essentially a heavy-duty red filter.
As I had mentioned above, the original, unadjusted image was a tad dark and underexposed for my taste; if I had to retake this photo, I would have added one stop of exposure (total exposure ½ sec). In retrospect, compared to my previous empiric bracketing exposures with Rollei IR film at high noon, I likely overestimated the intensity of the “f/16 light” at 4:45 pm (likely it was closer to f/11 intensity). Further, I probably would have stopped the lens down to f/32 to squeeze out a little more DOF. Alternatively, for future exposures with this film, I just may re-adjust my filter factor rating for the Hoya R72 to +7 stops and the ISO of Rollei IR to ISO 3. Overall, though, I felt this was an interesting (and fun) first test shot on 4×5 infrared film.
Although I did not originally intend to delve in the following discussion, our PL commentator, Gary Bunton, made an interesting comment on the suggested shutter speed for this exposure: “ . . . based on the wave movement in the background, about 125th of a second.” Indeed, the breaking waves in the distance do appear to be in “acceptable” focus, meaning the shutter speed of ¼ second was sufficient to freeze the motion,which may sound counterintuitive to the beginning photographer in that such a slow shutter speed had this end result. How could a “slow” shutter speed of ¼ second have rendered the distant breaking waves/ripples reasonably sharp? Well, I am glad that you asked! The answer is encapsulated by three considerations. First, the speed of the subject across the image plane (the most obvious one). Second is the magnification: the size that the subject that will occupy on the image area. Third, the direction that the subject is moving (toward/away vs side-to-side). Let’s examine the latter two factors in more depth.
Subjects that have a small magnification (i.e., near infinity focus) need a relatively slower shutter speed to freeze motion compared to a larger magnification. Based on the classic thin lens equations for magnification ( M = image distance / subject distance = f / [subject distance – f] ), for a given focal length and for a given image distance (i.e., lens extension), magnification is inversely proportional to the subject distance. Hence, for a distant subject (i.e., the breaking waves that are about 450 yards away moving at about 3 mph on the image plane), the magnification is small, the subject speed across the image plane is small, the focal length is small relative to the size of the format (i.e., wide angle), all of which results in the need for a relatively slower shutter speed to freeze action (¼ to 1∕6 sec). Further, for a given subject distance, the longer the lens, then the greater the magnification that can be achieved. So, if I had used a normal lens for this photograph, I would have needed a faster shutter speed (1∕15 to 1∕20 second) to freeze the distant waves. And if I had used a long lens for this photograph, I would have needed a much faster shutter speed to freeze the distant waves (probably at least 1∕50 second). I would surmise that a very long focal length, say one that affords an angle of view from a 200mm lens in the 35mm format, would require a shutter speed of 1∕125 second to freeze the motion of the distant waves. Conversely, if I had used the same 75mm wide-angle lens to photograph a breaking wave at a closer distance, say 10 feet, then the situation again changes: the magnification is increased and the speed of the waves across the image plane is faster. Thus, a relatively faster shutter speed would be needed to freeze the motion.
Finally, a subject that is moving across the image plane (as opposed to away or toward the lens) will require a relatively faster shutter speed to freeze motion. I think this factor is relatively intuitive and straightforward in practice.
Special thanks to Northcoast Photographic Services, in Carlsbad, CA, for providing the film development services for this photograph. Great job, Scott! Please, stay tuned for an upcoming article, “The Quality of Light”, where I will examine the physical factors of light that influence the aesthetics and emotion of a photograph.
The post How Was This Picture Made #12: The Answer appeared first on Photography Life.


